
| KIT: | Fujimi 1/24 Ford GT-40 Mark II |
| KIT #: | 12139 |
| PRICE: | $37.50 MSRP |
| DECALS: | One option |
| REVIEWER: | Scott Van Aken |
| NOTES: | Contains etched metal parts and driver's harness. |
| HISTORY |
In the early 1960s, Henry Ford made
an offer to Enzo Ferrari to purchase his auto company. Ford really
wanted to win international sports racing events and thought that the
quickest way to do so was to buy the company that was dominating.
 Naturally, Ferrari turned him down, so Ford decided to build cars to beat
them at their own game. After several years and a number of disappointing, but
interesting cars, there resulted the Ford GT 40 (so named as its
roofline was 40 inches above the ground. The car went through at least four
different racing variants. The original GT 40, which was not successful,
followed by the more powerful Mk I, Mk II, and Mk IV racers. The Mk.III was
a streetable version of the Mk. II that was sold to a few very wealthy
enthusiasts. Recently, Ford has built a number of up-to-date Ford GT cars that
meet all the current safety requirements and are actually quite able to drive
over current streets without damaging the inhabitants of the car. Naturally, the
price was astronomical, but all were sold.
Naturally, Ferrari turned him down, so Ford decided to build cars to beat
them at their own game. After several years and a number of disappointing, but
interesting cars, there resulted the Ford GT 40 (so named as its
roofline was 40 inches above the ground. The car went through at least four
different racing variants. The original GT 40, which was not successful,
followed by the more powerful Mk I, Mk II, and Mk IV racers. The Mk.III was
a streetable version of the Mk. II that was sold to a few very wealthy
enthusiasts. Recently, Ford has built a number of up-to-date Ford GT cars that
meet all the current safety requirements and are actually quite able to drive
over current streets without damaging the inhabitants of the car. Naturally, the
price was astronomical, but all were sold.
| THE KIT |
This kit is the Mk II version with the 427 engine that
was the first Ford GT variant to win the Le Mans 24
hour race in 1966. By 1967, the Mk IV was to be the main type raced, but it
wasn't ready to go by the time Daytona rolled around. This particular car has
several differences from the previous year's car. One is that it runs two four
barrel carbs vice the since four barrel of the 1966 cars. This results in a new
rear window with a bulge in it to clear the carb inlets. Secondly, it has a new
lightweight rear deck free from any cooling scoops. These cars also have a roll
cage that is not supplied in the Fujimi kit. There are a few other minor
differences t hat include a fixed rear spoiler with a built up area in front of
it to keep it good a stiff, and an additional fuel filler in the left side,
probably because they run counter-clockwise at Daytona, unlike Le Mans, Sebring,
and other tracks.
hat include a fixed rear spoiler with a built up area in front of
it to keep it good a stiff, and an additional fuel filler in the left side,
probably because they run counter-clockwise at Daytona, unlike Le Mans, Sebring,
and other tracks.
Fujimi has a bunch of different boxings of the GT 40 MkII, each with different markings. This particular boxing is for the 1967 Daytona race and includes the markings of Bruce McLaren and Lucien Bianchi, the only Ford GT out of seven entered to actually finish the race. This was because all the half shafts used by the teams were improperly heat treated, causing transmission failures. This car had its rear end replaced with an older one from the 'J' car that was sitting in the paddock. Even then it was able to finish no higher than seventh.
Molded in black and yellow plastic, the kit includes an etched fret for the rear grille as well as buckles for the seat harness. A section of harness material is also included. The body and some of the external bits are in yellow and the rest of the kit is in black. Molding is very well done with no flash, no ejector pin marks in bad places and what few sink areas are there will be invisible.
The wheels are a rubber or vinyl
material and are shipped placed over the wheels. The wheels and knock-offs
are chromed, which is wrong for any of the racing cars, so you'll end up
stripping the chrome away. For this car, the
 wheels are a matte aluminum
color and the knock-offs are in red. There is a large sprue of clear bits,
with variations on the side and rear windows for other boxings.
wheels are a matte aluminum
color and the knock-offs are in red. There is a large sprue of clear bits,
with variations on the side and rear windows for other boxings.
Instructions are completely in Japanese, but thanks to the construction diagrams, there should be no difficulty building this one. It really is a somewhat simple kit since there is no engine to construct and the suspension is simplified. Color information appears to be Gunze paints so no problem there for those of us who have built a lot of Japanese kits. Decals appear to be well done and in register. It will be interesting to see how opaque the white number roundels are as yellow is a difficult color to cover with most white decals. If one doesn't like the kit decals, there are options out there for those who search.
| CONSTRUCTION |
Right up front I have to mention that Fujimi's black
plastic is a bit odd in the way that it sands and cuts when compared to standard
white or grey styrene. It seems a bit like there is some vinyl in it. It holds
paint fine and can be sanded, but the residue seems a bit, well, sticky as it is
difficult to brush off clothing. Anyway, the first thing I did was to identify
some of the early construction bits and paint them. The suspens ion parts are
supposed to be aluminum so I used Alclad II for that, after removing the
somewhat large mold seam from the parts. All of the parts have to be carefully
sanded down on all edges as things are a tad ragged in this regard.
ion parts are
supposed to be aluminum so I used Alclad II for that, after removing the
somewhat large mold seam from the parts. All of the parts have to be carefully
sanded down on all edges as things are a tad ragged in this regard.
Once the initial painting had been done, it was time to start attaching stuff. First the radiator was glued in place, followed by the lower front suspension. The suspension needed a bit of 'adjustment' to fit properly and it is imperative that it be firmly in place. Then the footwell was glued in place. This piece contains the upper A-arms so must be well attached. Painting the four brake assemblies was next on the schedule. I used steel for the discs, though in retrospect, a bright aluminum would have probably been more prototypical. Meanwhile, all four wheels were painted gold using Testors Modelmaster enamels thinned with lacquer thinner. This helps it dry quicker otherwise I might be looking at a drying time of several days as often happens with these colors.
The front wheels are held in place by first putting in
some polycaps and then inserting a plastic axle through the brake. This holds
things in place quite well. I left off the tires as I didn't want to have to
deal with the additional weight. Shocks/springs were then cleaned up and
painted. These actually just snap in place. They also suffer from slight mold
misalignment, as do the suspension pieces, so I found myself spending more time
in clean-up than I'd like. The wheels are designed to turn so a tie-rod was
snapped  on one front wheel assembly, that assembly was snapped in place,
followed by the other side and then the tie rod was clicked in place. As they
say in France "voila".
on one front wheel assembly, that assembly was snapped in place,
followed by the other side and then the tie rod was clicked in place. As they
say in France "voila".
Moving to the interior, I prepainted all the bits their
respective colors (mostly black and aluminum). Decals are provided for the
instruments and though they tend to look very much the same, they do work and
add some interest. The kit also comes with harness material and photo etched
hardware. The belts themselves are drawn on the back of the peel off material,
but they are oversize and won't fit into the p.e. bits. I found this out with
the first belt so just cut out the proper length, but made them narrower
 to
fit. Attaching these belts is really easy and the whole process took but about
20 minutes to do. They were then attached to the driver's seat. Then I realized
I had the seat piece upside down. I pulled off the belts and reattached them in
the proper place.
to
fit. Attaching these belts is really easy and the whole process took but about
20 minutes to do. They were then attached to the driver's seat. Then I realized
I had the seat piece upside down. I pulled off the belts and reattached them in
the proper place.
 The
pedals were glued in place, followed by the seat, gear shift, instrument
panel and steering wheel assembly. I then glued in tub, followed by the back
bulkhead and the door side panels. Fit is quite good and I was careful to test
fit everything before gluing.
The
pedals were glued in place, followed by the seat, gear shift, instrument
panel and steering wheel assembly. I then glued in tub, followed by the back
bulkhead and the door side panels. Fit is quite good and I was careful to test
fit everything before gluing.
Then it was on to the rear assembly, one that would prove to be a bit more complicated. The transmission housing/suspension piece was painted appropriately and then cemented in place. I then glued on the brake assemblies. I found that I needed to really tack these down and so used superglue on them to provide a solid base. The center section of the exhaust was then attached and the exhaust bits painted with burnt metal. Putting on the suitcase holders proved to be less easy than I'd hoped. the cases themselves were a bit narrower than the base plate and didn't want to stay in place. I had to coerce them a bit with a drop of super glue on the inside corners.
Once that was fully dry, I attached the two braces in
the middle. One of these had a mol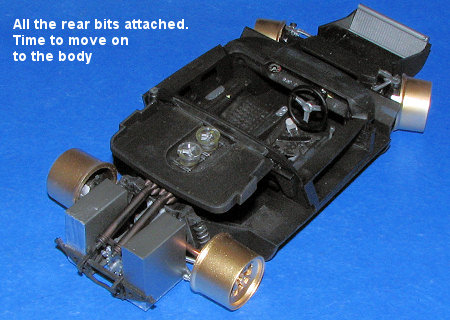 ding
defect that caused it to snap in half as I was removing it from the sprue. It
was cemented back together and when dry, both of the parts were attached at the
back as per instructions. I tried to cement the forward parts, but the whole
rear end seemed to droop down and prevented a good attachment. I held the parts
in place and used super glue, followed by accelerator to hold up the rear end.
This allowed me to thread through the axle. The rear wheels attached like the
ones in front with polycaps. I then glued on the tray behind the rear window and
attached the two clear carb velocity stacks. This pretty well concluded the
construction of the chassis and it was on to the body.
ding
defect that caused it to snap in half as I was removing it from the sprue. It
was cemented back together and when dry, both of the parts were attached at the
back as per instructions. I tried to cement the forward parts, but the whole
rear end seemed to droop down and prevented a good attachment. I held the parts
in place and used super glue, followed by accelerator to hold up the rear end.
This allowed me to thread through the axle. The rear wheels attached like the
ones in front with polycaps. I then glued on the tray behind the rear window and
attached the two clear carb velocity stacks. This pretty well concluded the
construction of the chassis and it was on to the body.
 As
you can probably understand, racing cars are not static. They change from race
to race. This particular car was the only survivor of at least 6 that started
the Daytona 24 hour race in 1967. It had some differences from the other GT-40
Mk IIs, the biggest of which was a light-weight rear body section. This piece
did not have the two large cooling scoops that stuck above rear deck as did the
other cars. Fujimi provides an insert for the large attachment lugs, but does
not say anything about the mounting plates. Thanks to knowledgeable readers on
the forum, I found out about the new rear body panel and so I filled the seams
and sanded the rear panel flat. This car also had an area above the driver's
door for an additional 'bump' that was used when Dan Gurney, who was very ta
As
you can probably understand, racing cars are not static. They change from race
to race. This particular car was the only survivor of at least 6 that started
the Daytona 24 hour race in 1967. It had some differences from the other GT-40
Mk IIs, the biggest of which was a light-weight rear body section. This piece
did not have the two large cooling scoops that stuck above rear deck as did the
other cars. Fujimi provides an insert for the large attachment lugs, but does
not say anything about the mounting plates. Thanks to knowledgeable readers on
the forum, I found out about the new rear body panel and so I filled the seams
and sanded the rear panel flat. This car also had an area above the driver's
door for an additional 'bump' that was used when Dan Gurney, who was very ta ll,
drove the car. Those marks had to be removed as well as some small lights. The
mold seam on the body is also a bit more prominent than on some car kits and
there was some flash in all the openings. This was also removed. An additional
fuel filler was put on the other fender requiring the fender to have a hole cut
in it (which I made too large) and a filler insert put installed. This took
several filler coats.
ll,
drove the car. Those marks had to be removed as well as some small lights. The
mold seam on the body is also a bit more prominent than on some car kits and
there was some flash in all the openings. This was also removed. An additional
fuel filler was put on the other fender requiring the fender to have a hole cut
in it (which I made too large) and a filler insert put installed. This took
several filler coats.
The nose hatch (I guess you could call it a trunk/boot as it held the required spare) has a splitter plate to install. The only alignment guide is on the underside of the leading edge of this piece. The plate itself had two deep ejector pin holes that needed filled and filed. Once the forward section was cemented in place, I tacked on the lower bit and clamped it in place. The join was flooded with cement to hold it in place as the part is a bit lower in height than the area it has to fill. Some more sanding took care of the glue smears.
Back at the body, a reinforcement plate in front of the
rear spoiler was glued in place as were the extended rear fenders to handl e the
large tires used in 1967. These rear fender extensions were not easy to install
as they don't exactly follow the curves of the body. I made a bit of a mess of
them and had to carefully sand off smudged glue. More inquiries resulted in my
filling in the old central air intake section that had a blanking plate
installed. I also removed all the adjustments from the rear spoiler as some
reading indicated that this car had a fixed spoiler. It was now ready for some
paint.
e the
large tires used in 1967. These rear fender extensions were not easy to install
as they don't exactly follow the curves of the body. I made a bit of a mess of
them and had to carefully sand off smudged glue. More inquiries resulted in my
filling in the old central air intake section that had a blanking plate
installed. I also removed all the adjustments from the rear spoiler as some
reading indicated that this car had a fixed spoiler. It was now ready for some
paint.
| COLORS & MARKINGS |
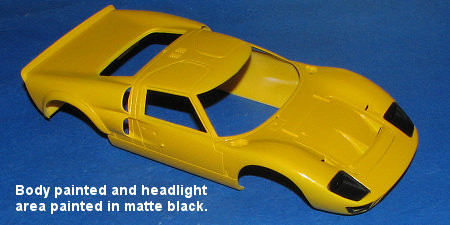 I
looked at what was available and decided on Testors Brilliant Yellow in their
enamel line. As with all my enamels, I thinned it with lacquer thinner till it
was a bit thinner than the usual so I could put on some wet coats. Of course, I
got some orange peel, but it was light and I can handle that. Next, I masked off
around the headlights and painted those matte black. Moving on to the lights
themselves, I first painted the back side of them with either clear red, clear
orange or silver as the case may be. Those painted in clear red and orange were
then again painted silver. The tail lights had the ou
I
looked at what was available and decided on Testors Brilliant Yellow in their
enamel line. As with all my enamels, I thinned it with lacquer thinner till it
was a bit thinner than the usual so I could put on some wet coats. Of course, I
got some orange peel, but it was light and I can handle that. Next, I masked off
around the headlights and painted those matte black. Moving on to the lights
themselves, I first painted the back side of them with either clear red, clear
orange or silver as the case may be. Those painted in clear red and orange were
then again painted silver. The tail lights had the ou ter
rims painted in silver on the outside as well. These were all later glued into
place. The fuel tank caps were then glued in place.
ter
rims painted in silver on the outside as well. These were all later glued into
place. The fuel tank caps were then glued in place.
Then I started on the decals. The Fujimi decals are nicely done, thin, work great with Solvaset, and have white that is about transparent. Despite putting TWO underlying white circle decals for the front and side numbers, the black stripes still show through. There are two cures for this. One is to paint the number areas white and the other is to cut the black stripe decals so that they do not go under the numbers. Actually, I guess that if the stripes and blank white circles were on the same decal, that would fix the problem as well, but you have been warned.
| FINAL CONSTRUCTION |
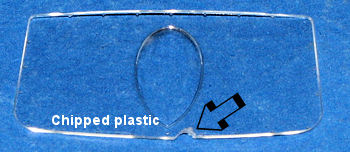 Now
that the decals were in place, I could start on the other bits. First, I
carefully removed all the clear bits from the sprues. Despite my care, I had a
chunk come out of the rear window. Fortunately, another GT-40 kit that didn't
use the dual carbs supplied a replacement. The main windscreen is glued in from
the inside so I used standard glue. On this you are supposed to glue the rear
view mirror. Mine didn't fit quite a well as I'd have liked, but it is in there.
The side windows and back window was glued on with standard glue and white glue
respectively. Moving to the front, the headlight and turn signal/driving light
covers were glued in place. Unlike the main windows, these do not fit very well,
and I'm not really sure why as you can't put them in wrong.
Now
that the decals were in place, I could start on the other bits. First, I
carefully removed all the clear bits from the sprues. Despite my care, I had a
chunk come out of the rear window. Fortunately, another GT-40 kit that didn't
use the dual carbs supplied a replacement. The main windscreen is glued in from
the inside so I used standard glue. On this you are supposed to glue the rear
view mirror. Mine didn't fit quite a well as I'd have liked, but it is in there.
The side windows and back window was glued on with standard glue and white glue
respectively. Moving to the front, the headlight and turn signal/driving light
covers were glued in place. Unlike the main windows, these do not fit very well,
and I'm not really sure why as you can't put them in wrong.
 In the
back the etched rear grille was glued in place, using small bits of super glue.
Up front, the hood hold-down pins were glued on with clear paint, the cables
running into the front section. I then went to the tires. These have decals for
them and while the un-readable (to me) instructions almost look like the
lettering is dry transfer, it is actually a type of decal I've used many, many
years ago. First, one cuts out the decal that is needed. Then the backing is
removed, and the decal is positioned. This decal is slightly sticky to help
placement. Then, when you have it where you want it, you add water to the front
(which still is covered). When this covering is able to be pulled off, the decal
is in place. Solvaset works fine here too. The folks at Fujimi give a spare in
case you botch one. These tires were then pushed onto the wheels, and in the
front, doing so managed to break the steering arm on one side. So much for
steerable front wheels. I glued the arm in place with the wheels cocked slightly
to one side. The last bits to add were the knock-offs and the front jack points.
These were painted da-glo red and then glued in place. The front jack points
hold the ends of the hood pin cables. The knockoffs were poorly molded with lots
of flash and on one, a spoke was short shot. The body was then snapped into
place (and it is a really tight fit). I glued on the rear-view mirror and then
glued in the last of the exhaust pipes in the back. That was it.
In the
back the etched rear grille was glued in place, using small bits of super glue.
Up front, the hood hold-down pins were glued on with clear paint, the cables
running into the front section. I then went to the tires. These have decals for
them and while the un-readable (to me) instructions almost look like the
lettering is dry transfer, it is actually a type of decal I've used many, many
years ago. First, one cuts out the decal that is needed. Then the backing is
removed, and the decal is positioned. This decal is slightly sticky to help
placement. Then, when you have it where you want it, you add water to the front
(which still is covered). When this covering is able to be pulled off, the decal
is in place. Solvaset works fine here too. The folks at Fujimi give a spare in
case you botch one. These tires were then pushed onto the wheels, and in the
front, doing so managed to break the steering arm on one side. So much for
steerable front wheels. I glued the arm in place with the wheels cocked slightly
to one side. The last bits to add were the knock-offs and the front jack points.
These were painted da-glo red and then glued in place. The front jack points
hold the ends of the hood pin cables. The knockoffs were poorly molded with lots
of flash and on one, a spoke was short shot. The body was then snapped into
place (and it is a really tight fit). I glued on the rear-view mirror and then
glued in the last of the exhaust pipes in the back. That was it.
Late Note: I have been told that the right side knock-offs would have been painted blue as the threads were different on each side.
| CONCLUSIONS |
 I have been wanting to build this kit for years, but just
never seemed to get around to it. It wasn't a quick build, though I'm sure there
are car builders who would fly through construction. The end result is a really
superb looking model with enough detail to make me happy. Since there are no
opening doors or engine hoods, there isn't the usual hassle involved in lining
things like that up. While it will be a bit before I get around to doing another
GT-40, there are others in the Fujimi racer line that I very much want to do,
and if they turn out as nicely as this one, are well worth the cost. Besides, it
is nice to do something other than a constant stream of aircraft
I have been wanting to build this kit for years, but just
never seemed to get around to it. It wasn't a quick build, though I'm sure there
are car builders who would fly through construction. The end result is a really
superb looking model with enough detail to make me happy. Since there are no
opening doors or engine hoods, there isn't the usual hassle involved in lining
things like that up. While it will be a bit before I get around to doing another
GT-40, there are others in the Fujimi racer line that I very much want to do,
and if they turn out as nicely as this one, are well worth the cost. Besides, it
is nice to do something other than a constant stream of aircraft
April 2007
#1464 in a series
Thanks to me for this one.
If you would like your product reviewed fairly and quickly by a site that has over 350,000 visitors a month, please contact me or see other details in the Note to Contributors.