| KIT: | Tamiya 1/72 P-47D Thunderbolt (Razorback) |
| KIT #: | 60769 |
| PRICE: | $20.00 MSRP |
| DECALS: | Two options |
| REVIEWER: | Scott Weir |
| NOTES: |
| HISTORY |
The P-47D is more commonly associated with the E.T.O. during WWII. It’s hard to imagine this five ton pugilist dueling it out with the very light, extremely agile fighters of the Japanese army and navy.
 In Sep.42 General George C.
Kenney took over the the remnants of the beleaguered 5th A.F.
for which earlier in the year had lost a lot of its men and equipment to
the Japanese in the Phillipines. With the Pacific campaign playing second
fiddle to the effort in Europe, the materials of war could be hard to come
by in the remote, vast expanses of the largest theater of operations. Many
in the War Dept. believed that the Jug was totally unsuited for ops in the
Pacific feeling its range to be too short and a poor match for the nimble
fighters of the Empire. Despite the grumbling of the brass General Kenney
wanted the Thunderbolt and any other aircraft he could get his hands on
irrespective of whatever shortcomings they might possess. It was a skinny
little Texan by the name of Neel Kirby who figured out how to best exploit
the P-47’s better attributes against its smaller, more maneuverable
Japanese counterparts. The Jugs performance at low to medium altitudes was
somewhat mediocre. But, its high altitude performance for which it was
designed was excellent. Col. Kirby figured if he could use the altitude
advantage of this bird he could hit and run and utilizing the great speed
of the descent to regain altitude. Now with a torrent of fire from eight
0.5”Brownings seemingly coming out of nowhere the Japanese came to fear the
object that was previously believed to be no match.
In Sep.42 General George C.
Kenney took over the the remnants of the beleaguered 5th A.F.
for which earlier in the year had lost a lot of its men and equipment to
the Japanese in the Phillipines. With the Pacific campaign playing second
fiddle to the effort in Europe, the materials of war could be hard to come
by in the remote, vast expanses of the largest theater of operations. Many
in the War Dept. believed that the Jug was totally unsuited for ops in the
Pacific feeling its range to be too short and a poor match for the nimble
fighters of the Empire. Despite the grumbling of the brass General Kenney
wanted the Thunderbolt and any other aircraft he could get his hands on
irrespective of whatever shortcomings they might possess. It was a skinny
little Texan by the name of Neel Kirby who figured out how to best exploit
the P-47’s better attributes against its smaller, more maneuverable
Japanese counterparts. The Jugs performance at low to medium altitudes was
somewhat mediocre. But, its high altitude performance for which it was
designed was excellent. Col. Kirby figured if he could use the altitude
advantage of this bird he could hit and run and utilizing the great speed
of the descent to regain altitude. Now with a torrent of fire from eight
0.5”Brownings seemingly coming out of nowhere the Japanese came to fear the
object that was previously believed to be no match.
 Ironically on March the 5th
of 1944 Col. Kirby had engaged and shot down an enemy bomber after which he
found himself at a low altitude and a slow speed only to be overtaken by
what is believed to have been a KI-43 Oscar. He was the highest scoring
Thunderbolt ace of the Pacific with 22 confirmed kills.
Ironically on March the 5th
of 1944 Col. Kirby had engaged and shot down an enemy bomber after which he
found himself at a low altitude and a slow speed only to be overtaken by
what is believed to have been a KI-43 Oscar. He was the highest scoring
Thunderbolt ace of the Pacific with 22 confirmed kills.
The story of the P-47 and the 5th A.F. in the Pacific is one of great courage, improvisation, and that CAN DO spirit that ultimately led to victory. Understanding the weaknesses and utilizing fully the strengths for that which was given to complete the task at hand. The P-47 Thunderbolt was a great instrument of war. But the thing that made it and all others like it great were the courageous young men who flew, fought and maintained her in defense of democracy. My hat is off to all those who called themselves Kenney’s Kids.
| THE KIT |
Let me refer you to Richard Bingham’s preview of this kit.
| CONSTRUCTION |
A little painting prep was
needed out of the gate. Cockpit and masked canopy parts were painted
interior green, the instrument panel in black with the kit supplied
instrument panel and seatbelt decals. The internal cockpit details were
painted per instructions with the addition of some details from Squadron
Signal’s P-47 Walk Around. A light dry brushing of silver gives the cockpit
that lived in look. Just as in
Scott Van Aken’s review
of the bubbletop the cockpit tub literally snaps
 together. Glue the corners
of the tub to secure it for final assembly. The three piece engine was
then painted aluminum with a wash of black and gear reduction
housing/magnetos primer gray. Prop hub was given a dose of Pactra chrome
silver mixed with some gray primer. Last up for the paint prep were the
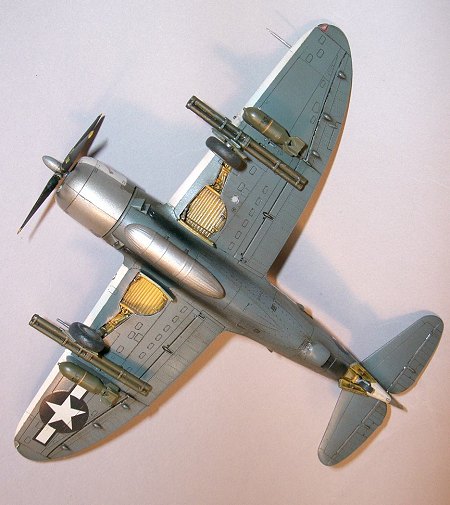
wheel wells, gear doors, wing spar and cowling interior chrome yellow. The
lower portion of the cowl interior was painted neutral gray as was the
supercharger/oil cooler ducting. Wheel wells, gear doors and spars then
received a wash of raw umber.
together. Glue the corners
of the tub to secure it for final assembly. The three piece engine was
then painted aluminum with a wash of black and gear reduction
housing/magnetos primer gray. Prop hub was given a dose of Pactra chrome
silver mixed with some gray primer. Last up for the paint prep were the
wheel wells, gear doors, wing spar and cowling interior chrome yellow. The
lower portion of the cowl interior was painted neutral gray as was the
supercharger/oil cooler ducting. Wheel wells, gear doors and spars then
received a wash of raw umber.
With all this prep and sub
assembling done it’s time to get down to business. Cockpit and wing spar in
place we can now slide the fuselage halves together. Some alignment of the
cockpit tub may be needed at this time. Don’t forget to punch out the holes
on the inside lower wings for the desired racks and or ordinance. The wing
sections were glued together and then placed over the spars to then glue
them to the fuselage. After the horizontal stabilizers were put into
position I did some minimal sanding along the spine, belly and wing leading
edges. Unlike the last 1/72nd Jug I
reviewed on Modeling Madness, this kit fits together very well
requiring very little sanding and no filler.
| COLORS & MARKINGS |
 Before the painting can begin
the wheel wells and inside engine cowl need to be masked off after which
the entire aircraft is sprayed in Testors gray primer. In the review of the
Revell A.G. P-47 natural metal finish was achieved using Plasti-kote
aluminum fast drying enamel via my brother in-law/modeling compadre. The
NMF on this kit is done with RUST-OLEUM aluminum enamel. It comes in an
eight oz. paint tin from Wal-Mart for under $3.00. That’s like buying
sixteen bottles of Model Masters for about the price of one and it looks
fantastic. Not to mention the added corrosion protection that’s synonymous
with this brand. I recommend spraying light applications until coverage is
complete. If it is applied too heavy at one time [belching out the brush
like Old Faithful] it tends to have more of a chromed mirror finish. As
with the primer the aluminum covered the entire kit so the severity of
paint chipping can be determined after painting is complete. Panel shading
on the vertical stabilizer and lower engine cowl comes courtesy of a #2
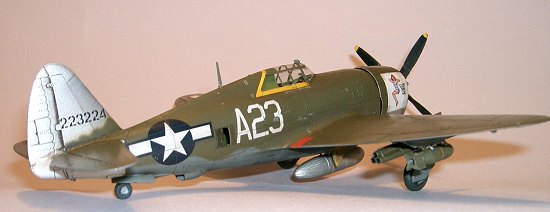
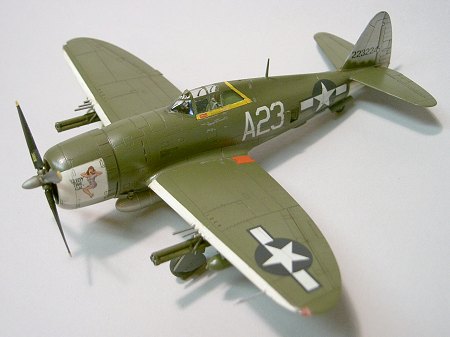
pencil and some Q-tips. AeroMaster neutral gray adorns the underside while
a mix of Pactra olive and Testors o.d. #1711 graces the top. The panels
under the horizontal stabs and the sides of the cowl now get masked to get
a coat of white. After a clear coat of enamel she’s ready for markings.
Before the painting can begin
the wheel wells and inside engine cowl need to be masked off after which
the entire aircraft is sprayed in Testors gray primer. In the review of the
Revell A.G. P-47 natural metal finish was achieved using Plasti-kote
aluminum fast drying enamel via my brother in-law/modeling compadre. The
NMF on this kit is done with RUST-OLEUM aluminum enamel. It comes in an
eight oz. paint tin from Wal-Mart for under $3.00. That’s like buying
sixteen bottles of Model Masters for about the price of one and it looks
fantastic. Not to mention the added corrosion protection that’s synonymous
with this brand. I recommend spraying light applications until coverage is
complete. If it is applied too heavy at one time [belching out the brush
like Old Faithful] it tends to have more of a chromed mirror finish. As
with the primer the aluminum covered the entire kit so the severity of
paint chipping can be determined after painting is complete. Panel shading
on the vertical stabilizer and lower engine cowl comes courtesy of a #2
pencil and some Q-tips. AeroMaster neutral gray adorns the underside while
a mix of Pactra olive and Testors o.d. #1711 graces the top. The panels
under the horizontal stabs and the sides of the cowl now get masked to get
a coat of white. After a clear coat of enamel she’s ready for markings.
Being the Jug junkie I am
it was really hard to decide what markings to finish this premium kit in.
Wanting to do a Pacific bird I scrounged through the shoebox of decals and
scouted the selection at the hobby store. All this searching brought me
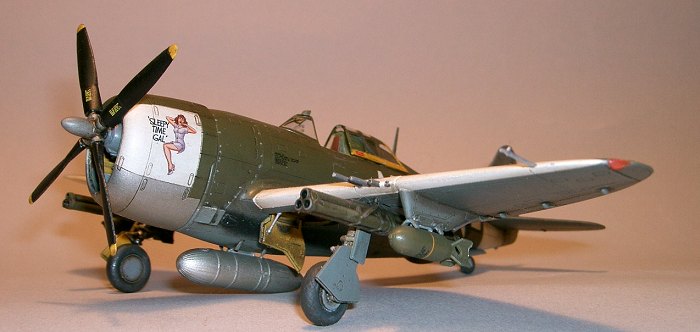
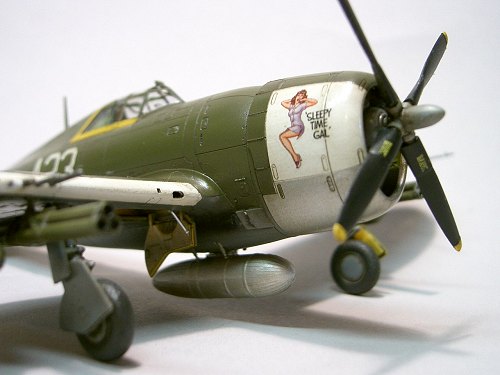
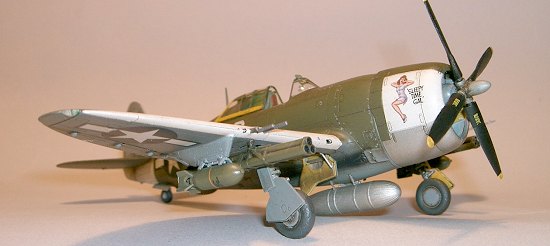
back to the kit supplied decals of 1st Lt. Herbert B.Emerich’s
Sleepy Time Gal, 5th AF, 58th FG, 69th FS.
These decals needed two or three coats of Solvaset to lay down but are very
opaque and look fabulous when all is said and done. After the final seal
coat of clear enamel is shot and cures a wash of raw umber is applied to
give it that used in the field look. Judging from photos of Sleepy Time Gal
in Squadron Signals THUNDERBOLT-PACIFIC THEATER she seemed to be fairly
well clothed in her war paint at that time leading me to keep the paint
chipping to a minimum mainly around the cockpit area.
| FINAL CONSTRUCTION |
 Just like Tamiya’s bubbletop in
Scott Van Aken’s review there’s still a lot to do before she can be
stabled. Landing and formation lights, landing gear and doors w/hydraulic
cylinders, tires w/inserts, gear struts, windscreen rearview mirror,
inboard gun barrel inserts, pitot tube and antenna mast. The very last
thing on the list is which condiments to garnish this bird with. In the two
photos of the Gal in the above mentioned book she’s wearing a pair of P-38
style long range tanks. This would be logical as to enhance the P-47s
lackluster range in the vastness of the Pacific theater. Since there are no
such tanks supplied in the kit, instead of more bark I went for the more
ferocious bite of bombs and rockets with a centerline paper tank.
Just like Tamiya’s bubbletop in
Scott Van Aken’s review there’s still a lot to do before she can be
stabled. Landing and formation lights, landing gear and doors w/hydraulic
cylinders, tires w/inserts, gear struts, windscreen rearview mirror,
inboard gun barrel inserts, pitot tube and antenna mast. The very last
thing on the list is which condiments to garnish this bird with. In the two
photos of the Gal in the above mentioned book she’s wearing a pair of P-38
style long range tanks. This would be logical as to enhance the P-47s
lackluster range in the vastness of the Pacific theater. Since there are no
such tanks supplied in the kit, instead of more bark I went for the more
ferocious bite of bombs and rockets with a centerline paper tank.
| CONCLUSIONS |
 Tamiya has done it again.
They have produced another kit that happens to be the best representation
of its kind in 1/72nd scale on the planet. The only critique I
would have for the $20.00 price tag would have been the addition of
optional position cowl and landing flaps. It would be nice if down the road
they could tool a cowl for the earlier D series as mentioned in Richard
Bingham’s preview as to make Col. Kirby’s Fiery Gingers and other great
oldies. That being said this is a tooling masterpiece that takes this scale
to another level and is a sheer joy to build. The attention to detail on
the engine, in the wheel wells and cockpit are exquisite. The outline and
scribing are superlative. I would recommend this kit to anyone looking for
the outright best Razorback in this scale that’s not bothered by the price
tag.
Tamiya has done it again.
They have produced another kit that happens to be the best representation
of its kind in 1/72nd scale on the planet. The only critique I
would have for the $20.00 price tag would have been the addition of
optional position cowl and landing flaps. It would be nice if down the road
they could tool a cowl for the earlier D series as mentioned in Richard
Bingham’s preview as to make Col. Kirby’s Fiery Gingers and other great
oldies. That being said this is a tooling masterpiece that takes this scale
to another level and is a sheer joy to build. The attention to detail on
the engine, in the wheel wells and cockpit are exquisite. The outline and
scribing are superlative. I would recommend this kit to anyone looking for
the outright best Razorback in this scale that’s not bothered by the price
tag.
Review courtesy of my wallet.
If you would like your product reviewed fairly and quickly by a site that has over 250,000 visitors a month, please contact me or see other details in the Note to Contributors.