|
KIT: |
Tamiya 1/72 P-47D Thunderbolt (Bubbletop) |
|
KIT # |
60770 |
|
PRICE: |
¥1400 (about $13.00) from Hobby Link Japan |
|
DECALS: |
Two options |
|
REVIEWER: |
Scott Van Aken |
|
NOTES: |
|
BACKGROUND |
What it takes to be awarded the Congressional Medal of Honor.
 "In April of 1945, Lt.
Knight led several low level strafing attacks against enemy airfields in
Northern Italy. During the attack on Ghedi airfield, he went in alone to
find the location of the enemy aircraft, drawing heavy fire in the process.
He then led his flight in the attack, destroying five aircraft. He returned
to base to lead another attack against Bergamo airfield. As before, he went
in along to locate the enemy aircraft, drawing heavy fire. He then led his
flight in the attack, after which he returned alone, making ten passes and
destroying eight aircraft. During the attack, his aircraft was heavily
damaged. The next day, he led another attack against Bergamo to destroy the
remaining aircraft and again his aircraft was severely damaged. Lt. Knight
was killed trying to bring his damaged aircraft home when it crashed in the
mountains. For these actions he was awarded the Congressional Medal of
Honor. Lt. Knight flew 84 missions, destroying 24 enemy aircraft before his
death."
"In April of 1945, Lt.
Knight led several low level strafing attacks against enemy airfields in
Northern Italy. During the attack on Ghedi airfield, he went in alone to
find the location of the enemy aircraft, drawing heavy fire in the process.
He then led his flight in the attack, destroying five aircraft. He returned
to base to lead another attack against Bergamo airfield. As before, he went
in along to locate the enemy aircraft, drawing heavy fire. He then led his
flight in the attack, after which he returned alone, making ten passes and
destroying eight aircraft. During the attack, his aircraft was heavily
damaged. The next day, he led another attack against Bergamo to destroy the
remaining aircraft and again his aircraft was severely damaged. Lt. Knight
was killed trying to bring his damaged aircraft home when it crashed in the
mountains. For these actions he was awarded the Congressional Medal of
Honor. Lt. Knight flew 84 missions, destroying 24 enemy aircraft before his
death."
|
THE KIT |
Please visit the preview for a look at what comes in the box and a brief history.
|
CONSTRUCTION |
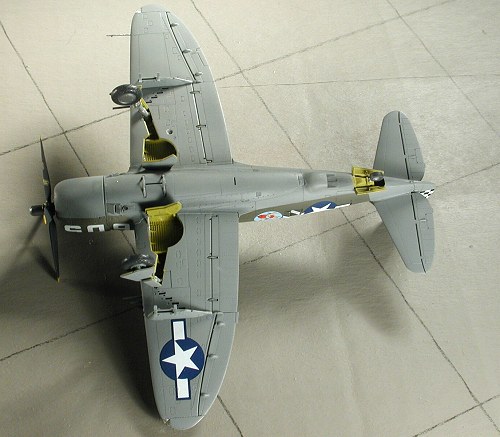
First thing was to do a bit of gluing and that meant the control and seat for the cockpit. Then I did a bunch of painting, with the interior bits being Testors Interior Green enamel, the wheel wells and inner doors Testors Zinc Chromate Yellow, and the inside of the cowling ZC Yellow on the top and Neutral grey on the lower section.
 Turning to the wings, I glued the upper and lower halves together.
There are small inserts that fit into the wings (mostly because the
landing light location changes in other versions). These inserts fit very
tightly and you can almost convince yourself they are not there! Moving
to the cockpit, the various details were picked out and the instrument
panel painted black. I then attached the decal for the instruments and
the seat belt. Personally, I like decal seat belts as they are relatively
convincing and easy to apply. I wish all 1/72 kit makers included them.
Turning to the wings, I glued the upper and lower halves together.
There are small inserts that fit into the wings (mostly because the
landing light location changes in other versions). These inserts fit very
tightly and you can almost convince yourself they are not there! Moving
to the cockpit, the various details were picked out and the instrument
panel painted black. I then attached the decal for the instruments and
the seat belt. Personally, I like decal seat belts as they are relatively
convincing and easy to apply. I wish all 1/72 kit makers included them.
I then snap fit the parts of the cockpit tub together. Yes, the fit is that good. Then I added a bit of glue to the seams so that it wouldn't accidentally fall apart some time in the future. Threading the wing spar through the fuselage halves, I also glued the interior in place and glued the fuselage as well. During this time, I glued the upper fuselage sections together. When dry, I glued it to the rest of the fuselage. To my surprise, the forward section of this upper insert was narrower than the fuselage. Next time, I'll glue it together when I glue the fuselage halves. Perhaps that will prevent this from happening. Needless to say, I had to use filler where it was a bit short. Alson on the bottom where a rather large seam appeared. I thought I'd cleaned that all up to prevent that sort of thing, but I guess not. In fact, just about the entire underside needed filler.
 Next, I painted the engine parts and when those were done, I glued
them together and set that subassembly aside. The wings were then
threaded on the wing spars and glued in place. One side fit superbly with
no fuss while the other was a bit of a struggle and left a touch of a
gap. I then glued the tail planes in place. Fit here isn't a snap-lock
and you have to keep your eye on things to make sure they don't dry in
the wrong angle. I also installed the wing gun inserts. These are
not a very good fit and did not sit flush with the wing leading edge. I
also glued in the separate rudder. Moving to the underside, the
centerline rack parts were glued in. These are a VERY tight fit and were
a bit of a pain to install. I also glued the wing pylon halves together
and then glued those in place. With that done, I masked the interior and
wheel wells and headed for the paint shop.
Next, I painted the engine parts and when those were done, I glued
them together and set that subassembly aside. The wings were then
threaded on the wing spars and glued in place. One side fit superbly with
no fuss while the other was a bit of a struggle and left a touch of a
gap. I then glued the tail planes in place. Fit here isn't a snap-lock
and you have to keep your eye on things to make sure they don't dry in
the wrong angle. I also installed the wing gun inserts. These are
not a very good fit and did not sit flush with the wing leading edge. I
also glued in the separate rudder. Moving to the underside, the
centerline rack parts were glued in. These are a VERY tight fit and were
a bit of a pain to install. I also glued the wing pylon halves together
and then glued those in place. With that done, I masked the interior and
wheel wells and headed for the paint shop.
|
COLORS & MARKINGS |
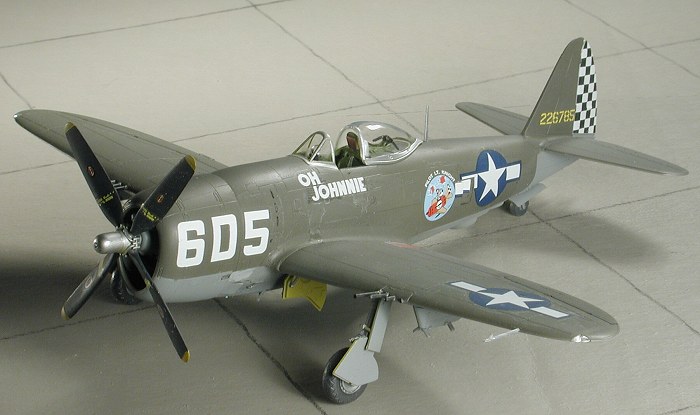
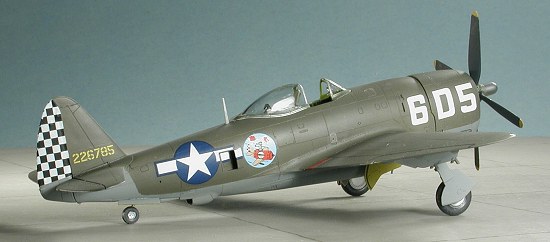
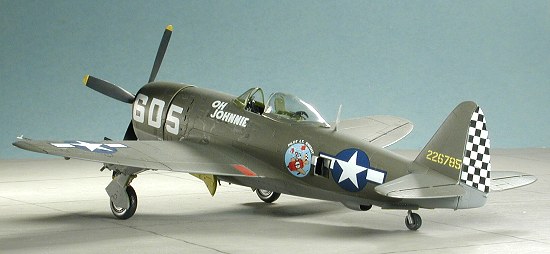
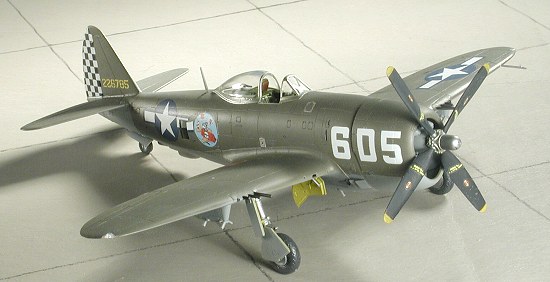
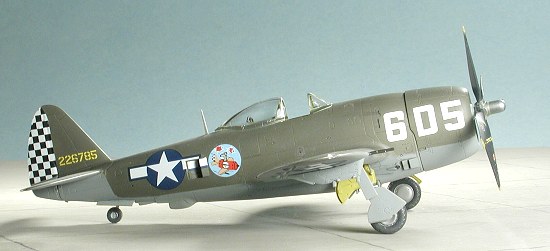
First step was to paint the entire airframe as well as the outside of the gear doors in Alclad II Duralumin. This included painting the landing gear struts and wheel hubs as well as the wing pylon halves with this color. I masked off a small area aft of the head armor and painted it Interior Green. I then went to look for some decals. What I found was a set that required an OD over Neutral Grey airplane! Well, no problem as it just meant a repaint. It also gave me an opportunity to sand down the poorly fitting wing gun inserts. Actually, it was sort of a blessing in disguise as with the sanding I'd done, a bare metal finish would have shown all the scratches I'd missed!
 I used Testors Model Master enamels for the two colors, painting the
underside first, then masking it when dry and doing the upper colors.
This aircraft would have a bare metal canopy frame so those were not
installed. With the plane properly painted (at least somewhat close to
it), the kit was returned to the work bench to have more stuff added.
This included the landing gear and main landing gear doors. The wheels
have two different inserts to choose from. One is a flush plate that is
used on most P-47s. The others are spoked wheels that are only used on
much later versions, most of which have the dorsal fillet. This one does
not have that feature so I used the flush one. The fit is very tight here
as well. With the airplane on its gear, I then gave it a coat of clear
acrylic gloss in preparation for the decals.
I used Testors Model Master enamels for the two colors, painting the
underside first, then masking it when dry and doing the upper colors.
This aircraft would have a bare metal canopy frame so those were not
installed. With the plane properly painted (at least somewhat close to
it), the kit was returned to the work bench to have more stuff added.
This included the landing gear and main landing gear doors. The wheels
have two different inserts to choose from. One is a flush plate that is
used on most P-47s. The others are spoked wheels that are only used on
much later versions, most of which have the dorsal fillet. This one does
not have that feature so I used the flush one. The fit is very tight here
as well. With the airplane on its gear, I then gave it a coat of clear
acrylic gloss in preparation for the decals.
I used the markings on Superscale 72-810. Several reasons. One is that it didn't have Invasion stripes on it; another is that it used the Hamilton Standard prop; and the main one is that it is an aircraft flown by a man who wasn't a famous ace, but who gave his all for his country. The decals went on beautifully with no trouble. It seems to this reviewer's eye that the blue in the insignia could have been darker, but I don't think it makes that much difference. I used some of the markings from the kit decals and left off most of the stencil decals as it appears that his plane had been painted after it left the factory. With that done, I did a bit of touch-up painting and then gave the kit a clear matte coat.
|
FINAL CONSTRUCTION |
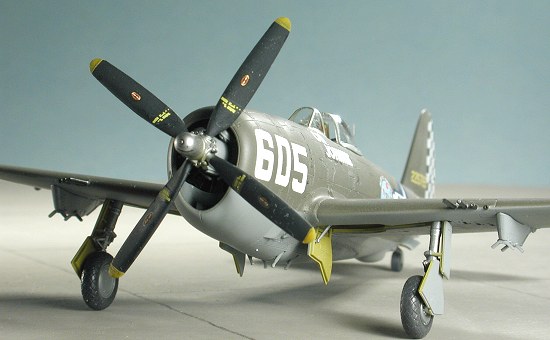
 Back at the bench, it was time to add a bunch of stuff I'd left off.
This included the inner gear doors, the tail wheel doors, pitot tube, and
the two other guns (which have not had the barrels nicely drilled out as
the ones are on the inserts.). The canopy parts were attached with white
glue and the fit is really very good. There are positive locators on both
the windscreen and the canopy itself. The little brace is not glued to
the canopy at all but glued into the slot behind the head rest depending
on how you are going to position the canopy. I glued in the landing light
lens and the two wing tip position lights. Final bit was to push the prop
on its shaft and then add a touch of pastel to the exhaust. For those who
are going to point out that you can tell the prop markings are
decals....well....guess what....in reality they are decals as these
markings were not painted on.
Back at the bench, it was time to add a bunch of stuff I'd left off.
This included the inner gear doors, the tail wheel doors, pitot tube, and
the two other guns (which have not had the barrels nicely drilled out as
the ones are on the inserts.). The canopy parts were attached with white
glue and the fit is really very good. There are positive locators on both
the windscreen and the canopy itself. The little brace is not glued to
the canopy at all but glued into the slot behind the head rest depending
on how you are going to position the canopy. I glued in the landing light
lens and the two wing tip position lights. Final bit was to push the prop
on its shaft and then add a touch of pastel to the exhaust. For those who
are going to point out that you can tell the prop markings are
decals....well....guess what....in reality they are decals as these
markings were not painted on.
|
CONCLUSIONS |
 I'd have to say that Tamiya has another winner here. With less than $5
difference between current boxing Hasegawa kits, it is no doubt going to
do well in Japan. Those on a budget might cringe at paying $20 for a 1/72
kit and go for Revell or Academy. However, I have to say that (despite my
induced errors), this is probably the best small scale Thunderbolt on the
market and so highly recommended.
I'd have to say that Tamiya has another winner here. With less than $5
difference between current boxing Hasegawa kits, it is no doubt going to
do well in Japan. Those on a budget might cringe at paying $20 for a 1/72
kit and go for Revell or Academy. However, I have to say that (despite my
induced errors), this is probably the best small scale Thunderbolt on the
market and so highly recommended.
August 2004
#1326 in a series
You can find this kit and many others at
 . "You have a friend in
Japan."
. "You have a friend in
Japan."
If you would like your product reviewed fairly and quickly by a site that has over 250,000 visitors a month, please contact me or see other details in the Note to Contributors.