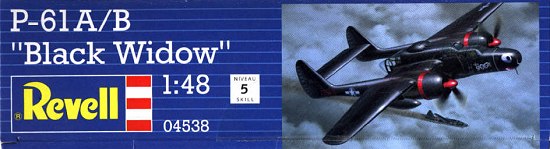
Revell AG 1/48 P-61 Black Widow
|
KIT # |
5438 |
|
PRICE: |
@ $16.00 |
|
DECALS: |
3 planes |
|
REVIEWER: |
|
|
NOTES: |
Monogram Kit. Difficulty rated 5 out of 5 |
|
HISTORY |
The development of short-wave radar by the british early in the war gave the allies a considerable advantage over axis powers in WW II. Only late in the war were the germans able to field a few sets of centrimetric radar copied from captured allied sets. Their own equipment, working with longer wavelengths, was always less efficient and with its clumsy „antler“ antenna arrays seriously compromised the planes´ performance. Just compare the german night fighter radar FuG 202 or 220 to the one used on the Black Widow...
 The British experimented
with airborne radar rather early, as they were the first targets of night
bombing and as conventional, radar-less interceptors had only very slight
chances of destroying night intruders. They had installed a very capable chain
of long-wave coastal radar stations that proved decisive to the outcome of the
Battle of Britain. This system reliably succeeded in bringing day fighters in
visual contact to intruding german planes, thus enabling them to concentrate
their forces and then enter dogfights. Yet at night, planes led „close“ to
intruders by radar still could miss them for lack of a radar of their own that
could bring them at range.
The British experimented
with airborne radar rather early, as they were the first targets of night
bombing and as conventional, radar-less interceptors had only very slight
chances of destroying night intruders. They had installed a very capable chain
of long-wave coastal radar stations that proved decisive to the outcome of the
Battle of Britain. This system reliably succeeded in bringing day fighters in
visual contact to intruding german planes, thus enabling them to concentrate
their forces and then enter dogfights. Yet at night, planes led „close“ to
intruders by radar still could miss them for lack of a radar of their own that
could bring them at range.
In February of 1940 british scientists managed to produce radar waves with a wavelength of only 10 centimetres, which was far less than anything existing; the resulting AI Mk VII radar, first used aboard Beaufighters late in 1941, featured the now-common dish antenna and could easily be installed under a streamlined fairing in the nose or under the wing of a plane.
While the British used existing Bristol Beaufighters and De Havilland Mosquitoes as nightfighters, it took the Americans some time to develop their first purpose-built nightfighter, the Northrop P-61 Black Widow.
Summing up what I might write about the
P-61 is a quick business. The most salient points have been mentioned in
Danny Luey´s recent excellent article. The only
reason I still wrote mine after reading his was that I had tried weathering my
plane and would like to present it to you whereas Danny´s P-61 is
factory-fresh. In all, the P-61 was a big, capable and
 mean-looking plane, equipped
with tremendous firepower, a state-of-the-art radar and a good endurance.
Sadly, it arrived at the front a bit late due to prolonged development and
teething problems. Thus, its wartime service was limited, it was used mainly
in the Pacific flying missions against night intruders with mostly all-black
planes, and a limited number was also used in the ETO – amongst others
fighting V-1 buzz bombs. The planes in the ETO were painted rather OD over
Neutral Grey.
mean-looking plane, equipped
with tremendous firepower, a state-of-the-art radar and a good endurance.
Sadly, it arrived at the front a bit late due to prolonged development and
teething problems. Thus, its wartime service was limited, it was used mainly
in the Pacific flying missions against night intruders with mostly all-black
planes, and a limited number was also used in the ETO – amongst others
fighting V-1 buzz bombs. The planes in the ETO were painted rather OD over
Neutral Grey.
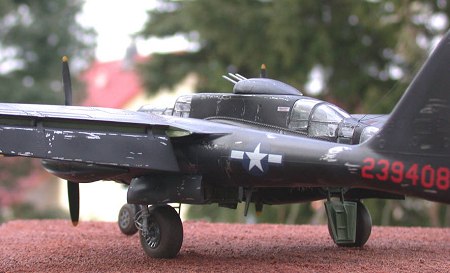
The plane´s advanced remote-controlled turret caused buffeting problems and was omitted or arrested in the forward-firing position in most planes of the first production series, the P-61 A. It ws reintroduced in the P-61 B along with some other modifications. Next to their wartime service, some P-61´s were used in meteorological research – with some nice paint schemes (hint, hint!). Only a few P-61´s have survived; one is currently rebuilt by the Mid Atlantic Air Museum, and I suggest you´d start your tour on the web right there, at the Widow´s Web at http://www.maam.org/p61.html The links page leads to some useful sites covering many aspects of this big and awesome nightfighter. (Editor's Note: there is a Black Widow at the USAF Museum. It is a P-61C painted as a P-61B, something that the USAFM has done to a number of its aircraft.)
|
THE KIT |
 Let me first of all say a
big and heartfelt thank you to Monogram for pushing forward the standard in
plastic modeling way back when I went to school; they´ve produced a number of
the finest plastic kits that have stood the test of time and can still be
built to please us; some are still the only game in town, or did I miss a 1/48
B-17 or B-29 or P-61, for instance?
Let me first of all say a
big and heartfelt thank you to Monogram for pushing forward the standard in
plastic modeling way back when I went to school; they´ve produced a number of
the finest plastic kits that have stood the test of time and can still be
built to please us; some are still the only game in town, or did I miss a 1/48
B-17 or B-29 or P-61, for instance?
Now this kit was produced in 1974; I bought it twice, once in a Monogram box in 1996 and once in a Revell of Germany box in 2001. I´ve kept the Monogram one for the future, to be used together with an Eduard etched brass set, although I´ll have to get aftermarket decals still – the kit decals (at least mine) are surely the weakest point of the original kit, they´re basic, thick and glossy. But we´ll see how things´ll be, the kit I bought only gave you decals for one plane, „Time´s a-wastin´“, and that´s a really cool nose art (and unavailable on the aftermarket AFAIK).
 The kit is adequately molded
in black styrene, with the raised panel lines of that era, fine rivets and
generally it´s a clean and flash-free business. It´s markedly above the
quality of my recent build, Hobbycraft´s Ar 234, talking details as well as
molding quality in respect to e.g. sink marks. Given the age of the molds,
they´re still in pretty good shape (and that´s good since no one else makes a
1/48 Widow ...) The clear parts are numerous, a bit on the thick side, yet
transparent. The kit offers various options; several maintenance panels may be
opened and the port engine, the radar and the belly gun installation may be
shown. The front and rear canopies are also prepared to be posed in the open
position. I did not opt to do so since I wanted to do the kit OOB, so I left
it all closed. The kit is a major tail sitter; I figured out that you´d have
to put nearly the weight of a full Testor´s glass paint bottle into the nose
to keep it from sitting on its behind. A transparent rod is provided to keep
the plane upright, but as Danny already pointed out, that leaves something to
be desired. As the model is, rather open and transparent with good access to
both the cockpit and the front wheel well, you only have the options of either
leaving out the radar and filling the nose with weight or somehow fixing it to
the floor. Which I finally did.
The kit is adequately molded
in black styrene, with the raised panel lines of that era, fine rivets and
generally it´s a clean and flash-free business. It´s markedly above the
quality of my recent build, Hobbycraft´s Ar 234, talking details as well as
molding quality in respect to e.g. sink marks. Given the age of the molds,
they´re still in pretty good shape (and that´s good since no one else makes a
1/48 Widow ...) The clear parts are numerous, a bit on the thick side, yet
transparent. The kit offers various options; several maintenance panels may be
opened and the port engine, the radar and the belly gun installation may be
shown. The front and rear canopies are also prepared to be posed in the open
position. I did not opt to do so since I wanted to do the kit OOB, so I left
it all closed. The kit is a major tail sitter; I figured out that you´d have
to put nearly the weight of a full Testor´s glass paint bottle into the nose
to keep it from sitting on its behind. A transparent rod is provided to keep
the plane upright, but as Danny already pointed out, that leaves something to
be desired. As the model is, rather open and transparent with good access to
both the cockpit and the front wheel well, you only have the options of either
leaving out the radar and filling the nose with weight or somehow fixing it to
the floor. Which I finally did.
|
CONSTRUCTION |
Construction begins
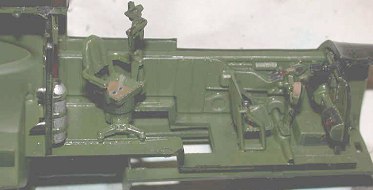 This kit has a nicely
detailed cockpit with room for three crew members, and of course that was
where I started. I sprayed it all interior green, drybrushed with aluminum and
finally picked out the one or other detail. As the canopies were to be closed,
I just did what seemed appropriate. I encountered no major difficulties.
Simultaneously, I started what other subassemblies that presented themselves,
as there were four drop tanks, the wings (holes for mounting the droptanks
must be opened), the wheels, the twin booms and so on. What could be painted
on the sprues was. I diverged from the instructions in not mounting the front
wheel together with the wheel well so it could be turned. I left it out to
avoid breakage. The engines were installed in the nacelles and their covers
attached with Maskol; the front of the nacelles was covered with wet tissue. I
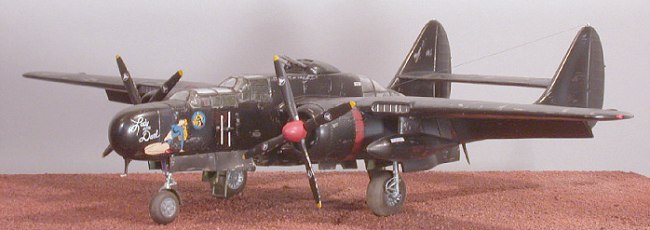
wanted that turret plus heavy weathering, so had early on decided to build the
„Lady in the Dark“.
This kit has a nicely
detailed cockpit with room for three crew members, and of course that was
where I started. I sprayed it all interior green, drybrushed with aluminum and
finally picked out the one or other detail. As the canopies were to be closed,
I just did what seemed appropriate. I encountered no major difficulties.
Simultaneously, I started what other subassemblies that presented themselves,
as there were four drop tanks, the wings (holes for mounting the droptanks
must be opened), the wheels, the twin booms and so on. What could be painted
on the sprues was. I diverged from the instructions in not mounting the front
wheel together with the wheel well so it could be turned. I left it out to
avoid breakage. The engines were installed in the nacelles and their covers
attached with Maskol; the front of the nacelles was covered with wet tissue. I
wanted that turret plus heavy weathering, so had early on decided to build the
„Lady in the Dark“.
Working that way, I pretty soon had
quite a big plane sitting on my workbench. The transparent parts were also
glued at this stadium using cyanoacrylate glue. I wanted no dust to collect
inside the plane while sanding it so closed all openings as soon as possible
using the appropriate access panels or tissue.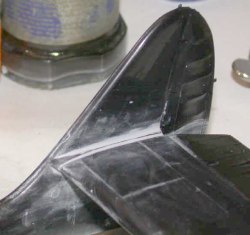
I had to do some limited sanding and filling, especially at the joint between the wing and the booms, but nothing major, again as compared to the HC Ar 234. The glass parts needed some sanding and fitting and shaping and blending, too. When I was satisfied with them, I masked the entire glass parts with Parafilm M, gently cutting out all the framing with a fresh #11 X-Acto blade. The wheel wells and each other part of the model that should not receive exterior paint was then rechecked and covered with moistened tissue.
Then it was time for the next step: Checking the seams. I sprayed aluminum metalizer to check for flaws and redid what did not seem OK until I was through with that. It of course took some passes.
|
CAMOUFLAGE & MARKINGS |
The real fun begins
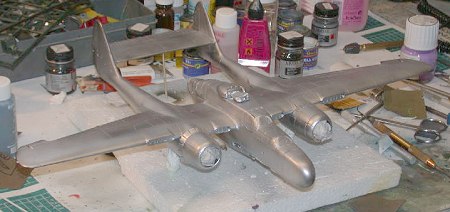 I sprayed the entire plane
aluminum metalizer preparatory to the paint job. The surface was then buffed
gently with a paper towel. I had put the plane on my usual support, that is
three toothpicks in a piece of styropor, so I could easily handle it for the
next part. I had decided to redo what had been done with the real plane as far
as possible, so I sprayed it gloss black next. I know I might have primed it
with zinc chromate, too, but I simply did not think of that at the time. Might
have been better yet, with the paint peeling off in some places to the primer
and in others right down to the bare metal. Next time. Anyway, my P-61 looked
really nice when it sat there gloss black all over. I did the same to the
various droptanks and wheel well covers, too. BTW: USAAF tests showed that a
gloss black scheme worked best for a night fighter, whereas the british used a
rather flat and sooty black paint, whereas the germans opted for a
grayish-blue tone covered with squiggles of a darker paint (I won´t go into
RLM cabbalistics here ;-)))))). Now all of those airforces must have made
tests, and all of them must have been convinced that their decision was the
best. Who was right? What do you mean?
I sprayed the entire plane
aluminum metalizer preparatory to the paint job. The surface was then buffed
gently with a paper towel. I had put the plane on my usual support, that is
three toothpicks in a piece of styropor, so I could easily handle it for the
next part. I had decided to redo what had been done with the real plane as far
as possible, so I sprayed it gloss black next. I know I might have primed it
with zinc chromate, too, but I simply did not think of that at the time. Might
have been better yet, with the paint peeling off in some places to the primer
and in others right down to the bare metal. Next time. Anyway, my P-61 looked
really nice when it sat there gloss black all over. I did the same to the
various droptanks and wheel well covers, too. BTW: USAAF tests showed that a
gloss black scheme worked best for a night fighter, whereas the british used a
rather flat and sooty black paint, whereas the germans opted for a
grayish-blue tone covered with squiggles of a darker paint (I won´t go into
RLM cabbalistics here ;-)))))). Now all of those airforces must have made
tests, and all of them must have been convinced that their decision was the
best. Who was right? What do you mean?
Decaling
Next came the decals. I had chosen to apply all decals prior to weathering as they work best on a glossy surface and I wouldn´t have to interfere with the weathering. Moreover, what pics I had seen led me to the idea that where there was more paint on the gloss black, there wasn´much chipping, so these areas would remain largely unchipped in my book.
The new Revell kit decals are what we´ve
come to expect from RoG, they´re thin and a bit matte, there are many of them
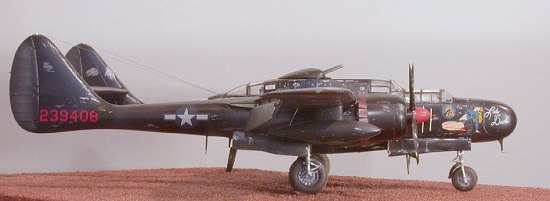
and they cover interesting subjects. You can either build two pacific P-61´s
with turret, both from the 548th NFS; they were called „The Spook“
and „Lady in the Dark“ and both have great nose art (just leaf through all
those pics and nosearts you´ll find at
http://www.geocities.com/mep1100/units.html ). „The Spook“ is special in
having twin nose arts and being calles „Anonymous III“ on the port side. The
third option is a turretless P-61 from the ETO in OD over Neutral grey with
full invasion stripes called „Lady Gen“; it belonged to the 422th NFS and was
stationed in Florennes in Belgium in late 1944.
 The decal instructions aren´t
complete. There are quite a number of decals on the sheet I did not find in
the placement guide. I applied the decals as far as I thought proper. They did
not react over-willingly to MicroSol, MicroSet worked better. In some places,
I had to open bubbles with a blade and ensure proper setting with MicroSet.
When everything was worked out, I added some gloss coats over the decals to
seal and stabilize them.
The decal instructions aren´t
complete. There are quite a number of decals on the sheet I did not find in
the placement guide. I applied the decals as far as I thought proper. They did
not react over-willingly to MicroSol, MicroSet worked better. In some places,
I had to open bubbles with a blade and ensure proper setting with MicroSet.
When everything was worked out, I added some gloss coats over the decals to
seal and stabilize them.
Working on the decals, I had figured out that I might cover the decals and only them with Maskol, so that they would not be harmed during weathering. It was a tedious process, especially with the wing walkways, but I coped. At that point, I realized via a friend that I had applied the national insignia atop the wing to the wrong side. (Been there and done that with a natural metal 1/48 B-25. Most embarrassing. Ed) So I made spray masks using the applied decal and sprayed the whole thing on the port wing, sanding and repainting the area where the decal had been on the starboard wing. Nice practice.
Weathering
 Now this was fun. I had
seen quite a number of pics of black P-61´s, and they all showed significant
deterioration of the paint and huge exhaust stains. Given the fact they were
operated with minimal maintenance from more than basic runways (crushed
coral...) this was a moment for really going to it. So I took a curved scalpel
blade and started scraping off paint where I had seen it in the pics and where
I thought it likely. That took some sessions until I was satisfied. The
exhaust stains were sprayed with flat medium grey paint in various shades and
later on retouched with pastel chalks.
Now this was fun. I had
seen quite a number of pics of black P-61´s, and they all showed significant
deterioration of the paint and huge exhaust stains. Given the fact they were
operated with minimal maintenance from more than basic runways (crushed
coral...) this was a moment for really going to it. So I took a curved scalpel
blade and started scraping off paint where I had seen it in the pics and where
I thought it likely. That took some sessions until I was satisfied. The
exhaust stains were sprayed with flat medium grey paint in various shades and
later on retouched with pastel chalks.
Moreover, I lightened the fabric-covered steering surfaces and did some postshading with various shades of dark grey until the surface did not look uniform any more. At this point, the masking on the decals was removed, and the resulting glossier places were sprayed clear flat until I liked what I saw.
Pastel chalks were used on the wheels and undersides, the wheel well covers and where personnel would walk over the plane.
|
FINAL CONSTRUCTION |
Now came the moment of putting the plane onto its wheels. The tyres had been sanded and flattened, sprayed Testor´s Rubber and finally retouched with pastel chalks. The masks were removed from the glass parts, the wheel well covers were installed, antennae were made from stretched black sprue, and that was nearly all.
 I still had to decide what
to do with the tail-sitting trouble. I wouldn´t want to destroy the nice
radar, so I did the following: I drilled an oblique hole through the front
Tyre and fitted a piece of brass (rectangular ½ mm square) into it. I took a
piece of styropor of convenient size and put the brass into it, so I could
arrest the model on the small protruding end of the brass. The styropor was
covered with a layer of white glue, and then with scenery building material
from the model railroad supply, little „pebbles“ and „brick colored dust“. The
model was put onto it, and the glue was set to dry. Some airbrushing was done
and the edges of the styropor were hand painted Siena red. That was my base
plate. I consider adding figures and/or a wood framing to it some day. After
all Monogram provides nice crew figures and even an oil drum!
I still had to decide what
to do with the tail-sitting trouble. I wouldn´t want to destroy the nice
radar, so I did the following: I drilled an oblique hole through the front
Tyre and fitted a piece of brass (rectangular ½ mm square) into it. I took a
piece of styropor of convenient size and put the brass into it, so I could
arrest the model on the small protruding end of the brass. The styropor was
covered with a layer of white glue, and then with scenery building material
from the model railroad supply, little „pebbles“ and „brick colored dust“. The
model was put onto it, and the glue was set to dry. Some airbrushing was done
and the edges of the styropor were hand painted Siena red. That was my base
plate. I consider adding figures and/or a wood framing to it some day. After
all Monogram provides nice crew figures and even an oil drum!
|
CONCLUSIONS |
 Yet another big thank you to
Monogram. This has been a very agreeable project that did not offer major
problems and looks cool even OOB. I was still wondering why nobody had
submitted a review of this plane during building mine when Danny´s recent
article turned up. I´ll sure build my other kit! Highly recommended, to all
from the average guy like me to the big shots who might produce eye-watering
super detailed diorama maintenance scenes. Now this is what´s great about this
kit for me: It offers many possibilities yet looks pleasing OOB.
Yet another big thank you to
Monogram. This has been a very agreeable project that did not offer major
problems and looks cool even OOB. I was still wondering why nobody had
submitted a review of this plane during building mine when Danny´s recent
article turned up. I´ll sure build my other kit! Highly recommended, to all
from the average guy like me to the big shots who might produce eye-watering
super detailed diorama maintenance scenes. Now this is what´s great about this
kit for me: It offers many possibilities yet looks pleasing OOB.
March 2003
Copyright ModelingMadness.com
If you would like your product reviewed fairly and fairly quickly, please contact the editor or see other details in the Note to Contributors.