If you recall from the last installment, I'd added an extension to the track and was waiting for some more pieces in order to complete it. I also experimented with stacking some sheets of dense foam board in order to add some elevation to things. I wanted this new extension to be something more than just flat.
In the meantime, I changed the rather square left side of the long section into a nice banked turn. However, all was not well with this part as I couldn't get the outer borders to stay in place. When the cars lost traction in this section, they went flying off the track with some going over the short wall and hitting the floor. I put sections of carpet down after the first crash and smash so that following cars wouldn't get damaged. I also removed the outer borders and put fence right up to the edge of the track. This helped, though some cars had their rear wings catch the edges of the fence resulting in some broken wings.
To fix this, I tried cutting large circular templates to put under the outer borders and keep them in position. This helped quite a bit, though I still had trouble with the outer borders coming free, even after using hot glue to try to hold them in place. No real fix aside from going slower through that section.
It was during this time that I
installed a new lap counter as well from DS products. It is a digital counter
that uses a photo electric cell to count when the car has come through. It is
programmable to count up to a certain number of laps, to count for a period of
time, to give the difference in time and laps between two cars and other
options. One can also program the period of time between counts. In this way, it
prevents double counting in case a car deslots, goes into that lane and through
the wrong counter.
 Generally
one sets it at near the fastest lap any car will turn. So if the fastest lap is,
say 10 seconds, one sets the counter at 9.5 seconds and then when a car goes
through, it won't count a lap for that period of time.
Generally
one sets it at near the fastest lap any car will turn. So if the fastest lap is,
say 10 seconds, one sets the counter at 9.5 seconds and then when a car goes
through, it won't count a lap for that period of time.
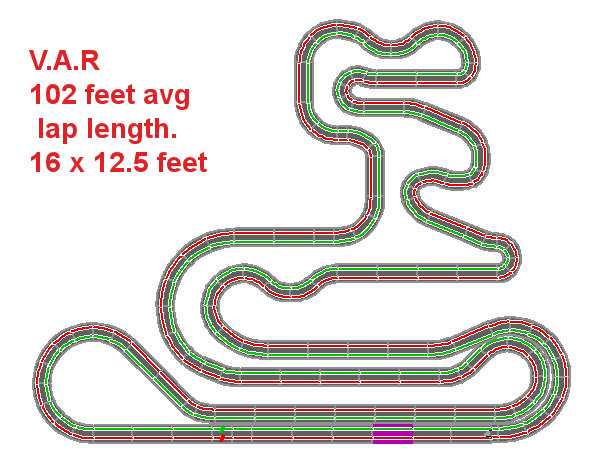
Finally, the rest of the track bits arrived and I was able to get the track into the final layout that it is now. By adding in a combination of different radii in most of the switchback turns, I added some interest to things.
The track now looked like this.
You can see that the sections that return to the original hairpin are now made of different shaped turns. I had to add a standard hairpin near the top as nothing else would fit into the space. I now had a track that measured a bit over 100 feet in length. This not only gave me fast and slow bits, but also provided a lap time that didn't have the cars traveling by the driver at the speed of berserker mice!
However, I wanted this upper portion to be elevated so started asking around as to what would be the best way to do it. Now I didn't want it too high so I thought that 4 inches above the flat would be enough. In 1/32 scale, that is the equivalent of about 10 and a half feet.
I needed some sort of way to get the
track up to that 4 inch height and back down. Just layering foam board wasn't
going to cut it. 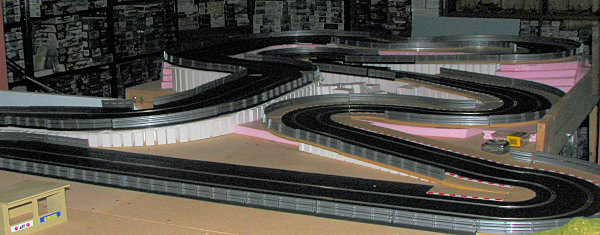 Fortunately
Woodland Scenics makes ramps for train sets. The #4 ramp set will get one to 4
inches in 8 feet. Others will reach there in longer stretches. The 8 feet one
seemed the right one to use. I started it at the beginning of the long sweeper
on the left and it went through the two left turns that form a backwards 'C'. I
used three ramp sets per end to support the track. The start of it is off to the
left of this image. You can see how the foam ramps are cut to allow things to
snake around as needed. Each ramp is 2.5 inches wide, more than enough for the
usual HO train, but my track with borders was 12 inches wide, hence using three
sets per incline: one each on the edge and one in the middle.
Fortunately
Woodland Scenics makes ramps for train sets. The #4 ramp set will get one to 4
inches in 8 feet. Others will reach there in longer stretches. The 8 feet one
seemed the right one to use. I started it at the beginning of the long sweeper
on the left and it went through the two left turns that form a backwards 'C'. I
used three ramp sets per end to support the track. The start of it is off to the
left of this image. You can see how the foam ramps are cut to allow things to
snake around as needed. Each ramp is 2.5 inches wide, more than enough for the
usual HO train, but my track with borders was 12 inches wide, hence using three
sets per incline: one each on the edge and one in the middle.
I installed the outside one first,
using hot glue to attach the segments (there are four of them) and to attach
these to the board. It 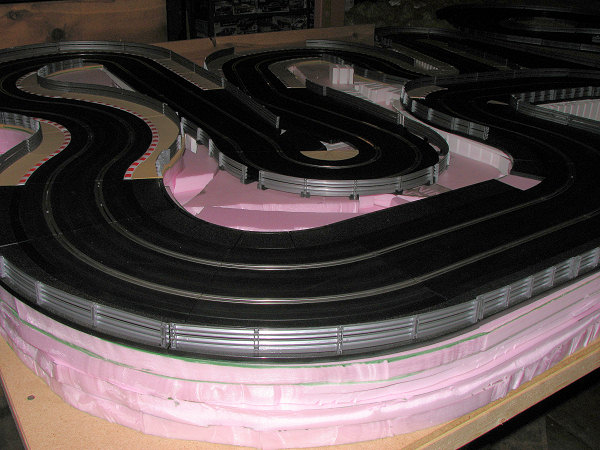 worked
great and since the ramp pieces are cut in such a way as to have them easily
bend, the fit was super. Then I started adding the other ramps. Since they are
on the inside, they would be 'too long' compared to the outer ones. So I put
down the part at the beginning of the incline first. Then I removed sections to
try to keep things level. It sort of worked, but still the first turn has a
decided reverse camber to it as the highest part of the turn is on the inside. I
can live with that as it does add interest to things and is like many of the
smaller roads on which I've driven.
worked
great and since the ramp pieces are cut in such a way as to have them easily
bend, the fit was super. Then I started adding the other ramps. Since they are
on the inside, they would be 'too long' compared to the outer ones. So I put
down the part at the beginning of the incline first. Then I removed sections to
try to keep things level. It sort of worked, but still the first turn has a
decided reverse camber to it as the highest part of the turn is on the inside. I
can live with that as it does add interest to things and is like many of the
smaller roads on which I've driven.
The rest of the track headed straight from the C to the sharp bend at the top left was all level. I used a hot wire to cut out the 1 inch boards that I stacked together. Using smaller boards was an economy thing as one thick 4" board was much more expensive that four 1" boards. Go figure. Anyway, it did make things easier to cut with the hot wire. As you can see from this photo, the stuff is pink so you know I wasn't going to leave this stuff up for long!
Once those higher elevation pieces
were in place, I used the other three ramp sets to do the downhill portion.
You can see this in this third image. The original hairpin is at the lower
left, just out of the frame. As I wante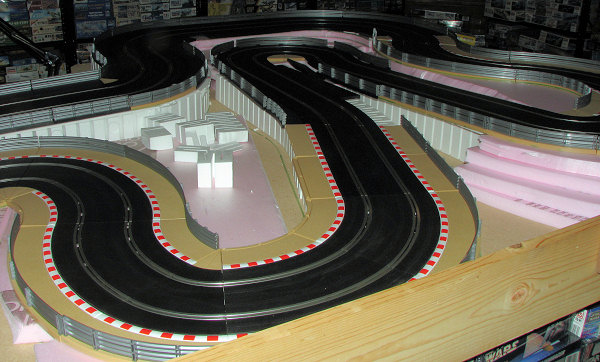 d
this section to be longer than the uphill, and didn't want any more off camber
turns, I only put the incline pieces under one gentle left turn, leaving all the
hairpins on the flat. Each section of four ramp sections brought the track down
an inch which meant that the last of the ramp was even with the original hairpin
turn at the end of the switchbacks. I used the 1 inch foam board to hold up the
curves at the appropriate height and also extended these pieces or used large
chunks of them to make up a sort of terrain. I had originally wanted the hairpin
you see in the upper portion of this image to be lower down, but then drivers
wouldn't have been able to see their cars. As it is now they can see part of it
and that helps out quite a bit.
d
this section to be longer than the uphill, and didn't want any more off camber
turns, I only put the incline pieces under one gentle left turn, leaving all the
hairpins on the flat. Each section of four ramp sections brought the track down
an inch which meant that the last of the ramp was even with the original hairpin
turn at the end of the switchbacks. I used the 1 inch foam board to hold up the
curves at the appropriate height and also extended these pieces or used large
chunks of them to make up a sort of terrain. I had originally wanted the hairpin
you see in the upper portion of this image to be lower down, but then drivers
wouldn't have been able to see their cars. As it is now they can see part of it
and that helps out quite a bit.
While the track was in this condition, I raced on it for some time to be sure all my connections were good and things were working well. I thought the foam would cause things to be quiet, but that is not the case. While it isn't noisy by any means, it does have a sound to it that is a bit different. You can see the barriers on the edge of the table in this lower shot. I have none on any other section of the extension as I only put these up when I have had a car go sailing off onto the floor. These twisty bits are slow enough so that the plastic guard rails have been enough to keep cars off the floor.
Next time, I'll get more into adding groundwork to it.
I'd like to thank those who sent in their slot car experiences and I'll make a note of sharing those with readers at a bit of a later date. Meanwhile, I'd like to keep hearing from you on the subject so please e-mail me at mmreaders@aol.com.
Scott