Roden 1/48 Fokker D.VII (early)
|
KIT # |
415 |
|
PRICE: |
$19.98 SRP |
|
DECALS: |
Four options |
|
REVIEWER: |
Scott Van Aken |
|
NOTES: |
|
BACKGROUND |
Please visit the preview for a historical
background and a look at what is in the box.
|
CONSTRUCTION |
As most of you know, I've not done a WWI model in well over 15 years or so if not longer. It is the 'fear of rigging' deal as you might suspect, but since the Fokker D.VII had almost none, it is the kind of model from that time that I can successfully finish.
 Roden has taken the usual step of providing multiple
sprues, many of which are the same from kit to kit, depending on the need.
In this case, it seems as if the only really different sprues will be for
the engine cowling and that is what generally distinguishes the different
D.VII aircraft variants.
Roden has taken the usual step of providing multiple
sprues, many of which are the same from kit to kit, depending on the need.
In this case, it seems as if the only really different sprues will be for
the engine cowling and that is what generally distinguishes the different
D.VII aircraft variants.
I started this one by beginning the engine. There are two of them in the kit so make sure you choose the correct one. It actually builds up into a very nice model in its own right. My only complaint is that some of the parts placements were a bit vague, specifically the large 'C' shaped piece that fits on the left rear side. The only bit that was near where it was supposed to fit really didn't seem to be the right one as it wouldn't reach so I just glued whatever it is in an area close by. Fortunately for me, I'm totally ignorant about WWI aircraft so can do these things without any guilt pangs! It was painted in various shades of Testors Metallizer and looks really nice when it is done.
I then went to work on the wings. Each of these is an upper and lower section. They are held onto the sprues by a myriad of attachment points so be careful when removing them. The trailing edges are nice and thin so be sparing with the cement. The fabric effect is superb without the usual hills and valleys that one so often sees. Having separate wing tips was a bit unusual and they were a touch oversize, but once they are sanded down they look just great. The trailing edges of some of the wings had some flash that needed to be carefully removed once the wings were dry.
Cockpit is a rather small affair, though it will look busy enough when done. The color information for this area is somewhat lacking. What color to paint the insides fuselage? or the back bulkhead? I don't know as there was no info. I ended up painting the interior walls with Humbrol Linen, though I'm not sure that is correct. The back wall was eventually painted wood like the floor, but again, that may well be incorrect. Rudder pedals and control column bits were then added to the floor and painted as appropriate. I painted the tubing on the inside walls aluminum as well as the bits that attached to them.
 Back at the engine, I built up the cowling pieces. You can
display the side panels off if you wish and for that, there are more braces
that need to be added. If not, it is relatively simple. I painted all the
interior bits of the cowling with aluminum. You then build the cowling
around the engine. If you don't, you'll never get the exhaust to fit
through the side panel. I left my engine loose so that I could fudge as
much as I needed to get the cowling panels on. Thanks to their non-scale
thickness, I had trouble with the upper covers and had to do some thinning
to get them to fit over the top of the rocker arm section. These were then
clamped in place while the glue dried as it really was quite a fussy
construct.
Back at the engine, I built up the cowling pieces. You can
display the side panels off if you wish and for that, there are more braces
that need to be added. If not, it is relatively simple. I painted all the
interior bits of the cowling with aluminum. You then build the cowling
around the engine. If you don't, you'll never get the exhaust to fit
through the side panel. I left my engine loose so that I could fudge as
much as I needed to get the cowling panels on. Thanks to their non-scale
thickness, I had trouble with the upper covers and had to do some thinning
to get them to fit over the top of the rocker arm section. These were then
clamped in place while the glue dried as it really was quite a fussy
construct.
I then glued the fuselage halves together minus the seat (which was missing from my kit and doesn't seem to have even been molded as the sprue attachment point was smooth). Next I glued (or should I say 'tried to glue') the engine on the front. Folks, this did not fit worth a hoot. I highly recommend getting the fuselage halves together before doing any assembly on the engine section. This way, you'll be sure to have all the appropriate bits properly lined up before it is glued solid. Problem areas were that the engine seemed to fit too far back and interfered. I also had the engine section too wide and it would not mate up with the side properly. I'm assuming that the side covers had to be relatively flush, otherwise there is no place for the glue to hold other than the bottom, and I can't believe that would be the case as it would be too weak. I got out my BAF and started filing the rear as flat as I could to get a good glue join. I also made sure that I did all my various fitting with the upper cockpit cover in place (though not glued). End result is not pretty and is a little bit off from center. I can only hope it won't make a huge difference when the wing struts are put in place (though it probably will).
|
CAMOUFLAGE & MARKINGS |
The nature of WWI planes is that
you have to paint parts prior to total assembly. No other way around it.
With this one, at least the wings were to be totally covered in decal.
With that in mind, I started on the upper wing with the kit lozenge
decals. These are quite gloss and very nicely printed. I used very hot
water and they simply screamed off the paper backing and
 onto the wing.
They also did not want to settle down and when dry I had several large
air bubbles. These were totally impervious to any of the setting
solutions that I had. It does not bode well for any bits that have to
conform over little lumps and bumps. I should also mention that the
decals are quite brittle when dry so flake rather easily. Deciding to cut
my losses, I applied some Polly Scale decal and paint remover. I could
imagine the decals laughing at me: "that the best you got, bud?" The only
solution was an aluminum scrubbing sponge and hot water.
onto the wing.
They also did not want to settle down and when dry I had several large
air bubbles. These were totally impervious to any of the setting
solutions that I had. It does not bode well for any bits that have to
conform over little lumps and bumps. I should also mention that the
decals are quite brittle when dry so flake rather easily. Deciding to cut
my losses, I applied some Polly Scale decal and paint remover. I could
imagine the decals laughing at me: "that the best you got, bud?" The only
solution was an aluminum scrubbing sponge and hot water.
Once off, I dug through my decal
collection and found several sheets of Fowler decals. These are very
nicely done, and though old, came of the sheet very nicely. I then added
Solvaset to them to help them snuggle down. Big Mistake #2. These ended
up looking like the face of a 16 year old with terminal zits. Additional
applications only made things worse. Out came the Polly Scale stuff again
and this time the decal turned to mush within seconds and was quickly
removed.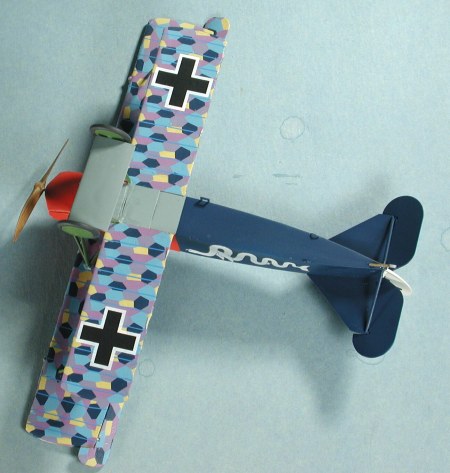
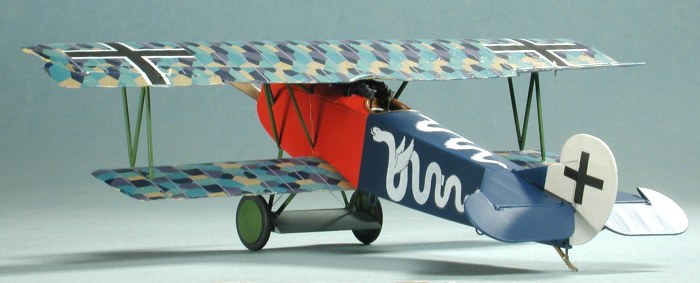
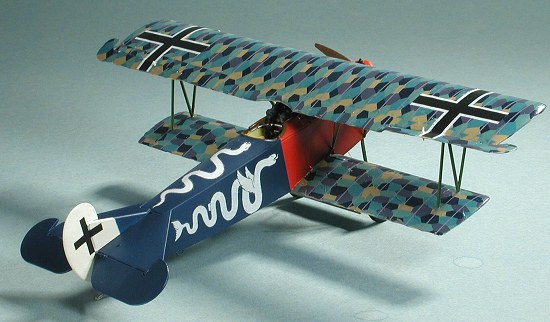
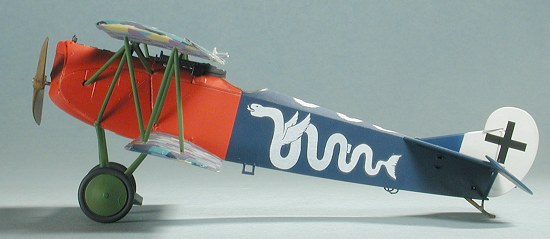
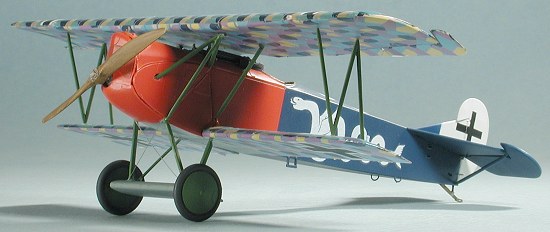
Third time has to be the charm so this time I used good old Microset/sol on the decals and awaited my fate. Meanwhile, I decided to paint a bunch of the other bits and pieces. Deciding to dare to be different, I picked up several tinlets of Humbrol paints and used what the instructions suggested. The hobby shop didn't have the insignia blue, but I figured it would be in the vast morass of paint jars, bottles and tinlets at home. Wrong. Instead, I used Blue Angel Blue from Testors Model Master line. Looks good to me and is close, if a little bit lighter than insignia blue. I painted the fin and rudder white, the tail planes and elevators blue, the wing between the wheels #87 grey, and various struts and the wheels #80 green. The nose was painted white and then painted #60 red. Masking the forward and rear section of the fuselage was easy as the demarcation line is right down the middle of the cockpit and there is a seam there anyway!
Once the major bits were painted, it was time for the decals. Please don't send me e-mails on how badly I screwed up the lozenge on this one as I know it is undoubtedly horribly wrong in a dozen ways. I'm not good at these kinds of things and it shows. Even doing a poor job took many hours with the lozenge decals and the 82 bezillion little rib tapes. Gad! Now I remember why it is that I don't do German WWI planes. I thought I'd never get it done.
|
FINAL CONSTRUCTION |
There is actually a lot of construction after doing all that lozenge. I completed the assembly of the fuselage by adding on the tail skid, the grab handles at the rear and the step. Then the tail plane and elevators were glued in. These really don't fit that well and you have to do some trimming to get them to fit. Biggest problem was that they were a bit too small so various bits had to be enlarged to get a fit. I ran into this situation all over the kit. This was then painted blue to match the rest of the rear fuselage. The upper cowl section with its fuel tank and instrument panel were glued into place. With all the wing decals done, I then assembled the landing gear. Naturally, I broke one of the legs during this time.. AARGH
 Actually, I repeated that
small performance three more times and managed to lose one of the legs in
the process. This was replaced by a piece of sprue. Not pretty, but this
kit was getting to the point where I just wanted it to be over! I added
in the guns and the lower wing. The lower wing is not a strong
attachment so one has to be quite careful. I was fearful that I might
break off one of the wings during this process. The fit is VERY tight and
I had to trim the front part to make it past what are probably too-wide
cowling covers (and undoubtedly my error in construction). I then gave
the entire kit a coat of Future clear gloss acrylic. I did it at this
time as I needed to mask off a section of the lower fuselage to paint it
grey. This meant masking over the lozenge. Somehow I was successful at
this little project and didn't trash things any worse than they were
already!
Actually, I repeated that
small performance three more times and managed to lose one of the legs in
the process. This was replaced by a piece of sprue. Not pretty, but this
kit was getting to the point where I just wanted it to be over! I added
in the guns and the lower wing. The lower wing is not a strong
attachment so one has to be quite careful. I was fearful that I might
break off one of the wings during this process. The fit is VERY tight and
I had to trim the front part to make it past what are probably too-wide
cowling covers (and undoubtedly my error in construction). I then gave
the entire kit a coat of Future clear gloss acrylic. I did it at this
time as I needed to mask off a section of the lower fuselage to paint it
grey. This meant masking over the lozenge. Somehow I was successful at
this little project and didn't trash things any worse than they were
already!
Returning to the landing gear, I stuck the wheels on. I made no attempt to have them so they would roll. There are three different outer wheel bits and they are also very tight fitting. Gluing may not be necessary, but I did anyway just in case.
Now for the hard part. The upper wing. Fortunately, Tom Cleaver (who's done a LOT more WWI planes than I) had his nearly finished at so told me that the inner struts were too short. I opened up the mounting holes for the outer N struts and glued them and the top wing in place. Then I carefully trimmed and tested, trimmed and tested the inner struts, starting with the inverted V strut until all fit in place. You have to be really careful not to over trim so take your time. Finally, all was in place, the joins hit with superglue and left to dry.
 I then got around to
using the rest of the decals from the kit sheet. These were mainly the
insignia and unique markings. These decals are superbly printed, very
thin, the most brittle things I've ever used, and are totally impervious
to ANY setting solution. I broke each decal at least once and that was
merely by moving it into position! I have no idea how the Roden folks are
able to get these to behave. They must use some sort of special stuff on
them that is too toxic to sell outside Ukraine or something. If anyone
has any suggestions on how to get these things to work (other than
drowning them in Future upon application), I'd very much like to know.
I then got around to
using the rest of the decals from the kit sheet. These were mainly the
insignia and unique markings. These decals are superbly printed, very
thin, the most brittle things I've ever used, and are totally impervious
to ANY setting solution. I broke each decal at least once and that was
merely by moving it into position! I have no idea how the Roden folks are
able to get these to behave. They must use some sort of special stuff on
them that is too toxic to sell outside Ukraine or something. If anyone
has any suggestions on how to get these things to work (other than
drowning them in Future upon application), I'd very much like to know.
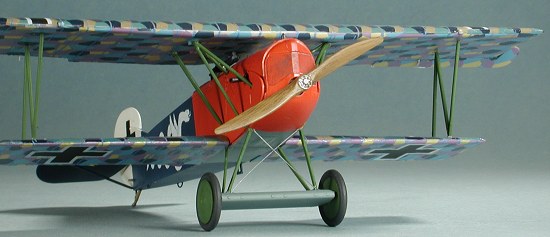
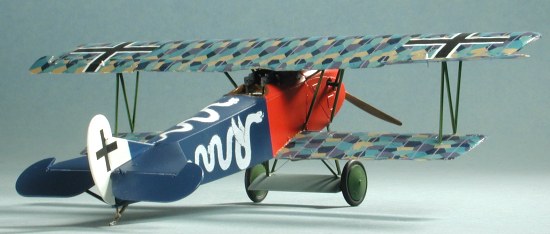
Much more bit painting was done to cover the glue and touch stuff up. I painted the prop with Testors Wood and then took Vallejo Burnt Umber and let it semi-dry. Then I took a regular rag and wiped the Burnt Umber until it gave a passable representation of a wood prop. The best image of this is about the middle of the review. The ailerons were attached (they also needed trimming to fit), the two bracing wires on the landing gear made with stretched sprue and I was almost done. You remember I mentioned that there was no seat? Well, I had CRM Hobbies order me a set of Eduard Etched WWI seats. They are very nice and have a dozen different seats, none for any kind of Fokker! I picked the closest one to what I thought would be in there and from a plane I knew I'd never build, painted it and superglued it in place. It looks passably good, as long as the pilot never has to pull back on the control stick!
A coat of matte clear and I was done. Finished is really more like it.
|
CONCLUSIONS |
I'm sure this kit will be received with cries of joy from most WWI modelers. It also reaffirms why I don't do WWI aircraft. It had more disasters built into one construction project than the last 10 models. I sorta expected fit problems so I won't blame the kit in that area. I also would hope that something can be done about the kit decals as they will cause most modelers endless frustration trying to get them to work. Perhaps I should stick with Allied WWI aircraft.......
November 2003
#1292 in a series
If you would like your product reviewed fairly and fairly quickly, please contact the editor or see other details in the Note to Contributors.