Fujimi 1/72 A-7A Corsair II
| KIT #: | F-10 |
| PRICE: | 800 yen when new in 1986 |
| DECALS: | Two options |
| REVIEWER: | Scott Van Aken |
| NOTES: | 1986 release. Built as an A-7A |
| HISTORY |
 The first production version was the A-7A. All A/B version Corsair IIs had
two 20 mm Colt Mk 12 cannons with 250 rounds per gun. Maximum ordnance,
carried primarily on the wing pylons, was theoretically 15,000 lb (6,804
kg), but was limited by maximum takeoff weight, so the full weapon load
could only be carried with greatly reduced internal fuel; equipped with
AN/APN-153 navigational radar, AN/APQ-115 terrain following radar, and a
separate AN/APQ-99 attack radar; 199 built.
The first production version was the A-7A. All A/B version Corsair IIs had
two 20 mm Colt Mk 12 cannons with 250 rounds per gun. Maximum ordnance,
carried primarily on the wing pylons, was theoretically 15,000 lb (6,804
kg), but was limited by maximum takeoff weight, so the full weapon load
could only be carried with greatly reduced internal fuel; equipped with
AN/APN-153 navigational radar, AN/APQ-115 terrain following radar, and a
separate AN/APQ-99 attack radar; 199 built.| THE KIT |
In the mid 1980s, Fujimi was a major player in the 1/72 kit market. They were bringing out new kits with considerable regularity and filled a lot of wish lists with USN/USAF types such as the A-7, F-4, and A-6 along with a number of Japanese types. I know that I built quite a few of them back then and still do, though not quite with the production level of those days.
 This one is typical in
that the kit is designed with a lot of variability to use some base sprues with
inserts to include the bits used by different variants. The A-7A/B are basically
the same boxing as there is little external difference between the two. So if
you have an A-7B kit (which seems to be the most available one around), you can
do an A-7A.
This one is typical in
that the kit is designed with a lot of variability to use some base sprues with
inserts to include the bits used by different variants. The A-7A/B are basically
the same boxing as there is little external difference between the two. So if
you have an A-7B kit (which seems to be the most available one around), you can
do an A-7A.
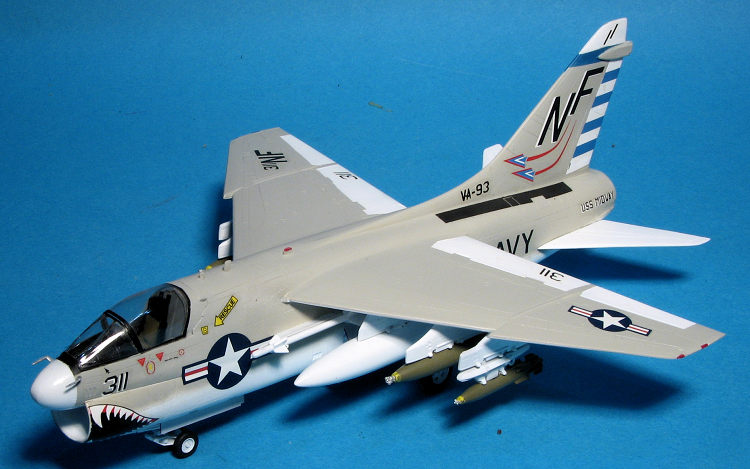
The cockpit is as good as you'll get in many new tool 1/72 kits and provides decals for the instrument panel and side consoles. There is a fair bang seat included as well. A fairly full intake (at least the lower part of it) is provided which will have a long seam to fill. There is no real nose gear well, just a platform on which to put the nose gear. Main gear wells are fairly well detailed.
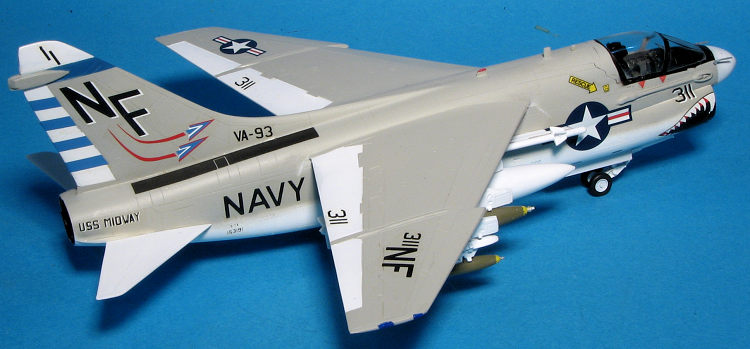
The wings have a small insert for the underside and one will need to open holes in this to put the pylons. A-7s almost always had all six pylons attached, even if empty. Two fuel tanks, two MERs, two TERS and a lot of snakeye bombs are provided. So are a pair of Sidewinder rails and missiles for the fuselage. The kit does include the proper Navy wheels and a lot of the various little bits appropriate to this version are included on the sprues. Some are very small and some are a bit delicate. No nose weight is shown, but a prudent modeler will include a bit just in case. This is drew the line at this detail and mine wears Lanc boots.
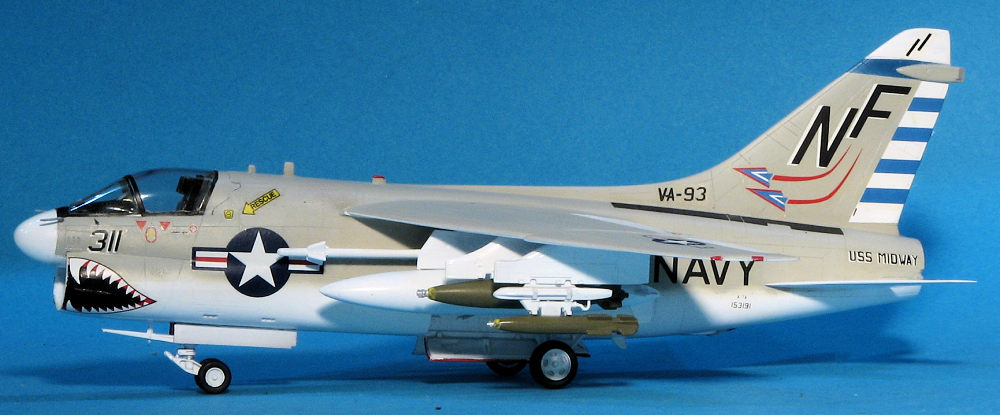
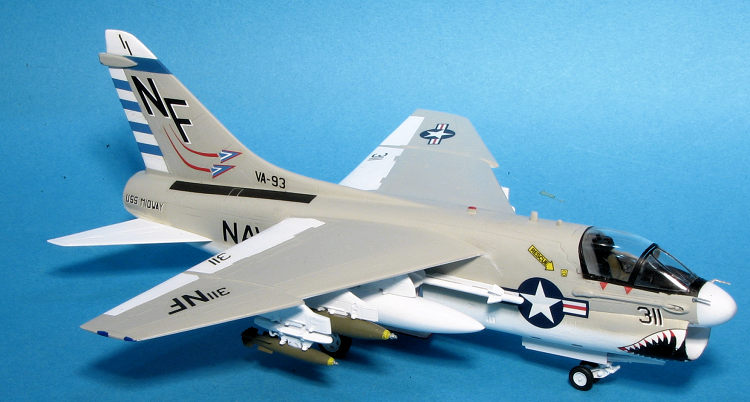
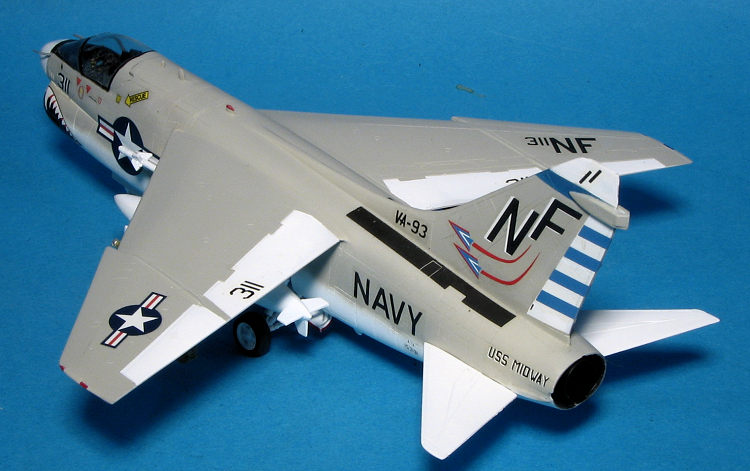
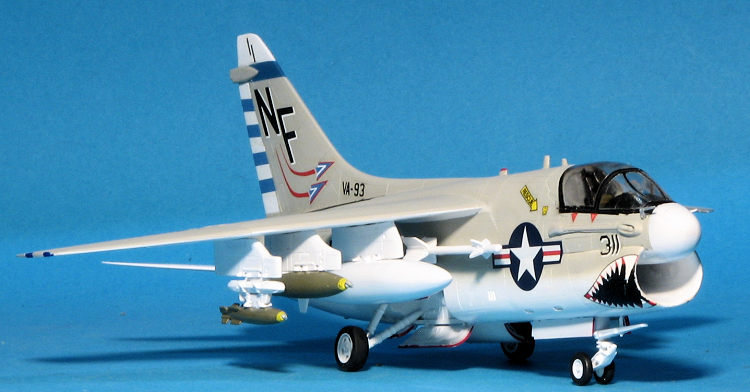
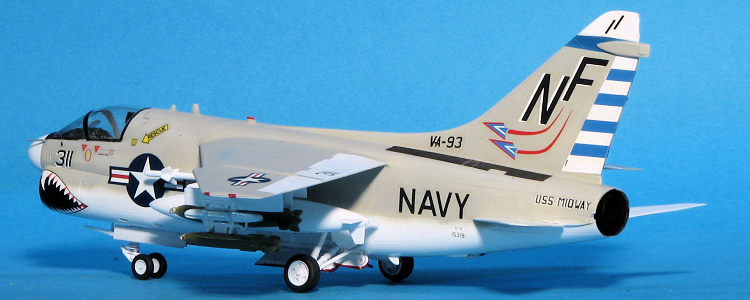
Instructions are well drawn with Gunze paint references. Two markings options are included both in light gull grey over white. Box art is the Bicentennial plane from VA-215 aboard the USS Oriskany, while the other is the CAG bird with VA-56 aboard the USS Midway. Decals are thick, will need hot water and have whites that are off-white.
| CONSTRUCTION |
 I began this kit in a standard way. That means I built up the cockpit. Due
to the age of the kit, it took a long time for the instrument decals to come
free of the backing, but they worked fine. They are oversize, which is
better than too small, I guess. I also prepainted things like intakes, wheel
wells and wheels. I used white for all those and also painted the landing
gear and some of the control surfaces, though I knew I'd have to repaint them
later after removing the mold seams.
I began this kit in a standard way. That means I built up the cockpit. Due
to the age of the kit, it took a long time for the instrument decals to come
free of the backing, but they worked fine. They are oversize, which is
better than too small, I guess. I also prepainted things like intakes, wheel
wells and wheels. I used white for all those and also painted the landing
gear and some of the control surfaces, though I knew I'd have to repaint them
later after removing the mold seams.
Assembling the intake was next. This is not the best fitting item as
removing the intake interior seams took some effort using first a motor tool
and sanding drum followed by sandpaper rolled
up over a dowel. There are also some sink areas that need filled in the
intake and fuselage halves. I used super glue for all my filler needs. The
wings had the holes drilled out for the pylons and the inserts installed.
Once the interior was done, I installed the cockpit and later added about 3
grams of weight behind it 'just in case'. Then the fuselage halves were
glued together. For some reason, in the nose section, the left half is
larger than the right. This produces a major lip that has to be sanded down.
Motor tool to the rescue followed by total eradication of the offending lip.
This is not unique to this exact kit as another has the same issue.
With that done, the intake assembly was snapped in place. One of the down
sides of building this up to remove the seam is that sometimes it is a bit
narrow in the back. I lucked out on this one and didn't have any issues.
 The insert below the rudder was
attached. It is a bit too small so filler was used to deal with that. With the
fuselage cleaned up and rescribed, a couple of small bits were glued on and then
I attached the wings. These fit fairly well on one side, but the other wasn't so
great. To ensure that both wings were at the same level, one had to be 'raised
up' a bit and left a fair gap that had to be filled. Such was the case here and a goodly amount of filler was
needed to take care of that.
The insert below the rudder was
attached. It is a bit too small so filler was used to deal with that. With the
fuselage cleaned up and rescribed, a couple of small bits were glued on and then
I attached the wings. These fit fairly well on one side, but the other wasn't so
great. To ensure that both wings were at the same level, one had to be 'raised
up' a bit and left a fair gap that had to be filled. Such was the case here and a goodly amount of filler was
needed to take care of that.
Panel lines were rescribed where needed and after attaching the fin antenna, I painted the underside color and those areas on the upper surface that needed white. In the mean time, I figured out what I wanted in terms of a load and in this case, it was a pair of drop tanks, then a 1,000 lb bomb and finally the TER. This latter items only has a tab for a single bomb which is a bit odd, but that is how I ended up doing it. I attached the tanks and the TER to its respective pylon and when dry, painted all the pylons and bits white.
| COLORS & MARKINGS |
 I did get a bit ahead of myself in
the last sentence, but this aircraft is to be in the standard light gull grey
over white. I used Tamiya gloss white for all these white areas. I also had a
bit of masking to do to ensure that the upper control surfaces, nose and rudder
remained in this color. When all that was done, I painted the rest of the
airframe in light gull grey, this time using Model Master FS 16440 enamel. As I
was building a VA-93 aircraft, a small blue strip had to be added to the top of
the fin. I used MM French Blue for this. The canopy surround and a bit of the
nose was treated with matte black.
I did get a bit ahead of myself in
the last sentence, but this aircraft is to be in the standard light gull grey
over white. I used Tamiya gloss white for all these white areas. I also had a
bit of masking to do to ensure that the upper control surfaces, nose and rudder
remained in this color. When all that was done, I painted the rest of the
airframe in light gull grey, this time using Model Master FS 16440 enamel. As I
was building a VA-93 aircraft, a small blue strip had to be added to the top of
the fin. I used MM French Blue for this. The canopy surround and a bit of the
nose was treated with matte black.
For decals I used an ancient Microscale sheet, 72-172 which had a VA-93 plane on it. I had seen these planes almost daily when I was in Atsugi during the early/mid 1970s. In fact the VQ-1 AIMD spaces were in the CAG-5 side of the hangar and I generally opened the door to the hangar area only to face an A-7 on most days, but I digress. Despite Hasegawa boxing their A-7A kit with these markings, I had not ever done a VA-93 plane. The decals were purchased in the early 1980s so were not exactly new. Despite this, they went on without a lot of fuss. The biggest issue I had were the tail stripes. Old decals often have the clear start to deteriorate and many of these stripes came free from the clear part. I could have coated them with decal film but it wasn't a major issue and the film often reduces the effectiveness of setting solutions. Kit decals were used for the stencils and the walk areas on the rear fuselage. The sheet had no insignia so I used some from Fantasy Printshop FP710 using the kit insignia to size them.
 Once the decals were in place, I
attached the landing gear. Then, once the gear doors were removed from the
sprue, the edges were highlighted in red with a Sharpie. It took a while to
attach them all as the are, for the most part, a butt join and sit at different
angles. The tailpipe and tailhook were then installed. At this time, I sprayed a
semi-matte clear coat over all the areas that were light gull grey. Though new
build USN planes started being painted in gloss light gull grey starting in
Nov/Dec 1972, it is highly probable that this plane was still matte.
Once the decals were in place, I
attached the landing gear. Then, once the gear doors were removed from the
sprue, the edges were highlighted in red with a Sharpie. It took a while to
attach them all as the are, for the most part, a butt join and sit at different
angles. The tailpipe and tailhook were then installed. At this time, I sprayed a
semi-matte clear coat over all the areas that were light gull grey. Though new
build USN planes started being painted in gloss light gull grey starting in
Nov/Dec 1972, it is highly probable that this plane was still matte.
Now for the part I dread on these sorts of kits; pylons and weapons. I simply cannot seem to get everything on straight. Either the pylon (if a butt fit), weapon rack, or weapon will end up being misaligned. So it was with this one. I started on the inside and worked my way out. For the center wing pylon I couldn't see loading up a MER with bombs so picked a 1,000 lb one from a Hasegawa weapons set. Once all that was on, the last items glued in place were the nose probes. Masking was removed and a bit of touch up painting was done.
| CONCLUSIONS |
It is difficult to choose between the ESCI and the Fujimi kit for best 1/72 A-7. Both have their issues and both will make for a nice model when done. I know I'll build more of them. One could say the same about the Airfix A-7E though the previously mentioned kits are generally better. It is really a shame that Hobby Boss did such a terrible job with the intake of their kits. They have much more detail and will probably be better engineered. I have one in the stash, but every time I bring it out to consider building it, I look at the intake and put it back on the shelf. One of these days....
| REFERENCES |
https://en.wikipedia.org/wiki/LTV_A-7_Corsair_II
30 August 2019
Copyright ModelingMadness.com. All rights reserved.
If you would like your product reviewed fairly and fairly quickly, please
contact
the editor
or see other details in the
Note to
Contributors. Back to the Main Page
Back to the Review
Index Page
Back to the Previews Index Page