| KIT #: | 01640 |
| PRICE: | Around $30.00 |
| DECALS: | Two options |
| REVIEWER: | Scott Van Aken |
| NOTES: | 2023 tooling |
| HISTORY |
Initially designated A2F, the Intruder first flew in mid 1960 and was just what the Navy needed. The aircraft was requested for use by the Marines in the close air support role and to take over the long range interdiction role for the Navy. Both of these roles were being performed by the AD Skyraider and a fast jet replacement was needed. Though the final design is nothing that one could call sleek and sexy, the purposeful Intruder was able to meet all the goals set for it. A first for BuAir was that the airframe manufacturer was responsible for all aspect of the plane from engines to avionics. In the past the Navy has required the airframe manufacturer to use specified equipment, but that had produced a number of fiascos such as the F3H Demon and others who were saddled with unsatisfactory engines.
Naturally, there were some problems in development, but those were ironed out
and the first production A-6s (as they were called from 1962 onward). In late
1962, the first production aircraft were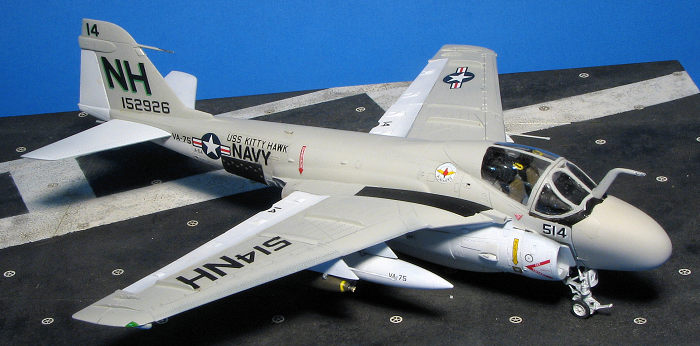 delivered to VA-42 the East Coast fleet
replacement squadron (FRS). It was quickly integrated into the fleet and by the
time the Vietnam war had heated up, there were a number of A-6A squadrons aboard
carriers and carrying out strike missions against targets in both North and
South Vietnam.
delivered to VA-42 the East Coast fleet
replacement squadron (FRS). It was quickly integrated into the fleet and by the
time the Vietnam war had heated up, there were a number of A-6A squadrons aboard
carriers and carrying out strike missions against targets in both North and
South Vietnam.
Over the years, several different versions of the plane were developed, but only the A-6E with its improved sensor suite was ever put into production. Many A6Es were actually rebuilt A-6A airframes and they did not always incorporate the full sensors until the program was well underway. There are two ways to tell an A-6E from an A-6A. One is from the FLIR pod that juts below the nose radome. The other is from the rear airbrakes. On new build A-6Es these are either solid or not there at all. A-6As had perforated airbrakes. E models also have a large cooling scoop just forward of the fin. Other A-6As were developed into dedicated tankers and called KA-6Ds.
In the 1980s, a vastly improved A-6F was developed. This had all the latest bells and whistles as well as improved turbofan engines. It would have been the next generation of Intruder. However it was not built, though some of its systems were used in the last batch of 12 A-6Es to be built. These aircraft dribbled off the production line over several years and were very costly to produce. It was finally decided the the A-6 was too expensive to maintain and Intruder units either went away or transitioned to the much less capable F-18 Hornet. As a result, many A-6s, some with very few airframe hours on them, were either cut up, dumped into the Gulf of Mexico or used as targets on various ranges. With the demise of the Intruder, so went the tanker fleet. There are times when those of us who are military aircraft enthusiasts wonder what in the world the people who make these decisions are thinking. Now the Navy has no truly capable long range interdiction aircraft and no dedicated carrier-based tankers. Fortunately, the F-18Ds that are operated by the Marines are relatively capable, but still do not have the range/payload of the older A-6s. The F-35s can carry even less.
| THE KIT |
 First of all, this kit is actually initially designed to be an
A-6E. To do an A model, there are some parts to install to make the earlier
version and there are some parts missing. That will be covered more a bit later.
First of all, this kit is actually initially designed to be an
A-6E. To do an A model, there are some parts to install to make the earlier
version and there are some parts missing. That will be covered more a bit later.
The instructions start with you building up the interior. There are decals for the instruments, which is fine for a 1/72 kit. This all builds up into a standard tub. Next the nose gear and gear well are built. It appears that one could wait to install the nose gear, which would be more helpful. This is followed by the main gear, which is fairly complex.
Next items to be assembled are the two intakes which has first stage compressors at the end. This morphs into the assembling the main fuselage by installing the nose gear well, interior, the lower aft fuselage with the tail hook and then closing the fuselage halves. If you want the speed brakes open, then holes need to be opened. (As a note, the speed brakes were made inoperative after the 18th aircraft, and new builds starting with buno 154170 had these plated over. Once the speed brakes were inoperative on the fuselage, the wing tips were modified and the brakes put there.)
After this, the intakes and exhaust along with the horizontal stabs and rudder are installed. The canopy interior is built up and the speed brakes are installed. Now comes the missing part. The speed brakes on the box art option were the original design and should be perforated. This style is not included with the kit (remember this is basically an A-6E kit with some additional bits). However, you can do the other option. These were disabled after the 18th A-6 so should be modeled closed. I should also add that you need 10 grams of nose weight, but there is a lot of room in the radome for that.
 Now we move on to the wings. There is a stub section that fits
into the fuselage. I say stub because you can model the kit with the wings
folded. The slats and flaps can be modeled either up or down so this will be the
time to make that choice. After looking at dozens of photos of A-6s on the
ground, I could not find one where the flaps and slats were extended. Only
images showing aircraft landing or taking off did I see these items extended.
Now we move on to the wings. There is a stub section that fits
into the fuselage. I say stub because you can model the kit with the wings
folded. The slats and flaps can be modeled either up or down so this will be the
time to make that choice. After looking at dozens of photos of A-6s on the
ground, I could not find one where the flaps and slats were extended. Only
images showing aircraft landing or taking off did I see these items extended.
The next step has the nose gear doors installed and the various scoops and antennas installed on the underside. The wing stubs are now installed. Next the outer wings are built up. Here one has the option to have the speed brakes open or closed. Again, these are almost never open on the ground, but are deployed when landing. The outer wings are then installed along with upper fuselage scoops and the refueling probe. The boarding ladder can then be installed either open or closed.
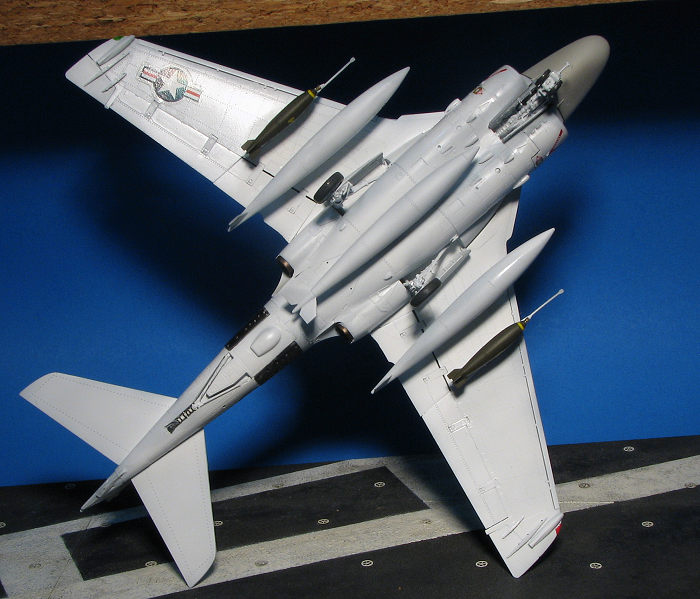
Underwing pylons and main gear doors are next. Note that on early A-6As there is an ESM probe that is on one of the inner pylons. This was later removed so check images of the aircraft you are building to see of this was on your aircraft. The kit provides a nice selection of underwing weapons. A MER is included for Mk-81/82 bombs, fuel tanks are provided along with Mk.20 Rockeye bombs and GBU-8 guided bombs. A loadout diagram is provided to help.
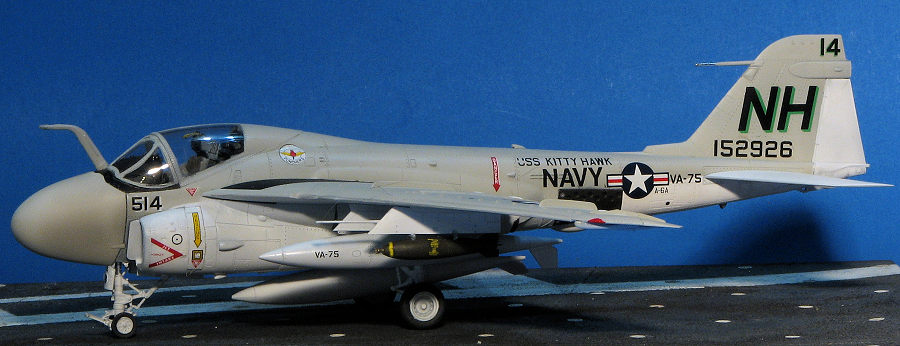
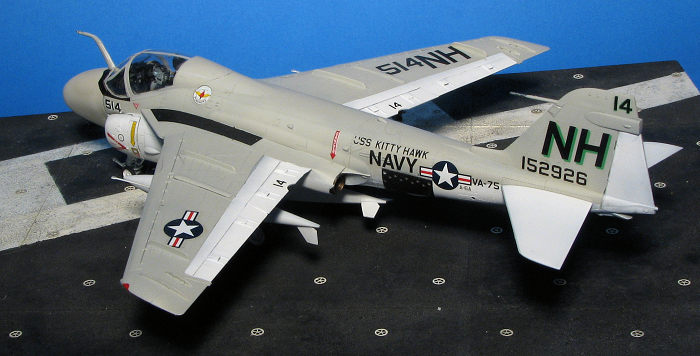
Instructions are standard Trumpeter and uses a number of paint references. A full color paint and decal sheet is provided for the two options as well as one for weapons. One option is the box art plane from VA-196, which uses the perforated speed brakes that are not included with the kit. The other is from VA-145, which can be built as it is a later airframe. Both are in light gull grey over white. The large decal sheet is nicely done and there are aftermarket sheets if you wish to go that route.
| CONSTRUCTION |
I started on this one expecting the usual trouble-free Trumpeter build. The cockpit was the first thing I tackled, followed by the nose gear well and nose landing gear. I had some difficulty with the nose gear as the instructions are not as clear as I'd like to have seen them. This sort of thing along with mis-identifying part numbers popped up from time to time throughout the build.
 This kit provides the options to have a lot of things extended
or folded. There is a closed/up option for all those items and I found that
building things like that required some additional effort. I closed the fuselage
halves and dealt with the seams. I left off the radome and put some sections of
lead into the area forward of the cockpit. The tailhook well was also installed
at this time. Note that the well fits fully inside the fuselage with the edges
providing a mating surface with the inside of the fuselage. Intakes and boarding
ladder were attached to the fuselage. Fit is only fair so some sanding was
needed to get the parts smooth with the surrounding fuselage.
This kit provides the options to have a lot of things extended
or folded. There is a closed/up option for all those items and I found that
building things like that required some additional effort. I closed the fuselage
halves and dealt with the seams. I left off the radome and put some sections of
lead into the area forward of the cockpit. The tailhook well was also installed
at this time. Note that the well fits fully inside the fuselage with the edges
providing a mating surface with the inside of the fuselage. Intakes and boarding
ladder were attached to the fuselage. Fit is only fair so some sanding was
needed to get the parts smooth with the surrounding fuselage.
Then the inner wing stubs were assembled. Trumpeter provides separate hinges for the flaps and slats depending on whether you will pose these items retracted or deployed. Since the A-6 has these items retracted when on the ground, that is what I chose. They fit fairly well in the retracted position on both the stubs and outer wings. I also attached the wingtip brakes in the closed position. Both the stubs and outer wings were then attached to the fuselage. There are holes in the outer wings for some antennas and for the inner pylons. These needed to be slightly enlarged to get the parts to fit.
At this time, I installed the myriad of scoops on the fuselage. Some were very small and thanks to the sprue gate being attached to the mating surface, these were a pain to clean up. The tailplanes are a tight fit and were pressed in place for painting. The main and nose landing gear were built up and installed. Both are quite fiddly, but can be made to fit without any issues. The canopy was masked and then installed. The kit provides masks for the canopy, but I forgot about them and did the masking the old way. With pretty much everything in place it was a good time to head for the paint shop.
| COLORS & MARKINGS |
 These aircraft at this time were light gull grey uppers over
white undersides and flight control surfaces. I painted everything white on the
underside and this includes the drop tanks and pylons that had yet to be
installed. When dry, there was some masking to do to side and upper white areas
and then it was painted the light gull grey. I used Tamiya for the white and
Mr.Color for the LGG. The airframe was then given a couple of light coats of
clear gloss.
These aircraft at this time were light gull grey uppers over
white undersides and flight control surfaces. I painted everything white on the
underside and this includes the drop tanks and pylons that had yet to be
installed. When dry, there was some masking to do to side and upper white areas
and then it was painted the light gull grey. I used Tamiya for the white and
Mr.Color for the LGG. The airframe was then given a couple of light coats of
clear gloss.
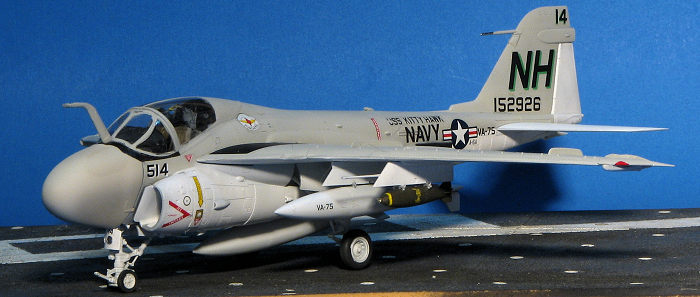
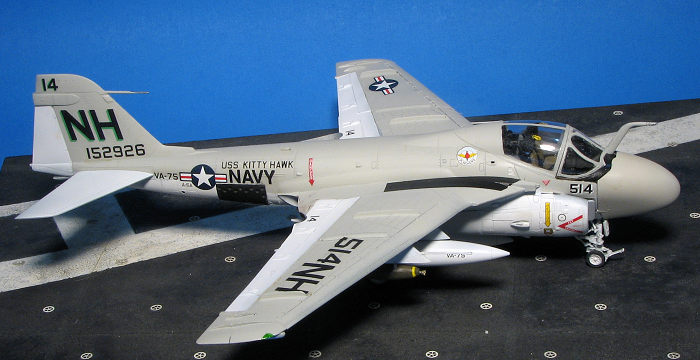
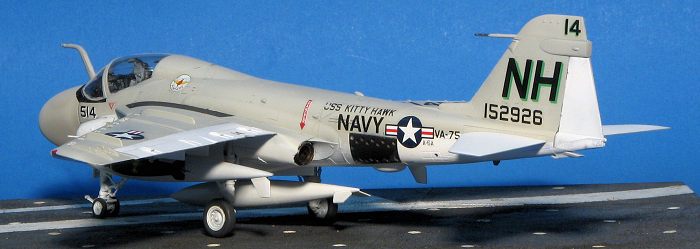
It was then time for decals. In this case, I used a set of ancient Microscale decals (72-080). These were so old that the sheet had $1.50 printed on it. It had four older A-6A options and I chose one of the VA-75 markings. Fortunately, these were still quite viable and I had no issues with splitting, cracking or even with them being too stiff. As is typical of older Microscale sheets, there were no insignia. Fortunately, I have the equally old insignia sheets to use. Unfortunately, these did suffer from falling apart when they got wet so I clear coated those I needed and all was good.
| CONSTRUCTION CONTINUES |
 The decals were
given a coat of clear matte on the light gull grey areas and clear gloss on the
white bits. The pylons were then built up or had the anti-sway bars attached.
I'd already built the drop tanks and those were glued in place. When it came to
weapons, I picked what was listed as M117 bombs, but to my eyes they simply
looked like larger Mark 80s. They also did not fit the pins on the outer pylons
so I had to cut away the aft attachment pin before gluing on the bombs. Had I to
do this again, I'd simply pick the bombs from a Hasegawa weapons set.
The decals were
given a coat of clear matte on the light gull grey areas and clear gloss on the
white bits. The pylons were then built up or had the anti-sway bars attached.
I'd already built the drop tanks and those were glued in place. When it came to
weapons, I picked what was listed as M117 bombs, but to my eyes they simply
looked like larger Mark 80s. They also did not fit the pins on the outer pylons
so I had to cut away the aft attachment pin before gluing on the bombs. Had I to
do this again, I'd simply pick the bombs from a Hasegawa weapons set.
Next came the nose radome. This was first painted with white that had a touch of khaki and black added to it. When dry, it was installed. Fit isn't as tight as I'd like it, but it was good enough. Last things to attach were the wheels, gear doors, and the tail hook. I also attached the fuselage speed brakes. I had to rob these from a Fujimi kit as Trumpeter does not include the perforated versions, and I mentioned that in the kit description. These items had to be sanded down a bit to fit the openings and even then do not fit as well as if they were designed for the kit. The canopies were unmasked and that was it.
| CONCLUSIONS |
| REFERENCES |
Grumman Aircraft since 1929 by Rene J Francillon
13 March 2026
Copyright ModelingMadness.com. All rights reserved. No
reproduction in part or in whole without express permission.
If you would like your product reviewed fairly and
fairly quickly, please
contact
the editor or see other details in the
Note to
Contributors.