
Hasegawa 1/48 F-4C Phantom II
| KIT #: | ? |
| PRICE: | about $5 as I got an F-4E kit in a bag with a ton of other bits, including most of an F-4C kit |
| DECALS: | None with this particular one |
| REVIEWER: | Scott Van Aken |
| NOTES: | Thanks to those who helped get me some of the bits I was missing. Much appreciated. |
| HISTORY |
I'd have to say that the F-4 Phantom II is the aircraft that finally gave the Navy an aircraft that was superior to anything flown by the Air Force. While their FH-1 Phantom, F2H Banshee and F3H Demon were generally well liked and gave good service, they were all rather underpowered. This is especially true of the Phantom and the Demon. One thing about the Banshee is that with its long, wide wings, it was one of the few planes that could actually intercept the high flying B-36s, making it a very good bomber interceptor, though it got all its press dropping bombs on the North Koreans and Chinese during the Korean war.
 The F-4C version is basically a Navy F-4B that has Air Force avionics systems in it. Externally, it can be identified by wider main wheels, which required the upper wing and main gear doors to be bulged to house them. It also has a stabilator that does away with the 'slatted' leading edge as the Air Force has nice long runways and didn't need the additional low speed control. The bridle attachment points under the leading edge of the wing are also gone. Inner wing pylons are also a different shape, being more rounded. The D model was similar but had upgraded avionics over the C that included a better bombing/nav computer, better radar, and the ability to carry more and different weapons. It can be distinguished from the C model by a square 'box' under the IR seeker on the lower radome. Both of these versions were handed over to the ANG and reserves after regular USAF units transitioned to the F-4E. For a decade or more, most of the air defense units flew the F-4C/D Phantom II, until replaced by the F-16 ADF in the early 1990s when they were then phased out of service. The only other country to fly the F-4C was Spain and those were phased out about the same time as USAF units in the late 1980s.
| THE KIT |
As mentioned, this kit was part of a bagged situation where I got a complete F-4E and most of an F-4C. By digging through the spares and with help from some very kind readers, and with the assistance of some aftermarket upgrade bits (which I put with the F-4E) I have been able to piece together enough stuff to build the kit.
 The F-4C along with the F-4N are two of the original F-4 series back in the late 1970s when these kits first came out. I can remember thinking that no one in their right mind would pay $20 for a model kit. Well, I was wrong and a lot of people did. Nowadays, that same $20 will get you a decent 1/72 kit and really, you'll have to pay $30 for the 1/72 Phantoms. The 1/48 versions are now at around $45-50 dollars.
Anyway, this and the F-4N have not been upgraded to engraved panel lines, though the F-4J/S and F-4E have been along with the British Phantom kits. Having raised panel lines isn't a problem with me, but there are quite a few modelers to whom this isn't acceptable. Their options are to rescribe the whole kit, or just not build the C/D or B/N version. In fact, they might as well stay away from the RF-4 kits as they use several of the raised panel line sprues from the C/D kit. I found this out when building theRF-4E a few years back when it came out.
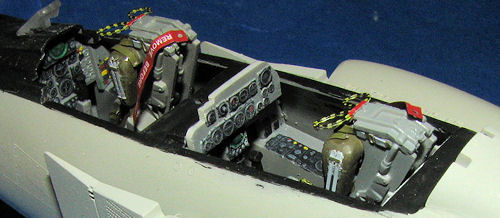
The general detail level is quite good and there is a nicely done interior with good bang seats and nicely raised instrument panel and side console details. I'm not 100% sure if this is a totally accurate set up for the F-4C or the F-4D (the other variant that can be built with this kit), but I'd guess not as there were changes between the two versions. One would need a dedicated aftermarket set to provide the bits needed for the specific version. The kit offers separate canopy sections as well as their actuating pistons. Intakes go back a goodly distance, but are blanked off. Really, that is about all I can say about it as what I have is still missing main wheels and wing tanks. It also has Sidewinders that are more modern than the Vietnam era ones and have the 'L' shaped forward steering fins. I'll have to hunt up a set of proper missiles, probably from the spares bit or a weapons set.
| CONSTRUCTION |
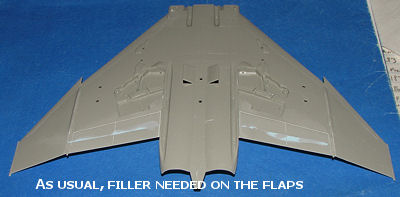
 This particular kit had been started in that the previous owner had already glued on the main engine intakes and the small cooling intakes on the nose. He did a good job on it as all I had to do was put on a couple of applications of Mr Surfacer, sand it down, and rescribe the lost detail with my Xacto. First thing I did was to glue the wings together. Hasegawa molds the aft portion of the lower wings with the upper wing halves. Makes for a nice sharp trailing edge, but there is a seam that I've never been able to get right, so out with the filler. Wouldn't be so bad if the seam was along a panel line, but it isn't. The inserts for where the bridle attachments would go were also installed. Fit on these is perfect.
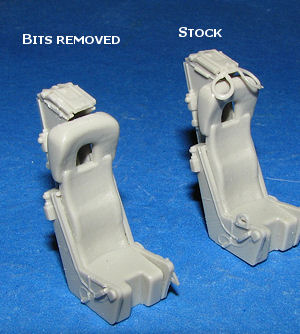 Meanwhile, I did some preliminary painting by spraying the inside of the intakes, the inside of the gear doors and gear bays, landing gear and a number of other bits in white. Interior pieces got the Dark Gull Grey treatment. I assembled the seats and then removed a few bits as they were to be replaced with pieces from an Eduard color etched set that was made just for the seats.
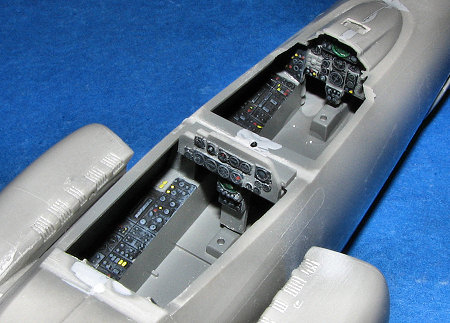 Back at the rest of the kit, I grabbed the Vallejo matte black, thinned it a bit and went after all the instruments on the side consoles and the instrument panels. Then I used some light grey to dry brush all of these bits to bring out some detail. Next, red and yellow, also Vallejo acrylics were used to add some color to things. In reality, aircraft cockpits are very dull with almost no color, yet we paint on these bright bits as if someone had held down the 'lamp test' button! I also used transparent green on the radar scope faces. I imagine that gloss black would have been more appropriate.
With that done, I cemented the instrument panels into the cockpit tub and the nose wheel well to the underside. This was then glued into one fuselage half. It seemed like a good time to glue together the fuselage halves, so that is what I did. fit is really pretty good, though I know that I'll have at least one or two spots where the fuselage refused to align itself and will have to grab the filler for those areas. Actually, I ended up putting Mr Surfacer on the entire fuselage seam as I figured it would need it anyway! It took  much sanding as you can imagine. I should mention that no nose weight is needed. Never built a Phantom II that had to have it, all thanks to its long wheelbase.
I then attached the wing. Fit is not bad. There is need for the usual filler at the forward wing/fuselage join and I had to sand the heck out of the area behind the wing to level things out once the glue had dried, but was able to get that done and smoothed out rather quickly. The bumps on the upper wing and the little lumps on the lower forward wing have to be removed. I chiseled them off and then sanded away the remnants. I did them one at a time so that I could use the other side as a guide to replace the sanded away raised detail. As I am a rather slow builder compared to some, this all took a while as I give each application of filler pretty much a full day to dry before sanding and moving on.
Meanwhile, I did some work on the seats. First I painted the 'cushion' areas with an Olive color. As one stands on the seat to get in the aircraft, having this rather cruddy would not be out of the norm. Then I started adding on the etched stuff this is rather fiddly, to say the least and I was not at all helped by the Eduard instructions, especially when it came to the rather complex stuff in the middle of the seat. There is no clue at all as to how this should be folded and I made a real mess of both of mine. When the seats were finally done, they were set aside until near the end of the build.
With the wings pretty well smoothed, I installed the control sticks and used a one-piece canopy to keep paint out of the cockpit. I first covered this canopy with tape so it might be used later if I wished and it was attached with white glue. Then I went to paint it.
| COLORS & MARKINGS |
 Since I was doing an early USAF F-4C, it was to be in the Navy paint scheme of light gull grey over white with white upper surface control surfaces. Step one for me was to paint the nose and anti-glare panel black. This was then masked off and I painted the rear section with aluminum, using the new SnJ Talon aluminum paint. This covers fairly well and dries glossy. I needed several coats. Then this was masked off. I also did the horizontal stabs with this shade. Next, I painted all the underside, the rudder and upper control surfaces as well as the outer parts of the stabs in white with Floquil's Reefer White. A couple of coats. Then, much of this was masked. I cut the lower fuselage join areas in a wavy pattern when the demarcation line was masked. I should also note that I did not have the splitter plates glued in as they were to be a solid light gull grey. This shade was sprayed over the entire upper surface and all was left to dry.
Meanwhile, I painted the pylons (I had to rob the inner Navy-style pylons from an RF-4B kit as the RF-4B doesn't have self defense missiles (which I also robbed as I needed early AIM-9s.). The centerline tank was painted as were the outer pylons and all the gear doors and landing gear struts. I later wrapped the oleos of the struts with Chrome Bare Metal Foil and painted the wheels and tires as well.
Later on, I masked off various parts of the rear hot section and painted them with various shades of metallics using mostly Alclad II shades. Same with the inner portion of the horizontal stabs. Photos of F-4s show quite a variation of colors on these parts. I then glued in the burner cans. The base airframe was painted gloss clear in preparation for decals.
| FINAL CONSTRUCTION |
With the airframe basically painted, I next went on to handling some of the other bits and pieces that needed to be done. This meant installing landing gear. Fortunately, I was able to get a nearly full set of gear for this kit, thanks to the kindness of friends. These were cleaned up, painted white, and glued in place. I realized that I was missing the oleo scissors link for the front gear and so though of ways of getting one. In the end, I made one out of card stock. The wheels were a good fit as were the gear doors, though the small inner door hinges didn't want to fit in their assigned slots.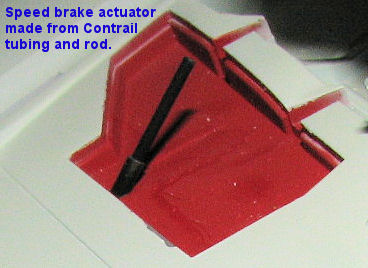
 Anyway, with the seats done, I cleaned up the cockpit area of any left over white glue when the single piece canopy was removed and then the seats were glued in place. I pushed on the horizontal stabs now they'd been done, and they are a tight fit. The sprues were missing the speed brake actuators so I made some out of Contrail tubing and rod.
At this juncture, it was time for decals. Since there were no kit markings, and I didn't have a Phantom II stencil set, I was limited to what was on Aeromaster 48-763, one of their later sheets before the company stopped producing decals. I chose 64-0693, the first  F-4 MiG killer. This particular sheet is printed in Mexico and as such, will laugh at standard decal setting solution. One has to use something strong and I used Solvaset on mine. The decals went on well, though the white is a bit transparent and allows the red turbine warning stripe to show through on the fuselage insignia.
During the usual several days of decal application, I worked on a few other things. One was the Sidewinders. I didn't have a proper set of stencils or stripes for them and while I was able to find some Microscale yellow stripes at a train shop, brown ones eluded me completely. So I used a pair of yellow ones on the missile bodies and left it at that. Not accurate, but then again, this is a kit that would not have been build were it nor for spare parts and friends. The missiles were glued to the pylons and set aside for a bit.
This left the outer wing pylons. I was in a real quandary about these. Normally, USAF Phantoms use wing fuel tanks and put bombs on a MER on the centerline. I had no wing tanks and did have a centerline so my airplane's bombs would have to be on the outer pylons. Problem was, no TERs. A plea on the Forum got a set of M![]() onogram inner pylons with TERs from Dan Lee. I then cut the plyon away from the TER and cleaned things up. Matching the TER mounts to the outer pylon slots showed that there was not a match. Only thing to do was to fill in one slot and cut another. Not a difficult chore that took a day, including filling it with plastic, sanding it and applying a layer of filler. The TER was glued on and the assembly painted.
onogram inner pylons with TERs from Dan Lee. I then cut the plyon away from the TER and cleaned things up. Matching the TER mounts to the outer pylon slots showed that there was not a match. Only thing to do was to fill in one slot and cut another. Not a difficult chore that took a day, including filling it with plastic, sanding it and applying a layer of filler. The TER was glued on and the assembly painted.
 Then there was the problem of weapons. In the early war, the majority of photos I've seen of F-4Cs loaded with bomb are all the M117s left over from WWII and Korea. It wasn't until the planes were camouflaged that one starts seeing the low drag Mk 80 series. Not to say they weren't carried in combat, just that I have seen no photos of grey/white USAF F-4Cs with them. As my weapons set only had two, I was facing another quandary. In the end, I stole two from my Hobbycraft 1/48 A-4H (and they fought furiously to stay on) so that I could put two on each TER (the maximum load for these pylons).
Next step was to replace the pitot tubes on the fin leading edge that I'd broken off. I always do that and it is as much of an irritant as anything else. I cut two sections of fine stainless steel tubing, drilled out the pitot mounts and glued them in place with clear paint.
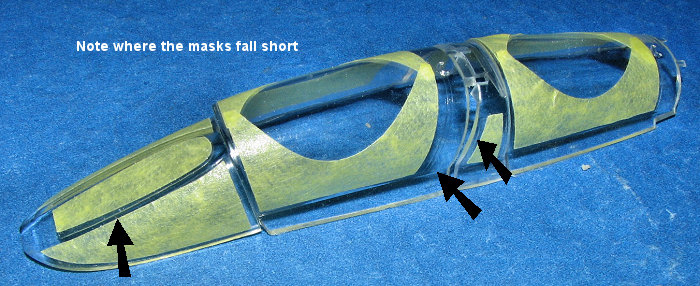
 Then I used a brand new Eduard mask set specifically made for the Hasegawa 1/48 F-4. Unfortunately, they don't fully fit. I'm not sure how this screw-up happened, but the center part of the windscreen, the pilot canopy and the smaller windows between the two canopies are too small (see the image). I have heard from others who corroborate that they have also found their Eduard masks to have sections that don't fit the prescribed kit. This is not difficult to fix, but takes as much additional work as having to mask it yourself using tape. Because of the uncertainty that a set may not fit what it says it will, I cannot recommend using these masks and suggest you save your money as you will be taking a chance.
Anyway, with the canopies masked, I put tape on the inside with goodly amounts jutting out of the sides. To these pieces of tape, I affixed a toothpick. I now had a nice, long handle. This allowed me to do all of a color at one time instead of holding an edge, painting part and then holding another part once the first coat had dried. I painted it black first, and then light gull grey.
These were then glued in place, followed by the canopy extension/retraction struts. I then glued on the nose gear doors and the oleo scissor that I'd made. My technical pen came in very handy filling in the various vents around the airframe. The two canopies were then glued in place. I tried not to use any super glue on this as that would fog the clear bits. Had to make a sort of jig to hold the canopies in place while the glue dried. I then glued on the speed brakes, then the inner pylons with their missiles. The outer pylons had the bombs attached and then they, too, were glued in place.
I generally don't grunge up my aircraft so rather than make excuses like "this was the squadron commander's plane and kept is pristine condition" or "this unit was well known for the cleanliness of its planes" or "this aircraft is modeled after it came out of repaint", I'll just say that I don't usually do weathered planes and leave it at that. I did add some jet exhaust to the rear underside, and that was about it.
| CONCLUSIONS |
 It may be hard to believe, but since the Hasegawa 1/48 Phantom IIs came out in the late 1970s and I built a 'Supersonic Can Opener' F-4N when it was new (and at the outrageous price of $22.00), this is only the third one of these I've done. It is a fine kit in most respects and while several of their kits are still raised panel lines, and even though Hasegawa intermixes raised line sprues with engraved ones in some kits, it is still the best 1/48 F-4 series on the market (though the Monogram one really isn't that far behind). I enjoyed the challenges of making a model from various sources and have promised myself that the next one will be more complete from the get-go!
Just as a final aside before this one gets uploaded. I notice that one of my main wheels got loosened and is a bit askew. I also thought that I should mention that this kit took about 6-7 weeks from the time that I started on it until it was photographed this AM. I know this isn't a fancy scheme, but it an important one and one that will certainly add to my collection.
| REFERENCES |
This kit courtesy of me and those kind folks who helped out with missing bits.
April 2007
#1465 in a series
If you would like your product reviewed fairly and fairly quickly, please contact the editor or see other details in the