Hasegawa 1/48 F-104DJ Starfighter
| KIT #: | 09700 |
| PRICE: | 2600 yen |
| DECALS: | Numerous options |
| REVIEWER: | Scott Van Aken |
| NOTES: | Finally, a two seat Starfighter in 1/48 |
| HISTORY |
The Starfighter was designed as a point defense fighter whose main goal was to get off the ground and to the incoming bomber stream as quickly as possible. As a result, the airframe was designed to not only be a small as possible to meet the criteria, but was as aerodynamically clean as could be. Since it would be operating from fixed bases, a very short wing and 'T' tail were part of the design. This meant high take-off and landing speeds along with some of the problems that a 'T' tail brought with it in terms of high speed stalls and flat spins, from which pilots rarely recovered.
 Though the USAF flew the early A and C models, it was not widely used and most of its success was with the G model for export sales. These planes were developed as high speed fighter-bombers so had to be able to handle a realistic ordnance load and carry more fuel. The fuel thing was taken care of with fuel tanks on the wing tips and if needed on wing or fuselage pylons. The wing tip tanks were normally always fitted as they actually improved the flying qualities of the plane at lower speeds.
Japan was one of the earlier users of the F-104 most of which were built by Mitsubishi under license. They also purchased 20 two-seaters, all built by Lockheed. These were used as aircraft in which to get some refresher training and as test birds or unit hacks; each Starfighter squadron having at least one. Despite their less than uplifting reputation with the Luftwaffe, the Japanese did not have the problems with multiple crashes that European countries did, despite all concerned transitioning from the much more staid F-86 Sabres. This was mainly because Japanese pilots were using them in air defense and not ground attack so did little low-level flying. Though I'm not 100% sure, the last Starfighter was retired in the late 1980s with units transitioning to the Phantom or the Eagle.
| THE KIT |
For many, many, many, many, many years (well, a long time), 1/48 jet modelers have been pining for a two seat Starfighter. The urgency increased several years ago when Hasegawa released their superlative 1/48 F-104J kit followed by the C, G, S and multiple reboxings/fresh decals of the same.
But still no two-seater. It is a rather unfortunate fact of model history that twin seat versions (often considered little more than trainers) of various aircraft were thought to have no appeal. Well, I'm not one of those who find twin-stickers to be boring. In most cases, I find them to be better looking airframes than the standard single seat fighter version. While this isn't the case with the F-104 (sorry fans), the two seat version is one that I've built more of than the standard version of the 104 in 1/72 thanks to first Heller 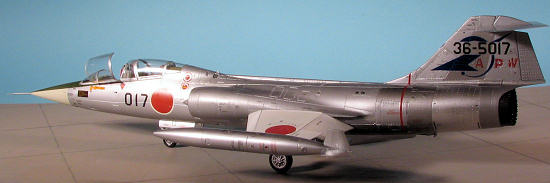 and much later Hasegawa.
Now I'll be the first to admit that I've not built ANY 1/48 F-104, confining my Starfighter interests to 1/72. But I have built the smaller Hasegawa kits and the more recent versions have been quite sweet.
Do I need to tell you the panel line/rivet detailing is superb? Nah, you know that. Same with the quality of the molding in terms of no flash, no obvious sink marks and none of those pesky ejector pin marks.
You'll also not be surprised that several of the sprues are common to the single seat versions, but there are new ones. There are new fuselage halves (DOH!, we know that), a new sprue for clear parts (natch, Jackson), and a new one for the various cockpit bits, nose gear well, instrument panels, pylons and the other stuff. The single seat clear sprue is also provided for the windscreen and other common clear bits. I found it interesting that the sides of the front and rear seats are quite different. The rear seat has little 'wings' near the head rest while the front is pretty normal looking. A third set is in there as well, undoubtedly for the G version.
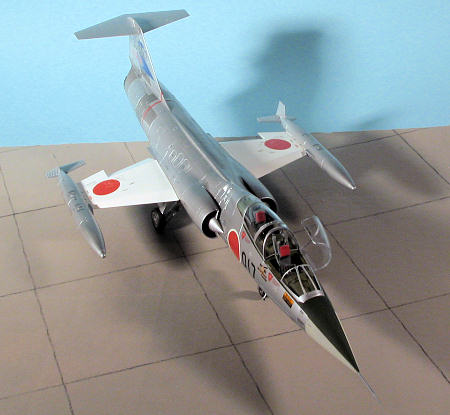
According to the sprue lay-out guide, you'll have quite a few pieces left when done. Apparently the DJ version didn't use wing pylons as these are included, but not shown as part of the build. Only tip tanks, and no 'winder rails. The canopy sections are 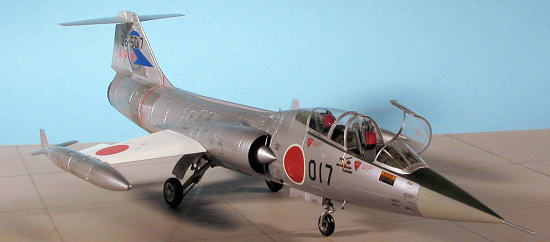 separate from the rest of the cockpit coverings, but no actuating mechanisms or latches are provided. These swing to the left when open as shown in the pic below.
I'm not conversant enough on Starfighters to know if a TF-104G can be built from this boxing or not. It seems so from the redundant bits, but for sure, it will be a version without the larger wheels and bulged doors as those are not included. I'd bet that a CF-104D could be done though as those are quite similar to the F-104DJ. You seem to get the proper seat sides for it. As they say, 'Check your references'!
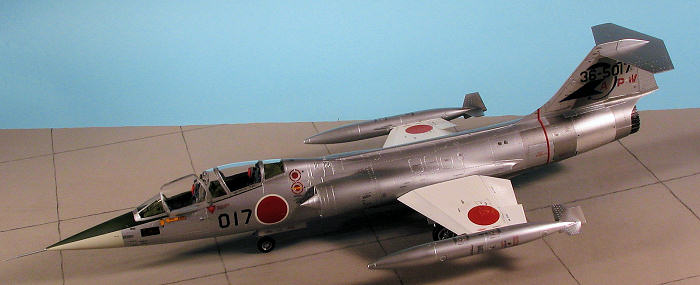
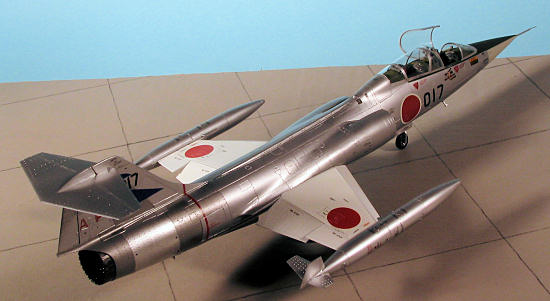
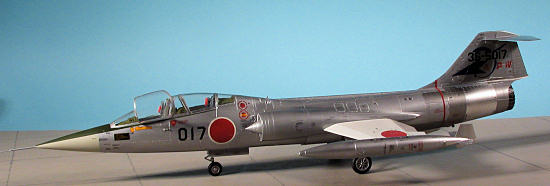
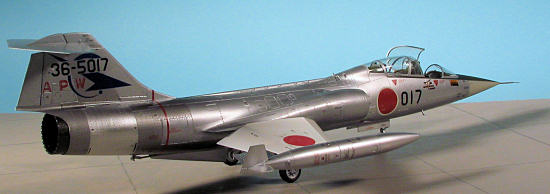
This brings us to the decal sheet. This thing is huge and fills the bottom of the box. No need for aftermarket on this one as not only are there ten distinct options (covering every unit in Japan that flew them), but there are also enough 'spares' to make the serial of any F-104DJ that was built. These appear to be the 'new' Hasegawa decals with actual white and proper reds. I just realized that the pic I pulled from the archives is the box art plane and the first F-104DJ built. It was assigned to 207 Squadron and painted in what is listed as Aircraft Grey with white upper wings and unpainted metal in the aft fuselage where it got quite hot. You can see the shades of metal in the image. I should mention that some early Starfighters were in unpainted metal for the fuselages, but I'm not sure if that is true of the DJ's. They all got a coat of paint pretty early in life if that was so and remained in this scheme for their entire career.
| CONSTRUCTION |
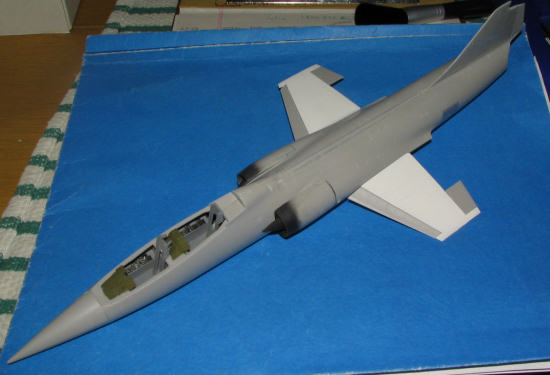
Not having built any of Hasegawa's 1/48 Starfighters before, I studied the instructions looking for things that could go together which were painted the same color. There isn't as much on this one as other kits. I cemented the wing tip tanks together and glued in a number of interior bits, including the rails for the seats. The seats were also glued up. There are quite a few parts to each seat and the side rails are different between the front and rear. I'm sure there are differences between the DJ and C and G versions as well. Seems like F-104 seats went through a lot of changes during its life.
 I used decals over the instrument panels and side consoles. A couple of applications of Solvaset made sure things snuggled down well and the match is really quite good. I left off the seats until near the end of the build as they'd just get in the way. I painted and assembled the exhaust section, then glued it in place. It came loose later on after the fuselage was cemented together so be sure to get it firm. I thought I did but it appears not. The main gear wells were assembled and painted silver using Floquil's Old Silver. This paint works quite well and does have a sheen of weathered aluminum. It also provides an excellent base if you want to use Alclad II atop it. The small well for the arresting gear was also cemented to a fuselage half and the fuselage halves were cemented together. Fit is fairly good, but I could not get the fuselage to meet aft of the main wheel wells. The gap eventually was filled with super glue. I also found the nose gear well/lower forward fuselage part to be quite difficult to get in place. Once it was there, it was in to stay. The small piece aft of that needed some filler as well.
I was somewhat distraught to find that the underside of all the control surfaces had ejector pin marks on them. It meant extra work to fill them and sand them smooth. This and the work done on the fuselage meant that the indented rivet detail was lost in several areas. This was restored by taking a hand drill and lightly re-drilling the rivet detail. One does have to be careful when doing this. I also glued the upper and lower wing halves together. The slats and flaps/ailerons are separate.
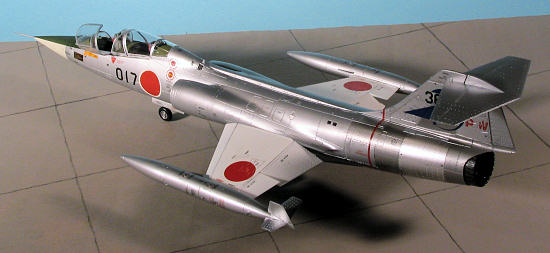
 One other thing I did was to cement the speed brakes closed. Now I know that Hasegawa has gone to a lot of trouble to provide them separately, but after looking at a considerable number of photos of F-104s on the ramp, not one of them had the speed brakes open. In fact, I only saw open ones on photos of planes landing. I also noted that you could have the slats and flaps either fully up or slightly depressed while on the ground. It didn't seem to make a lot of difference as I found about an equal number of photos with them in either position. I chose to show them deployed, especially as Hasegawa makes it so easy to do so. The flaps and slats have rounded corners and the wings are curved where they slot in. This is unlike other kits where the surfaces are flat. It is a reason we pay the extra money for a Hasegawa kit.
 Anyway, I glued together the upper and lower wing halves then pre-painted them gloss white. Overdid it a bit, I fear, but then glued on the slats and ailerons and left them to dry. During this time I worked on the wing tip tanks by gluing on the tail sections. These are a bit larger than the join surface so a touch of sanding was done to blend them in. When those were dry, the small fins were installed. Back at the fuselage, I painted the intake interiors with Old Silver from Floquil. When dry, the forward part of the intake and shock cone were painted black after finding a number of photos showing this. When dry, they were glued in place. I also painted the cockpit coaming and anti-glare panels in Khaki Green as directed by the instructions, using Humbrol 159. I'd have thought these would be black, but I guess not. After a bit of trimming as noted in the instructions, they were glued in place. After quite a bit of filler work on one pesky seam, the nose cone was glued in place. Fit is not bad, but not perfect so some filler and/or sanding was needed. The rudder was also glued in at this time.
 Moving forward, I installed the seats and then the clear blast shield that goes behind the front seat. This part is a bit large so I had to sand down the edges. I then started installing the clear bits after doing a bit of touch-up. I used white glue for these and masked them prior to installation. You need to be very careful about installing the piece between the front and rear canopies as it only goes on one way. It was also the only part I attached with standard glue as it didn't really want to fit well. The fit of the pieces is quite tight and some sanding had to be done to get all five to mate up properly.
Then the landing gear was glued in place after the usual clean up as it is basically the same color as the wheel wells and the rest of the airframe.
| COLORS & MARKINGS |
I had originally decided to do a complex camo pattern that I found in the reference, but since I only had a side shot, I decided at the last minute to forego this option and do the metallic version. This meant painting over the black intakes that I'd earlier so carefully 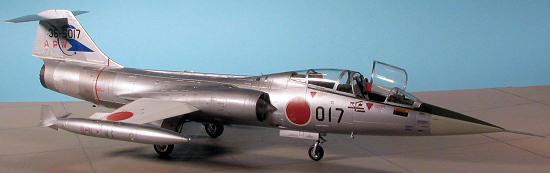 masked off! The upper surface of the wings were masked over to prevent any overspray and the undersides painted, along with the tip tanks, horizontal stab, and the fuselage, with Floquil's Old Silver, which had been thinned with lacquer thinner. This allows it to dry to the touch in about 20 minutes. Not enough for a lot of handling, but enough to allow you to hold it to move the part or get to other sections that need painting.
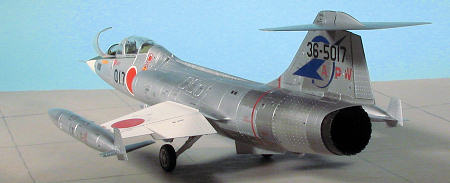
After a day of curing, the nose section was masked off and I painted it with FS 36622 light grey using Testors Model Master enamels. I'm not sure what color the instructions wanted as they would have you mix shades. It looks pretty close to what's in the pictures of the FAOW. Over the next few days, I painted the anti-glare panel FS 34079 as recommended and I also used several shades of Alclad II on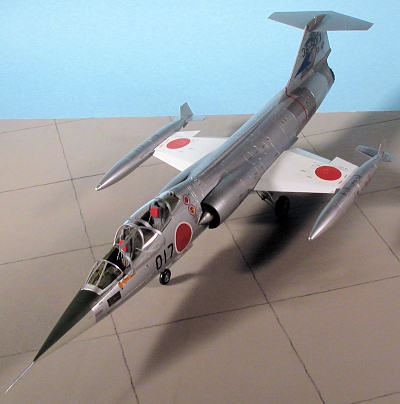 the tail section.
With the main painting done, I started attaching more airframe parts. First the gear doors and their actuating mechanisms. This would give me an opportunity to do touch-up spray painting on the areas where the bits were removed from the sprues before tackling the decals. With the fit of the wing so good, I thought I'd go ahead and put on the markings before gluing these and a few other things onto the airframe.
I had little choice but to use the kit decals for this one. The sheet is really remarkable with all the stencil markings one could want along with unit markings for every JASDF unit that flew it. Thanks to this being a 'new age' Hasegawa sheet, the decals are thin and the proper color shade. I decided to use the markings for APW, the test wing, though some of the others were mighty tempting! The decals are just superb. They are thin and went on without any problems, succumbing to whatever setting solution I used. However, that did not mean that a few didn't silver, a real problem on a metallic paint job. One thing that helped was that this was done without the wings, tail plane, or some other small bits attached. Made it much easier to apply some of the markings. Doing that took the better part of four days, for even though many of the stencils are ganged together by carrier, one did have to leave sections blank so there'd be something to hold onto. Once all the markings were on, a coat of Testors Metalizer Sealer was applied. This also cut down on the shine of the metallics and made things look a bit more weathered.
| FINAL CONSTRUCTION |
 Last steps are really minor compared to some kits. It consisted of gluing on the wheels, landing lights and nose pitot (which I must have broken off a dozen times). The wing tanks were merely pressed onto the wing tips and the wings pressed into the fuselage. No glue. Same with the horizontal stabilizer, which is a very tight fit. My stabilizer had some parts of the edge crunched during all the jostling around in the bag. This is very thin plastic and is obviously easily damaged. The masking was removed from the clear bits and the front canopy was glued in the open position just to add some interest.
| CONCLUSIONS |
 Though I've not built any of the other 1/48 Hasegawa Starfighters, I'm sure they are as nice a build as is this one. About the only thing I didn't like were those clear insert thingies that go in various fuselage locations. If these are standard Starfighter bits, the holes for them should have already been drilled out. I was also left with a number of stencil decals for which I could find no placement. Something that I've run across before in 1/48 Hasegawa jet kits. Most odd. Other than that, it is a superb kit and one that you really should consider. I'm sure there will be the usual myriad boxings for Canadian and NATO F-104s as well.
| REFERENCES |
August 2006
#1427 in a series
Copyright ModelingMadness.com. All rights reserved. No reproduction in part or in whole without express permission.
If you would like your product reviewed fairly and fairly quickly, please contact the editor or see other details in the