Novo/Frog 1/72 Sea Vixen FAW.2
Kit Number: ??
Price: $15.00
Media: Injected Plastic
Decals: One version; 899 Sq
Date of review: 17 July 1997
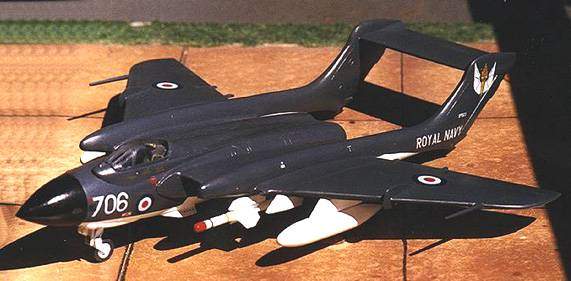
The Sea Vixen was the final British designed non-VTOL aircraft to see service as a fighter on their large-deck carriers. It was a huge aircraft and must have been quite a sight to see catapulted off into the sky! Their service life was rather short, but they did last a while longer as drones or drone controllers, the last one retiring in 1996.
This kit is the Novo version, so came in a bag without instructions and with a very poor set of decals. Typically Frog, the kit has raised panel lines, rudimentary interior, and some rather thick parts. Having said all that, for the longest time, it was the only Sea Vixen available and as a result, commanded some rather high prices, when available. Other than the 'packaging' by Novo, it is Frog through and through, molded in light grey plastic with a thick and semi-clear canopy.
First job is to build the interior. I tossed the seat and used an Aeroclub white metal replacement. It is about the only thing that can be seen of the interior, and the extra weight is greatly needed, as boomed aircraft are notorious tail sitters. The interior was painted black and a great amount of extra weight was added in the nose. The top and bottom of the fuselage was then cemented and set aside to dry. Next the tail booms were glued together as were the wings and any other bits, like fuel tanks. The upper fuselage fairing where the canopy attaches was glued and faired in, as were the strakes on the underside of the fuselage. The intakes needed some grills and these were made of plastic card. Next the tail booms and horizontal stabilizer were carefully glued after much dry fitting to prevent massive puttying. The fit was fair and still required putty.
Now that I had a relatively complete airframe, it was time for all the other bits. The aft nose gear door as well as the inner main gear doors were cemented in the up position as this is how the aircraft normally sits. Various fuselage vents were then drilled out, the canopy attached and the airframe prepared for painting. The Sea Vixen saw most of its life in extra dark sea grey upper and white lower camouflage. All the underside parts were painted white and after that dried, the plane was masked off for the upper color. Typical of most British aircraft, the upper camo wraps under the leading edge of the wings and tailplane (why, I do not know, other than to cause extra work for modelers). Once the upper color was painted, it was time for a gloss coat and decals. Just for the record, I used Gunze Sangyo acrylic for the upper and Testor's Model Master for the underside. The landing gear, wheels, gear doors, pylons and underwing stores were then readied and added. Unfortuately, the underwing pylons are so close together, that if you can only use the outer and inner pylons. With missiles and fuel tanks so place, there is no space for the other set of missiles.
Now for the markings. As I said, the Novo decals were totally useless and out of register as well. Fortunately, I had an ancient Modeldecal sheet with several Sea Vixens on it and chose that of 766 Sq at Yeovilton in 1968. The roundels came from a Modeldecals sheet as well. What I did not do was cut a zillion small red strips for the myriad warning 'X's that festoon the upper fuselage. The Novo sheet had them, but not the Modeldecal sheet so I left them off.
The results are what looks very much like a Sea Vixen. No collection of FAA
aircraft is complete without one of these skulking about on the shelf. It
is the kind of kit that requires many of your modeling skills to build and
to have it come out well. Definitely not a Tamiya "shake and bake" kit.
Recommended to Anglophiles and those with intermediate skills.
Back to Reviews Page 2017