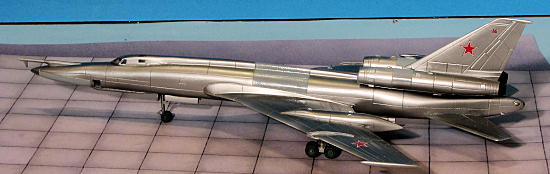
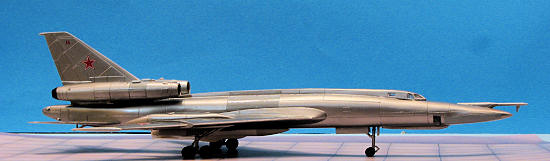
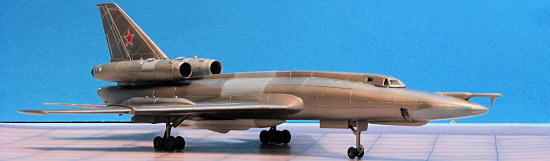
Anigrand 1/144 TU-22K 'Blinder-B'
| KIT #: | AA-4056 |
| PRICE: | $102.00 from www.nostalgicplastic.com |
| DECALS: | One option per aircraft |
| REVIEWER: | Scott Van Aken |
| NOTES: | Includes three other 1/144 resin kits |
| HISTORY |
The Tu-22 was originally intended as a supersonic replacement for the Tupolev Tu-16 bomber. Preliminary design of an aircraft to meet this requirement, designated Samolët 105 by Tupolev, was started in 1954, with the first prototype completed in December 1957, and making its maiden flight from Zhukovsky on 21 June 1958, flown by test pilot Yuri Alasheev.The availability of more powerful engines, and the TsAGI discovery of the Area rule for minimizing transonic drag, led to the construction of a revised prototype, the 105A. This first flew on 7 September 1959.
The first serial-production Tu-22B bomber, built by Factory No. 22 at Kazan, flew on 22 September 1960, and the type was presented to the public in the Tushino Aviation Day parade on 9 July 1961, with a flypast of 10 aircraft. It initially received the NATO reporting name 'Bullshot,' which was deemed to be inappropriate, then 'Beauty,' which was deemed to be too complimentary, and finally the 'Blinder.' Soviet crews called it "Shilo" (awl) because of its shape.
 The Tu-22 entered service in 1962, but it experienced considerable problems, leading to widespread unserviceability and a number of crashes. Amongst its many faults was a tendency for skin heating at supersonic speed, distorting the control rods and causing poor handling. The landing speed was 100 km/h (62 mph) higher than previous bombers and the Tu-22 had a tendency to pitch up and strike its tail on landing, though this problem was eventually resolved with the addition of electronic stabilization aids. Even after some of its teething problems had been resolved, the 'Blinder' was never easy to fly, and it was maintenance-intensive.
Pilots for the first Tu-22 squadrons were selected from the ranks of "First Class" Tu-16 pilots, which made transition into the new aircraft difficult, as the Tu-16 had a co-pilot, and many of the "elite" Tu-16 pilots selected had become accustomed to allowing their co-pilots to handle all the flight operations of the Tu-16 except for take-off and landings. As a consequence, Tu-16 pilots transitioning to the single-pilot Tu-22 suddenly found themselves having to perform all the piloting tasks, and in a much more complicated cockpit. Many, if not most of these pilots were unable to complete their training for this reason. Eventually pilots began to be selected from the ranks of the Su-17 "Fitter" crews, and these pilots made the transition with less difficulty.
By the time the Tu-22B (Blinder-A) entered service it was already clear that its operational usefulness was limited. Despite its speed, it was inferior to the Tu-16 in combat radius, weapon load, and serviceability. Soviet leader Nikita Khrushchev felt that ballistic missiles were the way of the future, and bombers like the Tu-22 were in danger of cancellation. As a result, only 15 (some sources say 20) Tu-22Bs were built.
A combat-capable reconnaissance version, the Tu-22R ('Blinder-C'), was developed alongside the bomber, entering service in 1962. The Tu-22R could be fitted with aerial refueling probe that was subsequently fitted to most Tu-22s, expanding their radius of operation. 127 Tu-22Rs were built, 62 of which went to the AVMF for maritime reconnaissance use. Some of these aircraft were str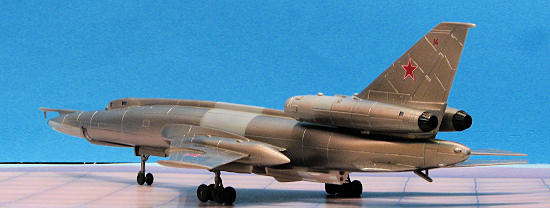 ipped of their camera and sensor packs and sold for export as Tu-22Bs, although in other respects they apparently remained more comparable to the Tu-22R than to the early-production Tu-22Bs.
A trainer version of the 'Blinder,' the Tu-22U ('Blinder-D') was fielded at the same time, with a raised cockpit for an instructor pilot. The Tu-22U had no tail guns, and was not combat-capable. 46 were produced.
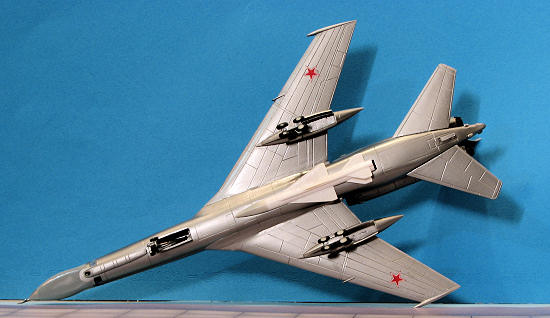
To try to salvage some offensive combat role for the Tu-22 in the face of official hostility, the Tu-22 was developed as a carrier, the Tu-22K ('Blinder-B' and subject of this kit), with the ability to carry a single Raduga Kh-22 (AS-4 'Kitchen') stand-off missile in a modified weapons bay. The Tu-22K was deployed both by DA (Strategic Aviation), and AVMF (Naval Aviation).
The last Tu-22 subtype was the Tu-22P ('Blinder-E') electronic warfare version, initially used for ELINT electronic intelligence gathering. Some were converted to serve as stand-off ECM jammers to support Tu-22K missile carriers. One squadron was usually allocated to each Tu-22 regiment.
The Tu-22 was upgraded in service with more powerful engines, in-flight refueling (for those aircraft that did not initially have it), and better electronics. The -D suffix (for Dalni, long-range) denotes aircraft fitted for aerial refueling.
Tu-22s were exported to Iraq and Libya in the 1970s. An Egyptian request was turned down after the cooling of Soviet-Egyptian relations in the wake of the Yom Kippur War.
| THE KIT |
This is another of Anigrand's superb 1/144 model kits and though it seems pricey, it is really quite a bargain as it includes four complete kits, one of the additional three being quite large itself.
The packaging is first rate with the all the resin parts being sequestered in their own compartment. The small kits, small parts like landing gear legs and wheels, and the clear bits are packaged in small zip bags to further keep them safe and free from damage.
 Over the years, Anigrand kits have been slowly improving until nowadays, their kits are as good as those from other resin companies. It used to be that one would find some sort of molding glitch, from air pockets, to pin holes to blobs of resin on surfaces and in wheel wells. Inspection of these kits shows none of these and I'm very pleased at this big improvement in their molding quality.
The kits have engraved panel lines and while one doesn't expect much in the way of an interior, there are seats in most of these kits. The kits also include clear resin canopies with well formed frame lines that help assist masking. Probably the biggest challenge of any of these kits is finding room for nose weight. In the larger kits, there seems to be space to put weight, but the smaller kits don't offer that at all so perhaps will require being attached to a base when displayed.
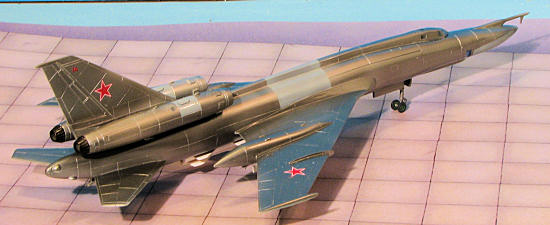
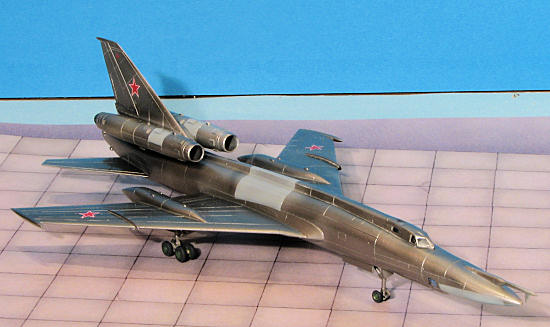
The Tu-22K has a well detailed AS-4 'Kitchen' cruise missile complete with the lower fin being folded over as it would be until just prior to launch. The other kits include the rather large Tu-128 complete with its four large AA-5 'Ash' air air to air missiles, the MiG-9, the Soviet Union's first operational jet and the Mil-1 helicopter.
Instructions are well done with 3D artwork showing both the upper and lower surface of the more complex kits. Aside from the Mil-1 which is in overall Olive Green, the other planes are in unpainted metal that has been weathered. The Tu-22Ks missile is white. The decal sheet is well printed and has proven over the years to adhere well, though they are not really that susceptible to setting solutions. There is one markings option per aircraft which is basically insignia and aircraft number.
| CONSTRUCTION |
 Construction starts off rather quickly with this one. No need to spend time fixing molding glitches. I begin most of these types of kits with the fuselage and tend to glue it in stages. When one has a long skinny fuselage, it is a good idea to keep things aligned. I start at the back, then when dry get the front properly aligned and then do the center section. I use super glue as a filler to prevent shrinking and 'ghost seams' after painting.
Next were the engine nacelles. Now this provided a bit of a problem. You see, resin is a rather fluid substance in terms of how it reacts to changes in atmospheric conditions on the day a part is molded. It is possible for the same part from the same mold to be two different lengths or widths on two different days. Apparently this is what happened to mine as the engine nacelle pieces were different lengths. Meant that the panel lines and the external square intake thingies didn't match up. Best thing to do is to get things the best you can in terms of alignment and sand the ends equal. When installing the engine compressor face, be sure to paint it and the intake before gluing the halves together. It can be difficult to reach when complete. The burner cans were then glued on. On the underside of each nacelle is a small notch for an L shaped probe. The instructions completely miss this item.
 With the fuselage together, the seats are installed and the interior painted. Next is the canopy. Unlike previous Anigrand kits, the canopy does not have recessed frame lines and in fact is a rather soft mold in terms of crispness. It also requires the 'dash' to be trimmed down to get the canopy to fit anywhere close to well and there is a large gap in the back where it meets the fuselage. Much filler on what is the poorest fitting part in the kit.
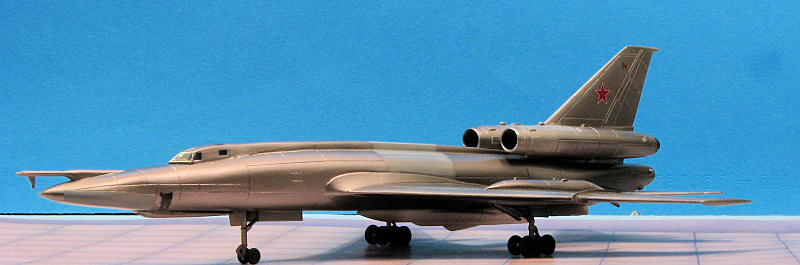
With that masked, the wings were attached. A good fit though filler is needed. The tail planes are a very snug attachment so no worries there. The fin needs to have the tab trimmed in length to have this piece fit properly. The refueling probe and the camera fairing were also glued in place.
At this time, since the plane is overall bare metal, the landing gear legs were glued in place. These are quite wobbly until the glue dries, and even the retraction strut doesn't make them super sturdy. I also glued on the gear doors. These are way over-scale and those who want more scale appearance will want to replace them with styrene care of brass sheet.
| COLORS & MARKINGS |
 Soviet era bombers and most fighters were bare metal and red stars. Boring, but that is how it is. For the metallics I used Alclad II. I started spraying Aluminum for the whole airframe, but during this, spilled my bottle (I'll blame my cats for this during their daily "let us kill the human" foray). Other than waiting a week for my usual foray to the LHS, I decided to mix in some Dark Aluminum, which made the paint....well....dark.
Next, the missile was painted gloss white using Boyd's enamel. It looked too bare so I misted some Testors Light Gull Grey on the nose cone. This same shade was used for the bomber's radome, an upper fuselage section and a section on the engine nacelles (which were still unattached until after painting). This was by direction of the instructions. The aft engine nacelle was painted Jet Exhaust.
Though not installed until the very end, the wheels were painted Aeromaster Soviet Radome Green with Floquil Weathered Black tires. These wheels have great detail on one side with raised rims and no detail at all on the back, making proper painting difficult.
Decals consist of six red stars, all the same size and a tiny aircraft number on the tip of the fin. The instructions do not point out this aircraft number but it is on the decal sheet. Decals fit well, are relatively immune to setting solutions, and are in register.
| FINAL CONSTRUCTION |
 Last bits are the installation of the wheels and the resin clear bits for the various camera ports. These actually fit better than I had feared and are quite a tight fit. Naturally, not all the main wheels touched the ground so some careful sanding was done to try to take care of that situation. The engine nacelles were glued in place, masking removed and that was it.
| CONCLUSIONS |
Were I anyone else, it would not take me 3-4 weeks to build this sort of kit, but I'm slow and have many other things to occupy my time beside building models, so there it is. It is a fine model and for those who believe that large planes are better in 1/144 so they will fit on a display shelf, this is your kit. I know you will enjoy it and the others in the set. Two of the remaining planes from this group are being built as I type so stay tuned.
| REFERENCES |
 http://en.wikipedia.org/wiki/Tupolev_Tu-22
December 2010
Copyright ModelingMadness.com. All rights reserved. No reproduction in
any form without express permission from the editor.
If you would like your product reviewed fairly and fairly quickly, please
contact the editor or see other details in the
Back to the Review Index Page 2026