Academy 1/48 Mig-21 MF
|
KIT # |
2171 |
|
PRICE: |
$25.00 |
|
DECALS: |
Three aircraft |
|
REVIEWER: |
|
|
NOTES: |
|
HISTORY |
 The most popular Soviet fighter of the 60's, 70's, and into the
80's is the Mig-21. It is very much a contemporary of the US F-4 Phantom II,
though built to very different specifications. Basically, the Mig-21 is a point
defense fighter. It is designed to get to altitude as fast as it possibly can
and shoot down incoming enemy aircraft. As a result, the airframe is quite
small, weapons are not very extensive and range is equally small. Typical
mission flight time is in the area of 30-45 minutes depending on if auxiliary
fuel tanks are carried.
The most popular Soviet fighter of the 60's, 70's, and into the
80's is the Mig-21. It is very much a contemporary of the US F-4 Phantom II,
though built to very different specifications. Basically, the Mig-21 is a point
defense fighter. It is designed to get to altitude as fast as it possibly can
and shoot down incoming enemy aircraft. As a result, the airframe is quite
small, weapons are not very extensive and range is equally small. Typical
mission flight time is in the area of 30-45 minutes depending on if auxiliary
fuel tanks are carried.
Weaponry for the Mig-21 MF variant consists of twin 30mm cannon in a small pod under the fuselage and as many as four Atoll air to air missiles, similar to Sidewinders. If wing fuel tanks are carried, the number of missiles is reduced to two. Unusually, the wing tanks are generally carried on the outer wing pylons. The type also can carry unguided rocket pods for use in ground attack.
The plane seems to stay in service somewhere around the world even today. Its relatively low operating cost, ruggedness of design and high speed make it perfect for those air forces that don't have a lot of money to spend on hi-tech aircraft. The airframe is basically sound and several countries have been doing avionics upgrades to keep it a viable weapons system.
|
THE KIT |
The detailing is all that one expects from a kit produced in 1998. Engraved
panel lines, a well detailed cockpit and plenty of bits and pieces. Under wing
stuff includes Two different types of missiles, two fuel tanks and two different
types of rocket pods. Other options are separate flaps and ailerons. I'm not
sure why the separate flaps other than they were expected. The Mig-21 is almost
never seen with these deployed while on the ground unless it is on the landing
roll or undergoing maintenance. Also offered are the option to have the forward
and aft speed brakes deployed. Again these items were rarely
seen open while on the ground.
Often a fuel tank was carried on the centerline instead of the wings. If one is
used there then the builder cannot put them on the wings as only two are
provided in the kit. The instructions are quite good offering not only the usual construction
sequence, but also photos of completed subassemblies. This will come in handy to
make sure things are properly aligned. Markings are provided for three aircraft.
One is the box art plane from the Soviet Air Force in sand, green and brown with
light blue undersides. Another is from the Hungarian AF in dark green and light
brown over light green, a very fetching camouflage. Finally an Indian AF Fishbed
in overall light grey. Kit decals are well printed and should work without too
much trouble. If you want something different, there are a number of aftermarket
decals for this plane available. In addition, there are resin and photo-etch
bits out there so you can trick out the kit to any degree you wish. 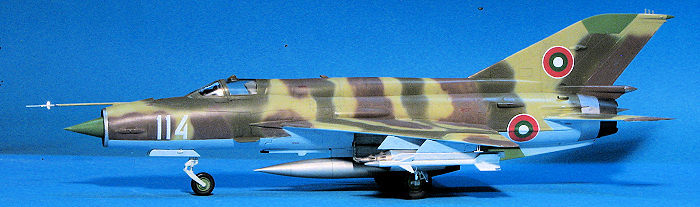 Academy was good enough to produce two Mig-21 kits. The first was the earlier
PF variant and this later MF version. Both share a number of similar sprues,
mainly the central airframe, wings and accessory sprues. The differences being
in the canopy/cockpit, forward fuselage, spine and fin.
Academy was good enough to produce two Mig-21 kits. The first was the earlier
PF variant and this later MF version. Both share a number of similar sprues,
mainly the central airframe, wings and accessory sprues. The differences being
in the canopy/cockpit, forward fuselage, spine and fin.
 Just as a note of information. Several readers have contacted me about this
kit; specifically about the juxtaposition of the spine and the fin. To quote one
reader, "...(the kit) does not represent a true MF version. The most
prominent giveaway being the point where the spine blends completely into the
vertical stabilizer. In MF version it's noticeably closer to the front of the
aircraft. I'm not sure if it is a true "Bis" either, but it's not a true MF."
Just as a note of information. Several readers have contacted me about this
kit; specifically about the juxtaposition of the spine and the fin. To quote one
reader, "...(the kit) does not represent a true MF version. The most
prominent giveaway being the point where the spine blends completely into the
vertical stabilizer. In MF version it's noticeably closer to the front of the
aircraft. I'm not sure if it is a true "Bis" either, but it's not a true MF."
Here is an additional note that you may find of interest "...I am a Mig 21/ Mirage 2000 pilot from the Indian AF. Just wanted to sort out some issues. The decals on the IAF were earlier issued by Aero master, the decals are for 26 Sqn 'the warriors' thus the warrior with a spear on the nose. Further, C2281 was a bis. All Indian T-96s or MFs were 15-- or 17-- series. All bis were 22-- series up to 28-- . ' SANU' was short for Sanu Kenikara, a pilot with 26 Sqn who left as a wing commander and now resides in the US. Each ac had a pilot in charge of its serviceability and appearance and had his name painted on it. It appeared on both sides."
|
CONSTRUCTION |
I had held off building this for many years because of the fin issue. However, I've built most of the MiG-21 kits in this scale including the Revell, Trumpeter, OEZ, and Eduard versions so felt that I should build this one to complete the collection. First thing is to deal with the fin issue. The first quote is correct in that the spine blends in too far back for it to be an MF. There is a resin correction for this from Quickboost, but it is not inexpensive with it probably adding $20 to the price of the kit by the time it arrives. That being said, it is also not long enough to be a bis, but it is close so that is what this will be.
 After the Revell
and OEZ kit, this is the oldest 1/48 MiG-21 and that shows in the
kit's detail. Regardless, it will be built as it comes in the box. First I
assembled a bunch of parts for the cockpit and painted them that sort of
turquoise green shade seen on many Soviet aircraft. The bang seat is fairly nice
and has molded on harness. Black Box and others make replacement cockpits for
this kit if you want more detail. Then I misplaced the instructions. I'll
undoubtedly find them once the kit is done, but for now, I've been using a set
downloaded from Scalemates.
After the Revell
and OEZ kit, this is the oldest 1/48 MiG-21 and that shows in the
kit's detail. Regardless, it will be built as it comes in the box. First I
assembled a bunch of parts for the cockpit and painted them that sort of
turquoise green shade seen on many Soviet aircraft. The bang seat is fairly nice
and has molded on harness. Black Box and others make replacement cockpits for
this kit if you want more detail. Then I misplaced the instructions. I'll
undoubtedly find them once the kit is done, but for now, I've been using a set
downloaded from Scalemates.
Once the cockpit was done, I gathered the required 15 grams of nose weight, installed the nose radome, the nose gear well and the cockpit tub. Take your time on getting all these in place and you'll reap the rewards later. With that done, the holes for the fuselage pylon were opened, the exhaust assembly made up and installed and the rear fuselage halves closed. Next the nose section was mated to the aft section. Fit on this is pretty good. Then the fin was assembled and attached along with the spine. Do both of these at the same time for the best fit. The spine section is a bit pinched where it attaches to the back of the cockpit section so it is up to you if you wish to deal with this. I then attached the various separate intakes to the fuselage. There are small guide areas engraved on the fuselage to help with placement. The gear wells and inner gear doors were painted a light grey and when dry, the wells were filled with Silly Putty.
|
COLORS & MARKINGS |
 Wings were next
and actually fit quite well as do the horizontal stabilizers. Note that if you
want to use pylons, the holes for those need to be opened. I then attached the
forward speed brakes in the closed position. Fit on these is not that great as
they appear to be a little bit too small. I also masked the clear parts and
installed those. I did not attach any of the forward probes as I knew I'd break
them off while building the rest of the kit.
Wings were next
and actually fit quite well as do the horizontal stabilizers. Note that if you
want to use pylons, the holes for those need to be opened. I then attached the
forward speed brakes in the closed position. Fit on these is not that great as
they appear to be a little bit too small. I also masked the clear parts and
installed those. I did not attach any of the forward probes as I knew I'd break
them off while building the rest of the kit.
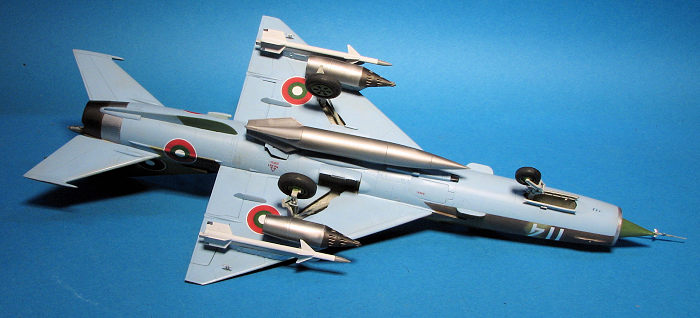
I chose a sheet that was in an Eduard MiG-21bis Profipack kit as it had a bunch of options and all I'd use are insignia and unique markings. For colors I chose those in the AKAN enamel line from one of their Russian Jet sets. I've used these colors before and liked them. For the metallics, those were Alclad 2. I first did the two exhaust area shades and when dry, masked them off. Then the green radome bits were painted and masked followed by the underside and yet more. The upper colors were all freehanded starting with the lighter and moving to the darker shades.
While all that was going on, the rocket pods, centerline tank
and the missiles were assembled and painted. I also painted all the landing gear
items and wheels. With all the colors on the kit, I installed the landing gear.
Main gear was rather wobbly and the retraction strut was a bit too long for the
wing attachment socket. Fitting the outer gear door was a real challenge to get
everything to fit right as Academy molded the oleo scissors and part of the
brake line as a separate part that goes between the outer door and the gear.
Inner main gear doors were fine as was the fit of the nose gear. Nose gear doors
have small tabs to assist in placement. Before attaching these I installed a
small sensor as it fits very close to one of the doors.
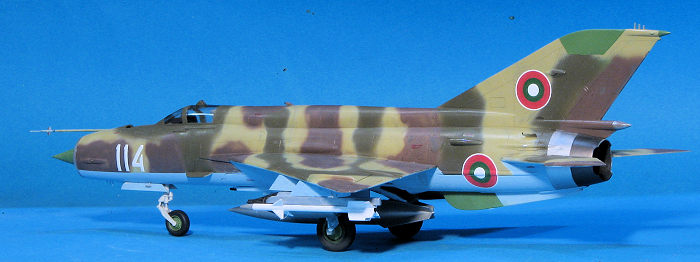
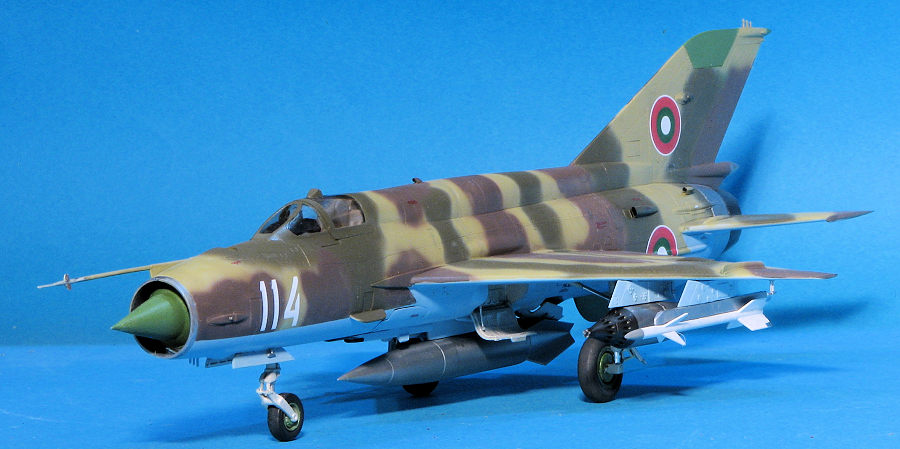
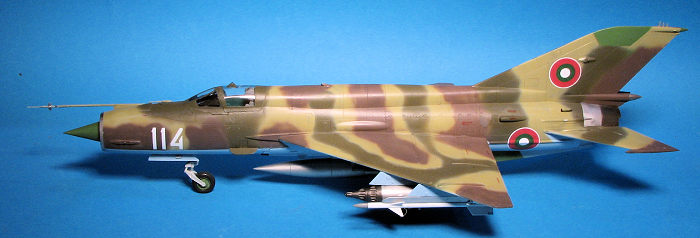
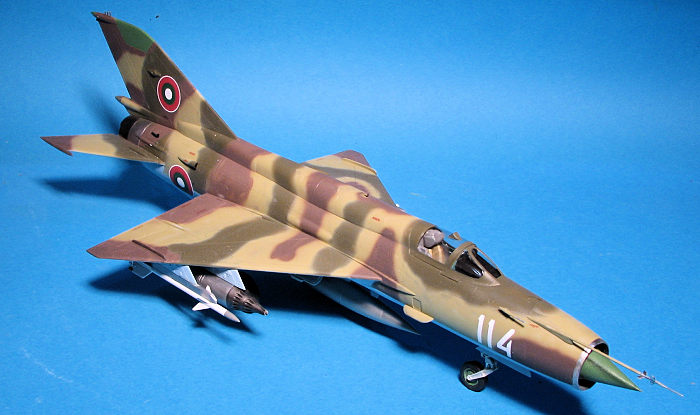
With all the doors in place, I then sprayed on an acrylic clear coat in preparation for decals. For markings I chose one of the Bulgarian Air Force. Both the Eduard decals and kit stencils fit well and succumbed to MicroSol. When dry, Tamiya flat clear was lightly sprayed on everything. Only then did I attach the nose probes. This was followed by the rocket pods with pylons and the missiles with pylons. For the rocket pods, I installed small sections of wire to help hold them in place while the glue dried. I removed the masks from the canopy and landing lights and for a last assembly, attached the small rad alt antennas. Some touchup painting was done and that was it.
|
CONCLUSIONS |
I think this one completes all the available MiG-21 kits in 1/48. Over the years I've built kits from Eduard, Revell, Trumpeter, and OEZ. This one has about the same complexity level as those from Trumpeter and OEZ with the Eduard kit being the most fiddly to build and the old Revell the easiest. None of them are 'shake and bake' kits and take some skill to finish to a standard. What puts this one down near the bottom of the list is the wrong tail fin. It has too long a spine intrusion to be an MF and not quite enough to be a bis. I built this one as a bis as it was closer. Frankly, most folks if not knowledgeable on MiG-21s won't notice the difference, but it is such that I'll probably not build another Academy 21 without having a fin correction set.
7 June 2024
Copyright ModelingMadness.com. All rights reserved. No reproduction in part or in whole without express permission from the editor.
If you would like your product reviewed fairly and quickly where it will be seen by well over 150,000 visitors a month, please contact the editor or see other details in the Note to Contributors.