Revell 1/48 MiG-21 PF
| KIT #: | 85-5482 |
| PRICE: | $19.98 MSRP |
| DECALS: | Two options |
| REVIEWER: | Scott Van Aken |
| NOTES: | Reissue. Original date 1977 |
| HISTORY |
The Mikoyan-Gurevich MiG-21 (Russian: Микоян и Гуревич МиГ-21) (NATO reporting name "Fishbed") is a supersonic jet fighter 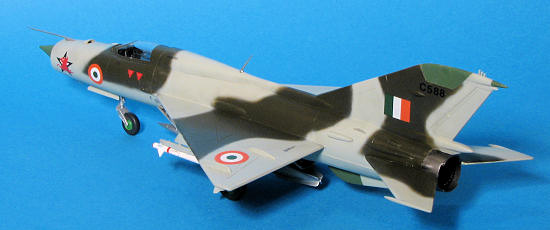 aircraft, designed and built by the Mikoyan-Gurevich Design Bureau in the Soviet Union. It was popularly nicknamed "balalaika", from the aircraft's planform-view resemblance to the Russian stringed musical instrument or ołówek (English: pencil) by Polish pilots due to the shape of its fuselage. Early versions are considered second-generation jet fighters, while later versions are considered to be third-generation jet fighters. Some 50 countries over four continents have flown the MiG-21, and it still serves many nations a half-century after its maiden flight. The fighter made aviation records. At least by name, it is the most produced supersonic jet aircraft in aviation history, the most produced combat aircraft since the Korean War, and it had the longest production run of a combat aircraft (1959 to 1985 over all variants).
| THE KIT |
Clearly molded on the underside of a stabilizer and on the inside of one wing section is the date 1977. That was 32 years ago so this isn't a new mold kit or even a reboxing of someone else's work. This is pure Revell from the youth of some and when it came out it was rightly hailed as a very good kit. Of course, it has been pressed so many times that there is a goodly amount of flash on 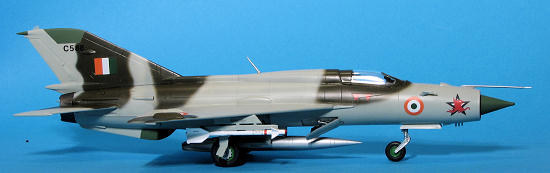 the sprues, but Revell won't re-do this one as there is no need. Now I've not built this kit before, but have owned it on several different occasions. The last boxing had a display plane with red upper surfaces and bare metal lower.
So, aside from flash, how does the rest look. Raised panel lines? Check. Soft detail? Check. Shallow wells? Check. Operating features? Well if you include the canopy that pivots forward, then Check. Poorly done missiles with rounded fin tips? Check. Sink marks? Only found one and that was on the rear of the center line fuel tank. Basic cockpit? Check. In fact, aside from a tub, seat (rather light on detail) stick, and a clear instrument panel on which you put the decal on the back, that is it. No console detail and it would benefit from some sort of additional detail. I doubt if Eduard does a p.e. set as much as I doubt that Aries does a cockpit or if there is much at all in the way of aftermarket. The dedicated could probably adapt bits made for the Academy kit if they wished. I should point out that this kit does offer the thinner and broader fin options 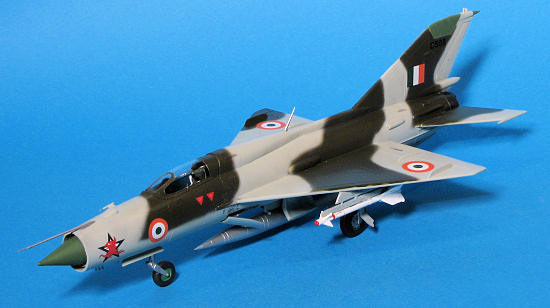 so I'm thinking one is an early PF and the other a later PF version as the PFM has a new side opening canopy. MiG-21 variants can be so confusing. Should also point out that one can build this wheels up if one can cobble together a stand for it as it does have 'wheels up' main gear doors.
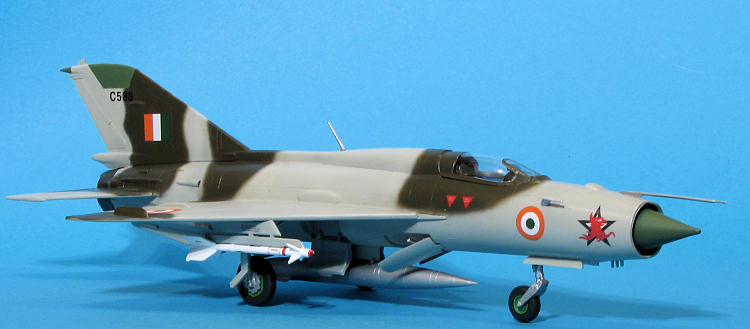
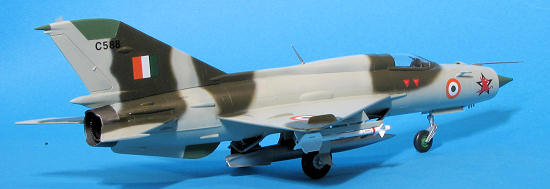
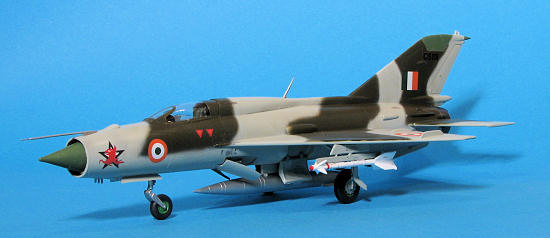
The kit instructions are well done with the usual well done construction illustrations and painting info that includes FS 595 info where it might be applicable. One thing I found interesting is that the instructions didn't think that nose weight would be needed. Perhaps. Markings are for two planes and the decals are very nicely printed. One is the box art plane from the Soviet AF in Dark Green upper and Pale Blue lower surfaces. The other is an Indian AF one in a rather 'eh' camo scheme of overall ADC Grey with Dark Olive upper surface camo bits. The decal sheet also includes a pretty good stencil suite.
| CONSTRUCTION |
 Started on this one by cementing the wings and the fin halves together. Unless you want to glue them both together at this time, one will need to choose the version one wants. I chose the larger fin as I've always thought the smaller one just looks wrong on the MiG-21. Fit is fairly good for such an old kit. The cockpit was next and after trying some Airfix Acrylic light blue (which is some of the worst acrylic I've ever used), I ended up using Vallejo's Light Turquoise, which seems a decent match for that rather interesting shade used on a lot of Russian aircraft. The seat is quite basic as is most of the kit. The decals for the instrument panel were applied to the back of the clear panel and painted over. Getting the seat properly glued in place wasn't as simple as I wished, much due to the amount of flash in the attachment slots.
 Now that I had the cockpit done, it was glued into one fuselage half. I took a section of lead weight and, after taping the major bits together, ascertained that I had enough and glued it in behind the intake. All of the 'radome' bits were painted using an old bottle of Aeromaster 'Soviet Radome' Acrylic paint. Aside from the ones on the lower strake, these were then masked.
The intake section was glued in place, and then the fuselage halve s carefully mated. Fit is such that you'll want to tape the bits together. I glued the fuselage in sections and it seemed to work out well. Still needed filler and so that was dutifully applied. All the lost raised panel lines were redone with a hobby knife. Of course, the upper fuselage behind the cockpit only needed sanded down as it was to be covered by the dorsal spine and fin. The fin was first glued into place, trying to keep it vertical and
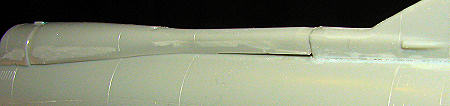 aligned with the lower fin. As usual, filler needed at the base. The two spine sections were then glued in place. The long center piece is narrower than the attachment point on the fin and also not tall enough as you can see by the photos. Not an impossible fix for one who knows the ways of sandpaper and filler. Things like this are why it takes me so long to turn kits into models.
I then attached the wings. I was less than thrilled to notice that the wing root was larger than the attachment point on the fuselage. This left steps both on the upper and lower wing to fuselage join. Nothing to be done except (drum roll please) applications of filler. In hindsight, I should have used epoxy filler as it would only have taken one application instead of several.
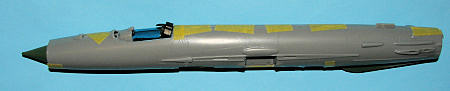
 With the wings smoothed out, I then attached the cockpit. I had already ruined the opening feature removing it from the sprue as one of the front attachment arms snapped off. The plastic is quite brittle for some reason so care had to be taken when handling it. After removing the nubs, it was glue in place. No surprise to see that the canopy was actually somewhat small for the opening. There was a large gap on the lower edge and even with this gap, the top of the canopy did not reach the height of the fuselage spine. Once the real glue dried, the various gaps were filled using clear gloss paint; in this case Vallejo's Game Varnish. The canopy was then masked and I went for some paint.
| COLORS & MARKINGS |
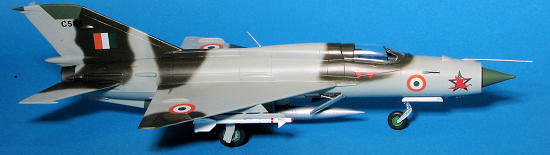
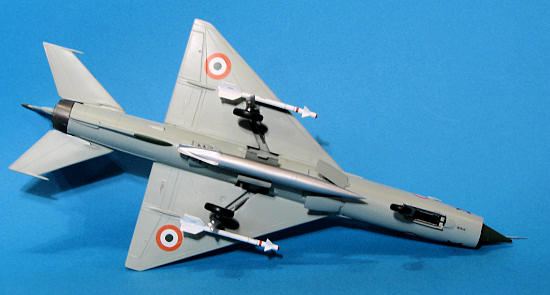
As I'd chosen the Indian AF version, I looked at the instructions for painting guidance. It told me that the airframe was overall ADC Grey (now called Light Aircraft Grey). No problem as I have that in the Testors enamel line. Doing some reading in the reference book, it stated that even the wheel wells and inner inside main gear doors were this color. No problem. Thanks to the addition of lacquer thinner, the paint was dry enough to carefully handle in about two hours and to paw in about 12.
 Meanwhile, the landing gear legs, struts, inside of speed brake doors, and outer doors were painted with Alclad II Aluminum. The tail cone was painted with Alcad II Jet Exhaust after the part had been carefully trimmed to be sure it would fit well once it was time to glue it on. I had thought to keep the speed brakes closed, but looking at photos I noticed that these often bled down so my choice was made for me.
For the upper surface, I used a greenish drab color that was pretty close to the FS 24098 that was listed on the instruction sheet. Once applied, I went back over the over-spray with the ADC Grey. The kit was returned to the work bench to have the landing gear installed.
Gluing on the gear wasn't difficult, but since the attachment holes are a bit large and the legs are thin, it was a careful gluing that got it all to be pretty much aligned with each other. Same with the nose gear as the attachment point wasn't real secure. Installing the nose tire meant trimming the stub axle pieces and even then, the tire was almost too wide for the opening. Main tires weren't a problem, though they did have to be carefully positioned as they are quite large compared to the struts. Once all was dry, things were very sturdy.
Speed brakes were next and first the retraction struts were installed. I had to cut the alignment pins on these as there weren't any in the fuselage to accept them. These were frequently seen deployed so if you want to glue them up, there were instances where this would be OK. Be advised they don't fit the wells and will require some additional sanding and filling.
 I then pushed on the exhaust section to allow the glue to soften the plastic for a better fit. It isn't perfect and one still has a bit of a gap, but it isn't bad. The tail planes glued on without any problems.
Back at the landing gear, I installed the outer gear doors and nose wheel doors. The drop tank was a real sanding challenge. The tail cone is considerably larger in diameter than the rest of the tank. It required mucho sanding and the help of a motor tool to grind things down to where I could get a smooth flow from tank body to fin body. The work, however, is well worth it.
With the centerline tank in position (it was painted aluminum using Alclad II on bare plastic/putty), the inner gear doors were attached. This allow sufficient room for these doors. All the attachment points are not as positive as one would hope, but adequate.
At this point, I started decaling. The marking are really well printed and as good as anything you get from an aftermarket sheet. The decals caused me no problems at all during application and responded well to Solvaset. Applying them took several days because I am slow.
| FINAL CONSTRUCTION |
N ow missiles were another thing. The plane looks bare without them and the kit ones are terrible as the fin tips are all rounded off with age. Hunting around, I found some old ESCI AIM-9J missiles and proceeded to trim off the extra bits on the forward fins. I also rounded off the nose. This made the missile a bit short, but it is much better than the kit ones. The kit provides all the decals needed for these missiles and after some white paint and a dip of the tip in some red, they were done. I had to cut away all the attachment areas on the kit pylons and glued the missile body right on the pylon itself. No worries.
The last things to add on were done after the kit got a coat of clear semi-gloss. This included the nose pitot tube, an air data sensor that is not shown in the instructions, and the radio mast. All the tape was taken off the dielectrics, some touch-up was done and the kit was finally transformed into a model.
| CONCLUSIONS |
I'm sure that many of you would not put this much effort into a thirty year old kit, especially when the one by Academy is much more modern, but then modeling is all about building stuff and this one will make a perfectly good model for your shelf.
| REFERENCES |
http://en.wikipedia.org/wiki/MiG-21
MiG-21 Walkaround, Part 1, Squadron/Signal, 2004
January, 2010
Copyright ModelingMadness.com. All rights reserved. No reproduction in part or in whole without express permission from the editor.
If you would like your product reviewed fairly and fairly quickly, please contact the editor or see other details in the