Trumpeter 1/48 MiG-21 MF
| KIT #: | 02863 |
| PRICE: | $45.00 SRP. Can be found for less. |
| DECALS: | Six options |
| REVIEWER: | Scott Van Aken |
| NOTES: |
| HISTORY |
The MiG-21 was designed as a point defense interceptor to be used against the
expected waves of American bombers carrying their nuclear destruction into the
Motherland. As such, it was designed to be fast and to get to altitude as soon
as possible. Armed with a single canon and two rather poor air to air missiles
(thought they'd be fine against lumbering bombers), the initial MiG-21F and F-13
fighters were perfect for the job.
 Of course, all that speed came at a price. There was very little fuel carried,
even with a centerline tank so their endurance was quite short. The aircraft had
no on-board radar and the avionics suite was basic. Still, of all the thousands
of MiG-21s built, these were the best flying aircraft.
Of course, all that speed came at a price. There was very little fuel carried,
even with a centerline tank so their endurance was quite short. The aircraft had
no on-board radar and the avionics suite was basic. Still, of all the thousands
of MiG-21s built, these were the best flying aircraft.
As with all planes, the aircraft got heavier as more equipment and capabilities
were added. All this reduced speed, reduced its turning abilities, and did
nothing for endurance. The MiG-21 MF added a second set of wing pylons to carry
more fuel and it could be equipped with a centerline gun, the gun having been
removed in the previous versions after the F-13. It was probably the most
exported of all the MiG variants as it had turned into a proper multi-role
fighter, capable of carrying bombs if needed. Still its missiles and avionics
were far behind those of Western powers. While even later aircraft got more
powerful engines and were able to carry more fuel and improved weapons and
avionics, the type was always a step behind what the 'other guys' were flying.
Not to say that the MiG-21 was a sitting duck as the type was surprisingly
effective during the 1967 and 1973 wars with Israel, despite was Israeli
propaganda would have one believe. They were also inexpensive to buy and
operate, though even that often came with the price of having to deal with the
Soviets.
| THE KIT |
Over the last few years, the MiG-21 has getting a lot of attention from both Trumpeter and from Eduard. Now I realize that Eduard has a pretty big fan base, but really Trumpeter kits are nice as well and generally less fiddly to build. I will leave all the picking of nits to others, but will tell you that at least they got the fin right on this one as on the MF, the fairing for the upper fuselage spine only goes partly into the fin.
As with most modern kits, this one has a very nice cockpit with a multi-piece bang seat, well detailed side walls and the option to put decals over the instrument panel and side consoles. It also has multi-piece nose and main gear wells that will fit into the fuselage halves prior to closing them. Trumpeter also gives you a complete exhaust system from the final compressor stage through the burner can. With this big piece in the back, I'd put in some nose weight, though the instructions do not call for it. The kit also provides a radio rack piece to fit in front of the cockpit section. This is then covered up with two upper nose pieces. A small p.e. fret is supplied of which you will use very little.
 MiGs seem to thrive on a lot of scoops around the engine and the -21 is no
exception. These are all butt joins. I was a bit surprised to see a single piece
windscreen/canopy as it tends to hide the interior detail. In order to do
multiple variants from the same basic sprues, the fin/rudder are extra pieces.
The speedbrakes can be modeled open if you so wish. The kit includes two fuel
tank designs for the center rack. I found it interesting that one installs the
inner main gear doors prior to gluing on the wings.
MiGs seem to thrive on a lot of scoops around the engine and the -21 is no
exception. These are all butt joins. I was a bit surprised to see a single piece
windscreen/canopy as it tends to hide the interior detail. In order to do
multiple variants from the same basic sprues, the fin/rudder are extra pieces.
The speedbrakes can be modeled open if you so wish. The kit includes two fuel
tank designs for the center rack. I found it interesting that one installs the
inner main gear doors prior to gluing on the wings.
Speaking of wings, you need to drill holes for the lower wing pylons and rad alt antenn. Separate flaps and ailerons are given those these are to be glued into the neutral position. MiG-21s almost never appear on the ramp with lowered flaps so that isn't an issue. As with most MiG-21 kits, you have to bend the outer main gear doors prior to installation. You are provided with rocket pods or two types of Atoll missile for the pylons.
Instructions are standard fare for Trumpeter in that they are clearly drawn and provide a few detail illustrations to help. Gunze paint references are provided and I noticed that they'd have you paint the cockpit and all the gear wells in light blue. Do a web search for more exact shades. Markings are for six aircraft. All but the Soviet option are camouflaged. You get an East German, two Iraqi, a Polish and Czech aircraft for the camouflaged options. Decals are nicely printed and while some may not like Trumpeter decals, I've not had any really bad experiences, and there are lots of aftermarket to use.
| CONSTRUCTION |
 As with most kits, instructions start you at the cockpit.
There really is a lot to it and that includes an ejection seat that is nine
pieces. No harness with this, though even decals would have been nice. I then
sprayed all the interior bits save the seat with AKAN's interior blue-green.
When that was done, I started applying the instrument decals. All this took
quite a while. Note also that when it comes to the kit's KM-1 ejection seat, I
found photos that ranged from the interior color on early seats to various
shades of grey on later versions. I used dark gull grey and it looks OK. I also
prepainted the gear well pieces. The color here also ranges from a greenish
shade to varioius shades of grey. I used a fairly light grey on mine. I also
noticed that the speedbrake bits and wells were generally unpainted on the
inside.
As with most kits, instructions start you at the cockpit.
There really is a lot to it and that includes an ejection seat that is nine
pieces. No harness with this, though even decals would have been nice. I then
sprayed all the interior bits save the seat with AKAN's interior blue-green.
When that was done, I started applying the instrument decals. All this took
quite a while. Note also that when it comes to the kit's KM-1 ejection seat, I
found photos that ranged from the interior color on early seats to various
shades of grey on later versions. I used dark gull grey and it looks OK. I also
prepainted the gear well pieces. The color here also ranges from a greenish
shade to varioius shades of grey. I used a fairly light grey on mine. I also
noticed that the speedbrake bits and wells were generally unpainted on the
inside.
The cockpit assembly is pretty straight forward and I found
that the decals fit quite well. The cockpit sides need some attention as they
hold the tabs that keep it in place in the fuselage. I should have test fit the
cockpit while the glue was still pliable on these as not doing so meant that
there were gaps once installed. Other subassemblies were built up that fit into
the fuselage and all the fuselage bits save for the nose radio compartment were
fit in place and the fuselage halves closed. This is a fairly fiddly operation
as one cannot s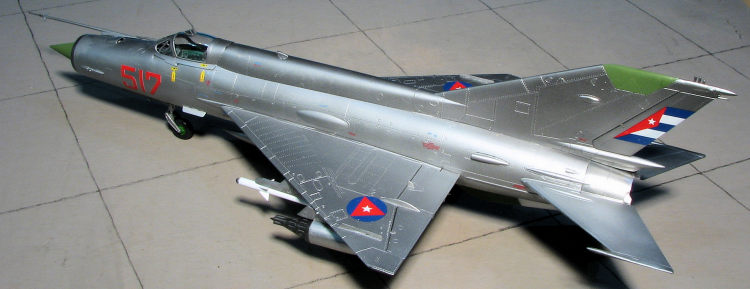 ee the various slots into which the subassemblies fit on one half
so it is important to wiggle things around a bit until they fit into place.
ee the various slots into which the subassemblies fit on one half
so it is important to wiggle things around a bit until they fit into place.
Once that was done and the seams dealt with, I attached the myriad of scoops that these earlier MiGs seemed to engender. I also built up the fin and once all the scoops were done, I glued the fin in place. There is a fair gap at the front but nothing major. Next were the wings. The various holes were opened and slots cut in the upper wing for the p.e. wing fences. I really don't like this feature as it is a pain to open up such a thin slot. The gear well was built and the wings were closed. Then the flaps and ailerons were attached. Note that I've not seen more than a handful of photos of MiG-21s on the ground with the flaps lowered unless they were undergoing maintenance. I decided to leave the tail cone off until after painting so I wouldn't have to mask it. It was painted stainless steel and set aside. As a result of leaving this off until later, the tailplanes were also not attached or I wouldn't be ale to get the tail cone attached.
Moving on, the completed wings were glued in place and I returned to the cockpit to install all the clear bits. The windscreen and canopy were masked prior to gluing them on. It was then time to consider some paint.
| COLORS & MARKINGS |
 Though I wasn't sure what markings to use, I did know that it
would be overall aluminum. I first painted and masked the green antenna areas
using AKAN lacquers. These areas were masked when dry. I also filled the gear
wells with Silly Putty using the same 'egg' I've had for nearly 20 years. For
this model I tried a primer I've had for a fair amount of time; Stynylrez.
This is a water based acryilic and I bought three shades. For this build, I
decided to use the black. It is touted to be premixed and ready to use. I shook
it up for several minutes and then started spraying. I learned quickly that it
has be misted on or it will pool and run. It took a while and several sessions
to get all the 'metal' bits covered but it does dry flat and is pretty hard. I
then sprayed Alclad II lacquer over it and was generally pleased with how well
the primer held up.
Though I wasn't sure what markings to use, I did know that it
would be overall aluminum. I first painted and masked the green antenna areas
using AKAN lacquers. These areas were masked when dry. I also filled the gear
wells with Silly Putty using the same 'egg' I've had for nearly 20 years. For
this model I tried a primer I've had for a fair amount of time; Stynylrez.
This is a water based acryilic and I bought three shades. For this build, I
decided to use the black. It is touted to be premixed and ready to use. I shook
it up for several minutes and then started spraying. I learned quickly that it
has be misted on or it will pool and run. It took a while and several sessions
to get all the 'metal' bits covered but it does dry flat and is pretty hard. I
then sprayed Alclad II lacquer over it and was generally pleased with how well
the primer held up.
Then it was time to add bits and pieces. The main landing gear was the first thing. Each of the gear legs comprises several pieces and the exact placement of the ancillary bits can be confusing. I recommend attaching all of these pieces at the same time to ensure you can get them in the proper position. Once done, the retraction strut was installed along with the gear let. Fit is quite loose so you'll need to keep adjusting on it until the cement gets fairly well set. I then installed the nose gear, discovering that it was designed to be attached during the construction of the nose gear well. I had to cut some attachment points to get it to fit. I then attached the main wheels. I'd been warned that these may deteriorate after time so I'll just have to wait and see.
Meanwhile, I built up the wing pylons that would require the
missile rails. I also assembled and painted a pair of missiles and the rocket
pods. These were set aside until after decaling. I then attached the main gear
doors and those on the nose. These latter items were a real pain to install. For
some reason, the hinge pi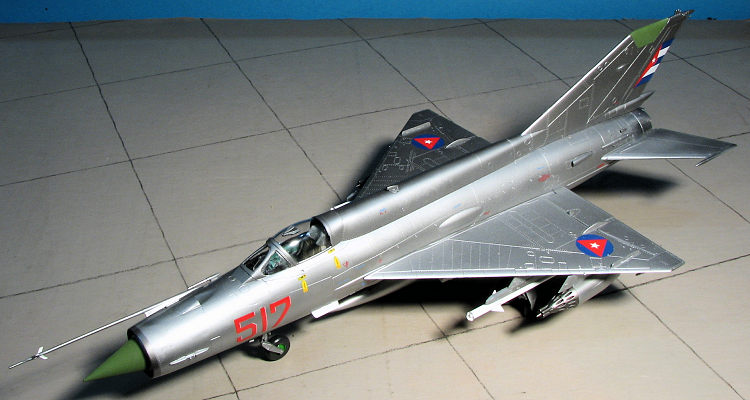 eces
simply did not want to fit into the slots designed for them. I got them on best
I could and then left it as it was. I found it unusual that there is no positive
attachment for the tailplanes, but they were eventually fitted, though I did
have to wiggle them around a bit as the glue set to get them just right. I
glued the forward speed brakes closed and the rear one was opened only a small
amount.
eces
simply did not want to fit into the slots designed for them. I got them on best
I could and then left it as it was. I found it unusual that there is no positive
attachment for the tailplanes, but they were eventually fitted, though I did
have to wiggle them around a bit as the glue set to get them just right. I
glued the forward speed brakes closed and the rear one was opened only a small
amount.
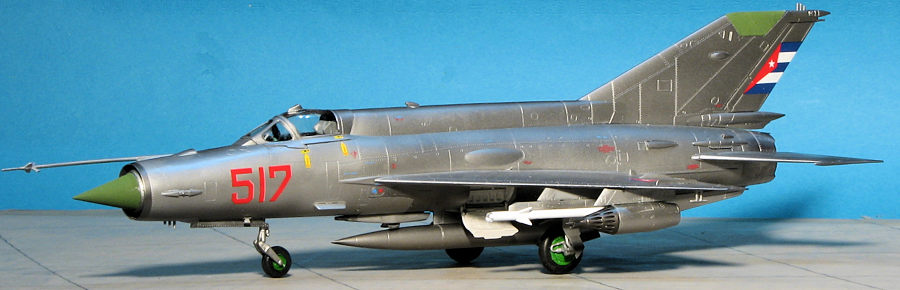
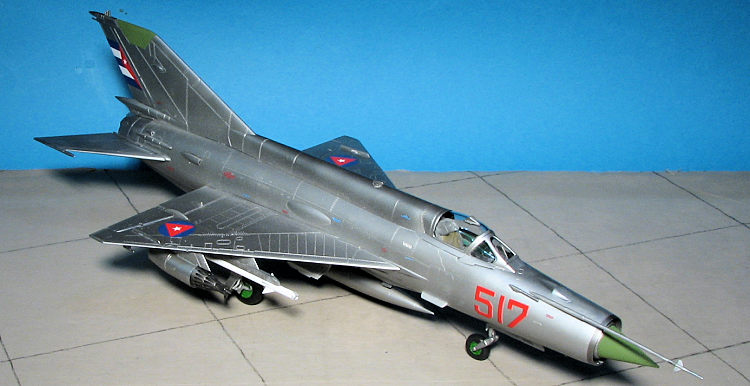
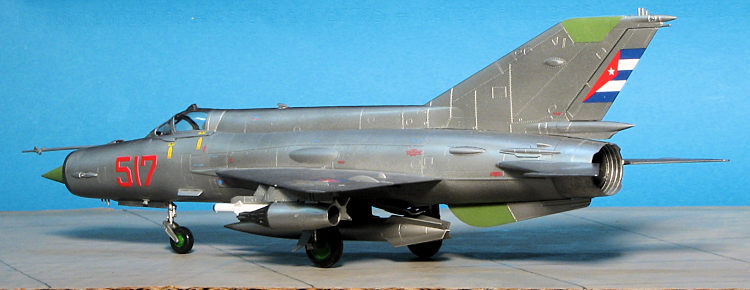
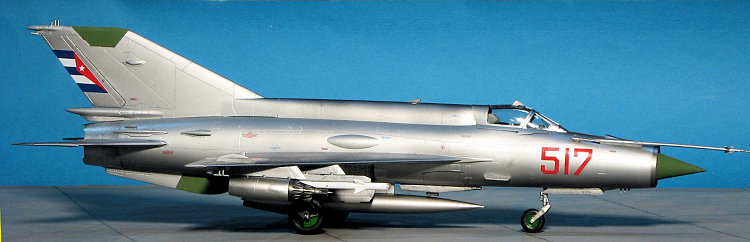
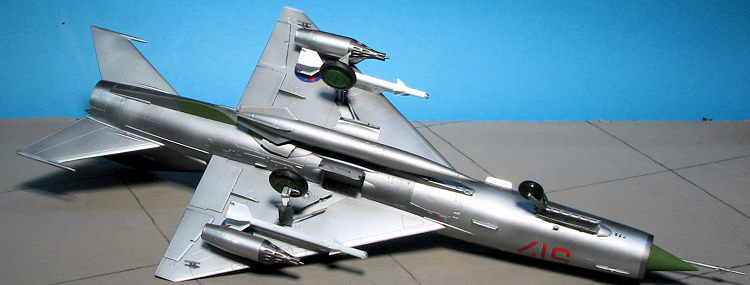
For decals, I chose the Cuban Air Force option from an RV Decals sheet I'd used before and will use again. This sheet does not provide upper and lower placement information, but a look on the web found what I needed for this one. No stencils are provided with the RV sheet but there are a ton of them on the Trumpeter sheet. I used about 20% of them just to make things look a bit less bare. The pylons and weapons were then attached along with the centerline fuel tank and gun. I unmasked all the dielectric panels and the canopy. The last things I added were the rear vision mirror atop the canopy as well as the two nose pitot sensors.
| CONCLUSIONS |
Though I had a few issues such as the nose gear doors, the rest of the build was pretty much trouble-free. It requires some careful masking of the dielectric panels and I'm not yet sure of how long the vinyl tires will hold up, but when compared to the Eduard kit of the same plane, it seemed to be less of a fiddly build and seemed to have better fit. Next on my list is the Academy kit, which I believe, is the oldest tooling of the three. We'll see how that one goes.
5 November 2021 Copyright ModelingMadness.com. All rights reserved.
No reproduction in part or in whole without express permission. If you would like your product reviewed fairly and
fairly quickly, please
contact
the editor or see other details in the
Note to
Contributors. Back to the Main Page
Back to the Review
Index Page
Back to the Previews Index Page