Zvezda 1/72 MiG-21bis
| KIT #: | 7259 |
| PRICE: | $17.50 SRP in 2008 |
| DECALS: | Three options |
| REVIEWER: | Scott Van Aken |
| NOTES: |
| HISTORY |
The Mikoyan-Gurevich MiG-21 (Russian:Микоян и Гуревич МиГ-21) (NATO reporting name "Fishbed") is a supersonic jet fighter aircraft, designed and built by the Mikoyan-Gurevich Design Bureau in the Soviet Union. Some 50 countries over four continents 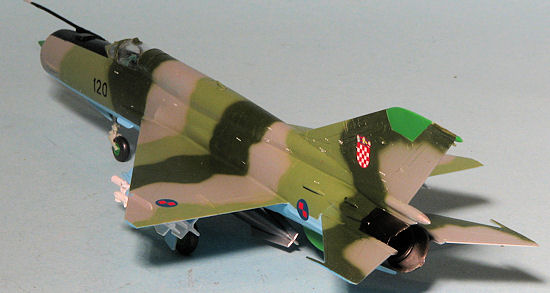 have flown the MiG-21, and it still serves many nations a half-century after its maiden flight. The plane has the distinction of holding a number of aviation records, including 1: the most produced jet aircraft in aviation history, 2: the most produced combat aircraft since WWII, and 3: the longest production run of a combat aircraft. Its Mach 2 capability exceeds the top speed of many later modern fighter types. Estimates are that more than 10,000 MiG-21s were built
| THE KIT |
There have been a number of MiG-21 kits over the years. Each of them has had its enthusiasts and its detractors. Apparently, according to the MiGistas, there has yet to be a completely accurate MiG-21bis done in any scale. Now to those of us who are not 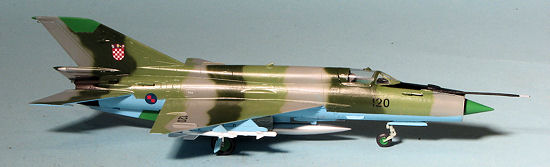 privy to all the nuances of each MiG variant (and there are quite a few), we've seen little wrong with the ones from KP and Fujimi over the years. In fact, I've built several of those two and was pleased with the results.
However, this on is supposed to be the best of the batch, from what I've been told and the fact that it is reasonably priced doesn't hurt.
Molded in a nice neutral grey plastic with very nicely done engraved panel lines, the kit seems hauntingly similar in layout to the Fujimi version. Perhaps there are just a finite number of ways to mold a MiG-21 just as there are many other popular subjects. The four grey and one clear sprue contain the 90 parts needed to build one fully loaded MiG-21 Fishbed L. There is room for the usual nose wieght in the radome (though none is shown needed in the instructions. A fairly nice cockpit tube with seat, stick and instrument panel are provided. There is some raised detailing for the instruments. Nose and main gear wells are separate and installed along with the exhaust when one closes up the fuselage.
The fin and upper spine are separate, allowing all the near similar MiG-21 versions to be built. It also is nice that one does not have to fill the upper fuselage seam. As on other MiG-21 kits, all the scoops, shields and antennas ar separate items. Even the need to slightly bend the main gear door is the same on all the others. Weapons galore are provided that include a centerline fuel tank, two types of missiles and rocket pods. RATO units are also part of the package. There is also a somewhat lame looking centerline gun. No wing fuel tanks are provided, which is not really bad as they'd fit on the outer wing pylons, something that just 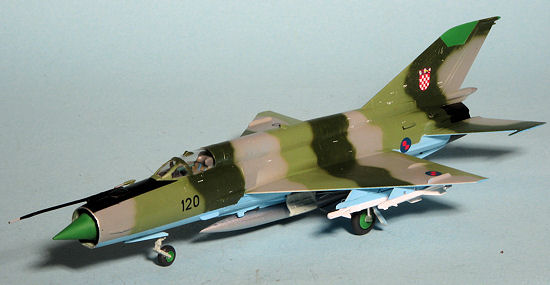 looks wrong. you can also display the speedbrakes open if you'd wish. Heck, you can do the gear closed on this one and use the pilot as a display stand is also provided. An anachronism from the 1960s, but one that many modelers will find useful.
Instructions are well done and provide Model Master paint references. Markings are given for three planes. One is the box art aircraft in a disruptive camo scheme from the Russian Air Force. Of course, there is the requisite Finnish version in black and green, while a Polish AF variant in overall bare metal finishes the three. This latter one could also be in a light grey as many were later painted this shade. I should mention that upper wing markings are provided for the Polish plane, something I think was not used. These are the older Polish insignia (I think) as the newer one has the red and white checks reversed. Decals are quite matte and should provide no problems. For those wanting something different, there are a slew of aftermarket sheets for this plane.
| CONSTRUCTION |
Some of you may recall that I recently built an Amodel MiG-21 and looking at the Zvezda sprues, I can see where Amodel found its inspiration. Quite a few of the parts are identically engineered and I would bet that many would be interchangeable. As usual, I started building up the cockpit. Not really all that much there as the MiG-21 is a pretty basic interceptor. There are some sidewalls that fit into recesses in the fuselage halvs. The tub needs the back bulkhead glued on as well as the control stick and instrument panel. All of this was painted that blue-green color using Testors enamels. I then used a black pastel pencil to bring out some instrument detail. Meanwhile, the exhaust sections were assembled and painted jet exahust using Alclad II. Humbrol 101 was used for the nose radome. I also glued in place the nose gear well and added some weight above it to be sure there would be no tail sitting issues. I should point out that the attachment area for the radome is very small and test fitting showed it could not add it in after the fuselage was closed up so that will need to be masked before overall painting. I also painted the inside of the fuselage at the intake and exhaust area with aluminum.
Then the fuselage was closed up. There was the usual sanding required and the radome area needed tape and super glue to hold the halves together. Once done, the upper spine and fin were glued in place. I also glued the three speed brake assemblies in the closed position. Rarely were the front ones open on the ground though the rear one was more frequently seen drooped down. Once the fin seams were filled, the wings were glued on. Again a small amount of filler was needed at the roots.
 At this time, I painted the dielectrics with Humbrol 101 and masked them. Returning to the underside, the forward 'Odds Rods' IFF antennas were attached. This is not only a very loose fit, but has a big sink area on it. The wing pylons were also attached. The inner ones are pre-drilled and Zvezda provides a plastic alignment tool so you can attach the outer pylons. This actually worked very well and is a great idea.
With the pylons in place, the various small intakes on the rear of the fuselage were glued on. These are an expected evil with MiG-21 kits as there is no real way to mold them in place. They are also very easy to lose so great care has to be taken when attaching these. I also installed the upper spine intake and the lower nose IFF antenna. The fit of this antenna was not good and filler was needed. The tail planes were not a problem to install and glued in with no issues. I had considered painting the jet exhaust before attaching these, and in hindsight, it would have made things easier. The canopy and windscreen were masked and after a resin seat was installed (robbed from another kit), these were glued in place. An excellent fit. The upper right sensor was attached at this time. I left off the nose probe until the end for fear of breaking it.
| COLORS & MARKINGS |
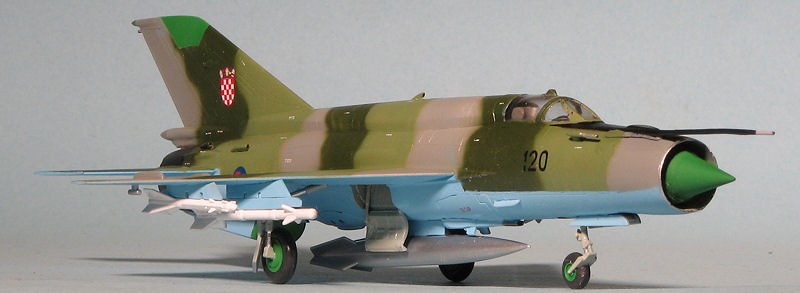
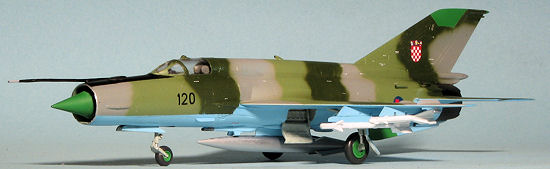
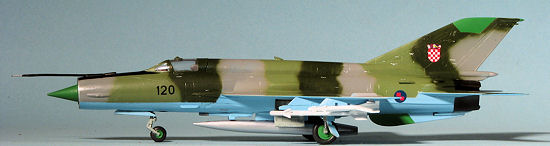
For this kit, I decided to use Balkan Models sheet BM-05 for Croatian MiG-21s. There are three distinct schemes provided and I wanted to do one of the aircraft in the four color camouflage that were overhauled and updated in Romania. I have to confess that 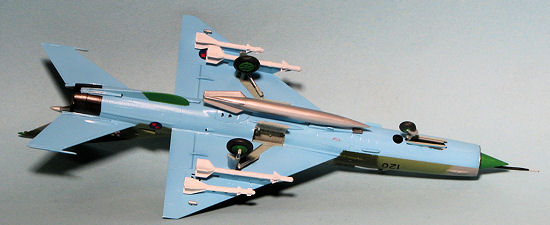 I had none of the colors listed so decided to use what I had. I used a nice light blue for the underside, a blue-grey for the upper surface and then sprayed on some olive green. These three colors were all acrylics from the AKAN acrylic range. The olive green was almost the same hue as the blue-grey and I thought that couldn't be right. I did a web search and found an image of one of these planes. As suspected, the olive should be much darker. Same for the underside blue-grey.
The closest I had for the olive green was Testors FS 34097. I added some white to it and it looked suitable to me. For the 'Forrest Green', I used FS 34079, also from the Testors Range. The underside was repainted using a Vallejo sky blue. This was too blue so I tried RLM 65. This was too grey. Finally, I tried some Gunze light blue and mixed in some white. This seemed to match pretty well. This made for a rather long painting sequence, as you can imagine. I should also point out that the colors are not exact as to the real aircraft, and probably more intense, but they look OK to me and again, I used what I had on hand.
| FINAL CONSTRUCTION |
Once all the colors were applied, I applied a gloss clear acrylic to the upper surfaces (the undersides were already gloss) in preparation for decals. I then installed the nose gear after painting it. The main landing gear were next. I think Zvezda has the part numbers for the main gear retraction struts backwards in the instructions. The small pin on the end should affix to the socket in the front of the landing gear. The main wheels were also glued on as was the long pitot tube. Fit of this item was not the best.
 I then started to apply the decals. The Balkan Models decals are superb and probably did not need setting solution, but I used some Microsol anyway. There are a myriad of small, white stencils to apply and that took quite a while. I noticed that some of the stencils seemed to not be there as after dipping the decal in water, I did not see the stencil, though according to the instructions they should have been quite visible. These decals have only a short working time on the backing sheet so it is wise to do only a few at a time. After several days, all the markings were on.
I then attached the gear doors and gave the model an overall semi-gloss finish. The polished metal nose ring was painted using Testors Silver. I tried Bare Metal Foil, but the area is just too thin for this to work well as it kept falling off. There was the usual touch up painting required and I cemented the missiles and drop tank in place. No stencils are provided for the missiles. The masking was removed, the nose anti-glare panel had some Vallejo matte clear brushed on and that was it.
| CONCLUSIONS |
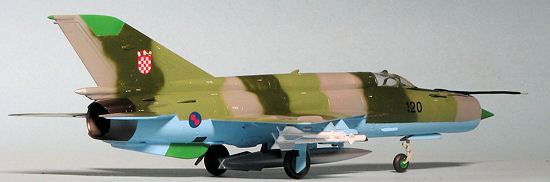 Though it will take a bit longer to do than, say, the Fujimi kit, the end result is a very nicely done and hopefully relatively accurate MiG-21bis. I am not fond of overly fiddly kits and I'd have to put this into the rather fiddly category what with all the small scoops and other tiny pieces. However, I do have to say that it is well worth the effort put into it to have such a nice model for the display shelves. Since the MiG-21 was flown by so many countries, finding markings that are something other than the norm is one way to keep things interesting. Will I build another? Probably as I like the MiG-21 and I still need to have several other variants done for the collection.
| REFERENCES |
January 2013
Thanks to an amenable trade for this one.
If you would like your product reviewed fairly and fairly quickly, please contact the editor or see other details in the