
ESCI 1/72 RF-5A Freedom Fighter
| KIT # | 9038 |
| PRICE: | $7.50 (in 1985) |
| DECALS: | Three aircraft |
| REVIEW : | |
| NOTES: |
|
| HISTORY |
I have gone over the history of the F-5A Freedom Fighter in an
Many of the nations that either built or bought the F-5A were supplied with this nose. While somewhat limited in its ability to photograph at high altitudes, at low altitudes it was very good and provided commanders with good appraisal of the tactical situation. Even today, this battlefield recon capability is still done with aircraft as most of the high altitude stuff is nowthe realm of low orbit satellites.
| THE KIT |
Again, I'll refer you to the earlier preview as the sprues are just about identical. The only difference is the addition of a small sprue containing the two halves of the RF nose.
 This particular kit comes with three decal options. One is for a USAF F-5C from the Skoshi Tiger project that sent the aircraft into combat in Vietnam to prove its capabilities. That is the aircraft so prominent on the box art. The other two have RF-5Aoptions and they are a camouflaged Spanish aircraft and a camouflaged version for the Canadian Air Force. I'd show you the decal sheet, but this kit was built over 15 years ago so the sheet is long gone. Let me just say that it is typicalESCI in that it is very matte and needs killer solvents!
| CONSTRUCTION |
Building the kit wasn't a hassle at all. In fact, it went together very well indeed. I can't say that no filler was used as I always use filler. However, it was an absolute delight to construct. If you can find one of these kits, get it as it is one of ESCI's best.
 I followed the kit instructions for the cockpit, painting everything in it a dark gull grey. There are decals for the instrument panels and they are adequate in the scale. The bang seat is basic, but looks the part. The only other interior part was
the control stick. I built it with canopy closed. Then the interior was glued into the forward fuselage and the fuselage glued together. I installed a bit of
nose weight, but don't think it was really needed. The rest of the fuselage is
split top and bottom as with every F-5 kit I have ever built with the wings
trapped between the two halves. On this kit the stabilizers are separate, but are a press fit. I did have to use filler when I joined the nose to the rest of
the fuselage as well as on the back portion of the fuselage.
I followed the kit instructions for the cockpit, painting everything in it a dark gull grey. There are decals for the instrument panels and they are adequate in the scale. The bang seat is basic, but looks the part. The only other interior part was
the control stick. I built it with canopy closed. Then the interior was glued into the forward fuselage and the fuselage glued together. I installed a bit of
nose weight, but don't think it was really needed. The rest of the fuselage is
split top and bottom as with every F-5 kit I have ever built with the wings
trapped between the two halves. On this kit the stabilizers are separate, but are a press fit. I did have to use filler when I joined the nose to the rest of
the fuselage as well as on the back portion of the fuselage.
The fin fit quite well into the upper fuselage half. The kit has a separate rudder which was glued at a bit of an angle for interest. Then I glued the intakes and the recce nose. Both of those needed filler and a bit of filing to smooth things out. I'm sure I would not have had as much filler usage were I building the kit nowadays. Back then I was a regular model factory,churning out several kits a week! A nice touch is that the leading edge slats are separate so I glued them slightly lowered. Probably terribly incorrect, but it looks nice.
 Fitting the rest
of the bits was quite simple. One thing I don't like about the kit is that they
assume that you will be using the wing pylons so have the slots already opened
in the wings. This is because they use a single piece wing, but I still don't
like it as I might want to do a clean aircraft.
Fitting the rest
of the bits was quite simple. One thing I don't like about the kit is that they
assume that you will be using the wing pylons so have the slots already opened
in the wings. This is because they use a single piece wing, but I still don't
like it as I might want to do a clean aircraft.
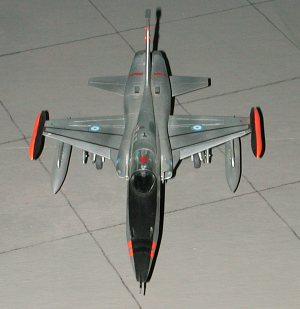
The landing gear looks scale and is very well done. The wells may be a bit shallow, but have a decent amount of detail. I left the center gear doors down, though they would normally be up. Not sure if the nose gear door is the same, but it would make sense if it were. Other bits and pieces were glued in place, including the pylons, additional intakes, pitot tube and wing tiptanks. Then it was off to the paint shop.
| PAINT & DECALS |
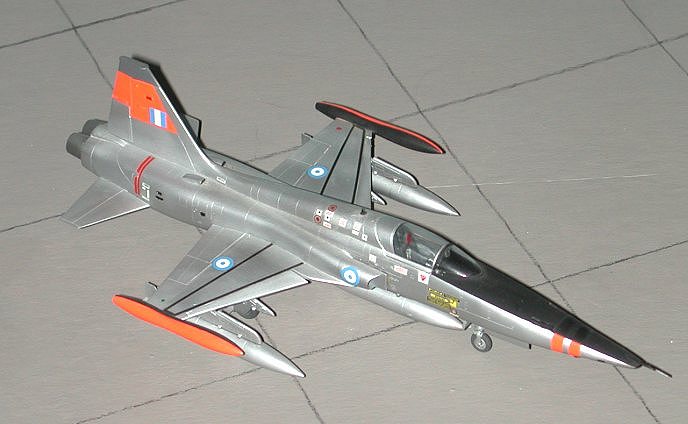
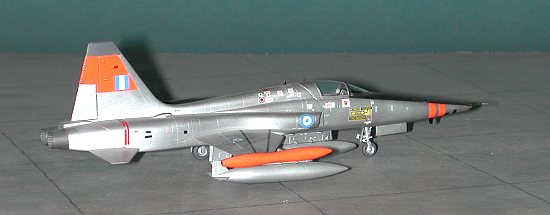
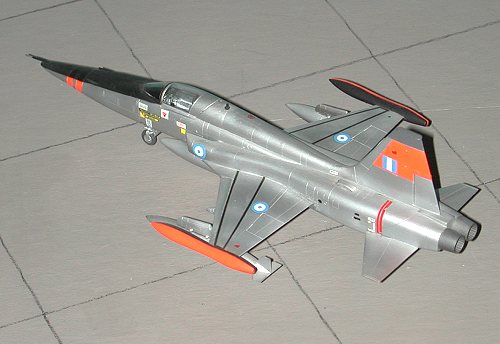
First thing was to mask the canopy and windscreen. Then the tail, nose and tip tanks were painted white. When dry, these were painted Day-Glo. The Day-Glo areas were then masked off and the anti-glare panel and inside of the tip tanks was painted flat black. The tip of the fin was painted dark grey. This was masked and the rest of the aircraft was painted aluminum using Testors Metallizer. I wanted to do a Greek RF-5A that was participating in an exercise as I thought the Day-Glo patches would look cool. I had seen this scheme in a book so duplicated it.
 Once all was dry,
I used kit decals for all but the insignia which came from one of those old ESCI insignia sheets They went on with no real hassles, but needed killer solvent to get them to conform to any panel lines. Naturally the Day-Glo overwhelmed the white in the tail flash. The only thing missing is a serial number, and I'll take the procrastinators 5th on that one!
Once all was dry,
I used kit decals for all but the insignia which came from one of those old ESCI insignia sheets They went on with no real hassles, but needed killer solvent to get them to conform to any panel lines. Naturally the Day-Glo overwhelmed the white in the tail flash. The only thing missing is a serial number, and I'll take the procrastinators 5th on that one!
Once all that was dry, the final bits were added to the kit. This included exhausts, wheels, and gear doors. The nose wheel is molded onto the nose strut for added strength. The tires were painted with Panzer Grey. Finally, the drop tanks on the wings and centerline were added. I put them on the outer wing stations as the photo had them there, though I think they would have looked nicer on the inner stations.
| CONCLUSIONS |
I can't say enough about how nice this kit is. It will take quite a bit of doing to make any improvements, though a nicer cockpit would-be one of them. It is a shame that this kit has not been reissued by AMT. The F-5B was for a very short period and it as well as this kit are not the easiest to find. Racing Champions could help pull themselves out of their money problems by looking at what they have and reissuing some of these ESCI kits.
Highly recommended.
October 2000
Review kit courtesy of me and my wallet!
If you would like your product reviewed fairly and fairly quickly, please contact the editor or see other details in the