| KIT #: | ? |
| PRICE: | $ |
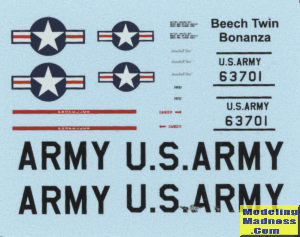
| DECALS: | One option |
| REVIEWER: | Scott Van Aken |
| NOTES: | Short run resin kit |
| HISTORY |
The Twin Bonanza was first flown on November 15, 1949 after rapid development, begun only in April of that year. The Model 50's type certificate was awarded in 1951, and production began the same year. The United States Army adopted the Twin Bonanza as the L-23 Seminole utility transport, making it the largest fixed-wing aircraft in its inventory at that time. According to Ralph Harmon, the airplane's designer, during an initial demonstration flight for the Army, Claude Palmer, a Beechcraft Demonstration Test Pilot, crashed while trying to land over a 50-foot (15 m) tree line while full of soldiers and sandbags. Everyone on board walked away from the crash. The Army was impressed with the structural strength of the Twin Bonanza, eventually purchasing 216 of the 994 examples produced. It was also the first twin-engined aircraft in its class to be offered to the business market, but the Korean War was raging in the early 1950s and the US Army took almost the entire production for 1952 and 1953. The Beechcraft Model 65 Queen Air and Model 90 King Air are both direct descendants of the Model 50 Twin Bonanza. All three aircraft share the same basic wing design, as well as landing gear, flaps, instrument panels, fuel cells, and more. The Queen Air added a larger cabin to the design, while the later King Air added turbine power and pressurization. Twin Bonanza production ended in 1963 while the King Air was under development. The military version was the L-23/U-8
| THE KIT |
 This is
very much your standard garage kit, but without the issue of molding glitches.
That means no air bubbles or pockets, though you do have to drill out the holes
for mounting the flight surfaces. Not a big deal and standard stuff for those
who build these sorts of kits. Note that the images shown are for the RU-8D, but
this kit is pretty much the same but without all the antennas.
This is
very much your standard garage kit, but without the issue of molding glitches.
That means no air bubbles or pockets, though you do have to drill out the holes
for mounting the flight surfaces. Not a big deal and standard stuff for those
who build these sorts of kits. Note that the images shown are for the RU-8D, but
this kit is pretty much the same but without all the antennas.
The sturdy box comes with the fuselage halves and wings separate with the rest of the parts in zip bags of various sizes. All of the parts are free of any pouring stubs and only a few, like the props and landing gear, are still surrounded by the resin wafers. This helps to keep them from breaking during shipment.
The interior consists of a floor onto which the front seats are attached. Behind this is a bank of radios and a seat for the radio operator. A small shelf is also included. This will fit into the left fuselage half where there are ridges to accept them. While no indication of how much weight is needed, you will need to fit it into every available space forward of the main gear. There is a good size cavity above the nose gear well for this.
Once the fuselage halves are joined, you can attach the various flight surfaces. The instrument panel with the control wheels is then glued in place followed by the cockpit/cabin clear piece. This is a large vacuformed part that has the windows and the surrounding fuselage. Two of these are provided in case you need a second one.
Both the nose and main gear take up a goodly number of parts with each having separate oleo scissors and retraction struts. The main gear cant forward a bit which is why it is important to put in as much nose weight as you can. Engine nacelles are an upper and a lower half which are joined together. A full engine is provided which attaches to the cowling front piece and is then inserted into the cowling. The cowling is joined to the wing. If concerned about weight, you may consider removing the last four cylinders from the engine to provide space. The kit includes a slightly longer nose cone without landing light if you wish to do a civil version.
 The instructions consist of a nicely done drawn page that is
folded to include construction steps. Basically, the outside is
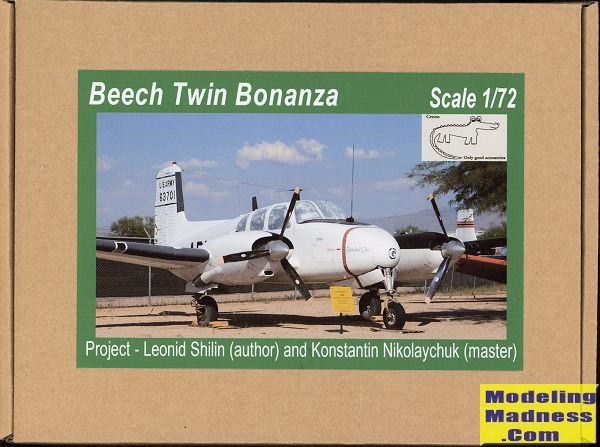
gloss white with the interior in dark grey. There is a nicely restored plane at
the Pima Air Museum and that is what is shown on the box art. If you want
something different, you'll have to do some sleuthing and make up your own
markings.
The instructions consist of a nicely done drawn page that is
folded to include construction steps. Basically, the outside is
gloss white with the interior in dark grey. There is a nicely restored plane at
the Pima Air Museum and that is what is shown on the box art. If you want
something different, you'll have to do some sleuthing and make up your own
markings.
| CONCLUSIONS |
The only way to get interesting kits like this is with resin as the major kits makers won't touch them. This one has several benefits. One is that it could easily be built as a civilian Twin Bonanza. I can tell you from building the RU-8 that this kit will take some careful building and those modeling skills you have been honing, but anyone with experience in building resin kits will not have any problems.
| REFERENCES |
https://en.wikipedia.org/wiki/Beechcraft_Twin_Bonanza
June 2020
Copyright ModelingMadness.com. All rights reserved.
Thanks to Croco for the review kit. Contact the owner at You can
find this kit on line by doing a search. You can also contact them direct at
sniff23@inbox.lv.
If you would like your product reviewed fairly and
fairly quickly, please
contact
the editor or see other details in the
Note to
Contributors. Back to the Main Page
Back to the Review
Index Page
Back to the Previews Index Page