| KIT #: | 051 |
| PRICE: | $ |
| DECALS: | Two options |
| REVIEWER: | Scott Van Aken |
| NOTES: | 1995 release |
| HISTORY |
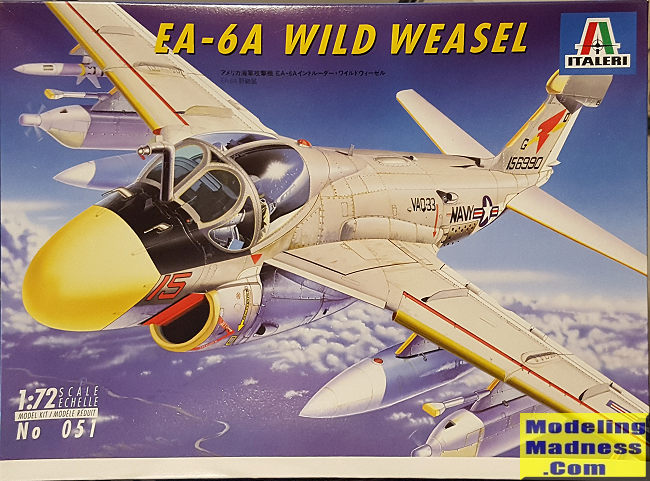
An electronic warfare (EW)/Electronic countermeasures (ECW) version of the Intruder was developed early in the aircraft's life for the USMC, which needed a new ECM platform to replace its elderly F3D-2Q Skyknights. An EW version of the Intruder, initially designated A2F-1H (rather than A2F-1Q, as "Q" was being split to relegate it to passive electronic warfare and "H" to active) and subsequently redesignated EA-6A, first flew on 26 April 1963. It had a Bunker-Ramo AN/ALQ-86 ECM suite, with most electronics contained on the walnut-shaped pod atop the vertical fin. They were equipped with AN/APQ-129 fire control radar, and theoretically capable of firing the AGM-45 Shrike anti-radiation missile, although they were apparently not used in that role. The navigational radar is AN/APN-153.
Only 28 EA-6As were built (two prototypes, 15 new-build, and 11 conversions from A-6As), serving with U.S. Marine Corps squadrons in Vietnam. It was phased out of front line service in the mid-1970s, remaining in use in reserve VMCJ units with the USMC and then the United States Navy in specialized VAQ units, primarily for training purposes. The last EA-6A had been retired by 1993.
| THE KIT |
 Developed
in the mid 1990s, this kit has the engraved panel line external detail that
was demanded and while not as fine as on some Japanese kits, is not the
trenches we have seen with other kits. Unlike more modern kits, there will
not be a lot of left over bits for other variants, pretty much everything on
the sprues goes into building the kit.
Developed
in the mid 1990s, this kit has the engraved panel line external detail that
was demanded and while not as fine as on some Japanese kits, is not the
trenches we have seen with other kits. Unlike more modern kits, there will
not be a lot of left over bits for other variants, pretty much everything on
the sprues goes into building the kit.
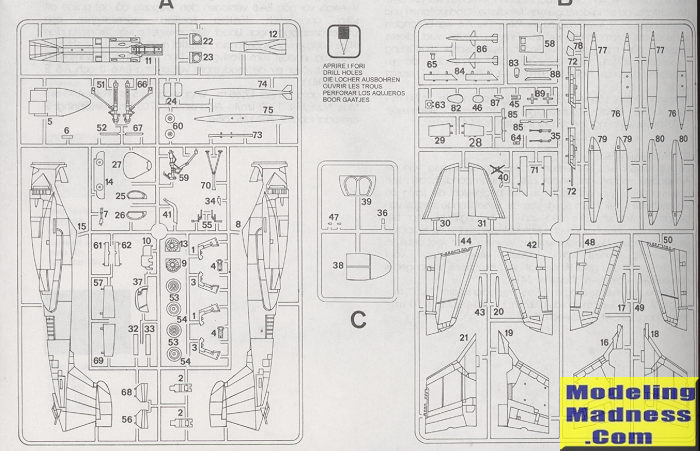
1/72 cockpits rarely rival their 1/48 brethern for detail and this one is no exception. There is nicely raised detail on the instrument panel and side consoles to paint as no decals are provided. Seats are four pieces and adequate for the scale. This all fits into an open front tub, which, along with the instrument panel, intake and exhaust compressor faces, a tail hook insert and the lower fuselage piece will it in between the two fuselage halves. Note that those wanting the speed brakes open will need to do some cutting.
The wings are designed to allow the outer sections to be folded. As such, there is some detail at the join area. The inner stubs are attached to the fuselage along with the intakes, radome, exhaust pieces and the tail planes. There is also the ability to have the boarding ladders extended. If you have cut the fuselage for extended speed brakes, those are now installed. For the closed those can simply be slipped into place.
While the instructions have you attach the clear bits, it might be worthwhile to wait until later, especially if you want the canopy open. There are various upper fuselage bumps and intakes that will need to be glued on before painting. Instructions then move on to assembling the outer wing pieces. Personally, if I was going to build the wings extended, I'd assemble the entire wings prior to this to help ensure a good join.
Landing gear and doors are next with
some detail drawings to help with installing the forward main gear doors and
retraction braces. All of the doors for both options have red lips so it
would be best to paint and glue these on separately. You are provided two
jamming pods and thr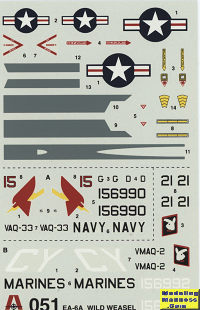 ee
fuel tanks. You might want to see if the ESM antennas on the center pylons
were on the aircraft you are building. I get the feeling that the VAQ-33
plane may not have had them. The outer pylons are for the Shrike radiation
missiles which would not have been carried by the VAQ-33 aircraft and as the
history mentions, were probably not used by the Marines either. Though the
holes for the inner two pylons are opened already, the outer pylon is a butt
fit. Looking at period photos of the plane, it seems this outer pylon was
used for things like travel pods and additional fuel tanks. so it would not
be wrong to leave it on, but empty.
ee
fuel tanks. You might want to see if the ESM antennas on the center pylons
were on the aircraft you are building. I get the feeling that the VAQ-33
plane may not have had them. The outer pylons are for the Shrike radiation
missiles which would not have been carried by the VAQ-33 aircraft and as the
history mentions, were probably not used by the Marines either. Though the
holes for the inner two pylons are opened already, the outer pylon is a butt
fit. Looking at period photos of the plane, it seems this outer pylon was
used for things like travel pods and additional fuel tanks. so it would not
be wrong to leave it on, but empty.
Instructions are well done and provide model master along with FS 595 paint references. The two options are in the older light gull grey over white scheme. One is the box art plane from VAQ-33 which provided spoof services for ships and other installations. The other is for a VMAQ-2 plane. While the instructions don't show it, this plane had a black tail and black surround to the canopy. Decals are quite matte, but should work well. The sheet includes fuselage and wing walk areas.
| CONCLUSIONS |
The only other EA-6A of which I am aware in this scale is by Fujimi. As to which is better, I couldn't tell you as I've not built either. However, I did build Fujimi's A-6A kit and found it about as I'd expected, which means good, but needed filler. The benefit of the Fujimi kit is that it has separate slats. Either way, painting will take a bit of masking in order to properly duplicate the buff flight surface leading edges, but the results are worth the effort.
| REFERENCES |
https://en.wikipedia.org/wiki/Grumman_A-6_Intruder
August 2019
Copyright ModelingMadness.com All rights reserved.
If you would like your product reviewed fairly and fairly quickly, please contact the editor or see other details in the Note to Contributors.
Back to the Main Page Back to the Review Index Page Back to the Previews Index Page