Huma 1/72 Dornier Do-27
| KIT #: | HM0013 |
| PRICE: | $9.99 when new |
| DECALS: | Six options |
| REVIEWER: | Scott Van Aken |
| NOTES: |
| HISTORY |
The Dornier Do 27 was a German single-engine STOL utility aircraft, manufactured by Dornier GmbH (later DASA Dornier, Fairchild-Dornier). Configuration was a classic high-wing, "tail-dragger" aircraft with fixed landing gear.
Dornier's facilities in Spain designed the Do 25, to a Spanish military requirement for a light utility aircraft, as a precursor to the production Do 27. Powered by a single 110 kilowatts (150 hp) ENMA Tigre G.V engine, the Do 25 was not selected for production.
 The Do 27 seated four to six and the original prototype first flew in Spain on 27 June 1955. Most production aircraft were built in Germany, the first German built aircraft taking flight on 17 October 1956, 50 more were manufactured in Spain by Construcciones Aeronáuticas SA as the CASA-127.
The German Air Force and German Army ordered a total of 428 of the Do 27A and Do 27B (with dual controls).
A later version with the same basic specifications but equipped with wider track landing gear was known as the Do 27Q-5. The aircraft was offered as a twin-float seaplane, the Do 27S-1, and with a larger engine (254 kW/340 hp Lycoming GSO-480-B1B6) and a three-blade propeller as the Do 27H-2.
In addition to the military operators in Germany and Spain, Portugal received 40 new build and 106 ex-German aircraft. The Portuguese Air Force used these extensively in the colonial war in Portuguese Africa during the 1960s-70s. In the Portuguese Guinea, in April 1973, two Do 27s were shot down by SAM-7 Grail shoulder launched AAMs.
The Do 27 was notable for being the first mass-produced aircraft in Germany after World War II. It was appreciated for its relatively wide, comfortable cabin and excellent short-field performance.
| THE KIT |
Let me start this by stating that I am not sure if Huma is still in business as they have not released anything new in many years. However, looking at some major retailers, I notice that most of their line is still available. I purchased most of my Huma kits back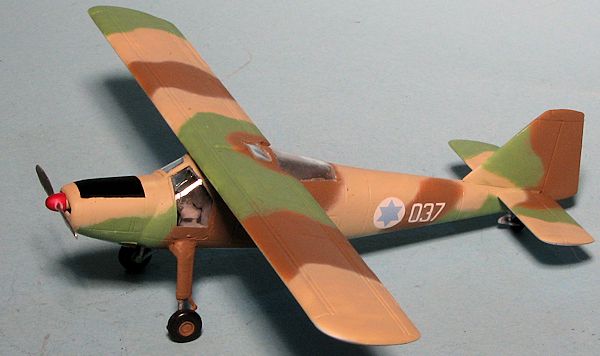 when they were still in bags and since that time, they moved to placing their products in boxes, and while the kit numbers changed (this one is HM0025 in the box), the kits are the same.
This one came in a bag with a clear sprue, white sprue, decals and instructions. Huma's detailing is actually very good and this one is no exception. The sprue gates are commendably small and there is none of the overlap of sprue onto the parts as one often sees in short run kits. The cockpit is fairly well detailed with a pair of seats, instrument panel and console along with control sticks. There is an optional co-pilot's seat provided. Huma also provides a photo of the cockpit and a cut away drawing of the interior for those who want to add detail. The cabin area has a pair of bench seats that face each other.
The rest of the kit is pretty standard stuff. The wing is a single molding as is the tailplane, which is slotted into the rear fuselage prior to installing the fin. All of the clear bits can be installed from the outside, 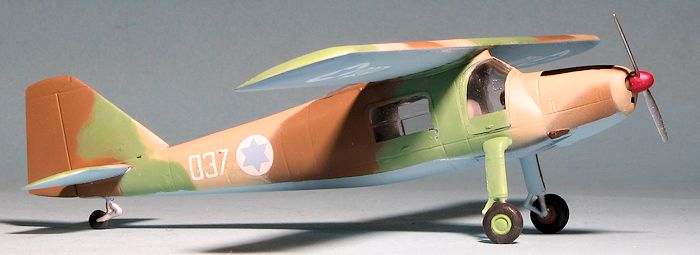 something I like as it helps with masking. There is a forward cowling piece into which a prop and its retainer are installed so you can have a rotating prop. The only option provided comes with the landing gear. You have the initial production version along with the wider one introduced later on. A good read of the instructions will tell you which variants used the wider gear.
Instructions are superb and consist of a very large foldout sheet. This includes a history in both German and English along with a large three view, sprue layout, construction diagrams and six markings options. Two are German, one army and the other air force, a civil version in white covered with zebra stripes, a Portuguese plane, Israeli version and a Spanish aircraft. The decal sheet is very nicely done and held up very well over the years.
| CONSTRUCTION |
Let there be no mistake, Huma kits are short run and their earlier kits are a lot 'shorter' than the later ones. This is one of their earlier kits and while the soft, white plastic is fairly well done, one has to treat it with more care than your standard plastic kit.
 The first thing I did was to mentally whine and complain about no floorboard on which to place the two piece seats. These seats pretty much fit where the glue touches and once one sands out the ejector marks on the center of the cushions and gets the backs to where they will stay in place, there is then the issue of exactly where these fit. Same goes for the instrument panel as there are no locators for any of these parts. What I did was first paint the interior a darkish grey. Then the seats were painted a lighter shade. As I was building a version that had only a single control, I had a fairly wide front seat on the left and a thinner one on the right. I glued both seats up against the outer bulkhead, taking them in place with super glue. Test fitting the fuselage at this time showed that there was barely room between them so that was a go.
The instrument panel was then glued in as best as I could and painted black. I also drilled out a hole for the control stick. Since the instructions showed nothing about the instrument panel decal, I did not realize it was there until time for decaling, by which time it was too late to put it on. I also did not put on the 'parking brake' item as there wasn't anywhere to attach it. I then attached the rear bulkhead after much test fitting and then glued the fuselage halves together. I could either get them to fit well in the back or the front, but not both and so rather than have the fin sections at different heights, I chose to save that for the front where it would be easier to sand to shape. I should mention that I painted the entire inner nose black from the instrument panel forward as there is nothing to fill the space and you can see it from the front.
 With the fuselage halves in place, I then installed the rear seats through the large openings in the top and side of the fuselage. Like the front seats, you have to cut off the little 'legs' at certain places to get these to fit with any success.
I now moved to the back to glue on the horizontal stab and the fin. One side of the stab lower section was a couple of millimeters lower than the opposite side which would have given a rather obvious angle to the stab, so I glued the high side first and then used super glue to fill in the space on the other side so that the stab would be somewhat level. After attaching the fin, there were more gaps to fill. I had to sand the bottom part of where the fin meets the fuselage as the fin has a step there and there isn't one on the fuselage.
Moving to the front of the plane, I started gluing in windows. While these ended up fitting fairly well, there was quite a bit of fussing around in terms of light sanding on various bits to get them to fit. Every edge on the kit parts had some sort of overdone mold seam/flash that needed to be cleaned up. I left off the front windows until after the wing was installed, but first, I glued on the forward cowling piece, lining it up with the tail section. The large overlaps that were present on the cowling were fairly easy to sand down so that wasn't an issue.
 I then glued on the wing. This was not an easy task as the small fuselage 'hoop' that fits under the forward part of the wing was not level and required a lot of adjustment to get right. While I got the wing on level, it ended up a bit canted when looking at it from the top. Never said it would be a show model, just one that I wanted in my collection as I have no 1/72 IDF/AF planes at all since I boxed up my black Matchbox Spitfire.
Next came the main landing gear. As the fuselage was all out of whack, I first glued on one then cut the alignment pin from the other and eyeballed it. It actually looks like I got things pretty level. Then the front windows. The mating area for the two is not square and any sanding will make it so they will not touch. I first installed one and after it was firmly in place and the cement dry, the other was installed. This was, like the other clear bits, a lot of fussing and reattaching. I filled in the gap between the two panes with clear gloss paint. A hole was drilled for the tail wheel and that was installed. After masking the clear bits, It was time for paint.
| COLORS & MARKINGS |
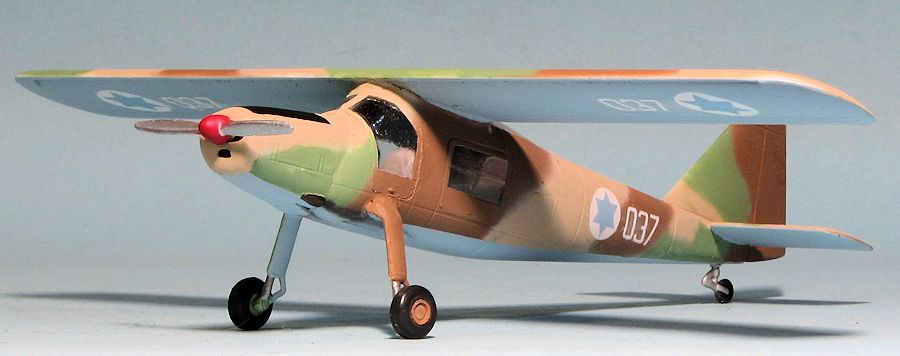
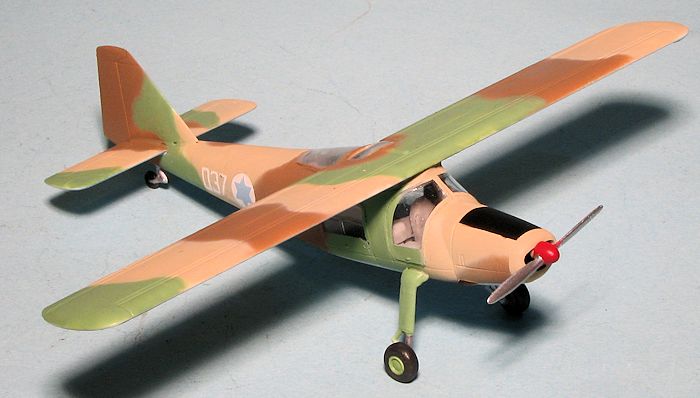
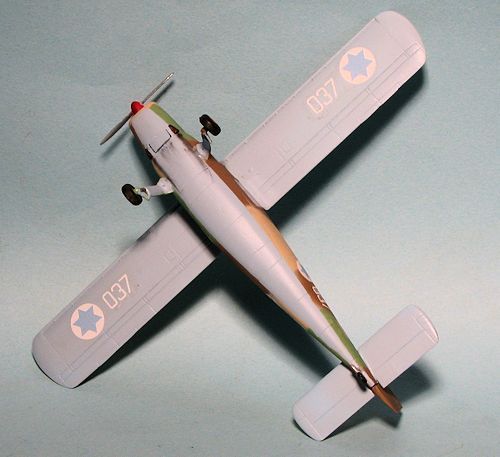
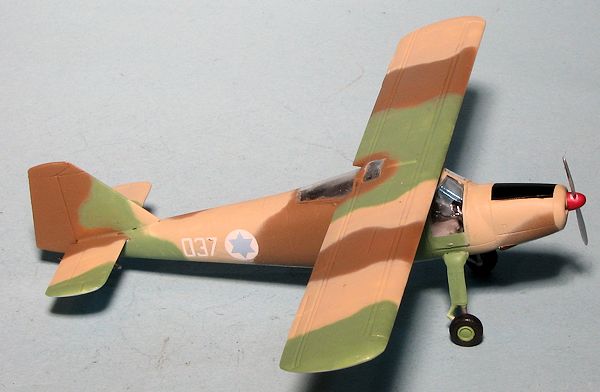
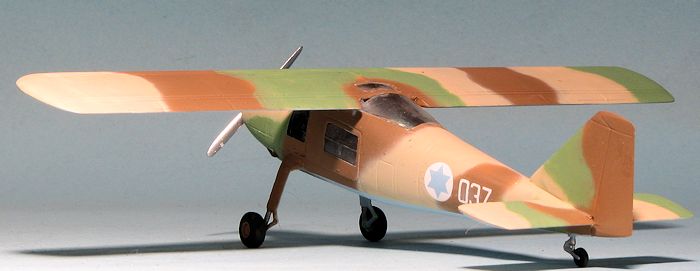
IDF/AF planes of the time had a three color upper fuselage and a light blue under. The upper colors (FS 30219, 33531 and 34227 I had in Model Master paints, but I did not have the underside color 35622. In its place I used 35190 which is a bit darker from what I gather, but is close enough. The other option I had, RLM 76 looked too grey.
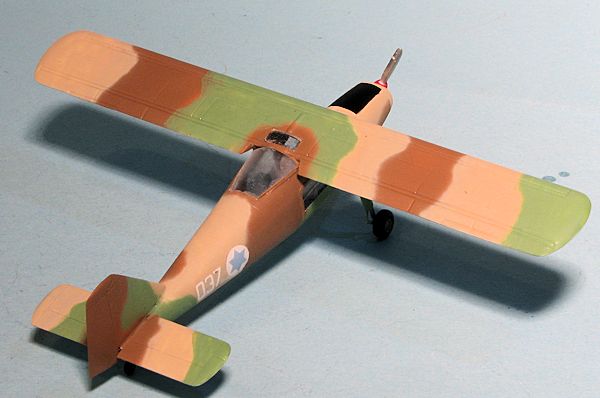 The underside color was painted on first and when dry, masked off as there is a sharp demarcation line between upper and lower colors. I then sprayed all the upper surfaces with the 30219 brown and then hand sprayed the 33531 sand and 34227 light green. The instructions only show one half of the upper wing and one side of the fuselage so one is left with one's imagination to do the other parts.
When all that was dry, I gloss coated the airframe, masked off the upper cowling and sprayed that are black. I tested the kit decals to be sure they would be OK and had no issues with the one I tried, not bad for kit decals that have to be 20-25 years old. I started with the wing decals, for which the instructions only showed it on the underside. It appeared from the way they were printed that they both went on the underside of the wing. I had trouble finding any decent photos of active duty Do-27s to verify this, but did see other planes with no upper wing insignia so figure this was normal. Oddly the few museum images I found had no insignia on the underside. I thought the blue was too light, but perhaps they really were that shade. The fuselage ones were not an issue. I used Microsol to help them snuggle down.
| FINAL CONSTRUCTION |
The last things to add were the wheels and the third replacement of the tail gear which seemed to like being knocked off. I gave the whole thing a coat of clear matte then removed the masking from the clear bits to see if anything leaked. The prop was then installed, the exhaust painted and some soot was added.
| CONCLUSIONS |
There are times when one wants to have a model of a certain aircraft on the shelf and the only available kits are short run. Such was the case with this one. It was not an easy build, despite its low parts count. Probably the best part of the kit is the decal sheet which is quite colorful and offers a lot of options. However, the kit is not unbuildable and while not for a new modeler, is one that any intermediate modeler should be able to complete to an acceptable standard.
| REFERENCES |
http://en.wikipedia.org/wiki/Dornier_Do_27
March2015 If you would like your product reviewed fairly and fairly quickly, please contactthe editor or see other details in the