Matchbox 1/72 Wessex HU.5
| KIT #: | PK-133 |
| PRICE: | $2 at a swap meet (no decals) |
| DECALS: | Two options (if they were there) |
| REVIEWER: | Scott Van Aken |
| NOTES: | Makes you appreciate some modern kits. |
| HISTORY |
 The first of these to commission, in July 1961, was No.815; the Wessexes of No.848 Squadron were for commando assault duties aboard H.M.S. Albion, having the ASW gear removed to make room for 16 troops or 8 stretchers and a medical attendant in the main cabin. Alternatively, a slung load of 1814kg can be suspended from an under-fuselage hook. From January 1967 the Wessex Mk.1's have been joined in service by the HAS Mk.3, which is powered by a 1600shp Gazelle Mk.122, and has an extended rotor head fairing and large dorsal radome. Twenty-seven HAS Mk.31's supplied to Royal Australian Navy since August 1962 are similar to the HAS Mk.1 apart from their 1540shp Gazelle Mk.162 engines.
All other Wessex variants have two coupled Gnome engines in place of the single Gazelle. These include the RAF's HC Mk.2, flown for the first time in production form on 5 October 1962 and entering service with No.38 Group in February 1964; the Navy's HU Mk.5, for which two orders have been placed and which entered service in summer 1964 as a commando-carrier assault transport; twelve Mk.52's for the Iraqi Air Force, three Mk.53's for the Ghana Air Force, and one Mk.54 for the Brunei government. Seven Wessex Mk.60's have been built for Bristow Helicopters Ltd. These are 10-passenger commercial equivalents of the Mk.2 and operate in support of the oil and gas drilling rigs in the North Sea. The Wessex is probably gone by now from British military service with the last unit operating them being 60 Sq in Northern Ireland.
| THE KIT |
Matchbox's kit of the Wessex is typical of the later kits produced before they stopped producing new kits and were bought by Revell AG. In several colors of plastic, the kit really is rather complex. It is of the raised panel line variety and you do have to be careful of ejector pin marks and of the usual sink areas in thick pieces and where there are alignment pins. The clear bits are rather thick, but nothing atypical of Matchbox.
 Though there is no cabin detail, the adventurous modeler can install what he feels needed as the cabin door is a separate piece and can be displayed open. The cockpit is equally Spartan and like most helo kits is missing the left hand control that determines engine speed and blade pitch (Collective). The rotor head is sufficiently complex enough to suit most of us. For some odd reason, the tail section is molded separately. I guess that is to give those of us who want to fold it over a head start.
The kit builds into either an HU.5 or HAS.31, the big difference between the two being the forward section of the helo. Instructions are probably typical Matchbox in that the color info is in a separate section of the instructions and the color info is generic. I'd also like to tell you about the decals, but you see, this kit has neither. It is one of those swap meet kits that I didn't thoroughly check before leaving. Fortunately, when one has done a lot of models, instructions are not always necessary, though they would be nice. I did locate a set of them courtesy of a reader several years back in anticipation of building it. Now I've finally gotten around to it! As for decals, Modeldecal did at least two sheets of Wessex' so there are oodles of markings available. One does have to be careful in the details as I found out to my dismay when researching things a bit more.
| CONSTRUCTION |
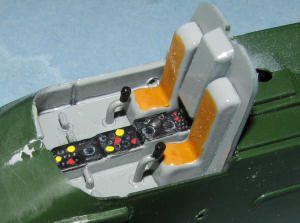
 As is the norm with things that fly, the first go was at the cockpit. I glued in all the multi-colored items and then attached the cabin floor and forward bulkhead. The fit of this and many of the other parts left a bit to be desired, but then these are not 21st century kits and some fit issues are to be expected. After these items had dried, they were given a spray of medium grey. Now I have read that Westland helos were normally a darker grey on the floor with the various bulkheads and overhead in a lighter shade. About all I have found is that these used Dark and Light Admiral Grey. I have found the dark stuff as a Humbrol Color (#5), but no joy on the lighter stuff so I went with one shade. It isn't like you'll see much through the thick clear bits.
 With the cabin painted, I glued in the windows. These were to cause a bit of concern a bit later on. Then the fuselage halves were cemented together, trapping a spuriously painted interior in its place. It is imperative that all is properly aligned so it is worth the time to fiddle
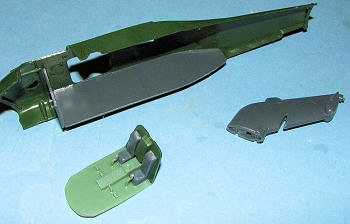
 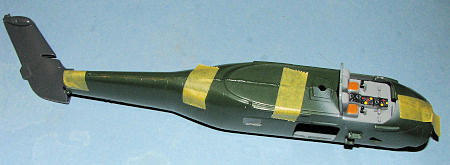 around to get it all just right. I used strips of tape to hold things together as the fit was less that optimum. I also took the time to build up the fin. Both the fin and aft fuselage have a small bulkhead in case you wanted to add more detail and pose the tail folded over.
![]() I then glued the tail in place. It isn't the best fit and even worse is the nose cap. This part is actually a bit smaller than the area to which it is to be mounted. This means some quality putty work and some heft sanding afterwards to smooth things out. Same can be said for the upper engine housing. The seam down the middle of the two parts is rather large. However, I felt that any attempt to fill and rescribe would be more work than it is worth so I left it alone. I did take the time to trim on the fuselage area where this part attaches. One side juts back a bit farther than the other and unless it is sanded even with the shorter side you'll have real fit issues. The small horizontal stab is smaller than the slot into which it fits. Thanks to the rather uneven opening, it only actually fits on the upper right corner. Once that is dry, the gaps are treated with superglue and then
I then glued the tail in place. It isn't the best fit and even worse is the nose cap. This part is actually a bit smaller than the area to which it is to be mounted. This means some quality putty work and some heft sanding afterwards to smooth things out. Same can be said for the upper engine housing. The seam down the middle of the two parts is rather large. However, I felt that any attempt to fill and rescribe would be more work than it is worth so I left it alone. I did take the time to trim on the fuselage area where this part attaches. One side juts back a bit farther than the other and unless it is sanded even with the shorter side you'll have real fit issues. The small horizontal stab is smaller than the slot into which it fits. Thanks to the rather uneven opening, it only actually fits on the upper right corner. Once that is dry, the gaps are treated with superglue and then ![]() the usual filler.
the usual filler.
The door rails were glued in place, making sure the door would fit and there are a pair of what I have to guess are cable ducts or perhaps the window rails on either side of the lower cockpit. The forward piece is molded in place, but not the aft section. Since most of the 'square' pieces are actually trapezoids with a wider bottom, it behooves one to sand the mating surface to the forward piece with an undercut. Still needs filler, though. During all this handling, I managed to pop out the cabin windows so had to reglue them in place. A good reason not to cement the door shut early in the build. I also found the tail join to be weak as I picked up the kit by the tail and the body fell off. More glue and a bit of superglue to add some 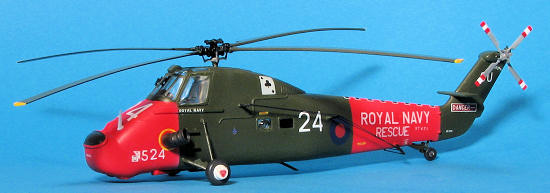 strength.
Then I moved on to the landing gear. After reading an earlier build review on this, I learned that this was probably the most difficult part of the build. Basically keeping what looks like a rather flimsy construct properly aligned. It wasn't easy, but I think I got them rather well in synch. The tail wheel assembly was then added. This has a particularly thin wheel mount so care needs to be taken not to damage it later on. The rather blah intake screen part was then glued on.
 Time for the clear bits over the cockpit. First I put in some blue tape belts just to keep things from being too dull. Thanks to the thickness of the clear parts, one doesn't need to do a lot of cockpit detailing. I had forgotten how poorly the cockpit transparencies actually fit. I basically just glued the central section as best as I could and before it dried completely, installed the side windows. The lower front is particularly bad and will probably need filler before things are done. As luck would have it, the tape held things down fairly well so I added more bits.
These included the step to the cabin door (no real holes, but some small pips to show where it goes) and the rescue winch. With those in place, I turned to the HF long wire antenna attachment points. These are marked as small ovals with three on each side of the fuselage. With the hoist in place, there is no way the antenna mast for the most forward one will fit so it was attached as close to it as possible. The cockpit and other clear bits were masked and the cabin door was cemented shut. There isn't anything to see anyway and really, one could just as easily saved the paint for this area.
| COLORS & MARKINGS |
With all that stuff masked, I started looking for markings options. Modeldecal did/does two sheets that are pretty much full of Wessex options. Set 95 has RAF aircraft and Set 96 has RN ones. Much to my dismay, I discovered that I could only use RN options and maintain any semblance of accuracy. The Matchbox kit has the more elongated cabin windows used on RN planes while all the ones on the RAF planes are square. Of course, there are undoubtedly exceptions, but none of them were on the RAF sheet. Modeldecal has photos of the subjects to prove it.
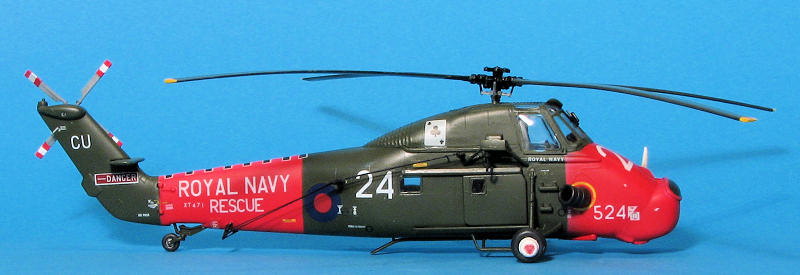
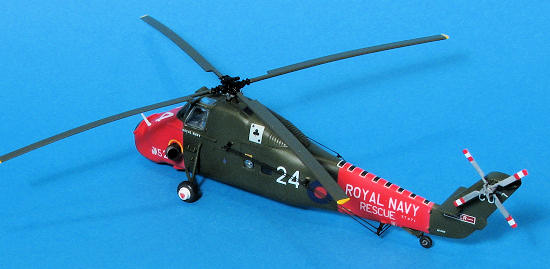
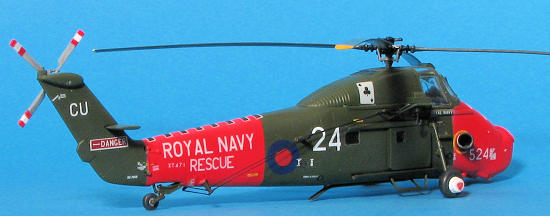
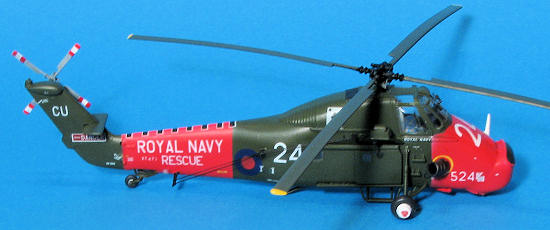
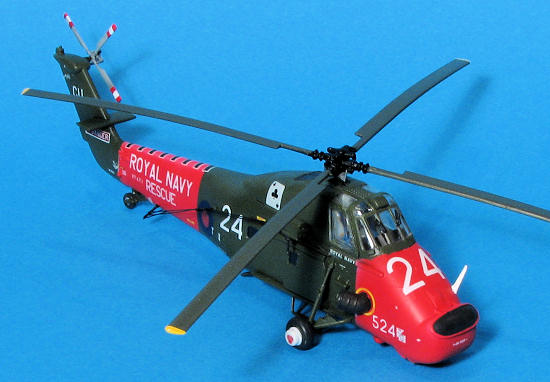 Looking through, I hit on the SAR bird from 771 Squadron, RNAS Culdrose. It has the usual RN Helo drab fuselage, but with the nose and most of the aft 'boom' section in red. Fortunately, I have Xtracolor RN Helo Drab and a nice red to use on this. First step, of course, was to paint these large areas with white in preparation for the red. I used Testors Boyd's gloss white enamel thinned with lacquer thinner. This makes such that it can be briefly handled in about a half hour, but to mask, I give it a day. Then I mixed up some Mr.Color red, the lacquer stuff, and sprayed that on.
![]() Then, after a lot of tape, the red parts were masked off, and using Xtracolor RN Helo Drab enamel, I painted the rest of the airframe. Typical of Xtracolor enamels, even when thinned with lacquer thinner, it remained tacky for about 4-5 days. Still, it is good paint and worth the extra time it takes. Be sure to have all the bits attached, though as the paint hates any sort of glues (including super
Then, after a lot of tape, the red parts were masked off, and using Xtracolor RN Helo Drab enamel, I painted the rest of the airframe. Typical of Xtracolor enamels, even when thinned with lacquer thinner, it remained tacky for about 4-5 days. Still, it is good paint and worth the extra time it takes. Be sure to have all the bits attached, though as the paint hates any sort of glues (including super ![]() glue) and will permanently wrinkle when it gets touched by it.
glue) and will permanently wrinkle when it gets touched by it.
Then it was time to apply decals. The 'problem' with Modeldecal is that they only supply common data for one aircraft. They supply unique markings for the subject, but for serial numbers, code letters, insignia and all that, you have to have their individual number/letter/insignia sheets to be able to complete things. This makes applying marking tedious, especially the rather small serial number decals. Thanks to having all those sheets, I was able to get everything done. An oddity about doing this and using the Modeldecals sheet is that the intensity of the white markings is not the same. Shows it OK in photos, but it is quite apparent in person that the white is somewhat transparent on some sheets. As I had used some of the common markings on a previous Wessex build, I had to dig through the 'spares' pile to get them. One thing I was unable to locate were the yellow surrounds to the cabin windows. Those were items that had to come from the kit sheet.
| FINAL CONSTRUCTION |
With the decals in place, I started attaching all the other bits and pieces. This included the main wheels, tail wheel, exhaust, and tail rotor assembly. I also had to figure a way to do the radio wires. I thought about stretched sprue, but decided instead to use wire. I have some .0125 bronze wire that I've used on rigging in the past. To be honest, just about anything is going to be over-scale. Photos of these planes show the radio wires to be near invisible, but this is a model and we have to make allowances for that. I cut the pieces to length and initially held them in place with clear paint. Knowing that these would eventually get bumped, 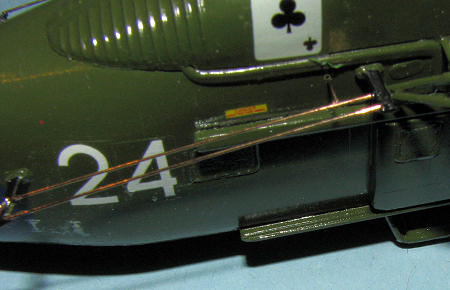 the join areas were reinforced with super glue once the paint had dried. A small hole was drilled into the fuselage side to accommod
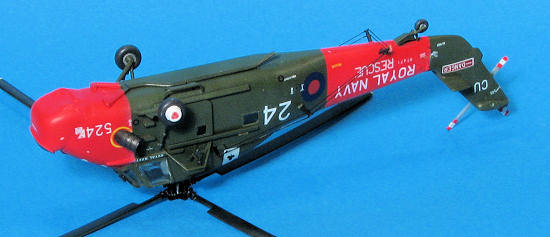 ate an antenna feed through and a short length of wire was inserted. I then painted over them with Mr.Color matte black.
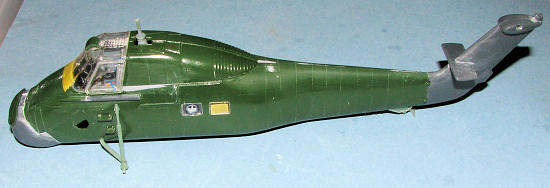
The main rotor blades were nearly the last parts to be assembled. I dipped the blades into very hot water to get some droop out of them, then glued all the bits together. I had painted the blades dark green on the upper surface and black underside with yellow tips. I probably should also have added small, white stripes to the upper blades as apparently, most of these helos had that feature. But not all so I had the option to be lazy. The fuel dump tube assembly was glued to the underside. This had broken in half when removing it from the sprue as it was very thin where these is a cutout to match the steps. Naturally, the forward attachment hole did not match the cutout so it had to be glues slightly askew. The model was given a coat of Polly Scale matte clear, the masking taken off the windows, the windscreen wipers glued in place followed by the main rotor blades. For the large intake screen, I painted that area a dark grey as again, photos showed this to be a very fine screen and so the intake opening would be visible. I think it looks OK, but others may beg to differ. At least it is better than being red.
| CONCLUSIONS |
 I recalled that this kit was not an easy one to do when I first built it over 20 years ago. I also know that Italeri's kit is probably more accurate but this was in the stash, the group build gave me an excuse to build it and I'm glad that I did. These older kits really deserve to be constructed. I mean, most of us have them so there is no real 'need' to go out and buy a more recent molding. Model kits are supposed to be enjoyable, either in their ease of construction or in the satisfaction one gets from completing a challenge. This one is somewhere closer to the former than the latter. If you have an older kit in your stash, break it out and build it. I know you'll be pleased you did.
| REFERENCES |
November 2009
Copyright ModelingMadness.com. All rights reserved. Thanks to me and my sense of frugality for this one. If you would like your product reviewed fairly and fairly quickly, please contact the editor or see other details in the Back to the Review Index Page
2017