| KIT #: | 80315 |
| PRICE: | $22.00 |
| DECALS: | Four options |
| REVIEWER: | Scott Van Aken |
| NOTES: |
| HISTORY |
The Mirage III family grew out of French government studies begun in 1952 that led in early 1953 to a specification for a lightweight, all-weather interceptor capable of climbing to 18,000 m (59,040 ft) in six minutes and able to reach Mach 1.3 in level flight.
Dassault's response to the specification was the Mystère-Delta 550, a sporty-looking little jet that was to be powered by twin Armstrong Siddeley MD30R Viper afterburning turbojets, each with thrust of 9.61 kN (2,160 lbf). A SEPR liquid-fuel rocket motor was to provide additional burst thrust of 14.7 kN (3,300 lbf). The aircraft had a tailless delta configuration, with a 5% chord (ratio of airfoil thickness to length) and 60 degree sweep.
 The tailless delta configuration has a number of
limitations. The lack of a horizontal stabilizer means flaps cannot be used,
resulting in a long take-off run and a high landing speed. The delta wing itself
limits maneuverability; and suffers from buffeting at low altitude, due to the
large wing area and resulting low wing loading. However, the delta is a simple
and pleasing design, easily built and robust, capable of high speed in a
straight line, and with plenty of space in the wing for fuel storage.
The tailless delta configuration has a number of
limitations. The lack of a horizontal stabilizer means flaps cannot be used,
resulting in a long take-off run and a high landing speed. The delta wing itself
limits maneuverability; and suffers from buffeting at low altitude, due to the
large wing area and resulting low wing loading. However, the delta is a simple
and pleasing design, easily built and robust, capable of high speed in a
straight line, and with plenty of space in the wing for fuel storage.
The first prototype of the Mystere-Delta, without afterburning engine or rocket motor and an absurdly large vertical tailfin, flew on 25 June 1955. After some redesign, reduction of the tailfin to more rational size, installation of afterburners and rocket motor, and renaming to Mirage I, the prototype attained Mach 1.3 in level flight without the rocket, and Mach 1.6 with the rocket lit in late 1955.
However, the small size of the Mirage I restricted its armament to a single air-to-air missile, and even before this time it had been prudently decided the aircraft was simply too tiny to carry a useful warload. After trials, the Mirage I prototype was eventually scrapped.
Dassault then considered a somewhat bigger version, the Mirage II, with a pair of Turbomeca Gabizo turbojets, but no aircraft of this configuration was ever built. The Mirage II was bypassed for a much more ambitious design that was 30% heavier than the Mirage I and was powered by the new SNECMA Atar afterburning turbojet with thrust of 43.2 kN (9,700 lbf). The Atar was an axial flow turbojet, derived from the German World War II BMW 003 design.
The new fighter design was named the Mirage III. It incorporated the new area ruling concept, where changes to the cross section of an aircraft were made as gradual as possible, resulting in the famous "wasp waist" configuration of many supersonic fighters. Like the Mirage I, the Mirage III had provision for a SEPR rocket engine.
The prototype Mirage III flew on 17 November 1956, and
attained a speed of Mach 1.52 on its seventh flight. The prototype was then
fitted with the SEPR rocket engine and with manually-operated intake half-cone
shock dif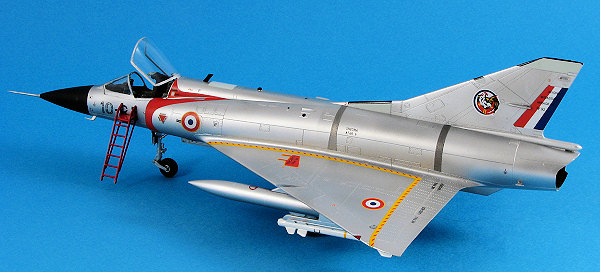 fusers, known as souris ("mice"), which were moved forward as
speed increased to reduce inlet turbulence. The Mirage III attained a speed of
Mach 1.8 in September 1957.
fusers, known as souris ("mice"), which were moved forward as
speed increased to reduce inlet turbulence. The Mirage III attained a speed of
Mach 1.8 in September 1957.
The success of the Mirage III prototype resulted in an order for 10 preproduction Mirage IIIAs. These were almost two meters longer than the Mirage III prototype, had a wing with 17.3% more area, a chord reduced to 4.5%, and an Atar 09B turbojet with afterburning thrust of 58.9 kN (13,230 lbf). The SEPR rocket engine was retained, and the aircraft were fitted with Thomson-CSF Cyrano Ibis air intercept radar, operational avionics, and a drag chute to shorten landing roll.
The first Mirage IIIA flew in May 1958, and eventually was clocked at Mach 2.2, making it the first European aircraft to exceed Mach 2 in level flight. The tenth IIIA was rolled out in December 1959. One was fitted with a Rolls-Royce Avon 67 engine with thrust of 71.1 kN (16,000 lbf) as a test model for Australian evaluation, with the name "Mirage IIIO". This variant flew in February 1961, but the Avon powerplant was not adopted.
The first major production model of the Mirage series, the Mirage IIIC, first flew in October 1960. The IIIC was largely similar to the IIIA, though a little under a half meter longer and brought up to full operational fit. The IIIC was a single-seat interceptor, with an Atar 09B turbojet engine, featuring an "eyelet" style variable exhaust.
The Mirage IIIC was armed with twin 30 mm DEFA revolver-type cannon, fitted in the belly with the gun ports under the air intakes. Early Mirage IIIC production had three stores pylons, one under the fuselage and one under each wing, but a second outboard pylon was quickly added to each wing, for a total of five. The outboard pylon was intended to carry a Sidewinder air-to-air missile (AAM), later replaced by Matra Magic.
Although provision for the rocket engine was retained,
by this time the day of the high-altitude bomber seemed to be over, and the SEPR
rocket engine was rarely or never fitted in practice. In the first place, it
required removal of the aircraft's cannon, and in the
 second, apparently it had a
reputation for setting the aircraft on fire. The space for the rocket engine was
used for additional fuel, and the rocket nozzle was replaced by a ventral fin at
first, and an airfield arresting hook assembly later.
second, apparently it had a
reputation for setting the aircraft on fire. The space for the rocket engine was
used for additional fuel, and the rocket nozzle was replaced by a ventral fin at
first, and an airfield arresting hook assembly later.
95 Mirage IIICs were obtained by the AdA, with initial operational deliveries in July 1961. The Mirage IIIC remained in service with the AdA until 1988. The type was also used with great success by the Israeli Air Force during the 1967 and 1973 wars. South African Mirage IIICZs remained in service for a considerable time due to a weapons embargo. Ex-Israeli Mirage IIICs were exported to other countries who wanted a capable aircraft but were unable to afford new aircraft or wanted to keep themselves free from any obligations to the US or other country.
The French Armée de l'Air (AdA) also ordered a two-seat Mirage IIIB operational trainer, which first flew in October 1959. The fuselage was stretched about a meter (3 ft 3.5 in) and both cannon were deleted to accommodate the second seat. The IIIB had no radar, and provision for the SEPR rocket was deleted, although it could carry external stores. The AdA ordered 63 Mirage IIIBs (including the prototype), including five Mirage IIIB-1 trials aircraft, ten Mirage IIIB-2(RV) inflight refueling trainers with dummy nose probes, used for training Mirage IVA bomber pilots, and 20 Mirage IIIBEs, with the engine and some other features of the multi-role Mirage IIIE. One Mirage IIIB was fitted with a fly-by-wire flight control system in the mid-1970s and redesignated Mirage IIIB-SV (Stabilité Variable); this aircraft was used as a testbed for the system in the later Mirage 2000.
| THE KIT |
This is the second new Mirage IIIC kit to be produced in 1/48 scale in the last few years. Prior to this, Eduard did a kit that was lauded by many and built by few. I'm not really sure why this was as it certainly looked good in the box. It was also pricey, retailing at double what this kit sells for. Recently, Eduard has reissued their kit in a 'weekend special' boxing with markings for one plane. I've noticed that they do this to kits that generally do not sell as well as hoped or as a way to sell off excess stock. Before that, there was the older Heller Mirage IIIB/C kit from the late 1970s. This kit could be built as the two seat version.
 This one
is all we have come to expect from a modern Chinese model maker. The surface
detail is nicely engraved panel lines along with recessed rivet detail that you
either like or hate. This detailing is not that great, but is there. I'm really
not sure just exactly where this trend started, but the first kit I can recall
having it was the Hasegawa 1/48 F-104 Starfighter.
This one
is all we have come to expect from a modern Chinese model maker. The surface
detail is nicely engraved panel lines along with recessed rivet detail that you
either like or hate. This detailing is not that great, but is there. I'm really
not sure just exactly where this trend started, but the first kit I can recall
having it was the Hasegawa 1/48 F-104 Starfighter.
There are five major sprues with this kit and one clear sprue. Two of the five sprues are identical and carry a large array of weaponry and pylons. Naturally, not all are going to fit on the model at once, but you do get three optional large missiles (As 30, Matra 530C/K, Matra 530E/M), two sets of fuel tanks, four Snakeye bombs, two rocket pods, two Sidewinders and two Magic missiles. All are well molded though the air to air missile bodies have large ejector pin holes to fill.
For the
rest of the kit there is a nicely done cockpit with raised console detail. A
five piece bang seat and separate rudder pedals. The wheel wells are made from
several sections and have good detailing. I noticed that there is no intake
trunking or blanking plate provided so I'm not sure if one will be needed. All
of the elevons are provided as separate pieces, though to be honest, I d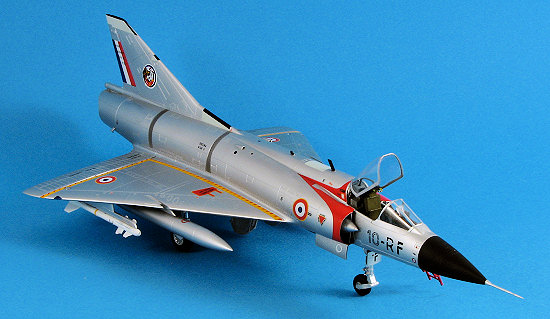 on't
recall seeing images of these in anything but the neutral position when the
plane was on the ground. One is also provided with a boarding ladder and a positionable canopy.
on't
recall seeing images of these in anything but the neutral position when the
plane was on the ground. One is also provided with a boarding ladder and a positionable canopy.
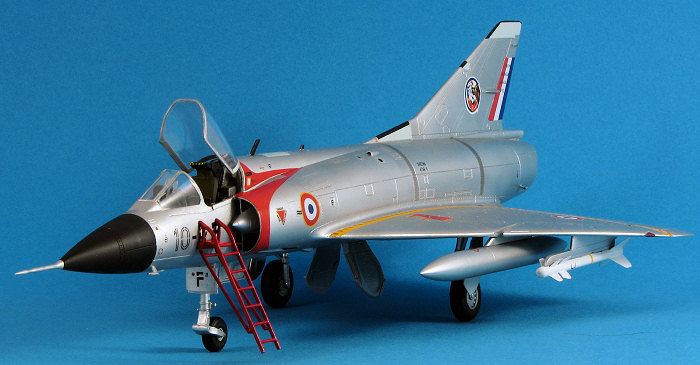
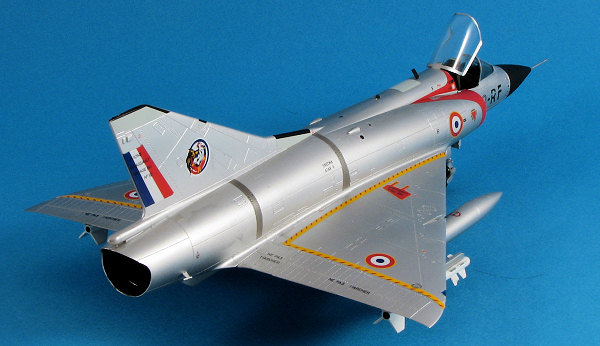
Instructions are well done with Gunze paint references. There is also a load-out drawing to help decide what to put where under the wings. The large decal sheet is very nicely printed and quite colorful. The color placement guide shows four different aircraft; one in an overall light blue from EC 2/10, another EC 2/10 in unpainted metal with the earlier markings that have the tricolor rudder flash and red around the intakes, a desert camouflaged EC 3/10 aircraft and a similarly camouflaged aircraft from 2 Sq SAAF. The sheet also includes decals for the instrument panels and several markings that are not called out on the markings guide. For instance, a larger set of SAAF roundels and several sets of code letters in a different font from any used. The sheet also includes the dielectric panels for the fin, which is a nice touch and will save some painting.
| CONSTRUCTION |
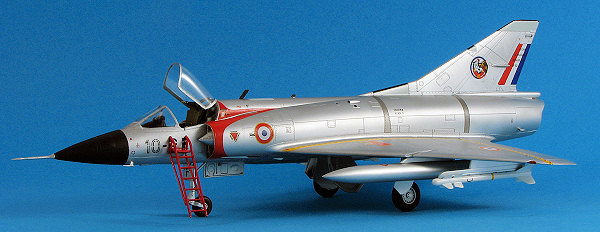
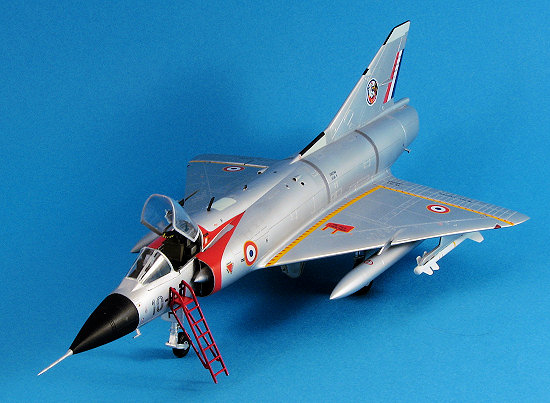
For this kit, the first thing I started doing was painting bits on the sprues. This included all the pieces for the wheel wells, the gear doors, interior bits and so on. I had already made up my mind to do an aluminum version as I just couldn't resist those nice red intake flashes and the tricolor on the fin.
Then I headed for the subassemblies. This meant the
high speed tanks, interior (which included the nose gear well) and I started
assembling the boxed in main gear wells. The kit offers decals for the
instrument panels and side consoles, which I used. They fit rather well, though
not as well as those in Tamiya or
 Hasegawa
kits. The decals reacted quite well to Solvaset, providing no problems at all. I
found that fitting the instrument panel and the anti-glare shield behind it was
a bit of a pain when it came to aligning things. Not impossible, just not a
totally precise fit.
Hasegawa
kits. The decals reacted quite well to Solvaset, providing no problems at all. I
found that fitting the instrument panel and the anti-glare shield behind it was
a bit of a pain when it came to aligning things. Not impossible, just not a
totally precise fit.
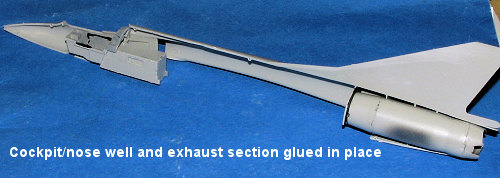
The exhaust section was also completed and then both it and the cockpit section was glued into the right fuselage side. I then added a bit of nose weight and then the instrument panel before closing up the halves.
Meanwhile at the wings I had installed the wheel wells
and drilled out the holes for the
 wing pylons. With that all done, the wings
were attached to the fuselage and I then did the usual filler for the seams. Fit
of the wings wasn't bad at all. At this stage, one does look at the openings for
the intakes and wonder just how those are going to fit.
wing pylons. With that all done, the wings
were attached to the fuselage and I then did the usual filler for the seams. Fit
of the wings wasn't bad at all. At this stage, one does look at the openings for
the intakes and wonder just how those are going to fit.
Well I can tell you that the fit isn't that bad at all. At least it was a lot nicer than how it originally looked. I did have to sand down the seam areas and use some filler, but overall it was better than many kits of a similar configuration. At this time, I added on the wing control surfaces. These are all separate, but are not designed to be in anything but the neutral position. Why they are not provided either molded on the lower wing or as a single piece is beyond me as they were very difficult to get properly aligned. Aligned they finally were and I then glued on the actuating hinges. These did not fit to the control surfaces very well and in fact the outer ones (which have the outer pylons attached), were near impossible to get to fit to both the wing and the control surface.
During all this I'd been taking care of the smaller bits like painting the landing gear, assembling the wheels, assembling the big Matra missile and cleaning up the rather clunky Matra Magics that are supplied. There are several scoops and other bits like the wing tip formation lights that need glued, sanded and masked. I also attached the windscreen and tacked the canopy in place. The windscreen is too narrow for the opening and the canopy does not fit well in the closed position. These items had been premasked and now it was time to paint.
| COLORS & MARKINGS |
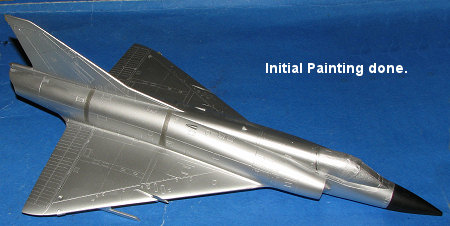 For
this bare metal experiment, I used Humbrol #11. First, of course, I painted the
radome black, then masked it off and sanded down the overspray. The Humbrol was
thinned with lacquer thinner and it went on quite well. One thing I did notice
is that this concoction turned to jelly in about two days so when I did the
inevitable touch up, I had to mix fresh paint. The dark bands on the fuselage
that you see on every photo of
For
this bare metal experiment, I used Humbrol #11. First, of course, I painted the
radome black, then masked it off and sanded down the overspray. The Humbrol was
thinned with lacquer thinner and it went on quite well. One thing I did notice
is that this concoction turned to jelly in about two days so when I did the
inevitable touch up, I had to mix fresh paint. The dark bands on the fuselage
that you see on every photo of 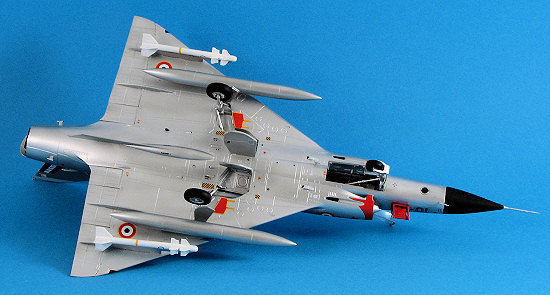 these planes were done using Alclad II. The kit
provides light grey decals for this that just don't look right.
these planes were done using Alclad II. The kit
provides light grey decals for this that just don't look right.
I then glued on the landing gear. These fit fairly well and though they are fussy builds, are quite sturdy when done. The nose gear is in several pieces with separate wheel forks. I glued the forks and sanded the seam, later grunting the nose wheel in place. It did scratch the paint, but that was cured later. With the main gear dry and the nose assembly done, it was time for decals.
I have to tell you that the decals with this kit are some of the finest I've every used. They are very colorful, quite thin for the single color markings (in fact, too thin in some cases), and reacted superbly to both Microsol/set and Solvaset setting solutions. I had no problems with silvering and the placement guide is very comprehensive, as far as it went. You see, they give no placement information for the weapons, drop tanks or the nose gear door, though there are certainly markings that go there according to photos. These are all on the sheet so one simply has to puzzle out what to use and use them.
| FINAL CONSTRUCTION |
Decaling took several days as there are so many and I'm
never one to hurry through decaling jets (which seem to be festooned with the
darn things). When one thinks things are near the end, there are always a ton of
other things to do. In this case, it was gear doors, actuating rods, guns, nose
probe, installing the prepainted and rather Spartan bang seat, a myriad of
antennas and  data probes as well as a number of clear bits. I also assembled the
boarding ladder, painting it red. You basically have to use it as Hobby Boss has
already opened the holes for it. There is a canopy actuating mechanism as well.
The instructions are not at all clear as to how this is supposed to fit so I
just guessed and it looks wrong.
data probes as well as a number of clear bits. I also assembled the
boarding ladder, painting it red. You basically have to use it as Hobby Boss has
already opened the holes for it. There is a canopy actuating mechanism as well.
The instructions are not at all clear as to how this is supposed to fit so I
just guessed and it looks wrong.
I found the fit of the forward landing light to be less than ideal. Despite trimming it, I just couldn't get it to fit all the way in so rather than risk damage, I left it as it was. The high speed fuel tanks were literally a snap fit and needed no glue. The attachment holes on the Matra Missiles were not only oversize, but out of alignment. I cured the latter situation by removing the aft mounting pin on the pylon. As I'd forgotten to drill out the holes for the centerline missile pylon, that was left off. The boarding ladder was attached using clear paint and that was it.
| CONCLUSIONS |
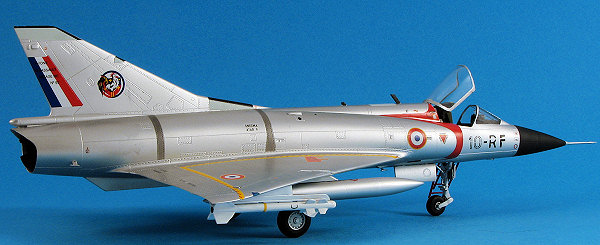 I've read the commentary about this being a knock-off
of the Eduard kit and to be honest, until I build that one there is no way for
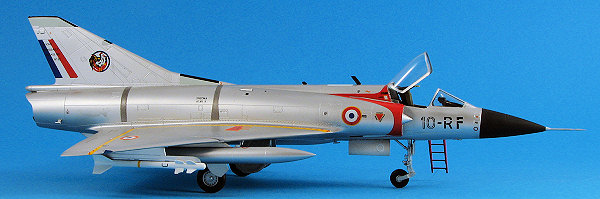
me to say for sure. Regardless, it is well done and despite the too narrow
windscreen, makes into a very nice model. I was pleasantly surprised by the
decals after reading that they'd be no better than the Trumpeter one. Nothing
could be farther from the truth. I was also less than thrilled with the less
than complete decal placement guide and hope that word of this gets back to
Hobby Boss so they can be more diligent.
I've read the commentary about this being a knock-off
of the Eduard kit and to be honest, until I build that one there is no way for
me to say for sure. Regardless, it is well done and despite the too narrow
windscreen, makes into a very nice model. I was pleasantly surprised by the
decals after reading that they'd be no better than the Trumpeter one. Nothing
could be farther from the truth. I was also less than thrilled with the less
than complete decal placement guide and hope that word of this gets back to
Hobby Boss so they can be more diligent.
| REFERENCES |
Wikipedia
June 2007
#1474 in a series
Copyright ModelingMadness.com. All rights reserved. No reproduction in part or in whole without express permission from the editor.
If you would like your product reviewed fairly and fairly quickly, please contact the editor or see other details in the Note to Contributors.