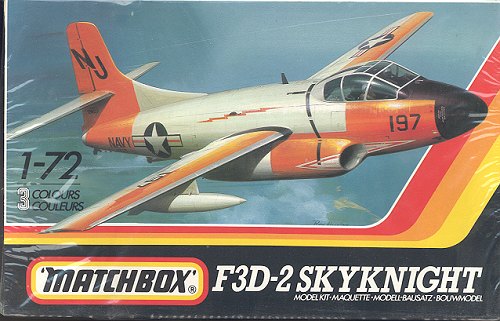
Matchbox 1/72 F3D Skyknight
| KIT # | PK 134 |
| PRICE: | $7.50 |
| DECALS: | See review |
| REVIEW : | |
| NOTES: | Kit currently out of production |
| HISTORY |
Back in the mid 1940's, Naval planners were deciding on a new carrier-borne night fighter. It was obvious that propeller driven aircraft were soon to be obsolete due to the new turbojet. However, the new jets were underpowered and used a lot of fuel. The design that was accepted was a Douglas design that was very conventional other than the power plants. It resulted in a rather bulky looking, twin-engined, two seat 'fighter'; the F3D Skyknight
The Skyknight was large as it needed lots of room for fuel. It had two engines as only one would not have provided enough power. There were two crew members as one was needed to operate the radar equipment. The aircraft had no ejection seats and entrance to the aircraft was gained by climbing up on the spine and then entering through a sliding hatch in the transparency. Emergency exit was through a chute in the underside of the plane. Since the plane sat so low to the ground, it was impossible to enter through the emergency chute, though that and several other traits were carried over into the much larger A3DSkywarrior.
The F3D proved to be a tractable and stable airframe, perfect for night interception. Though initially only armed with guns, the Skyknight was one of the first aircraft to ever carry the Sparrow missile, albeit as a development platform. The F3D was proven to be a capable night fighter, shooting down several aircraft during the Korean War. The biggest problem of the aircraftin that war was that it was too fast. Night interceptions were generally against small, low-powered biplanes, making it difficult for the larger Skyknight to gain an easy kill.
The aircraft soldiered on for years after operational service asa trainer and weapons test platform. One of the last F3Ds was used by the USArmy for several of its electronics and missile test platforms. Several arestill extant in museums.
| THE KIT |

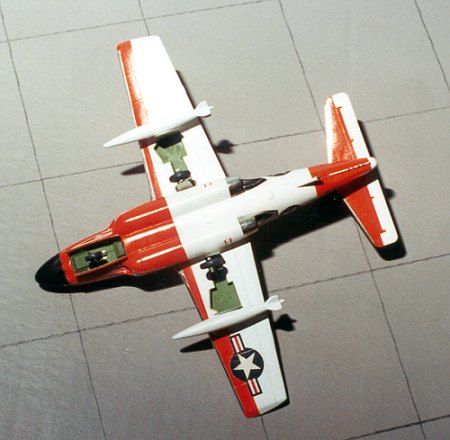
I have to be honest and tell you that it has been a number of years since I built this kit, however, I can still recall much about it. It comes in Matchbox's wonderful multiple colors of plastic. I guess it is a gimmick, but makes for difficulty in painting. Typical of Matchbox, the kit isnot difficult to build. One reason is the lack of any real detail in the kit. Panel lines are raised on this one, though there are not many of those. The interior detailing is almost nil consisting of a tub and a couple of seats that look nothing like what is in the real aircraft. There are underwing stores inthe form of two fuel tanks. There is no detail in the main wheel wells and they are open. The nose gear well is boxed in, but has no detail. The transparency is thick and has large frame lines.
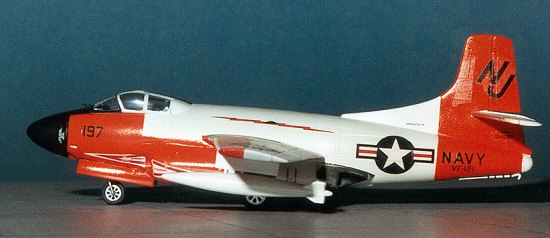
Landing gear legs are thin, but have not broken in years of handling and moving around. There are decals for two versions: VF-121 in the white and orange scheme, and an all black one from VMF-513 in Korea. This one in the picture is from VF-121 and used as a navigation trainer. The decals work quite well, their only real downfall is the white being more of an ivory colorant it isn't opaque enough to block the orange paint. This last bit isn't really a slam as few decals are that opaque. They do fit well and reacted well to setting solutions.
Instructions are typical Matchbox. There are several construction steps with color callouts being given in one section at the end of the instructions. Only Matchbox does sheets this way, others either include colors in each step or ignore them altogether.
| CONSTRUCTION |
 Building (or
assembling) this kit is very straightforward. Once the cockpit bits are glued
together, they and the interior walls were painted flat black, as was in vogue
during the late 1940s. This also eliminates the embarrassment of not having any
cockpit detail to look at. I put a lot of weight in the nose as otherwise, it
will be quite a tail-sitter. Once the interior is in place, the fuselage halves
are glued together. Fit, as with all Matchbox kits is quite good, though many of
the seams needed filler and sanding.
Building (or
assembling) this kit is very straightforward. Once the cockpit bits are glued
together, they and the interior walls were painted flat black, as was in vogue
during the late 1940s. This also eliminates the embarrassment of not having any
cockpit detail to look at. I put a lot of weight in the nose as otherwise, it
will be quite a tail-sitter. Once the interior is in place, the fuselage halves
are glued together. Fit, as with all Matchbox kits is quite good, though many of
the seams needed filler and sanding.
Next, I attached the engine pods. These are probably the worst fitting part of the kit, especially the front engine intakes. However, it is amazing just what filler can hide!
After the fuselage was together, the wings were glued together and attached. Again, fit is good. Same for the horizontal stabilizer that merely slots in place, though some filler was needed to fill a few gaps. The drop tanks were glued together, smoothed out, and set aside until the last. The canopy was then glued in place and masked in preparation for painting.
| PAINT & DECALS |
 Painting is
probably the most difficult part of this model. The orange and white scheme requires
a lot of masking to get right. First off the kit was undercoated in light grey.Then Gloss White was sprayed over the entire airframe. I used a combination
of Model Master enamels and Gunze acrylics for this, Model Master for the white andflat black. I also did the drop tanks and racks in white at this time. When
it was fully dry, the kit was carefully masked, and the orange was sprayed on.
Naturally, I messed up a few spots, so some back and forth painting was needed
to take care of the glitches. The final painting was the nose and anti-glare
shield that was done in flat black.
Painting is
probably the most difficult part of this model. The orange and white scheme requires
a lot of masking to get right. First off the kit was undercoated in light grey.Then Gloss White was sprayed over the entire airframe. I used a combination
of Model Master enamels and Gunze acrylics for this, Model Master for the white andflat black. I also did the drop tanks and racks in white at this time. When
it was fully dry, the kit was carefully masked, and the orange was sprayed on.
Naturally, I messed up a few spots, so some back and forth painting was needed
to take care of the glitches. The final painting was the nose and anti-glare
shield that was done in flat black.
Next, the leading edges of the wings and tailplanes were done in chrome Bare Metal Foil. The engine exhaust was done in titanium. BTW, the wheels and struts were painted white, while the wells and inside of gear doors was painted chromate green. The kit decals were used as I couldn't find an aftermarket sheet and as I mentioned earlier, they worked just fine with no silvering. No gloss coat was needed as both the white and orangeade gloss paints. Matchbox decals are strong and a bit thick so I did not apply a gloss coat over them and they have held up very well.
| CONSTRUCTION |
Once the kit was painted and decaled, the final bits were added.This consisted of the landing gear, wheels, gear doors, tail hook and the tail bumper. Now this last piece has broken off a number of times despite my attempts to be careful when handling it! Once it was on its gear, the drop tanks and mounts were glued in place and the kit was done! As you probably notice from the image above, I didn't add enough nose weight so had to put several pieces in the nose gear well.
| CONCLUSIONS |
Frankly, I was both surprised and pleased when Matchbox released this kit. Matchbox has released injected kits that no one else has ever done, including the Seafox, Siskin, He-70, Victor, Stranrear,Heyford, PB4Y-2, T-2C, Provost, Do-28, Wellesley, and a number of others. Now that Revell has bought the company, we can only hope that we will see some of these reissued in the near future.
Review kit built in 1985
Review copy courtesy of me and my wallet!
Copyright ModelingMadness.com. All rights reserved. No reproduction in part or in whole without express permission from the editor.
If you would like your product reviewed fairly and fairly quickly, please contact the editor or see other details in the
Back to Reviews Page 2022