Meicraft 1/72 P-35
Kit Number: ????
Price: $15.00
Decals :None
Date of Review: 3 May, 1996
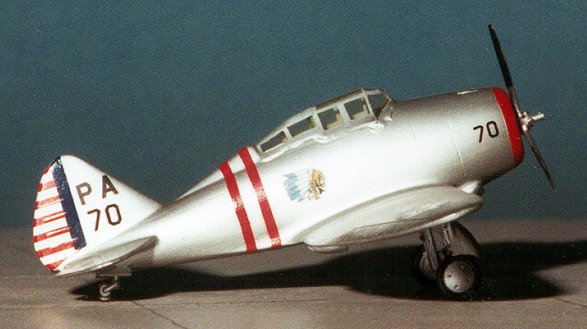
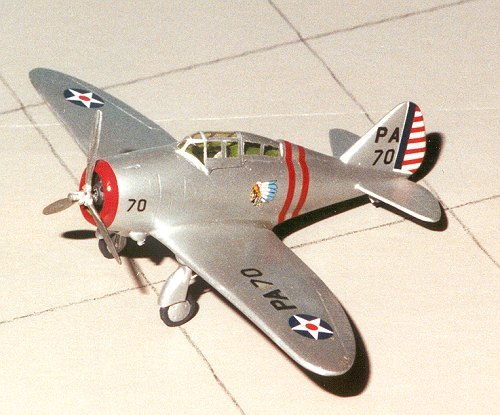
Comments: The Seversky P-35 is a direct descendent of the famous P-47 Thunderbolt. Built the in austere times prior to WWII in the US, the P-35 was built in very limited numbers. It was the winner of a flyoff with the Curtiss P-36 Hawk, yet the P-36 was a much more successful aircraft. The P-35 saw limited action in the Philippines and Hawaii during the opening days of the war. It was a P-35 from Wheeler Field that scored the first US kill of the Pacific war.
Although the P-35 has been available for a couple of years in 1/32 from Williams Brothers, and in 1/48 from Hobbycraft, in 1/72 is was only available as a vacuform kit. Thinking that a limited run injected kit would be easier than a vacuform, I purchased the Meicraft kit when it became available several years ago. When the Meicraft box is opened, it is obvious that there is a bunch of work ahead of you. There is a great set of instructions allowing the building of the stretched P-35A (if you are so inclined) as well as clear placement of parts and color schemes. The plastic parts, including the canopy are all extremely thick and have huge gates that must be sawed away and sanded off. The wings and stabilizers are one solid piece and need a couple of sink marks filled. This is a problem that arises with thick moldings. It is a shame that this puttying needs to be done as the detail is finely engraved, but very shallow.
 The first thing I did with the kit was to toss the 'engine' and propeller, and get nice Aeroclub white metal replacements. Then it was time to start cleaning up the parts for a good fit. After that, I discovered that the incredibly thick bits needed to be hollowed out some more to have any interior parts fit properly. Out came the moto-tool. Even with massive shaving, I had to cut off the rocker arms of the white metal engine to get it to fit in the fuselage. The interior is complete enough with floor, bulkheads, control stick and instrument panel. Any additional detailing is up to you, but it won't be easily visible through the very thick,
and very poorly-fitting canopy. I also had to shave a lot from the wheel doors to get the wheels to fit in them. Exhaust pipes and gear/door actuating rods had to be made from other sources. I also had to do a lot of work to get the front of the cowling to look decent. It took quite a while and I now wonder if the vacuform would not have been easier.
The first thing I did with the kit was to toss the 'engine' and propeller, and get nice Aeroclub white metal replacements. Then it was time to start cleaning up the parts for a good fit. After that, I discovered that the incredibly thick bits needed to be hollowed out some more to have any interior parts fit properly. Out came the moto-tool. Even with massive shaving, I had to cut off the rocker arms of the white metal engine to get it to fit in the fuselage. The interior is complete enough with floor, bulkheads, control stick and instrument panel. Any additional detailing is up to you, but it won't be easily visible through the very thick,
and very poorly-fitting canopy. I also had to shave a lot from the wheel doors to get the wheels to fit in them. Exhaust pipes and gear/door actuating rods had to be made from other sources. I also had to do a lot of work to get the front of the cowling to look decent. It took quite a while and I now wonder if the vacuform would not have been easier.
The P-35 spent most of its career in bare metal or aluminum finish. I chose a scheme from Selfridge Field in Michigan with the Indian head on the side. The decals were gleaned from various sheets (mostly the Monogram 1/72 P-36) and spare bits in my decal box. I never toss unused decals from kits unless they are just terrible as you never know when you'll need something. For this kit I used Metallizer paint and coated it with Future. This slightly dulled the finish to represent aluminum paint. The only color is the red cowling and the red command bands on the fuselage.
Although it was a chore to build, it did require use of many modeling skills. I guess this is the reason to model, as if I only built 'shake and bake' kits, I wouldn't consider myself much of a modeler. It is the pain kits that end up looking nice that are the ones that I keep on display.
Recommended if you have to have a 1/72 P-35 in your collection. In fact, it may no longer be available, and that would be a blessing in disguise.
Copyright ModelingMadness.com. All rights reserved. No reproduction in part or in whole without express permission from the editor.
Back to Reviews Page 2024