Huma 1/72 Klemm Kl-35B
Kit Number : 0002
Price: $12.00
Media: 'Limited' run injected plastic
Decals: 6(!) versions; three German civil, 2 German military, one Swedish military.
Date of review: 16 October 1997
Reviewer: Scott Van Aken
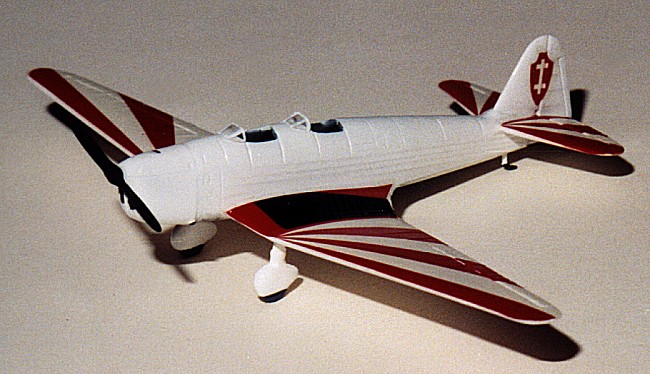
The Klemm Kl-35 replaced the very similar Kl-25 in 1935. A two-seat sports aircraft, it was quickly brought into service by the Luftwaffe as a trainer. A rugged little aircraft, it was used as a unit hack by many Luftwaffe squadrons as well as by a number of flying clubs around Germany. Sweden used it under the designation SK 15 and there was a version with an uprated engine called the Kl-106.
This is one of Huma's earliest kits; in fact, kit #2. As with all the early Huma kits, it is comprised of a single tree of engraved soft, white plastic, a great instruction sheet, a comprehensive selection of decals (with swastikas), numerous options, and a poly bag instead of a box. The downside of the bag is the possibility of broken parts and mine did have one of the windscreens smashed. There are also options for just about any Kl-25 type produced. The kit comes with an optional tail wheel in place of the skid as well as two types of landing gear. One is the spatted variety and the other is a more robust looking open type. There are also skis for the Swedish version. I chose the spatted gear and as a result, did not use over 1/3 of the parts on the tree.
I initially purchased this kit to use as a prototype of the 'Mistel' that used a KL-35 as the upper part and a DFS-230 glider for the lower section. The Huma DFS-230 comes complete with the support structure and decals needed for this combination. Instead, I made the DFS-230 without the Klemm and lost the other parts (typical). Last year, I got the Blue Rider booklet/decal sheet for the Lithuanian Air Force prior to WWII. Part of that sheet included a great white with red sunburst upper surfaces decal option for the Klemm. This version was the Kl-35B with spats and a tailskid.
The interior is five pieces as the seats are built into the floor. Just add the control columns and instrument panels. Fortunately the cockpit openings are small so there is little to see. These items were painted RLM02 green-grey. The interior was placed into the fuselage and the fuselage halves glued together. The tail, horizontal stabilizers and wings are solid pieces that showed no sink marks despite the thickness of the wing roots. (Why can Huma succeed with no sink marks on thick plastic when larger companies like Airfix cannot?) Fit is fair on these parts and there was flash that needed to be removed before assembly. Take special care with the wings as the guides are not properly aligned. I cut mine off and butt fitted the parts. With such soft plastic, the glue worked especially well.
Fitting the engine was a major problem was the facings were not square. Some time was spent with a file and sandpaper to cure this. I did have to use putty on the wings and engine. Once the airframe was complete, the spatted wheels were attached as was the tail skid. The aircraft was painted gloss white overall using Testors Model Master enamel. While that was drying the propeller was painted flat black.
Once painted, it was time for the decals. All but the large wing decals fit with no fuss. I did use Micro Set on them to get them to snuggle down. The large wing decals were another case. Due to the slight gull-wing at the root, there was a problem with fit. I used my strongest decal setting solution on one. A big error. While it did snuggle down, it also caused the red ink in the decal to dissolve and run. What a mess!! It isn't a complete write off, but too much trouble to remove and replace. I just overpainted those areas that were easily accessible. On the other side, I just used several applications of Solvaset until it finally snuggled down. Lesson to be learned. Don't use too much of a strong setting solution at once!
Final assembly (as such) was the installation of the prop (using white glue) and the windscreens. The broken one was repaired as best as possible and the frames painted white. The overall kit is really a nice little representation of a little known aircraft. What's more, it is simple to build and relatively hassle-free.