
CMR 1/72 Supermarine Type 300
| KIT #: | CMR 170 |
| PRICE: | $ |
| DECALS: | One option |
| REVIEWER: | Scott Van Aken |
| NOTES: | Resin with vacuformed canopy |
| HISTORY |
Supermarine's Chief Designer, R.J. Mitchell, had won four Schneider Trophy seaplane races with his designs: (Sea Lion II in 1922, S 5 in 1927, S 6 in 1929 and S 6b in 1931), combining powerful Napier Lion and Rolls-Royce "R" engines with minute attention to streamlining. These same qualities are equally useful for a fighter design, and, in 1931, Mitchell produced such a plane in response to an Air Ministry specification (F7/30) for a new and modern monoplane fighter.
This first attempt at a fighter resulted in an open-cockpit monoplane with gull-wings and a large fixed, spatted undercarriage. The Supermarine Type 224 did not live up to expectations; nor did any of the competing designs, which were also deemed failures.
 Mitchell immediately turned his attention to an
improved design as a private venture, with the backing of Supermarine's owner,
Vickers. The new design added gear retraction, an enclosed cockpit, oxygen gear
and the much more powerful newly developed Rolls-Royce PV-12 engine, later named
the Merlin.
Mitchell immediately turned his attention to an
improved design as a private venture, with the backing of Supermarine's owner,
Vickers. The new design added gear retraction, an enclosed cockpit, oxygen gear
and the much more powerful newly developed Rolls-Royce PV-12 engine, later named
the Merlin.
By 1935, the Air Ministry had seen enough advances in the industry to try the monoplane design again. They eventually rejected the new Supermarine design on the grounds that it did not carry the required eight-gun armament, and did not appear to have room to do so.
Once again, Mitchell was able to solve the problem. It has been suggested that by looking at various Heinkel planes, he settled on the use of an elliptical planform, which had much more chord to allow for the required eight guns, while still having the low drag of the earlier, simpler wing design. Mitchell's aerodynamicist, Beverley Shenstone, however, has pointed out that Mitchell's wing was not directly copied from the Heinkel He 70, as some have claimed; the Spitfire wing was much thinner and had a completely different section. In any event, the elliptical wing was enough to sell the Air Ministry on this new Type 300, which they funded by a new specification, F.10/35, drawn up around the Spitfire.
The elliptical wing was chosen for superior aerodynamic attributes but it was a complex wing to construct and the Messerschmitt Bf 109's angular and easy-to-construct wing offered similar performance (model per model) to the Spitfire. It has been reported that the Bf 109 took one-third the man hours to construct compared to the Spitfire.
 One flaw in the thin-wing design of the Spitfire
manifested itself when the plane was brought up to very high speeds. When the
pilot attempted to roll the plane at these speeds, the aerodynamic forces
subjected upon the ailerons were enough to twist the entire wingtip in the
direction opposite of the aileron deflection (much like how an aileron trim tab
will deflect the aileron itself). This so-called aileron reversal resulted in
the Spitfire rolling in the opposite direction of the pilot's intention.
One flaw in the thin-wing design of the Spitfire
manifested itself when the plane was brought up to very high speeds. When the
pilot attempted to roll the plane at these speeds, the aerodynamic forces
subjected upon the ailerons were enough to twist the entire wingtip in the
direction opposite of the aileron deflection (much like how an aileron trim tab
will deflect the aileron itself). This so-called aileron reversal resulted in
the Spitfire rolling in the opposite direction of the pilot's intention.
The prototype (K5054) first flew on 5 March 1936, from Eastleigh Aerodrome (later Southampton Airport). Testing continued until 26 May 1936, when Mutt Summers, (Chief Test Pilot for Vickers (Aviation) Ltd.) flew K5054 to Martlesham and handed the aircraft over to Squadron Leader Anderson of the Aeroplane & Armament Experimental Establishment (A&AEE).
The Air Ministry placed an order for 310 of the aircraft on 3rd June 1936, before any formal report had been issued by the A&AEE, interim reports being issued on a piecemeal basis.
A feature of the final Spitfire design that has often been singled out by pilots is its washout feature, which was unusual at the time. The incidence of the wing is +2° at its root and −½° at its tip. This twist means that the wing roots will stall before the tips, reducing the potentially dangerous rolling moment in the stall known as a spin. Many pilots have benefited from this feature in combat when doing tight turns close to the aircraft's limits, because when the wing root stalled it made the control column shake, giving the pilot a warning that he was about to reach the limit of the aircraft's performance.
| THE KIT |
 Though
this isn't the first Spitfire prototype kit, it is by far the best I've seen
in 1/72. The other kits I know about are a Pegasus low pressure injection
molded kit and I believe that Rareplanes did a vacuformed kit of this one.
None of those previous kits can match the detail and fidelity that is shown by
this CMR product.
Though
this isn't the first Spitfire prototype kit, it is by far the best I've seen
in 1/72. The other kits I know about are a Pegasus low pressure injection
molded kit and I believe that Rareplanes did a vacuformed kit of this one.
None of those previous kits can match the detail and fidelity that is shown by
this CMR product.
CMR has chosen to model the type 300 on its maiden flight. This provides some differences from the later versions. For one, there are no landing gear doors. Secondly, there won't be any problems deciding what shade the aircraft was painted for this one is to be painted in Zinc Chromate Primer with Polished Aluminum parts and aluminum painted fabric. The instructions state a yellow green primer, which I have to assume is what most of us call RAF interior green as there are no color charts, only generic titles. The box art shows something akin to a grey so I'm a bit uncertain on how this is actually to be painted.
The resin it superbly molded in tan with nicely engraved panel lines. The fabric detail on the control surfaces is quite good and should be appropriately convincing when painted. The Spit is a pretty basic aircraft when unencumbered with bomb racks and all that other stuff. This one has an interior that consists of a channel attached to two bulkheads. In that channel fits the control column, rudder pedals and seat. There is some flash on many of the parts but clean up will be very brief. There is nice sidewall detail that can be picked out in various shades.
 The wing is a single casting and does
have the proper underside 'gull'. This area is quite thin to get this feature
so one does need to take care. There are tabs on the stabs that fit into slots
in the tail section. The type 300 had a different shaped radiator from the
production aircraft and this is included. A nicely done Watts prop (I guess it
is) is provided as are the usual pitot tubes. Two nicely molded early (flat)
canopies are given. I always like a spare in case of incidents.
The wing is a single casting and does
have the proper underside 'gull'. This area is quite thin to get this feature
so one does need to take care. There are tabs on the stabs that fit into slots
in the tail section. The type 300 had a different shaped radiator from the
production aircraft and this is included. A nicely done Watts prop (I guess it
is) is provided as are the usual pitot tubes. Two nicely molded early (flat)
canopies are given. I always like a spare in case of incidents.
Instructions are two sheets. One is a painting/markings guide and the other is a construction guide with large, well drawn steps. There is a nice dihedral drawing to help out getting the wings just right. Another drawing shows the proper angle of the wheels from the front. Decals are provided which are basically roundels and fuselage serial. An additional set of under wing serials are provided if you want to do this aircraft as it was later in life. For the initial flight, they apparently were not worn. Decals are fairly well printed, though I did notice some teeny smears on the wing roundels. They are also semi-matte and quite thin so should settle down well.
| CONSTRUCTION |
Naturally, it all starts with cleaning up the bits that
one is going to use. This means the fuselage halves, wing and interior bits. The
interior builds up well as there are only 6 parts; two bulkheads, a centerline
trough, a seat, control stick and rudder pedals. I left some of the resin sprue
stub on the underside of the seat and used that to attach it in place. You can't
tell it is like that from the outside. All the bits were painted RAF Interior
Green except for the seat which was Aluminum. Control column top and instrument
panel were done in black. It would have been great to have a set of etched belts
and instrument panel in with the kit as they would
 have added quite a bit. There
is sidewall detail in terms of stringers and some black boxes that were painted
up. Not a lot of detail, but enough for a bare bones plane like the Spit
prototype.
have added quite a bit. There
is sidewall detail in terms of stringers and some black boxes that were painted
up. Not a lot of detail, but enough for a bare bones plane like the Spit
prototype.
Then I glued the forward part of the fuselage together. The fuselage halves are a bit warped due to being so thin, but by gluing in stages, that will all go away. I then glued a portion of the upper fuselage behind the cockpit. When that had dried, I installed the cockpit from the underside and then continued to glue the fuselage halves in steps working to the rear. This allowed me to keep things aligned during the glue.
 The
wings have some air pockets to fill where it attached to the pour stub. This
took several applications of Mr. Surfacer 500. During this, I test fit the wing
to the fuselage. I hate to say it, but the wing is broader than the root area on
the fuselage. It seems that the best way to tackle this is to remove material
from the lower front cowling and fill in the overhang on the upper wing root.
This is because the rear fits very well and were I to trim the back of the wing,
I'd have a larger mismatched area on the long sweep of the wing filet.
The
wings have some air pockets to fill where it attached to the pour stub. This
took several applications of Mr. Surfacer 500. During this, I test fit the wing
to the fuselage. I hate to say it, but the wing is broader than the root area on
the fuselage. It seems that the best way to tackle this is to remove material
from the lower front cowling and fill in the overhang on the upper wing root.
This is because the rear fits very well and were I to trim the back of the wing,
I'd have a larger mismatched area on the long sweep of the wing filet.
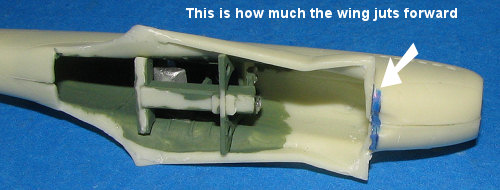
Well, I found out that the reason for some of the
over/undersize parts is that the RTV molds used are prone to
temperature/humidity changes and so they expand and shrink, sometimes quite a
bit. I had not known this facet and it does explain things. Even more reason why
some of these kits are recommended for experienced builders. Anyway, I rem![]() oved
the area marked in blue in the image above and sanded down the forward wing root
area a tad on the fuselage to get a good fit. The usual filler was need
oved
the area marked in blue in the image above and sanded down the forward wing root
area a tad on the fuselage to get a good fit. The usual filler was need ed to
take care of the gaps once I glued the wing in place. I left the rear section uncemented for the time being as I found that I'd somehow glued the tail in such
a manner as it was not straight. This wasn't apparent until I glued on the wing.
ed to
take care of the gaps once I glued the wing in place. I left the rear section uncemented for the time being as I found that I'd somehow glued the tail in such
a manner as it was not straight. This wasn't apparent until I glued on the wing.
Fixing this took about 30 seconds after I heated up the water in a kettle to near boiling. Pouring the hot water over the tail allowed me to move it into position and dousing it in cold tap water fixed it in place. Easy and the best way to fix bent resin. I then proceeded to glue the rear wing. After the usual filler, the tail planes were attached. These are keyed (assuming you don't cut off the keys) so you won't get them installed upside down. I then started on trimming the vac canopy.
Folks, I really don't like vac canopies as I have
trouble getting them to fit and often have trouble masking them properly. This
one
 was no different and I'm glad a spare was included as I used it. The canopy
was then attached to the fuselage using white glue. I
was no different and I'm glad a spare was included as I used it. The canopy
was then attached to the fuselage using white glue. I
 then used Mr. Surfacer to
fill in the gaps (which were many).
then used Mr. Surfacer to
fill in the gaps (which were many).
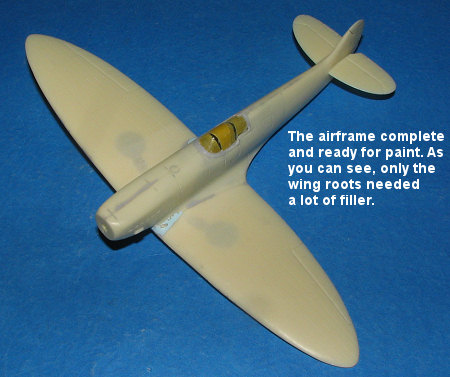
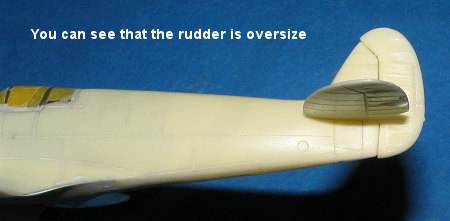
The oil cooler and radiator were glued to the underside of the wings and gaps were handled with a couple of Mr Surfacer applications. The rudder was then glued on and it was a bit oversize as you can see. This was sanded down without any problem. With the airframe complete, it was time for paint.
| COLORS & MARKINGS |
 I first gave the airframe a coat of primer to help spot
any areas that I missed. Lucked out this time and used a fresh bottle of Alclad
II primer. Unlike the earlier bottle, this went on smoothly without any of the
roughness I experienced before. I then painted the flight control surfaces with
Alcald II Aluminum. When dry, these were masked off. The nose was painted with
Polished Aluminum, though it may end up getting the Bare Metal Foil treatment if
it doesn't seem shiny enough. This was also masked off.
I first gave the airframe a coat of primer to help spot
any areas that I missed. Lucked out this time and used a fresh bottle of Alclad
II primer. Unlike the earlier bottle, this went on smoothly without any of the
roughness I experienced before. I then painted the flight control surfaces with
Alcald II Aluminum. When dry, these were masked off. The nose was painted with
Polished Aluminum, though it may end up getting the Bare Metal Foil treatment if
it doesn't seem shiny enough. This was also masked off.
The color of the airframe is described as being a
yellow green zinc chromate. The box art looks almost light grey with a tinge of
yellow while other artwork I've seen tends toward a more yellow color. Since
there are no color photos, I decided to mix up my own color on this and ended up
with a yellow green shade that seems about right to me. You may think it too
intense a color and perhaps it is, but it is what I'm going with. This was
 sprayed over the entire
airframe and later the trim tabs were brush painted with this shade. I
also painted the prop this color, leaving the spinner in aluminum. I did this
because on the drawings that came with the kit, this was shown as the same shade
as the rest of the plane. There is a nose panel that is 'red primer'. I used a
reddish brown paint I had mixed up for this area. When dry, the airframe was
given a coat of gloss acrylic clear (Future).
sprayed over the entire
airframe and later the trim tabs were brush painted with this shade. I
also painted the prop this color, leaving the spinner in aluminum. I did this
because on the drawings that came with the kit, this was shown as the same shade
as the rest of the plane. There is a nose panel that is 'red primer'. I used a
reddish brown paint I had mixed up for this area. When dry, the airframe was
given a coat of gloss acrylic clear (Future).
Next the landing gear, which had been painted aluminum and had the oleos wrapped with Chrome Bare Metal Foil, were glued in place. The hole for the tail skid was opened up and this part installed. Then the main wheels were attached with the top of them leaning outboard as shown in the instructions.
Then it was time to do something about the decals. These took a bit to slide off the backing when using cold water. They stuck well but were unresponsive to Microscale's setting solution, resulting in some silvering. I then applied some Solvaset to see if that would help. Help it did so I suggest using something a tad strong on these. The next thing I did was to brush paint on a matte clear. Yep, brush paint. Vallejo's matte clear goes on superbly and I had no problems with it. I basically did this as I'd stupidly removed the masking from the cowling and canopy and didn't want to put it all back on just to spray on the clear matte.
| FINAL CONSTRUCTION |
The last steps were quite simple. The wing had holes drilled in the leading edge for the two pitot tubes. These were glued in place, as was the prop. That was basically it. As the engine had not been run that much, I left off any exhaust staining, nor did I do oil flow stains from the oil cooler.
| CONCLUSIONS |
 This is
a very nice kit and a must for those who are really into Spitfires. I
wholeheartedly agree with the commentary on the box that this kit is for
experienced builders as there were some areas that needed more than just gluing
and filler. However, it isn't beyond the realm of most of you and even a
beginner into resin kits can do a good job as long as they take their time and
think things through. I'm sure my choice of colors will bring some commentary
and that is fine. It is my interpretation of things and since there are no color
photos of the prototype, then as long as one chooses something reasonable, then
that should work fine.
This is
a very nice kit and a must for those who are really into Spitfires. I
wholeheartedly agree with the commentary on the box that this kit is for
experienced builders as there were some areas that needed more than just gluing
and filler. However, it isn't beyond the realm of most of you and even a
beginner into resin kits can do a good job as long as they take their time and
think things through. I'm sure my choice of colors will bring some commentary
and that is fine. It is my interpretation of things and since there are no color
photos of the prototype, then as long as one chooses something reasonable, then
that should work fine.
| REFERENCES |
Wikipedia
January 2007
#1447 in a series
Copyright ModelingMadness.com. All rights reserved. No reproduction in any form without express permission from the editor.
My thanks to Czech Master Resin for providing the review copy.
If you would like your product reviewed fairly and fairly quickly, please contact the editor or see other details in the Note to Contributors.
Back to the Review Index Page 2025