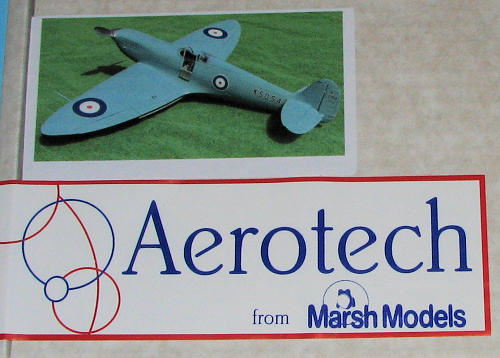
Aerotech 1/32 Spitfire Prototype
| KIT #: | AT32020 |
| PRICE: | $200.00 SRP from www.coopersmodels.com |
| DECALS: | One option |
| REVIEWER: | Scott Van Aken |
| NOTES: | Multi-media kit limited to 150 copies |

| HISTORY |
Construction on K5054 started in December 1934, although several modifications were to be incorporated into the prototype as construction continued. The most obvious change was to the Merlin engine's cooling system, which was now to use pure ethylene glycol rather than water, and the incorporation of a ducted radiator designed using the results of research conducted by Frederick Meredith of the Royal Aircraft Establishment at Farnborough. At the time of her first flight on 5 March 1936, K5054 was unpainted and the undercarriage had no fairings fitted and was fixed down. The first engine was a prototype Merlin C engine of 990 hp (738 kW), with six flush-fitting exhaust ports each side, driving an Aero-Products "Watts" two-bladed, wooden fixed-pitch propeller. The carburettor air intake was shorter and flatter than that of the Mk Is, and was recessed into the centre-section.
The rudder mass balance was larger than that of production aircraft, with an angled lower edge cutting further into the top of the fin. Although the basic wing plan was to stay the same for most production Spitfires, the prototype wing was structurally different: No weapons were fitted and the alclad skinning was laid out in spanwise strips; underneath the port wing the radiator bath started immediately behind the starboard undercarriage bay, with the opening conforming to the angle of the bay. Unlike production aircraft the wingtips were an integral part of the structure and, for the first series of tests a long pitot tube projected from near the port wingtip.
After the first few flights K5054 was returned to the factory, reappearing about 10 days later with an overall pale blue-grey finish, using a high-gloss automotive nitrocellulose-lacquer applied by people from the Rolls-Royce car plant (there is still some uncertainty over the actual colour). The tailskid originally fitted had been replaced by a Dowty manufactured, fully castoring tail-wheel unit. This tailwheel was to be modified several times on the prototype, including using twin tailwheels each smaller than the single wheel which was later standardised. The engine cowlings had been altered slightly and the angled fin tip had become straight topped - the rudder balance was correspondingly reduced in size. Undercarriage fairings had now been fitted to the legs. Although the propeller was still the fixed-pitch, wooden bladed unit the pitch had been changed in an attempt to increase the top speed. Several different types of propeller unit were to be fitted to the prototype. Later in 1936, the wings were replaced with a set which, for the first time, incorporated the famous eight .303" Browning machine-gun armament.
The Spitfire was to fly in this form until 22 March 1937, when a major oil pressure failure led to a "forced-landing" with the undercarriage up. When K5054 re-emerged from the factory the pale blue finish, which had deteriorated badly, was replaced by the RAF's standard "Dark Earth"/"Dark Green" camouflage on the top surfaces with a silver dope finish underneath; this was worn for the remainder of the airframe's life. On 19 September 1938 the Spitfire was flown for the first time with ejector exhausts, developed for the Merlin by Rolls-Royce. With these it was found that the exhausts developed 70 pounds of thrust, equivalent to about 70 hp at 300 mph.
K5405 came to the end of its flying life on 4 September 1939 while being tested at Farnborough. After a misjudged landing K5404 bounced and then tipped over on its back, trapping the pilot Flt Lt. White. White died four days later because of serious neck injuries which were caused by the design of the anchor point to the Sutton harness; this accident lead to the system being redesigned. Parts of the prototype went to the Photographic Department at Farnborough where they were used to test camera installations in the wings and fuselage of reconnaissance Spitfires.
Interestingly, the historical section in the kit instructions is word for word what you have just read from Wikipedia. Ed
| THE KIT |
Aerotech is a company that produces probably some of the finest resin multi-media kits around. I had the good fortune to build their Percival Mew Gull kit some six years ago and found it to be a delightful kit. This one looks to be no exception and is a considerably larger and more complex kit than the Mew Gull.
The resin parts are superbly molded with a complete fuselage and nearly complete wing being the two larger molds. I did find a number of small air pockets on the leading edge of the wing where it had been attached to the pour stub. Some had been filled with super glue, but I can tell it will need more work. Other resin bits are the control surfaces, wheels, prop and spinner, and some cockpit parts. Two rubber tires are included as is a single vac canopy which is divided into three sections. I would have liked another vac piece in case of goofs, but apparently just contacting them will get a replacement if needed.
There are a goodly number of cast metal parts and these are quite well done. They include a bevy of interior details plus the rest of the cockpit in terms of bulkheads and instrument panel. The tail skid and gear legs are cast metal as are the gear doors.
Three complete photo etch sheets are supplied. These are for all the interior framing, insides of gear doors and wells, the flap wells and the flaps themselves. This includes quite a few flap braces. Other bits like the instrument panel and the flat exhaust section are also on these sheets.
Instructions are in full color and show not only an exploded photo of the exterior, but also sections on how to build up the interior. This will require some finesse as one has to build up the inside of an alreadymolded fuselage. Not as easy as if the fuselage were in halves, but then there is no seam to deal with. This aspect of the build is one reason why I would only recommend this for modelers with experience in multi-media kits.
Decals are provided for the prototype and there is a photo of the completed kit to show where most of these are to be applied. The sheet includes an instrument decal and framework for the vac canopy. The decals are very nicely printed and based on my earlier experience should work very well. A nice addition is a color chip of the gloss Rolls Royce Blue that was worn by this aircraft. The canopy frame decals match this color. No information on what readily available paints will match this is given so one will be on their own when trying to match it.
| CONSTRUCTION |
I was determined to take this one slowly so as not to mess anything up. Initial work was to sand the leading edge of the wing to remove the remnants of the pour stubs. During this operation, several small pinhole air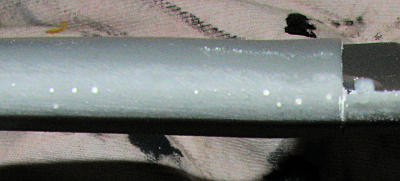 pockets made themselves known. Shown is the worst of it. These were simply filled with superglue, though it took a couple of applications. The resin dust showed them up quite easily and helped to soak up the superglue to fill the holes. After that was sanded smooth, I painted some silver over it to show what I missed.
Then the fuselage was sanded down. There is a mold seam that runs near the lower fuselage that needs to be removed and there are a few pips that also have to be taken care of. With that done, I test fit the wing to the fuselage. After about an hour's worth of work with a sanding stick and low speed grinder, I was able to get a pretty good fit. Basically, there is a groove in the wing on the inside into which the lower wing root section is supposed to fit. This needed to be widened and I also needed to trim down the height of the fuselage root section. It is not something one can do quickly.
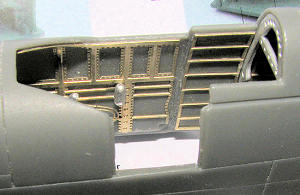 With that done, I started building the interior. This is a combination of resin, cast metal and photo etch. It is important to make sure all the parts fit properly as it will have to be slid in from the bottom of the fuselage opening. As you can see, the sidewall detail, which is considerable, has to be attached from the underside. When I glued the frames, I let the glue dry while the assembly was in the fuselage to be sure things would fit. To me, the instructions could be better. Having photos of completed assemblies is nice, but one would like to have a bit more. I also found it pretty silly to number all the resin and metal parts in the instructions, yet not have a parts guide. Finding the photo etch bits was not difficult as those do have numbers in the general area of the part.
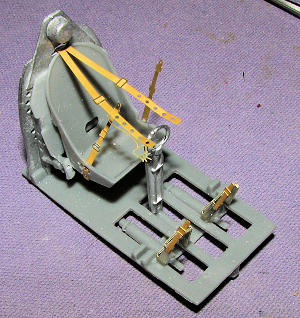 Eventually, I got all the pieces glued to the interior section and as you can see in this image (without the instrument panel), this is very much a multi-media kit. Meanwhile, I worked on some other bits and pieces. The landing gear doors are cast metal which is sandwiched between etched brass pieces. I also cleaned up the ailerons and glued those in place on the wings. These needed
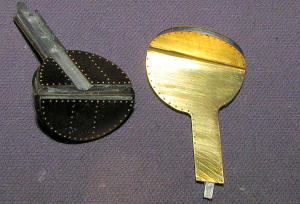 to be held in place while the super glue dried to keep them level with the wing surface. I also cleaned up the tail bits like the elevators and rudder. These have resin pegs that either need to have the receiving holes deepened or the pegs cut shorter. While on the subject of resin, I found that I almost immediately broke the resin pin onto which the cast metal control stick was placed. The assembly to which this is a part needs to be made from metal vice resin. Perhaps in a later Spit kit this will happen as it is pretty obvious that later Merlin Spits can be done from this molding.
One thing that made this clear is that there are slots for ejector exhaust and the upper oil filler cap hole on the fuselage. The latter had to be filled and the former has a resin plate that fits over it for the flush exhaust.
| COLORS & MARKINGS |
| FINAL CONSTRUCTION |
| CONCLUSIONS |
Overall, this is an exceptional kit of a famous aircraft. Though only 150 copies have been produced (the review kit is #5), I am sure that it will sell out rather quickly. I have already started construction of mine so stay tuned.
| REFERENCES |
http://en.wikipedia.org/wiki/Supermarine_Spitfire_%28early_Merlin_powered_variants%29
May 2012
Thanks to www.coopersmodels.com for the preview kit. He still has a few so get yours before they are gone.
If you would like your product reviewed fairly and fairly quickly, please contact the editor or see other details in the