Azur/FRROM 1/72 Potez 25 A2/B2 Hispano
| KIT #: | FR0038 |
| PRICE: | $ |
| DECALS: | Four options |
| REVIEWER: | Scott Van Aken |
| NOTES: | 2019 tooling. Short run with p.e. |
| HISTORY |
| THE KIT |
 Azur/FRROM
kits are all made by the MPM/Special Hobby group. This one is typical with
the molding in a light grey plastic. As the base sprues are used for other
variants, you'll fine several parts not used in this boxing, which is for
the Hispano powered aircraft. Typical of these sorts of kits, you will need
to drill some holes and fill a bit
to properly portray this variant. The instructions show you exactly where
this needs to be done so it would be wise to actually read through it before
starting. The photo etch fret is fairly extensive. It consists of the wire
wheels, control actuators and rigging attachment points. This latter feature
is the first I've seen in a kit of this scale.
Azur/FRROM
kits are all made by the MPM/Special Hobby group. This one is typical with
the molding in a light grey plastic. As the base sprues are used for other
variants, you'll fine several parts not used in this boxing, which is for
the Hispano powered aircraft. Typical of these sorts of kits, you will need
to drill some holes and fill a bit
to properly portray this variant. The instructions show you exactly where
this needs to be done so it would be wise to actually read through it before
starting. The photo etch fret is fairly extensive. It consists of the wire
wheels, control actuators and rigging attachment points. This latter feature
is the first I've seen in a kit of this scale. 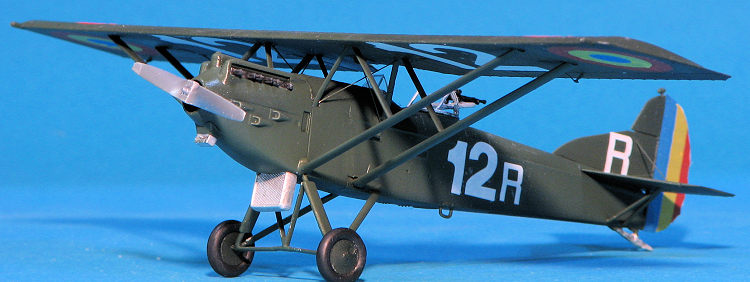 Construction starts logically with the interior and is quite complete with
both the pilot and observer/gunner's positions. In addition to the rear gun
(which is on a Scarff ring and installed near the end), you are provided
with a camera. Fuselage is in left and right halves with a separate bottom.
The forward fuselage is also separate to deal with the different engines.
Two cowling options are provided depending on the markings option you
choose. Attaching the upper cowling pieces traps a set of cabane struts. Lower wings
are a single piece and while the 'hills and valleys' may be a bit much for
some, this can be sanded or even filled in if you wish.
Construction starts logically with the interior and is quite complete with
both the pilot and observer/gunner's positions. In addition to the rear gun
(which is on a Scarff ring and installed near the end), you are provided
with a camera. Fuselage is in left and right halves with a separate bottom.
The forward fuselage is also separate to deal with the different engines.
Two cowling options are provided depending on the markings option you
choose. Attaching the upper cowling pieces traps a set of cabane struts. Lower wings
are a single piece and while the 'hills and valleys' may be a bit much for
some, this can be sanded or even filled in if you wish.  Once the nose is attached, then comes the upper wing. Some of these planes
had fuel tanks attached and the instructions guide you through that. All the
other struts are single pieces so some sort of jig would probably be useful.
Next the tailplanes are attached and the landing gear made up. Not all
options use wire wheels so you need to know which set of markings you'll be
using fairly early. If you do pick the wire wheels, you'll need to replace
the axle stubs with something thinner.
Once the nose is attached, then comes the upper wing. Some of these planes
had fuel tanks attached and the instructions guide you through that. All the
other struts are single pieces so some sort of jig would probably be useful.
Next the tailplanes are attached and the landing gear made up. Not all
options use wire wheels so you need to know which set of markings you'll be
using fairly early. If you do pick the wire wheels, you'll need to replace
the axle stubs with something thinner. | CONSTRUCTION |
Let me preface this build by stating that I am terrible when it comes to aircraft that require more than minimal rigging. These projects often last years. I'm simply not good at it so avoid these sorts of kits when it comes time to plunk something on the bench. However, this kit offered me a way out which I will comment on later in the build.
 As most of you know, Azur/FRROM kits are tooled by
Special Hobby/MPM so are of good quality. They are still short run kits and
need to be treated as such. For this build I followed the instructions
pretty much to the letter. The cockpit is one where you have to do a lot of
prepainting as there is sidewall detail to deal with. In addition a lot of
fairly small parts have to be placed throughout building the interior. I
found the installation of the floor to be particularly tricky as the control
sticks tend to be mounted so far forward that you cannot get them in place
once you have installed the instrument panels.
As most of you know, Azur/FRROM kits are tooled by
Special Hobby/MPM so are of good quality. They are still short run kits and
need to be treated as such. For this build I followed the instructions
pretty much to the letter. The cockpit is one where you have to do a lot of
prepainting as there is sidewall detail to deal with. In addition a lot of
fairly small parts have to be placed throughout building the interior. I
found the installation of the floor to be particularly tricky as the control
sticks tend to be mounted so far forward that you cannot get them in place
once you have installed the instrument panels.
The fuselage halves do not include the bottom which is a separate piece. The bottom section is attached with a 45 degree chamfered edge that makes proper placement somewhat tricky. Building up the separate engine also caused me some issues. You can't really attach the nose halves to the fuselage before as the rear cabane struts are trapped between the engine and fuselage. Besides, the join is pretty much a butt join as the tiny tab is not very helpful. I left off the exhaust until near the end after all had been painted.
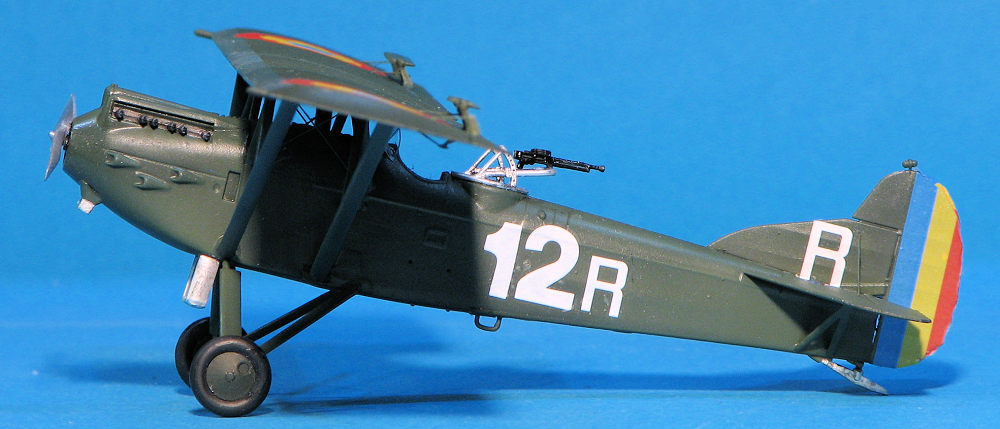
Now for the saving grace for me. Potez 25s were often flown as parasol aircraft without the lower wing. Apparently they were interchangeable. One of the options is for such a configuration and that is the one I chose. This means a plug where the lower wing would normally go. Again if choosing the lower wing, you have to attach this prior to attaching the nose as the wings are a single piece.
 This did not get me totally out of the woods as the
attaching wing struts are very long with no really positive locators. Just
some dimples and a small slot or two. Since I did not do a great job
attaching the nose, some of these were off a bit and that made attaching the
struts a major challenge requiring super glue and accelerator.
This did not get me totally out of the woods as the
attaching wing struts are very long with no really positive locators. Just
some dimples and a small slot or two. Since I did not do a great job
attaching the nose, some of these were off a bit and that made attaching the
struts a major challenge requiring super glue and accelerator.
With that fairly solid, I attached the appropriate fin/rudder for this version and the horizontal stabilizers. I then built up the landing gear using the required axle and wheels, though did not attach the wheels at this point. Then the tail skid. The small upper wing airfoil pieces were a disaster. I did not realize that the attachment bits were also provided in plastic so used the p.e. bits, which I totally hosed. Same with the aileron hinges.
At this point I had the airframe at a point where I could paint. Now I have to mention that I stopped and started this kit multiple times so the overall time frame of what preceded was about 4 months. I stuffed the cockpits with tissue and headed for the paint shop.
| COLORS & MARKINGS |
 This plane was to be painted in an overall dark green. The instructions
called for Gunze H36, which I do not have. So instead, I used Russian armor
green as the shade is very dark. I then gave the airframe a coat of Future
in preparation for the decals.
I had chosen one of the Romanian options that has some fairly large
markings. I had no issues getting the decals on the model. They are
admirably thin and reacted well to Microsol setting solution, one of the
milder ones out there. However, they are not very opaque and the dark color
under them darkened the colors of the roundels and fin flashes as they are
not backed up by white. No issues at all with the white markings.
This plane was to be painted in an overall dark green. The instructions
called for Gunze H36, which I do not have. So instead, I used Russian armor
green as the shade is very dark. I then gave the airframe a coat of Future
in preparation for the decals.
I had chosen one of the Romanian options that has some fairly large
markings. I had no issues getting the decals on the model. They are
admirably thin and reacted well to Microsol setting solution, one of the
milder ones out there. However, they are not very opaque and the dark color
under them darkened the colors of the roundels and fin flashes as they are
not backed up by white. No issues at all with the white markings. | CONCLUSIONS |
This was a kit that I had trouble building. It is not the fault of the kit. I am not used to kits like this with lots of struts and rigging so when I eventually build one, I tend to make a bit of a mess of things. Means it takes me a while to finish. However, the end result is pleasing enough if you don't look too close.
It is great seeing interwar planes being kitted. Especially this one as it was used so widely in the late 1920s and the 1930s. There are additional boxings so that you can build other variations.
| REFERENCES |
https://en.wikipedia.org/wiki/Potez_25
April 2020
Copyright Modeling Madness.com. All rights reserved.
My thanks to Azur/FRROM
for the review kit. Get yours today at your local
retailer or ask them to order it in for you.
If you would like your product reviewed fairly and fairly quickly, please contact the editor or see other details in the Note to Contributors.
Back to the Main Page Back to the Review Index Page Back to the Previews Index Page