Please visit the preview
for a look at what is in the box.
Not wanting to sound trite, but I almost started with the
interior! Actually, I started by removing resin bits from the various
pour stubs. Most of them could be removed with a sharp scalpel blade, but
some, like the seats, exhaust and radiator had to be sawn. The radiator
is particularly tricky as you have to cut a 'vee' out of the upper
portion while leaving the side portions tall enough to fit in the slots
on the fuselage nose. I did this portion rather carefully, test fitting
it many times to be sure it fit properly.
 Once that was done, I started gluing parts together.
Since the interior is basically aluminum (not much in the way of cockpit
lighting so a bright cockpit was preferred), I assembled much of the
interior portions, including one sidewall. The aft floor on my kit was
not well molded with sections of the floor being particularly 'soft', as
if there wasn't enough resin. There are small 'vee' braces that go in the
forward cockpit, but the instructions are not very forthcoming on exactly
how these bits are supposed to fit other than showing them attached near
the top of the cockpit walls. I left them off while I painted all the
interior parts with Alclad II aluminum. What appears to be a fuel tank
with a brace topped by an airfoil section is a bit tricky to install and
is one of those bits that 'only fits where it touches'! I detail painted
some of the boxes and forward instrument panel in black and then gave the
entire interior a wash of dirty thinner. Thanks to Alclad II being a
lacquer, the dirty enamel thinner did not harm the aluminum paint at all.
Seat belts were painted khaki as per the instructions. I then drybrushed
the black bits to bring out what little detail there is.
Once that was done, I started gluing parts together.
Since the interior is basically aluminum (not much in the way of cockpit
lighting so a bright cockpit was preferred), I assembled much of the
interior portions, including one sidewall. The aft floor on my kit was
not well molded with sections of the floor being particularly 'soft', as
if there wasn't enough resin. There are small 'vee' braces that go in the
forward cockpit, but the instructions are not very forthcoming on exactly
how these bits are supposed to fit other than showing them attached near
the top of the cockpit walls. I left them off while I painted all the
interior parts with Alclad II aluminum. What appears to be a fuel tank
with a brace topped by an airfoil section is a bit tricky to install and
is one of those bits that 'only fits where it touches'! I detail painted
some of the boxes and forward instrument panel in black and then gave the
entire interior a wash of dirty thinner. Thanks to Alclad II being a
lacquer, the dirty enamel thinner did not harm the aluminum paint at all.
Seat belts were painted khaki as per the instructions. I then drybrushed
the black bits to bring out what little detail there is.
While all this was drying, I added the exhaust to the
inside of the nose. There is no alignment help for these at all and
getting them in any kind of a even fit was a real chore. In fact, I found
it quite difficult and had to settle on getting them both as even as I
could. Two barrel shaped oil coolers fit into the outer parts of a
housing under the nose. Frankly, I think it looks a tad odd with the gap
between them and perhaps these should either be larger or the opening
narrower.
 Next step was
putting in the 'cover' over the aft cockpit and then gluing the other
side panel in place. Test fitting showed no problems there. Can't say the
same on the front. It turned out to be too wide so I had to do some
sanding and carving to get it to fit in place. I think it is a tad low
but without any references, don't know for sure. I did manage to fit
those 'vee' braces in the cockpit without too much trouble. The
instrument panel fits atop the resin cockpit and that had to be trimmed
down to get it to fit well enough to where I could close the fuselage
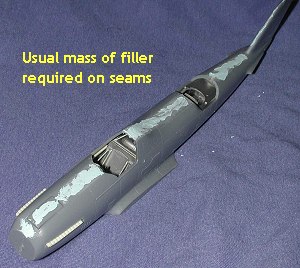
halves. This was relatively painless except for the nose section, where I
had to use superglue and clamp it for a while to get the halves to mate.
As usual, there were large seams that needed filled, even after I did
some preliminary filing.
Next step was
putting in the 'cover' over the aft cockpit and then gluing the other
side panel in place. Test fitting showed no problems there. Can't say the
same on the front. It turned out to be too wide so I had to do some
sanding and carving to get it to fit in place. I think it is a tad low
but without any references, don't know for sure. I did manage to fit
those 'vee' braces in the cockpit without too much trouble. The
instrument panel fits atop the resin cockpit and that had to be trimmed
down to get it to fit well enough to where I could close the fuselage
halves. This was relatively painless except for the nose section, where I
had to use superglue and clamp it for a while to get the halves to mate.
As usual, there were large seams that needed filled, even after I did
some preliminary filing.
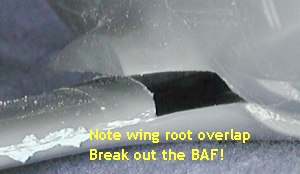 I then glued
the wing halves together and filled the gaps that were there after
sanding. Then I tried to fit the wings and fuselage together. Either the
fuselage is too wide or the upper wings too long. I ended up sanding a
bit off each of them. I had to use a BAF (Big *ss File) on the wing roots
to get them narrowed down to where the wings would fit. This plane has
very long wings in comparison to the fuselage! I then glued the wings in
place and propped it up hoping that I'd be able to get some dihedral on
them when the glue dries!
I then glued
the wing halves together and filled the gaps that were there after
sanding. Then I tried to fit the wings and fuselage together. Either the
fuselage is too wide or the upper wings too long. I ended up sanding a
bit off each of them. I had to use a BAF (Big *ss File) on the wing roots
to get them narrowed down to where the wings would fit. This plane has
very long wings in comparison to the fuselage! I then glued the wings in
place and propped it up hoping that I'd be able to get some dihedral on
them when the glue dries!
The gap on the wing root was such that it took several
coats of filler to fill and to smooth out. With that done, the tail
planes were glued in place. Fit there was not bad, but I did need a touch
of filler. Then I moved to the underside of the
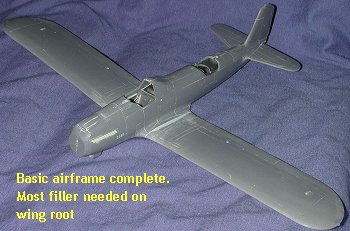 aircraft. First, I glued
the wheel pants together, trapping the resin wheels between them. I had
to slightly enlarge the holes for the small stub axles to get them both
in place. They do turn and that will make it easier to paint them, though
I'll have to go in stages. Yes, I should have pre-painted them, but I
didn't. I used no filler on the wheel pant seams.
aircraft. First, I glued
the wheel pants together, trapping the resin wheels between them. I had
to slightly enlarge the holes for the small stub axles to get them both
in place. They do turn and that will make it easier to paint them, though
I'll have to go in stages. Yes, I should have pre-painted them, but I
didn't. I used no filler on the wheel pant seams.
When it came to installing them, though, things were not
quite as rosy. I had to file them so that the attachment angle would be
such that they would be perpendicular to the ground. I think I got it
pretty close, but it did call for filler when done. The placement
instructions don't match the kit in terms of where they go. There is no
engraved guide, which would have been helpful. I glued one on where the
instructions showed and it seemed awful close to the fuselage. I
pulled it off and chose a majo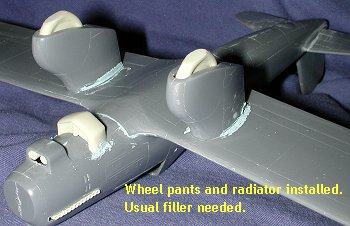 r panel line just outside where the
instructions suggested and lined the pants up with that. It looks a LOT
better. I also glued in the large radiator. This part is a bit narrower
than the kit at that point so I had to do some creative carving to get it
to fit. Again, I had to use filler to take care of the rather large gaps
created on the outside edges of this part.
r panel line just outside where the
instructions suggested and lined the pants up with that. It looks a LOT
better. I also glued in the large radiator. This part is a bit narrower
than the kit at that point so I had to do some creative carving to get it
to fit. Again, I had to use filler to take care of the rather large gaps
created on the outside edges of this part.
Once the gaps were filled on this and the radiator, I had
to decide what to do about rigging. Frankly, a plane like this just
doesn't look right without it, though I wasn't sure I was going to mess
with the spreader bars. I filed flat the ends of the lower wire
attachment housing and drilled four small holes into the ends using a #78
drill bit (.016 inches). These were then glued onto the wheel pants. On
the top, things aren't as easy. These attachment fairings are resin and
too small for the drill bit I was using. The only real option here is a
butt fit. I then drilled out the holes in the wing where these wires
would go, angling them towards the attachment fairings as I drilled,
again, using the #78 bit.
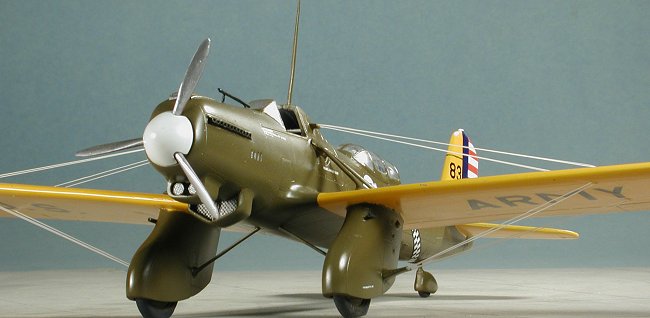
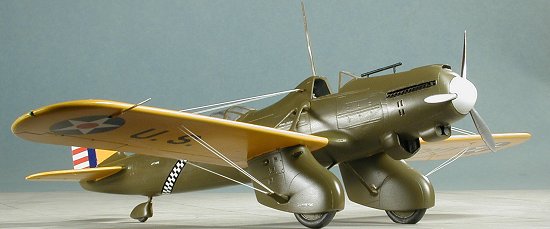
 Then it was time for some paint. I used Polly Scale
acrylics for this one as there was going to be no detail spraying needed
and Polly Scale has a selection of prewar colors. In this case, Yellow 04
and Olive Drab 22. The first step was to undercoat all the yellow areas
with white. I used Floquil Reefer white for this as it gives good
coverage and dries quickly. Then it was followed by two coats of Yellow
04. I thinned this and the OD 22 with Future to add some sheen to it as I
didn't want a totally flat finish. I didn't get that much of a sheen, but
it was better than dead flat.
Then it was time for some paint. I used Polly Scale
acrylics for this one as there was going to be no detail spraying needed
and Polly Scale has a selection of prewar colors. In this case, Yellow 04
and Olive Drab 22. The first step was to undercoat all the yellow areas
with white. I used Floquil Reefer white for this as it gives good
coverage and dries quickly. Then it was followed by two coats of Yellow
04. I thinned this and the OD 22 with Future to add some sheen to it as I
didn't want a totally flat finish. I didn't get that much of a sheen, but
it was better than dead flat.
After that dried, I sprayed on the Future over it and let
it dry. Then ALL the yellow was masked. It took quite a bit of tape, but
the only way to ensure that there are no overspray problems is to mask
everything. Then the OD 22 was sprayed on. This took several coats as I
wanted to get all of the wheels painted as well so had to paint a
section, let it dry, spin the wheel, and paint some more. I also painted
the spinner white at this time.
 Then the kit was taken back to the workbench to have the
canopies installed. There are two of them supplied so that if you make a
goof, there's a second one available. I cut these out by scribing along
the outer edges of the canopy and simply snapping them from the backing.
I then masked them and when that was done, glued them into place. The
forward windscreen needed a touch of additional trimming, but fit with no
real problems. The aft canopy is much larger and I found it to be a bit
oversize. In order for the back part to fit within the confines of the
fuselage, I had to squeeze it a bit while the superglue dried. This meant
that the forward section had large gaps. I glued this area down best as I
could then when it was dry, I did several applications of white glue to
fill in the gaps as best I could. The end result is not bad, especially
for me. The tail wheel assembly was glued and cleaned up.
Then the kit was taken back to the workbench to have the
canopies installed. There are two of them supplied so that if you make a
goof, there's a second one available. I cut these out by scribing along
the outer edges of the canopy and simply snapping them from the backing.
I then masked them and when that was done, glued them into place. The
forward windscreen needed a touch of additional trimming, but fit with no
real problems. The aft canopy is much larger and I found it to be a bit
oversize. In order for the back part to fit within the confines of the
fuselage, I had to squeeze it a bit while the superglue dried. This meant
that the forward section had large gaps. I glued this area down best as I
could then when it was dry, I did several applications of white glue to
fill in the gaps as best I could. The end result is not bad, especially
for me. The tail wheel assembly was glued and cleaned up.
 The kit then had the cockpit areas remasked to keep
overspray out of it and then repainted the areas around the canopies. At
this time, the tail wheel assembly and the upper and lower braces were
painted as well. When all was dry, more Future was applied. Returning to
the workbench, the braces had to be glued in place. Fit here is not the
best and I had to fill gaps, especially in the upper brace. Because I
moved the spats out a bit, the spat braces were a tad shorter than
normal, but no real problem. During all this, one of the resin wheel
axles broke off, leaving me a wheel that flopped around in the spat. Not
good! I had to superglue the wheel in place as otherwise it would have
ridden quite low on one side.
The kit then had the cockpit areas remasked to keep
overspray out of it and then repainted the areas around the canopies. At
this time, the tail wheel assembly and the upper and lower braces were
painted as well. When all was dry, more Future was applied. Returning to
the workbench, the braces had to be glued in place. Fit here is not the
best and I had to fill gaps, especially in the upper brace. Because I
moved the spats out a bit, the spat braces were a tad shorter than
normal, but no real problem. During all this, one of the resin wheel
axles broke off, leaving me a wheel that flopped around in the spat. Not
good! I had to superglue the wheel in place as otherwise it would have
ridden quite low on one side.
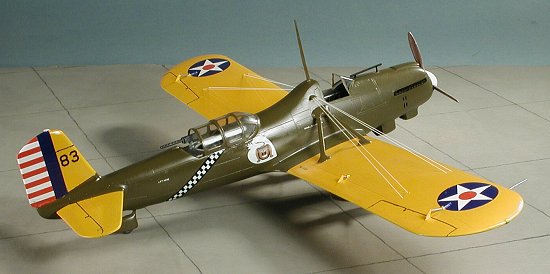
Now for the decals. I started with the tail stripes which
are not exactly the same shape as the rudder. This is quite clear on the
bottom where one must overlap a bit onto the painted area near the
forward section with the decal to get it to fit properly. The wing stars
are slightly off register and there is a sliver of white that peeks from
the edge. I trimmed these as best as I could, but you may wish to inspect
yours and replace them with aftermarket insignia. I didn't as the blue on
these is a lighter shade than any of the aftermarket ones I have and they
wouldn't have matched the rudder markings.
With the kit painted and decaled (at least mostly
decaled), I brought it back to the workbench for final assembly. On this
kit that means quite a bit of work to go. Specifically, rigging this
beastie. For some, this will pose no problem. For me, it wasn't that bad,
but was very time consuming. I chose the stretched sprue route and used
AMT sprues as their plastic stretches well (I have a stash from older AMT
kits I've built in the past). If you recall. I drilled holes for most of
the sprue attachment  points and that helped quite a bit. Using white glue
as the adhesive of choice (that way, if I totally screw one up, I can easily remove the offending bit and not have to redrill), I started on
the bottom. First attaching the sprue into the spats, I worked in pairs.
I trimmed the sprue to close to the actual size and then slipped them in
the wing holes, applying and then smoothing out the white glue. I moved
to the next pair and did the same. Once that pair was done, I returned to
the first set (which had now dried) and, taking a match, struck it, let
it burn a while and then blew it out. I passed the hot match head under
the sprue and they tightened up once they got hot. Don't know why plastic
does this, but it does and it makes things SO much nicer for us all.
points and that helped quite a bit. Using white glue
as the adhesive of choice (that way, if I totally screw one up, I can easily remove the offending bit and not have to redrill), I started on
the bottom. First attaching the sprue into the spats, I worked in pairs.
I trimmed the sprue to close to the actual size and then slipped them in
the wing holes, applying and then smoothing out the white glue. I moved
to the next pair and did the same. Once that pair was done, I returned to
the first set (which had now dried) and, taking a match, struck it, let
it burn a while and then blew it out. I passed the hot match head under
the sprue and they tightened up once they got hot. Don't know why plastic
does this, but it does and it makes things SO much nicer for us all.
I worked this way until all the lower (and shorter) wires
were done. You will notice that I weaseled out of doing the spreader bars
as I'd be totally hopeless with them. I broke as many as I attached so
once they were in place, I handled the model as if it was made of spun
glass! The upper wires were a bit different. No holes as the attachment
area was too small. Instead, I cut some sprue to length and then applied
superglue to the ends of the attachment pylons. Carefully attaching the
sprue, I put all four in place at the same time. Then when it was dry, I
inserted the other ends into the predrilled holes in the wing using white
glue and then did the match trick to tighten them up when dry. When the
sprue broke on the upper wing, repair was much more difficult as I had to
not only remove the old sprue, but scrape away a tiny area for the new
one to be attached.
 Finally, all of them were on and tight and they looked
good. I decided not to paint them for fear of breaking more in the
process, but the light grey doesn't look too bad. Now to glue on a bunch
more little resin bits. First were the two tiny steps for the rear
cockpit. Then I removed and installed the aileron and flap actuator
linkage. I broke one of these, but after repair, it was in place and I
gingerly moved on to the next. There are spat gun barrels supplied, but
they look nothing like gun barrels. In fact, not only do they look too
short (one is tiny), but they have no detail. Simply angled rod. I
drilled out the long ones and then glued them in place. Trying to put the
really teeny ones on as well was futile as I could barely hold them in
the tweezers. So rather than frustrate myself, my A-8 only has one gun
installed in each spat! Moving to the back, there is a gun for the radio
operator. This also has a bit of a mount and it is supposed to have a
separate resin handle. Well, I couldn't find it anywhere. Either I lost
it or it wasn't there in the first place as I really don't remember
seeing it. This gun and the spat guns were painted gun metal and the aft
gun and mount was glued in place. I trimmed the post on the bottom of the
rear gun before gluing it to its mount as it seemed way too tall with it.
Finally, all of them were on and tight and they looked
good. I decided not to paint them for fear of breaking more in the
process, but the light grey doesn't look too bad. Now to glue on a bunch
more little resin bits. First were the two tiny steps for the rear
cockpit. Then I removed and installed the aileron and flap actuator
linkage. I broke one of these, but after repair, it was in place and I
gingerly moved on to the next. There are spat gun barrels supplied, but
they look nothing like gun barrels. In fact, not only do they look too
short (one is tiny), but they have no detail. Simply angled rod. I
drilled out the long ones and then glued them in place. Trying to put the
really teeny ones on as well was futile as I could barely hold them in
the tweezers. So rather than frustrate myself, my A-8 only has one gun
installed in each spat! Moving to the back, there is a gun for the radio
operator. This also has a bit of a mount and it is supposed to have a
separate resin handle. Well, I couldn't find it anywhere. Either I lost
it or it wasn't there in the first place as I really don't remember
seeing it. This gun and the spat guns were painted gun metal and the aft
gun and mount was glued in place. I trimmed the post on the bottom of the
rear gun before gluing it to its mount as it seemed way too tall with it.
Moving to the front, I painted the back of the prop a
maroon color and then glued it into the spinner. I had to enlarge the
hole in the nose quite a bit to get the prop shaft in place. To my eyes,
the prop seems t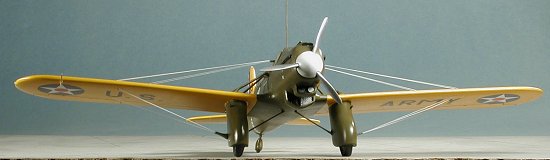 o be too small, but perhaps it was the norm for an engine
that only produced about 600 hp. I was feeling really proud of myself
when I noticed I'd forgotten the pitot tube and some of the stencil
decals. Those were quickly glued on/applied and the the kit was nearly
done. Looking in the box, I noticed the tall radio mast. Now you might
want to make a new one. Mine was a bit warped and not at all straight,
but I did glue it in place atop the fuselage. Also glued on was the gun
sight, which was painted black. I then went and touched up all the areas
that needed painted, like the resin bits I'd installed. A misting of
Future was then applied and I used a tiny bit of pastels for minor
exhaust stains. Since money was so tight in the 20's and 30's, a lot of
time was spent cleaning up aircraft and they were generally in pristine
condition, so grunge was not allowed! I then removed the masking from the
clear bits. Using acrylics has its problems in that it doesn't stick as
well as enamels so I had to do some touchup painting on the clear bits
where the paint had come up with the masking. Finally, the kit was
finished!
o be too small, but perhaps it was the norm for an engine
that only produced about 600 hp. I was feeling really proud of myself
when I noticed I'd forgotten the pitot tube and some of the stencil
decals. Those were quickly glued on/applied and the the kit was nearly
done. Looking in the box, I noticed the tall radio mast. Now you might
want to make a new one. Mine was a bit warped and not at all straight,
but I did glue it in place atop the fuselage. Also glued on was the gun
sight, which was painted black. I then went and touched up all the areas
that needed painted, like the resin bits I'd installed. A misting of
Future was then applied and I used a tiny bit of pastels for minor
exhaust stains. Since money was so tight in the 20's and 30's, a lot of
time was spent cleaning up aircraft and they were generally in pristine
condition, so grunge was not allowed! I then removed the masking from the
clear bits. Using acrylics has its problems in that it doesn't stick as
well as enamels so I had to do some touchup painting on the clear bits
where the paint had come up with the masking. Finally, the kit was
finished!
The kit took a lot more time to build than I'd originally
thought. The fit of the resin was average, but not great and as a result,
I had some problems. Were I to do another, I'd not use the resin wheels
so I wouldn't have to worry about breaking the axles. I'd also try to
figure out a way to drill holes in the upper wire braces as butt joining
the wires is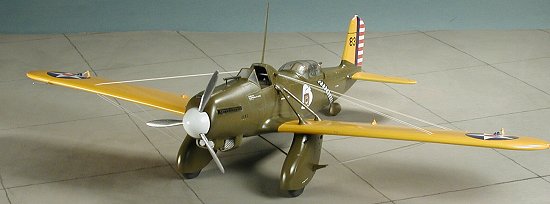 a real pain. I'd also hunt up some other gun barrels for the
spats and predrill the holes for them. It would look a LOT better.
a real pain. I'd also hunt up some other gun barrels for the
spats and predrill the holes for them. It would look a LOT better.
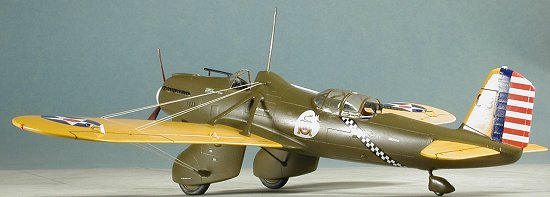
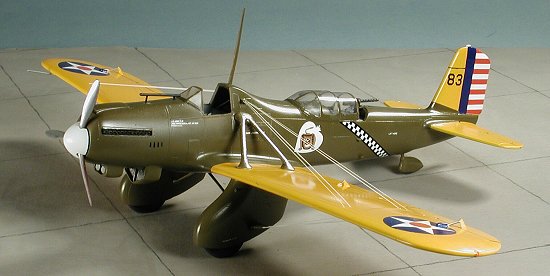
However, that is all hindsight. The finished model looks
really great and it isn't really so difficult that it can't be done by a
competent modeler. It is the first between wars 1/48 US Army model I've
done in over a decade and I'm quite happy with the results. I'm hoping
that this one does well so that they can bring out an A-12 and if we are
lucky, an A-17, then A-18.....
December 2003
#1296 in a series
You can find this kit and many others at

If you would like your product reviewed fairly and fairly quickly by a
site that has over 200,000 visitors a month, please contact
me or see other details in the Note to
Contributors.