Fujimi 1/72 F-4B/N Phantom II
| KIT #: | 7A-G3 |
| PRICE: | $15.00 SRP when new |
| DECALS: | One option |
| REVIEWER: | Scott Van Aken |
| NOTES: | 1985 boxing |
| HISTORY |
The McDonnell Douglas F-4 Phantom II is a tandem, two-seat, twin-engine, all-weather, long-range supersonic jet interceptor fighter/fighter-bomber originally developed for the United States Navy by McDonnell Aircraft. It first entered service in 1960 with the U.S. Navy. Proving highly adaptable, it was also adopted by the U.S. Marine Corps and the U.S. Air Force, and by the mid-1960s had become a major part of their respective air wings.
 The Phantom is a large fighter with a top speed of over
Mach 2.2. It can carry over 18,000 pounds (8,400 kg) of weapons on nine external
hardpoints, including air-to-air missiles, air-to-ground missiles, and various
bombs. The F-4, like other interceptors of its time, was designed without an
internal cannon. Later models incorporated a M61 Vulcan rotary cannon. Beginning
in 1959 it set 15 world records for in-flight performance, including an absolute
speed record, and an absolute altitude record.
The Phantom is a large fighter with a top speed of over
Mach 2.2. It can carry over 18,000 pounds (8,400 kg) of weapons on nine external
hardpoints, including air-to-air missiles, air-to-ground missiles, and various
bombs. The F-4, like other interceptors of its time, was designed without an
internal cannon. Later models incorporated a M61 Vulcan rotary cannon. Beginning
in 1959 it set 15 world records for in-flight performance, including an absolute
speed record, and an absolute altitude record.
During the Vietnam War the F-4 was used extensively; it served as the principal air superiority fighter for both the Navy and Air Force, and became important in the ground-attack and reconnaissance roles late in the war. The Phantom has the distinction of being the last U.S. fighter flown to attain ace status in the 20th century. During the Vietnam War the USAF had one pilot and two weapon systems officers (WSOs), and the US Navy one pilot and one radar intercept officer (RIO), achieve five aerial kills against other enemy fighter aircraft and become aces in air-to-air combat. The F-4 continued to form a major part of U.S. military air power throughout the 1970s and 1980s, being gradually replaced by more modern aircraft such as the F-15 Eagle and F-16 in the U.S. Air Force; the Grumman F-14 Tomcat and F/A-18 Hornet in the U.S. Navy; and the F/A-18 in the U.S. Marine Corps.
The F-4 Phantom II remained in use by the U.S. in the
reconnaissance and Wild Weasel (suppression of enemy air defenses) roles in the
1991 Gulf War, finally leaving service in 1996. It was also the only aircraft
used by both U.S. flight demonstration teams: the USAF Thunderbirds (F-4E) and
the US Navy Blue
 Angels (F-4J).[
The F-4 was also operated by the armed forces of 11 other nations. Israeli
Phantoms saw extensive combat in several Arab–Israeli conflicts, while Iran used
its large fleet of Phantoms in the Iran–Iraq War. Phantoms remain in front line
service with several countries, and in use as an unmanned target in the U.S. Air
Force. However, it is soon to be retired from the drone force by the QF-16C as
the diminishing number of Phantom airframes is used up. Phantom production ran
from 1958 to 1981, with a total of 5,195 built, making it the most numerous
American supersonic military aircraft.
Angels (F-4J).[
The F-4 was also operated by the armed forces of 11 other nations. Israeli
Phantoms saw extensive combat in several Arab–Israeli conflicts, while Iran used
its large fleet of Phantoms in the Iran–Iraq War. Phantoms remain in front line
service with several countries, and in use as an unmanned target in the U.S. Air
Force. However, it is soon to be retired from the drone force by the QF-16C as
the diminishing number of Phantom airframes is used up. Phantom production ran
from 1958 to 1981, with a total of 5,195 built, making it the most numerous
American supersonic military aircraft.
| THE KIT |
When Fujimi's 1/72 F-4 series was released in the mid 1980's they were welcomed with open arms. Prior to this, the only decent 1/72 Phantoms were the F-4C/D and F-4J offered by Monogram. These were and still are very nice kits, but were considered 'old technology' due to their raised panel lines. Engraved lines were the latest thing and Fujimi had been doing this sort of thing for a while. Their F-4 line was part of what was a growing line of USN jets like the A-7, A-6, and A-4 which are still considered by many to be the best in this scale.
Molded in a rather hard grey plastic with engraved panel lines, the detail level on the outside is superb. It is one of those 'insert intensive' kits that some do not like, but this sort of thing allows all the different variants to be done and a careful builder can handle them with little real trauma.
The cockpit consists of seats that sort of look like Mk 4
Martin Bakers, a control stick fore and aft and instrument panels. There are
decals for the instruments and side consoles. These cockpits are not only rather
bare, but had issues in terms of no rear bulkhead for the front seat, a USAF
rear seat, and a poor fitting aft bulkhead. Later kits around the G-8 series or
so had this fixed, but t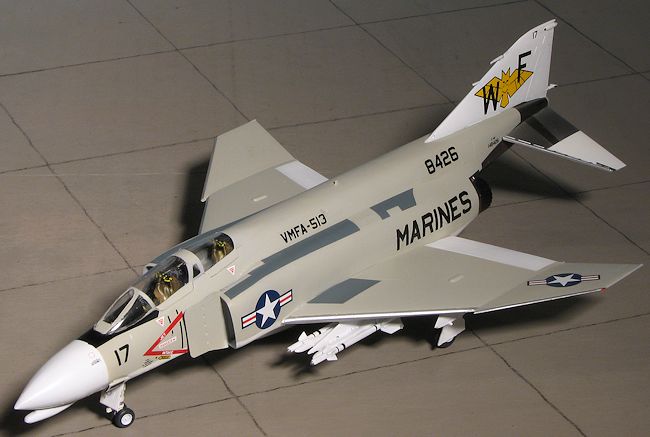 his is one of the early ones. To my knowledge, there has
never been an aftermarket cockpit for this kit and that is a shame as it really
needs one.
his is one of the early ones. To my knowledge, there has
never been an aftermarket cockpit for this kit and that is a shame as it really
needs one.
Intakes are pretty typical in that they do not go much more than a few scale feet back. Wings have a single piece lower section with outer upper left and right halves that incorporate the wing tip. The horizontal stabs will need to have the reinforcement arrow removed if doing an F-4B and if doing a very early F-4B, the slatted leading edge of these stabs is not correct for those. The kit does include a nice one-piece canopy section.
Wheels wells are a bit devoid of detail, but the gear is well done and a retraction strut for the inner gear doors is included. Be sure to have the main gear bowed in slightly as even loaded they were not straight down. The kit comes with a full load of stuff for under the wings and fuselage. This includes four sidewinders, four sparrows, a centerline tank and two wing tanks. Pylons alone can be installed in place of the wing and centerline tanks. No bombs are included, but you can glean these from other kits or weapons sets. The kit includes the intake RWR antennas that are used on the N but not applicable for the B.
The kit is boxed as an N so has a single set of markings for the CAG bird of VF-111 in light gull grey over white. The grey on this scheme is gloss as by the time the N came out, the Navy had switched to gloss polyurethane paint. If doing a B, this upper scheme would be semi-matte. The kit decals are well done and while thick, I have had no issues with them aside from a dislike of setting solutions.
| CONSTRUCTION |
This kit is no stranger to me as I've built probably a
dozen Fujimi F-4s, most of them done in the mid/late 1980s before the Hasegawa
kit came out. However, I still have several of them in the stash so couldn't see
a
 reason not to do another. This one is to be an F-4B so there will be a tiny
bit of modification required to properly duplicate that version and it will be
mentioned when the build gets to that area.
reason not to do another. This one is to be an F-4B so there will be a tiny
bit of modification required to properly duplicate that version and it will be
mentioned when the build gets to that area.
First things first was a trip to the LHS for some decent bang seats. In this case it was Quickboost 72-011 Martin Baker Mk.4 seats for the F-4. While the price of $6.50 may seem a bit high, it is well worth having nice seats under the canopy. I then painted the cockpit area with Dark Gull Grey using Testors enamels. With that done, the decals were placed on the instrument panels and side consoles. Despite their age, they went down with no issues and some Mr. Mark Softer helped them conform. Since is a Navy plane, I used only a segment for the left rear console to simulate the GIB's radio and ICS panel, and none at all for the right rear.
Meanwhile, I glued the upper and lower wing sections together.
Fujimi has all of the pylon holes open so if you do not want them open, you have
to fill them in. The holdback hook inserts were installed. Fit is only fair. I
also filled in a few sink areas on the upper wings, tailhook, and the gear
doors. There are a few small ones on the fuselage that will be taken care of
when the halves are joined. The front control stick was glued into the cockpit
along with the two instrument panels once the setting solution had dried. This
was then glued atop the nose gear well insert. Meanw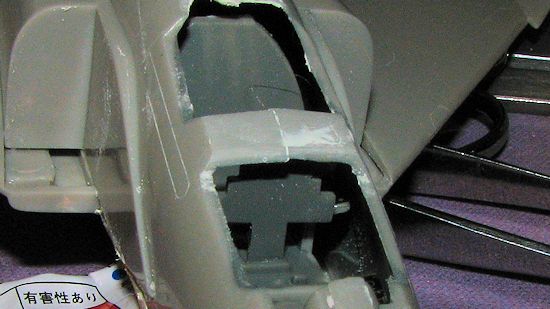 hile, the centerline tank
was glued together and the nose sensor halves were glued as well. I also glued
closed the chaff/flare dispenser doors. These latter items are not shown at all
on the instructions so don't forget them.
hile, the centerline tank
was glued together and the nose sensor halves were glued as well. I also glued
closed the chaff/flare dispenser doors. These latter items are not shown at all
on the instructions so don't forget them.
I then assembled the fuselage halves as I had discovered the cockpit could be inserted from below. A few bits need to be snipped from the fuselage halves to properly portray an F-4B and to leave room for the radome sensor. With the fuselage together, I took care of the seams and then inserted the cockpit lower fuselage section. As expected, there is a lot of space around the rear bulkhead and the lack of the front seat bulkhead is quite noticeable. So is the lack of any control boxes on the area that separates the two seats. I have always found it amazing that Fujimi let a glitch like this make it into production, but am equally glad they took the time to arrange a fix in later kits. This is the main reason why 'those who know' will eschew the earlier boxings for later ones.
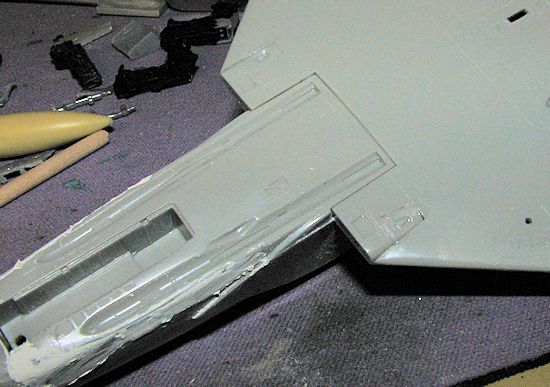 Anyway, this
insert also needed filler at all the join lines. I then decided to add on the
lower wing. Usually I wait until the intakes have been attached, but this time I
felt like doing something a bit different. I had forgotten about the rather
large step and gap between the forward wing and the lower forward fuselage. But
I have filler and am not afraid to use it! Once that was complete, I assembled
and installed the engine intakes. I guess the long time since I built one of
these kit has colored my impression of them, as I found even more large gaps on
the underside of the intakes where it joins the wings. Even the IR sensor
required filler where it met the nose. The next bits were the avionics cooling
scoops on the side of the nose. These are not handed and fit into depressions.
Anyway, this
insert also needed filler at all the join lines. I then decided to add on the
lower wing. Usually I wait until the intakes have been attached, but this time I
felt like doing something a bit different. I had forgotten about the rather
large step and gap between the forward wing and the lower forward fuselage. But
I have filler and am not afraid to use it! Once that was complete, I assembled
and installed the engine intakes. I guess the long time since I built one of
these kit has colored my impression of them, as I found even more large gaps on
the underside of the intakes where it joins the wings. Even the IR sensor
required filler where it met the nose. The next bits were the avionics cooling
scoops on the side of the nose. These are not handed and fit into depressions.
Next step was to fit the bang seats. Thanks to the poor cockpit placement, I had to put a riser under the back seat so it wouldn't disappear from view. I also took the right side rear cockpit wall from bits out of a Hasegawa Phantom and glued it in place after a bit of trimming. The bang seats were installed and I masked the canopy. The frame lines are relatively indistinct so this was a bit of a task. Then the canopy was glued in place and the airframe given a coat of Tamiya primer. It showed some areas that needed more filler so that was done and it was time to get down to the camo.
| COLORS & MARKINGS |
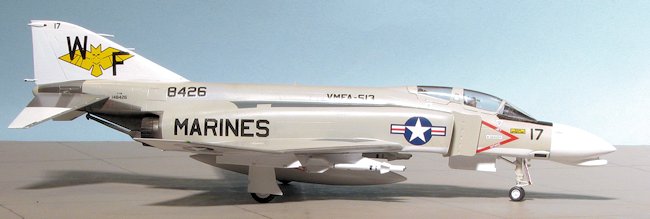
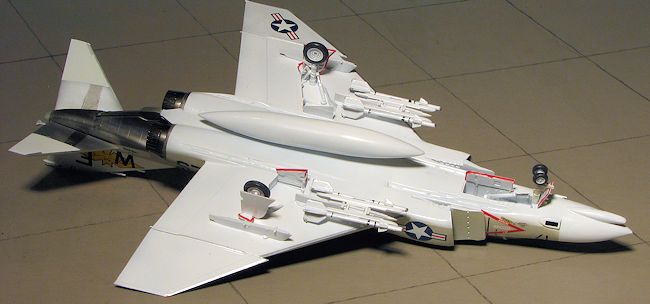
Naval aircraft of this time were painted in matt light gull
grey over gloss white with all the control surfaces in gloss white. Meant I
would use a lot of white so for that color, I went with Tamiya gloss white
thinned with lacquer thinner. I applied several coats for good coverage, then
did a bunch of masking to get ready for the light gull grey. Looking at photos
of the actual aircraft, I realized that I would have to remove the forward ECM
antenna as this was to be an early block 6-8 plane and those antennas were not
added until much later in F-4B production. So out came t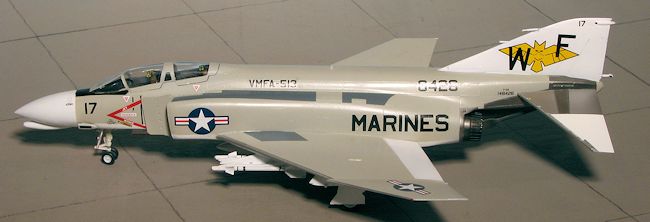 he sanding stick to
remove the antenna and the filler to take care of the panel lines left over. The
fin required a repaint after this was done. I also painted the stabilators at
this time as well.
he sanding stick to
remove the antenna and the filler to take care of the panel lines left over. The
fin required a repaint after this was done. I also painted the stabilators at
this time as well.
Once the upper surface white areas and the radome had been masked, I went with the light gull grey. For this I chose my favorite, Testors Model Master which is a bit on the brownish side compared to some other paint brands. While it is gloss, it is easy enough to make matte. I then did more masking in preparation for the metallic colors on the leading edge of the wings and the areas in the rear fuselage. Masking these areas is a bit tedious, but is pretty much mandatory if one wants that area to look right. The leading edges were painted with Alclad II aluminum while the hot section got a darker metallic. Despite all my precautions, I had a bit of overspray to take care of.
I then glued on the landing gear in preparation for the decals.
| FINAL CONSTRUCTION |
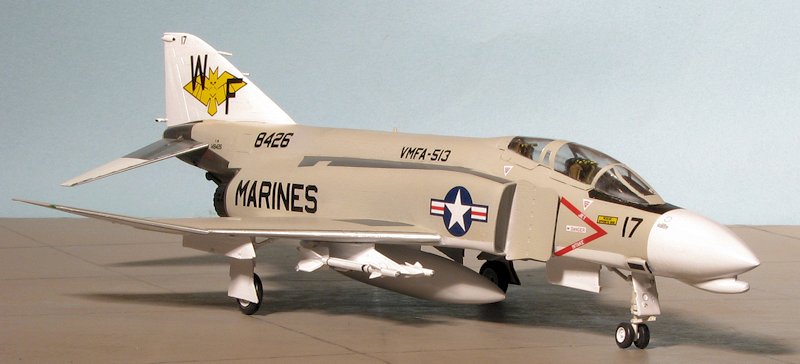
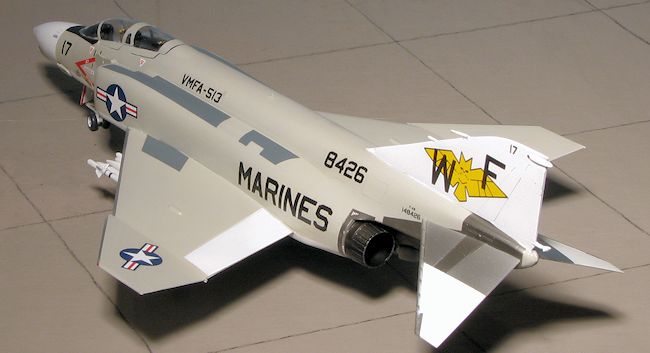
For this build, I decided to use Superscale sheet 72-869 that
had the markings for an early F-4B from VMFA-513 'Flying Nightmares' from 1973.
While the kit decals are fine, I had already built this kit with those markings
many years back and wanted something different. Plus the aftermarket markings
are thinner. They are also equally minimal in terms of data markings and provide
markings for which there is no information provided on the placement guide. I
also quickly found out that these decals are not sized for the Fujimi kit, but
the Hasegawa version and as a result noticed that the black antiglare panel is
too narrow and the intake
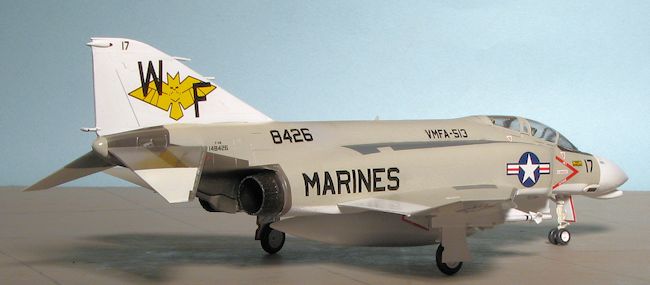 warning markings seem a tad short as the black step
lines will not reach the canopy frame. Nothing major, but something to keep in
mind.
warning markings seem a tad short as the black step
lines will not reach the canopy frame. Nothing major, but something to keep in
mind.
With the decals in place, I turned to attaching the wheels and then the gear doors. The gear doors were outlined in red as was the norm, and may well still be done today. There are no positive locators for any of the smaller doors though the large main and nose gear doors do have these. I then attached the outer wing pylons. This was followed by the centerline tank which does not fit all that well. I decided not to do any Sparrows, but did cobble up the kit's Sidewinders, using black stripe decal to provide some spurious markings for what would otherwise be simple white missiles. A bit of touch-up painting like the formation lights, some gluing back of the broken off pitot tube and fuel dump pipe (which seem to always be the first bits I break on an F-4), and a coat of semi-matte clear on the upper surface grey before I removed the masking from the canopy. Last step was to attach the Sidewinder pylons which were already loaded out prior.
| CONCLUSIONS |
IOne thing about building a lot of a certain type of
plane is that it is sometimes a challenge to find a set of markings one hasn't
already done. That does not seem to be the case with the Phantom. I daresay that
one could easily do 100 models and still not do all the different
squadrons/wings, even if one stuck with US
 versions. The Fujimi Phantom was not
the easy to build kit that my fading memory remembers, but it is no more
difficult than any other F-4 kit I have built over the years. It does not suffer
from the 'fiddles' like the Hasegawa kit with its myriad of inserts, and while
this one has the 'bad' cockpit, it still makes for a very nice addition to the
collection.
versions. The Fujimi Phantom was not
the easy to build kit that my fading memory remembers, but it is no more
difficult than any other F-4 kit I have built over the years. It does not suffer
from the 'fiddles' like the Hasegawa kit with its myriad of inserts, and while
this one has the 'bad' cockpit, it still makes for a very nice addition to the
collection.
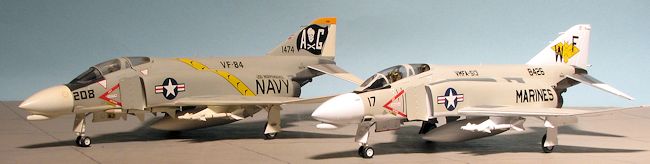
Just to show the difference in Light Gull Grey from two different paint companies (Gunze on left and Testors on the right), I have added this one photo. Generally I do not do 'multiple models' images. Both are Fujimi kits with the VF-84 version being one I built around 1987.
| REFERENCES |
http://en.wikipedia.org/wiki/F-4_Phantom_II
June 2013
If you would like your product reviewed fairly and fairly quickly, please contact the editor or see other details in the Note to Contributors.