| KIT #: | 04865 |
| PRICE: | $26.16 (47.99 SRP) |
| DECALS: | One option |
| REVIEWER: | Scott Van Aken |
| NOTES: | New tool in 2012 |
| HISTORY |
The General Atomics MQ-9 Reaper (formerly named Predator B) is an unmanned aerial vehicle (UAV) capable of remote controlled or autonomous flight operations, developed by General Atomics Aeronautical Systems (GA-ASI) primarily for the United States Air Force. UAVs are also commonly referred to as drones by the media. The MQ-9 and other UAVs are referred to as Remotely Piloted Vehicles/Aircraft (RPV/RPA) by the U.S. Air Force to indicate their human ground controllers. The MQ-9 is the first hunter-killer UAV designed for long-endurance, high-altitude surveillance.
The MQ-9 is a larger, heavier, and more capable aircraft than the earlier MQ-1 Predator; it can be controlled by the same ground systems used to control MQ-1s. The Reaper has a 950-shaft-horsepower (712 kW) turboprop engine, far more powerful than the Predator's 115 hp (86 kW) piston engine. The power increase allows the Reaper to carry 15 times more ordnance payload and cruise at almost three times the speed of the MQ-1. The aircraft is monitored and controlled by aircrew in the Ground Control Station (GCS), including weapons employment.
 In 2008, the New York Air National Guard 174th Fighter Wing began the transition from F-16 piloted fighters to MQ-9 Reapers, becoming the first fighter squadron conversion to an all–unmanned combat air vehicle (UCAV) attack squadron. In March 2011, the U.S. Air Force was training more pilots for advanced unmanned aerial vehicles than for any other single weapons system. The Reaper is also used by the United States Navy, the CIA, U.S. Customs and Border Protection, NASA, and others.
It is probably not surprising that the USAF is having a great deal of difficulty finding pilots willing to spend years inside a trailer in Nevada. The number recruited has fallen far short of requirements, despite a $1500 a month bonus incentive. Most who enter flight training envision themselves soaring in Eagles and not sitting in the dark participating in glorified video games. Unfortunately, the USAF has locked the doors on many potential pilots by not recruiting enlisted personnel, many who have the skills needed and would be more than willing to fly these aircraft.
Then Chief of Staff of the United States Air Force General T. Michael Moseley said, "We've moved from using UAVs primarily in intelligence, surveillance, and reconnaissance roles before Operation Iraqi Freedom, to a true hunter-killer role with the Reaper." One only has to look as far as one's old Heavy Metal magazines to see that the future is now.
| THE KIT |
This kit was released in 2012, but I had no interest in it until a recent Caracal decal sheet arrived and I was able to find the kit on Amazon for a really good price (free shipping, too as I also bought a blu-ray to meet minimums). It comes in a box much larger than it has to be for what is provided. The 77 pieces are molded in light grey plastic with a level of detail that is about average in the scheme of things. A bit crisper than old Airfix kits in this scale, but not as nice as Hasegawa/Tamiya. Probably due to the softer plastic.
 One can dispense with all the cockpit stuff on a drone so that should speed up building as there is no angst about upgrading the cockpit with endless resin and photo etch bits. The long wings interlock with each other and need to be installed before the fuselage halves so they are trapped in place on hefty pegs. Clear wingtip formation lenses are provided. Speaking of hefty, 20 grams of weight is required to keep this puppy from tail sitting. Hence the possibly good idea of using SAC metal gear.
The stalky landing gear legs are nicely done and just as simple as the ones on the real plane. The only thing designed to move is the prop and that only because of the long prop shaft as there will be nothing to actually hold it in place once pushed on. The FLIR turret and wheels are to be cemented in place. The main wheels are two piece tires that trap the wheel hub while the nose wheel is molded in place.
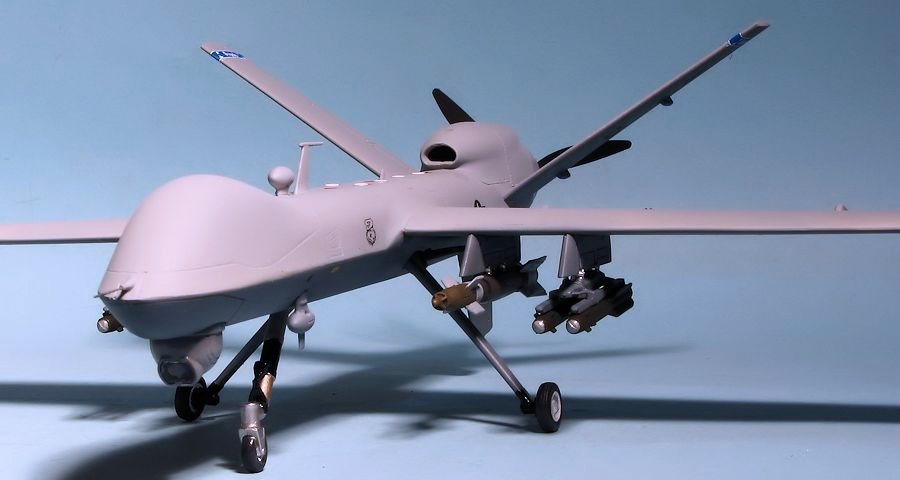
Much of the kit in terms of parts is devoted to pylons and weapons. There are a pair of laser guided bombs and four Hellfire missiles to use as a weapons load. Now would think that perhaps the aircraft would need fuel tanks to carry more than a minimal load, but apparently that is not the case at all so fitting the model with laser guided bombs inboard and Hellfires outboard may well be appropriate.
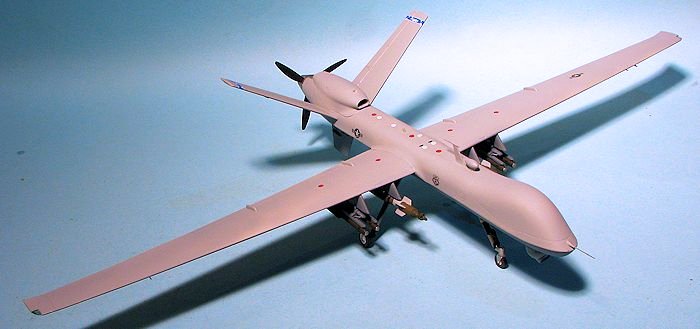
One set of markings is included, that being the 174 FW, New York ANG, an ex-F-16C unit from 2011. Revell provides only Revell paint references, making this company as irritating as Tamiya and Airfix in this regard and does not provide FS 595 colors. For the record, the aircraft are FS 36375 upper and FS 36176 on the underside. Note that the 174 Fighter Wing as on the decals is now the 174 Attack Wing.
| CONSTRUCTION |
 I decided to pretty much follow the instructions on this one, at least for the first step. This involved gluing the wheel wells into the lower fuselage section. Note that there are some relatively large ejector pin markings on the inside of the well pieces that will be quite difficult to remove. I did not even try.
I then glued the wing halves together. Note that in most cases I had to sand down the mating pins as they are too long and will keep parts from properly joining. I next glued together the engine nacelle halves. With that done, I attached the wings to each other. There is a rather thickly flashed over hole that will need to be enlarged in order to get the two halves to fit. These were left to dry and then glued to the lower fuselage half. I added 21 grams of weight to the nose (there is a lot of room for it so no worries) and then attached the upper fuselage piece.
Once that was done, the engine nacelle was glued on. I left off the fins as they would just get in the way of sanding the fuselage seam. There are some rather large gaps where the wings join the fuselage and it took several filler applications to smooth those out.
While all that was going on, I worked on the ordnance, FLIR pod, and pylons The tip of the LGBs where the cover gets glued is totally molded on one bomb half. It is very weak and I broke both of mine in handling. They were reattached with superglue and reinforced even more when dry. I found that, in general, the sprue attachment points are too close to the part. If you use sprue cutters, you will find it difficult to remove parts without damaging them. This makes it tedious to remove and clean the fins for the bombs. The Hellfires are all one piece, though the sprue attachment points are too close to the fins to 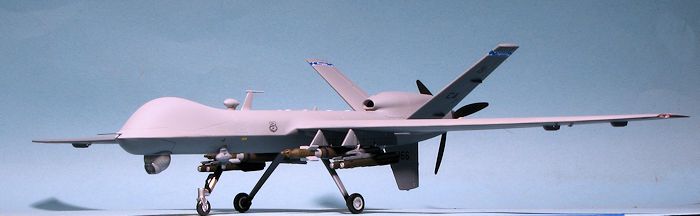 make for easy cleanup. Each of the four weapons pylons are the same and each are two halves with separate anti-sway pieces.
With the fuselage together and the wings taken care of, there are a number of other bits to attach prior to painting. These are the two large fins, an insert behind the engine exhaust, and some antennas. There are two 'football' antennas, both with large sink areas on them. In fact, I found sink marks on the landing gear legs and the shackles for the Hellfires. I do not expect basic short run defects from mainstream model companies so these were particularly disappointing.
The next step was to install the main landing gear. The nose gear will be a bunch of different colors, none of which are the underside shade, but the main gear are mostly the underside color. As mentioned, these have issues with sink areas and I just did not feel like messing with them. The fit is quite loose, even with the small retraction strut installed so keep an eye on it while the cement is drying. The thin, long main gear make the kit 'springy' and I would recommend using something more rigid, like SAC metal gear. The only reason I did not use them as I couldn't find the set I have! I really need a maid (college co-eds are welcome to apply).
When that was dry, I glued on the pylons without the anti-sway braces, which would be installed after the airframe was painted. The upper antennas were attached as was the nose piece. This latter bit is a bit loose in its opening and removing it from the sprue will challenge your ability to not break thin pieces. However, like pretty much all the parts in this kit, the fit is actually quite good.
| COLORS & MARKINGS |
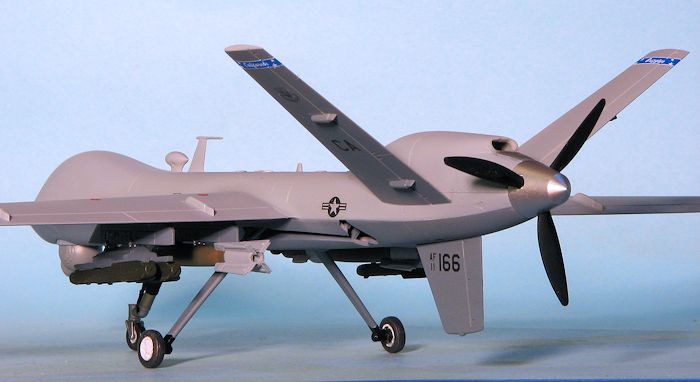
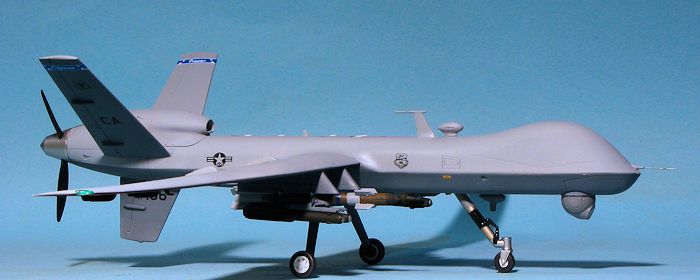
 With most of the bits in place, I went into 'paint' mode. I first painted the prop black, the spinner aluminum using Alcad II, and the underside with FS 36176 from the Model Master enamel range, which is also the darker color in the Mod Eagle paint scheme. The Hellfire racks were also painted this shade. Now the aircraft that is the basis of the kit markings seems to have had the underside black, but I'm using aftermarket decals and the standard lower shade is 36176. Very little actual masking has to be done on this one thanks to the design of the aircraft and the chine that runs almost all the way around the airframe. Only by the tail section does masking need to be applied.
During all that painting, I was not surprised that I broke away the nose probe. It was destined to happen so I accepted it and will fix it at the end of the build. I then painted and attached the nose gear and wheels prior to spraying the airframe with clear gloss acrylic to get ready for decals. I also painted the weapons, which will be attached once the decals are on.
For this one, I used Caracal Models CD 4848077, which was really the whole reason I bought the kit. I knew I wanted a set of US markings but the choice was tough. IN the end, I chose the one for the 196 RS, California ANG, primarily because I made several visits to the unit to take photos when they were flying Phantoms and KC-135s. Back then, the CA tail code was for a C-130 ANG unit flying out of Channel Islands ANGB which is at NAS Pt. Mugu, but apparently the trash hauler units have lost their tail codes and so it was available for the 196th, a unit that never wore tail codes until it got drones. The unit was the first ANG unit to fly the Predator and got its first MQ-9 in August of 2014.
 Anyway, the decals, what few there are, went on beautifully, though the tail bands seemed to be a bit misprinted. By this, I mean that if the bands are installed as far up the fin as they should, the fore and aft stars on the band will wrap around. If put down farther so the stars do not wrap, they are too short. I used a combination of Caracal and kit decals, finding that the kit decals behaved themselves as well.
Well, that was not the end of things. There are some tiny air sensors to add to the underside of the wings. These are all too large to fit the holes so one either has to thin the bits or make the holes bigger. Attaching the weapons wasn't the easiest either, thanks to the rather cramped quarters. I did eventually get them in place, but it was a bit of a battle. In this case, the holes where the anti-sway pieces fit into the pylons is too large and where it fits into the GBUs or the Hellfire rack was too small.
Once those were in place, I drilled out the broken nose pitot area and put in a new one. The last pieces to glue on were the clear bits. The nose sensor background area was painted black while the wing tip light areas were painted red or green. When dry, the clear bits were attached using clear gloss paint and I added some soot to the exhaust area using pastels.
| CONCLUSIONS |
 Overall, this is a very nice kit. It goes together rather well, the decals are nicely done and it is an interesting subject. From start to finish for me was about a week. Much of the speed of the build is thanks to no cockpit or need to mask canopies. There are also not a lot of parts. However, I find that in this day and age, sink areas on what is a nearly $50 SRP kit are unacceptable. Add to it the ease of breaking small bits removing them from the sprue and the loose fit of many of the parts keeps Revell AG in what I'd call the second tier of kit makers along with Italeri and Airfix. They all produce nice products, but they could be better
| REFERENCES |
http://en.wikipedia.org/wiki/General_Atomics_MQ-9_Reaper
April 2015
Copyright ModelingMadness.com. ALl rights reserved. No reproduction in
part or in whole without express permission from the editor.
If you would like your product reviewed fairly and fairly quickly, please contact the editor or see other details in the