Hasegawa 1/32 F-5E Tiger II
| KIT #: | 08062 |
| PRICE: | $6.00 (started) |
| DECALS: | Three options |
| REVIEWER: | Scott Van Aken |
| NOTES: | 1994 boxing |
| HISTORY |
In 1970, Northrop won the International Fighter Aircraft (IFA) competition to replace the F-5A, with better air-to-air performance against aircraft like the Soviet MiG-21. The resultant aircraft, initially known as F-5A-21, subsequently became the F-5E. It had more powerful (5,000 lbf) General Electric J85-21 engines, and had a lengthened and enlarged fuselage, accommodating more fuel. Its wings were fitted with enlarged leading edge extensions, giving an increased wing area and improved maneuverability. The aircraft's avionics were more sophisticated, crucially including a radar (initially the Emerson Electric AN/APQ-153) (the F-5A and B had no radar). It retained the gun armament of two M39 cannon, one on either side of the nose) of the F-5A. Various specific avionics fits could be accommodated at customer request, including an inertial navigation system, TACAN and ECM equipment.
 The first F-5E flew on 11 August 1972. A two-seat
combat-capable trainer, the F-5F, was offered, first flying on 25 September
1974, with a new, longer nose, which, unlike the F-5B that did not mount a gun,
allowed it to retain a single M39 cannon, albeit with a reduced ammunition
capacity. The two-seater was equipped with the Emerson AN/APQ-157 radar, which
is a derivative of the AN/APQ-153 radar, with dual control and display systems
to accommodate the two-men crew, and the radar has the same range of AN/APQ-153,
around 10 nmi.
The first F-5E flew on 11 August 1972. A two-seat
combat-capable trainer, the F-5F, was offered, first flying on 25 September
1974, with a new, longer nose, which, unlike the F-5B that did not mount a gun,
allowed it to retain a single M39 cannon, albeit with a reduced ammunition
capacity. The two-seater was equipped with the Emerson AN/APQ-157 radar, which
is a derivative of the AN/APQ-153 radar, with dual control and display systems
to accommodate the two-men crew, and the radar has the same range of AN/APQ-153,
around 10 nmi.
The F-5E eventually received the official name Tiger II; 792 F-5Es, 146 F-5Fs and 12 RF-5Es were eventually built by Northrop. More were built under license overseas: 91 F-5Es and -Fs in Switzerland, 68 by Korean Air in South Korea, and 308 in Taiwan. The F-5 proved to be a successful combat aircraft for U.S. allies, but had no combat service with the U.S. Air Force. The F-5E evolved into the single-engine F-5G, which was rebranded the F-20 Tigershark. It lost out on export sales to the F-16 in the 1980s.
Today, the F-5E and those upgraded still are in active service with several air arms around the world. In the US, ex-Swiss F-5Es are being flown in the aggressor role by the US Navy.
| THE KIT |
I have always liked the F-5 family and have built models of this plane in 1/48 and 1/72 several times. However, I've never been too successful in completing 1/32 kits. Not sure why, but I have at least three that have been worked on in fits and starts for several years. Though I already have this kit in a Revell and Minicraft box, when I saw this was so inexpensive and it was complete, I decided to pick it up. Researching the base kit for this article, I noticed that it was not currently being offered and the auction people wanted $50 plus $16 shipping for one. More than I'm willing to fork out for a kit that has been around for at least 30 years or more.
 I dare say that this kit was developed about the same
time as Hasegawa's other 1/32 offerings like the Zero and perhaps their pre-war
biplanes. I'm pretty sure it was in their 1976 catalogue. The kit itself is actually
pretty well done. Raised panel lines, of course, but actually not bad at all.
The kit has a fairly nice cockpit with a six piece seat (no belts), a tub with
console detail, a well done instrument panel, rudder pedals and control stick.
The canopy mechanism is attached to the seat assembly and allows for the canopy
to be built either open or closed.
I dare say that this kit was developed about the same
time as Hasegawa's other 1/32 offerings like the Zero and perhaps their pre-war
biplanes. I'm pretty sure it was in their 1976 catalogue. The kit itself is actually
pretty well done. Raised panel lines, of course, but actually not bad at all.
The kit has a fairly nice cockpit with a six piece seat (no belts), a tub with
console detail, a well done instrument panel, rudder pedals and control stick.
The canopy mechanism is attached to the seat assembly and allows for the canopy
to be built either open or closed.
The kit offers a separate nose section, which would be great if Hasegawa had ever done a two seat version, which they apparently did not. Intakes are in halves which have no compressor faces or even a flat wall at the end. The rear fuselage has options for open or closed engine bypass doors. These are only open if the engine is running. Wings are each two halves with the outer wing tip upper and lower section included in the upper piece. There will be a rather large seam to fill. Burner cans are fairly well done and can be installed after the aircraft is painted.
The F-5E has a rather complex nose gear and this is nicely molded with a separate nose wheels. Main gear are quite sturdy, also with separate wheels. The kit could be built gear up if you wished and after a bit of surgery to the inner doors, though the instructions do not show this. Speed brakes are also separate items and can be posed in the lowered position.
 Another feature is the ability to model the kit with
the left gun bay open to show off the gun and ammo storage. By cutting off a few
mounting posts, this can be closed up. A boarding ladder is provided, a nice
touch. For things under wings you have a very long central fuel tank, two
shorter wing fuel tanks, two 2000 lb mk 80 series slick bombs and a pair of
Sidewinders for the wing tips. One will need to decide which version of the
aircraft to build rather early as it requires either opening holes or removing
bits from the fin tip. Best thing to do is to have a photo of the plane you wish
to model. The kit also comes with a pilot figure, not seated, unfortunately.
Another feature is the ability to model the kit with
the left gun bay open to show off the gun and ammo storage. By cutting off a few
mounting posts, this can be closed up. A boarding ladder is provided, a nice
touch. For things under wings you have a very long central fuel tank, two
shorter wing fuel tanks, two 2000 lb mk 80 series slick bombs and a pair of
Sidewinders for the wing tips. One will need to decide which version of the
aircraft to build rather early as it requires either opening holes or removing
bits from the fin tip. Best thing to do is to have a photo of the plane you wish
to model. The kit also comes with a pilot figure, not seated, unfortunately.
Instructions are well done with the usual Gunze paint references. There are several construction notes that will be helpful during the build. Markings are provided for three planes. One is the box art plane with the 64th FWS at Nellis AFB. Another is a Swiss plane before the shark nose in an F-15 style scheme from 1991. The final option is an overall silver painted plane from the 46 TFS, Taiwan Air Force. The decal sheet is nicely printed, but old so I'm not sure how viable it still is after 20 years. Fortunately, there are lots of aftermarket sheets around for this plane.
| CONSTRUCTION |
 The previous owner had already started building the
kit and had glued together all the fuel tanks, the wings, and had built some of
the fuselage. Apparently he believed in using glue as filler so I had to do a
bit of work to fix some of these areas prior to reapplying filler. While he had
cut a lot of parts away from the sprues, it seems as if all the parts are there.
The previous owner had already started building the
kit and had glued together all the fuel tanks, the wings, and had built some of
the fuselage. Apparently he believed in using glue as filler so I had to do a
bit of work to fix some of these areas prior to reapplying filler. While he had
cut a lot of parts away from the sprues, it seems as if all the parts are there.
I decided before building that I wanted everything closed up as if the plane was on the ramp waiting for the next mission. To that extent, I installed the parts for the 'closed' bypass doors. I also cut off that mounting tabs from the gun doors so those could be closed as well. The area around the doors needed filler and I had to break the tailplanes loose as they were glued on without any anhedral. All of this required an application or two of filler. I then sprayed the insides of the already glued together intakes with silver paint.
At the cockpit, I painted everything dark gull grey. When building my T-38s, one set of instructions said to paint the seats black and the other said a dark sea grey, which, for the respective kits I did. For this one I checked internet photos and it was inconclusive so I went with the dark grey. As I assembled the bang seat, I realized I'd cut off the side mounting tabs, thinking they were sprue attachment points. Be careful of things like this.
 The interior and instrument panel had the instruments
painted black and I did some dry brushing and adding of some color to liven it
up a bit. In reality, airplane cockpits are not a profusion of red, yellow and
blue as you see on many models unless the 'bulb test' button is pushed, but
models are not reality so, like the Spanish school of panel line accentuation,
we modify reality to fit our tastes. The cockpit components were then glued
together and when dry, installed. The nose section halves were then closed up
and the usual mass of filler applied. When dry, the nose section was glued to
the rear fuselage section, followed my more seam work. This eventually succumbed
to several sessions of sand, fill, sand again before moving on. This similar
process was performed on the inserts for the guns. I attached the small interior
bit to the canopy and also glued on the gun sight glass. The windscreen and
canopy were masked then glued in the closed position. I often choose the closed
position as the interior in these big scale kits can easily be seen through the
glass and it makes dusting a lot easier!
The interior and instrument panel had the instruments
painted black and I did some dry brushing and adding of some color to liven it
up a bit. In reality, airplane cockpits are not a profusion of red, yellow and
blue as you see on many models unless the 'bulb test' button is pushed, but
models are not reality so, like the Spanish school of panel line accentuation,
we modify reality to fit our tastes. The cockpit components were then glued
together and when dry, installed. The nose section halves were then closed up
and the usual mass of filler applied. When dry, the nose section was glued to
the rear fuselage section, followed my more seam work. This eventually succumbed
to several sessions of sand, fill, sand again before moving on. This similar
process was performed on the inserts for the guns. I attached the small interior
bit to the canopy and also glued on the gun sight glass. The windscreen and
canopy were masked then glued in the closed position. I often choose the closed
position as the interior in these big scale kits can easily be seen through the
glass and it makes dusting a lot easier!
With all that done, it was time to hit the paint shop.
| COLORS & MARKINGS |
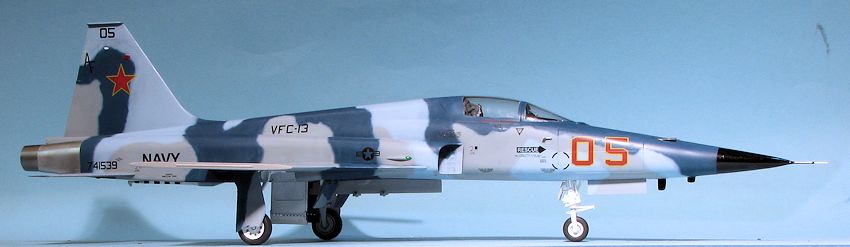
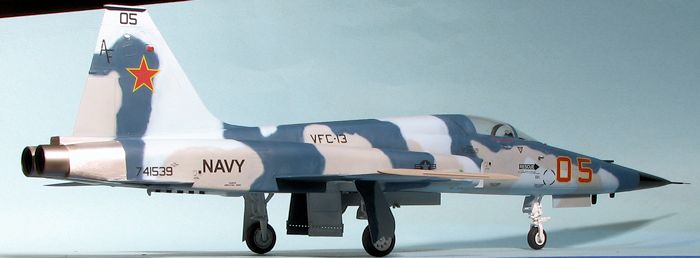
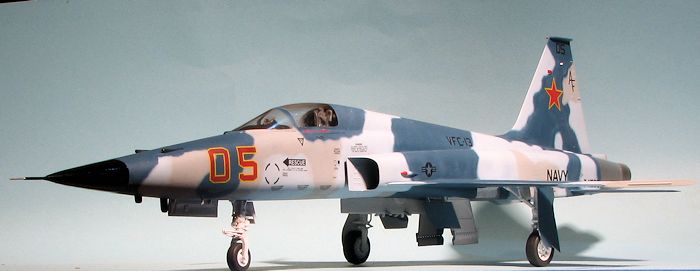
 For the
markings I used an older Two Bobs sheet that had several VFC-13 markings
options. The decal sheet instructions show that this plane was
painted in three colors; FS 35109, 35190 and 36375. All can be found in the Testors Model Master line and the 35190 is Flanker Light Blue. The contrast
between that color and 36375 is not as great as shown on the Two Bobs painting
guide, but does match well with the photos. To say that painting took several
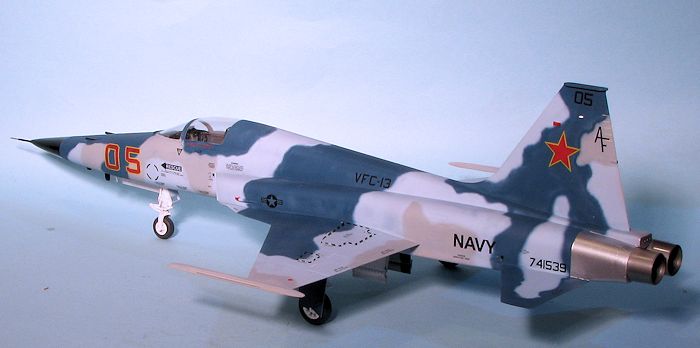
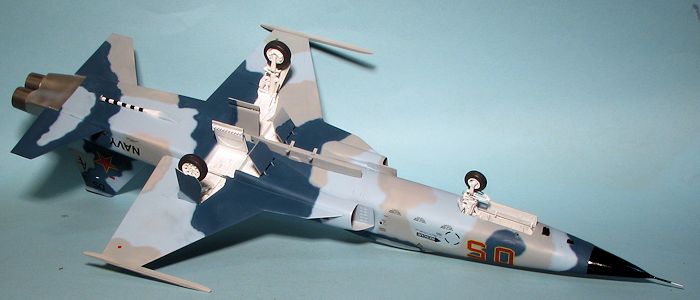
weeks would be about right as I first roughly sprayed the pattern then went back
and more finely tuned it. As it is a wraparound scheme, I had to do each color
in two sessions and wait for it to dry before moving on. Then the was the usual
touch up and fudging for the upper, lower, and side drawings did not match
perfectly. Still, I like painting camo schemes and eventually it turned out
rather well.
For the
markings I used an older Two Bobs sheet that had several VFC-13 markings
options. The decal sheet instructions show that this plane was
painted in three colors; FS 35109, 35190 and 36375. All can be found in the Testors Model Master line and the 35190 is Flanker Light Blue. The contrast
between that color and 36375 is not as great as shown on the Two Bobs painting
guide, but does match well with the photos. To say that painting took several
weeks would be about right as I first roughly sprayed the pattern then went back
and more finely tuned it. As it is a wraparound scheme, I had to do each color
in two sessions and wait for it to dry before moving on. Then the was the usual
touch up and fudging for the upper, lower, and side drawings did not match
perfectly. Still, I like painting camo schemes and eventually it turned out
rather well.
| FINAL CONSTRUCTION |
Before starting on the decals, I installed the landing gear. The nose gear requires you to attach the nose wheel as the wheel fork acts like a base for the oleo scissors. There is a part that fits on the front of the gear leg that is not well depicted in the instructions. I had to search for images of the F-5E nose landing gear on the net to figure out how this piece attached. Even then, the illustrations I located were not all that helpful, but I did get it attached and it looks the part.
 I then started applying decals. This was a rather slow process as the
placement guide is not all that clear, thanks to using the full color painting
guide as the basis for placement. The black ink and lines used to show position
disappeared against the dark blue portions. I also found that whomever printed
these decals did not bother backing up the red and yellow bits with white, so
when they were put on the model, they allowed the background colors to show
through somewhat, darkening them in places where the background was dark.
Despite putting several gloss clear coats on the kit, I had issues with
silvering that requires several applications of Solvaset to cure. Microset is
too weak.
I then started applying decals. This was a rather slow process as the
placement guide is not all that clear, thanks to using the full color painting
guide as the basis for placement. The black ink and lines used to show position
disappeared against the dark blue portions. I also found that whomever printed
these decals did not bother backing up the red and yellow bits with white, so
when they were put on the model, they allowed the background colors to show
through somewhat, darkening them in places where the background was dark.
Despite putting several gloss clear coats on the kit, I had issues with
silvering that requires several applications of Solvaset to cure. Microset is
too weak.
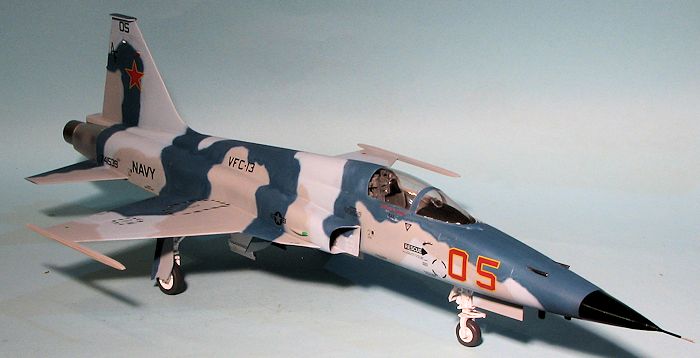
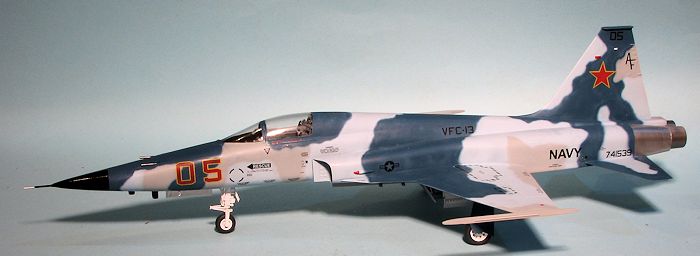
Once all the marking were on, I gave the airframe a coat of matte clear and started to attach the final bits. This consisted of the speed brakes and actuators, gear doors, pitot tube and a few sensors. I was quite pleased at how well the gear doors and other bits fit. I also patted myself on the back for waiting until the very last to install the pitot tube as I would have broken it off several times if done according to instructions. The last part was to install the center pylon (these planes are often seen with the rack and no tank), and remove the tape from the canopy. I had some bleed under so removed that best I could. The formation lights were painted and that was it.
| CONCLUSIONS |
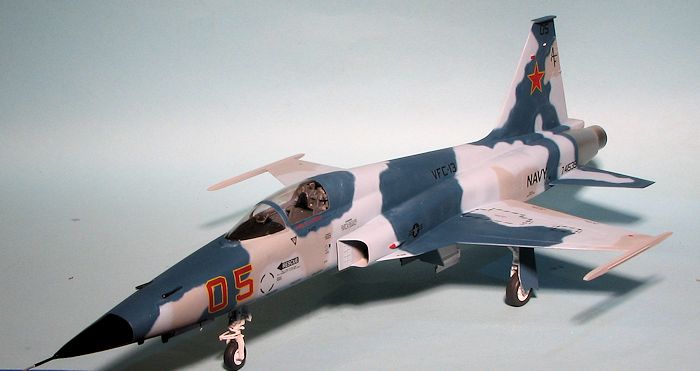
The F-5 series of aircraft has to be in my top 10 of
favorite aircraft. It just looks right and so I have built quite a lot of them,
but this is the first time I've done it in 1/32 scale. This is probably the
fourth or fifth of these kits
 I've bought over the years, but have sold most of
them off, figuring I'd never get around to building one. Well, that is now a
thing of the past. The painting took a goodly amount of time, probably around
3-4 weeks all told to get that pattern down and the edges sharpened up. However,
despite being time consuming, it was also one of the more fun parts of the
build. Typically, I did not weather it nor accentuate the panel lines as I'm not
all that fond of weathered models or those done with all the panel lines
accentuated. That is fine for those who like it, but often it is not at all
prototypical. At least, no F-5E I have ever seen in person was grungy or with
all the panel lines drawn on the airframe. Anyway, it makes for a very nice
model for most of us, is not all that fussy a build and provides the opportunity
to do some neat camouflage schemes.
I've bought over the years, but have sold most of
them off, figuring I'd never get around to building one. Well, that is now a
thing of the past. The painting took a goodly amount of time, probably around
3-4 weeks all told to get that pattern down and the edges sharpened up. However,
despite being time consuming, it was also one of the more fun parts of the
build. Typically, I did not weather it nor accentuate the panel lines as I'm not
all that fond of weathered models or those done with all the panel lines
accentuated. That is fine for those who like it, but often it is not at all
prototypical. At least, no F-5E I have ever seen in person was grungy or with
all the panel lines drawn on the airframe. Anyway, it makes for a very nice
model for most of us, is not all that fussy a build and provides the opportunity
to do some neat camouflage schemes.
| REFERENCES |
http://en.wikipedia.org/wiki/F-5E_Tiger_II
June 2014 Thanks to me for picking up the review kit. If you would like your product reviewed fairly and fairly quickly, please
contact
the editor
or see other details in the
Note to
Contributors.