Hasegawa F-15 Eagle; Eggplane Series
| KIT #: | 60101 (TH1) |
| PRICE: | $11.95 MSRP |
| DECALS: | Two options |
| REVIEWER: | Scott Van Aken |
| NOTES: | Nice to see these back as they are fun |
| BACKGROUND |
A decidedly Japanese phenomenon in modeling is the Egg
Plane. Just how this came about is really unknown, but the first batch to be
release sold very well and includes subjects like the Space Shuttle, F-86,
MiG-15, Phantom II, and some others. These kits all included bases that had
other figures. F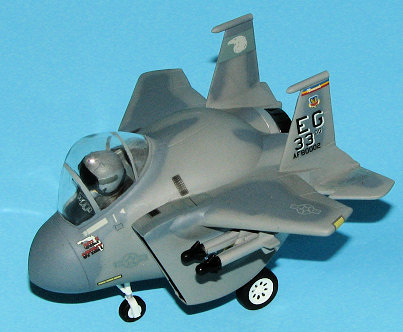 or instance, the
Zero had a samurai figure, the Phantom had the little Phantom figure holding the
gun pod, the Space Shuttle has an Earth base and so on.
or instance, the
Zero had a samurai figure, the Phantom had the little Phantom figure holding the
gun pod, the Space Shuttle has an Earth base and so on.
Over the years, several other types were added to the mix including the Avenger and FW-190. But gone are the neat bases that these planes used to have. This latest batch has a Tomcat, F-18, and the subject of this article, the Eagle. When hobby shops order these kits they get assortments. What that means is there are a lot of some and one of another. The LHS ordered two cases. Each came with several Space Shuttles and F-15s but only one Phantom, a couple of F-18s and one Tomcat. Needless to say, there will be many Eagles and Space Shuttles on the shelves when the rest are sold out.
| THE KIT |
This kit is an F-15 (sort of) and is actually quite complete in terms of a model. These are meant for kids or for those wanting something relaxing to build.
The parts count is really quite small, consisting of a bit more than 20 parts. No attempt at superfluous things like landing gear doors, or full cockpit are catered to. You do have a nice pilot's head to put in the cockpit and believe it or not there is an instrument panel decal. Weapons could be AMRAAMs and there are nicely done landing gear and wheels. Of course, the exhaust are the early type with turkey feathers.......
 No
indication of nose weight is provided in the simple instructions given. There
are three construction steps with paint references in Gunze paints and FS 595.
As Gunze is pulling out of the US market due to the formulation of their paint,
one will need to find substitutes and the FS 595 reference is appreciated.
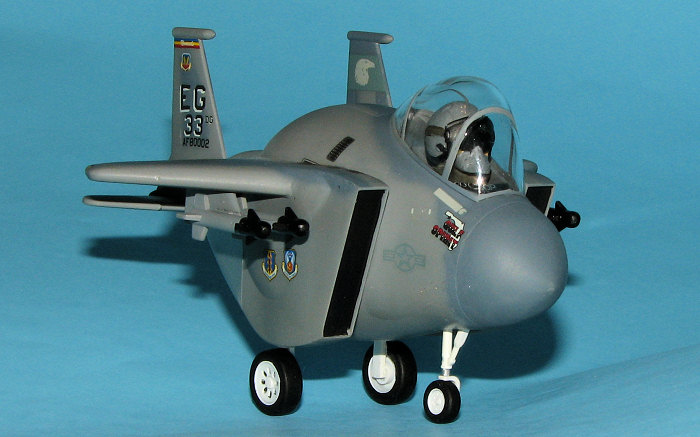
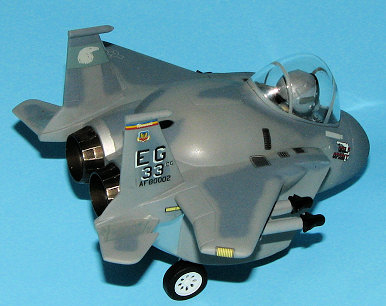
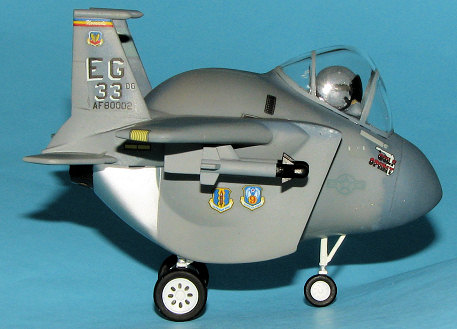
Decals are superbly done and provide markings for two planes. One is the box art
subject from the 305 Fighter Squadron in the old Compass Ghost Grey scheme. The
US F-15 is perhaps supposed to be in the Mod Eagle scheme as the darker grey is
a lot darker. It has markings for the 33rd FW's Spirit of the Gulf out of Eglin
AFB. Decals are very nicely done and should provide no surprises.
No
indication of nose weight is provided in the simple instructions given. There
are three construction steps with paint references in Gunze paints and FS 595.
As Gunze is pulling out of the US market due to the formulation of their paint,
one will need to find substitutes and the FS 595 reference is appreciated.
Decals are superbly done and provide markings for two planes. One is the box art
subject from the 305 Fighter Squadron in the old Compass Ghost Grey scheme. The
US F-15 is perhaps supposed to be in the Mod Eagle scheme as the darker grey is
a lot darker. It has markings for the 33rd FW's Spirit of the Gulf out of Eglin
AFB. Decals are very nicely done and should provide no surprises.
| CONSTRUCTION |
One would not think that there would be much to this kit. Well yes and no. It is generally pretty devoid of fiddly bits. There are no gear doors, no deep intakes, no interior detail, no drop tanks and a plethora of other 'no's. Needless to say, the anal modeler and detail freaks will be staying away from kits like this in droves.
 The kit
is nearly a snap, and the fit of the parts is tight enough that one could make a
case for that. However, most of you reading this will not be building it as a
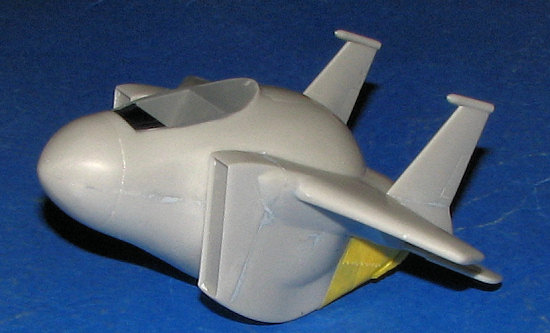
snap kit. In that case, you need to break out the filler. All of the seam areas
will need to prepped and smoothed down. There are two largish sink areas on the
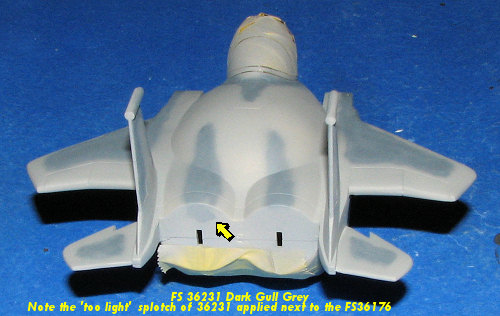
side fuselage that will need your attention as well. You can see this in
the image to the left. In this photo, the interior has been painted FS 36231
Dark Gull Grey with the instrument panel painted Black. The hot area on the
underside of the rear was painted Aluminum using Alclad II over bare plastic.
One has to take care to remove all the seams from the leading and trailing edges
of the wings. The lower wing is part of the lower fuselage and is something of
an 'insert'. It also is shallower than the upper wing area into which it fits so
much sanding and filling is needed to smooth all that out. No nose weight
is required unless you want to put some in because you feel the need.
The kit
is nearly a snap, and the fit of the parts is tight enough that one could make a
case for that. However, most of you reading this will not be building it as a
snap kit. In that case, you need to break out the filler. All of the seam areas
will need to prepped and smoothed down. There are two largish sink areas on the
side fuselage that will need your attention as well. You can see this in
the image to the left. In this photo, the interior has been painted FS 36231
Dark Gull Grey with the instrument panel painted Black. The hot area on the
underside of the rear was painted Aluminum using Alclad II over bare plastic.
One has to take care to remove all the seams from the leading and trailing edges
of the wings. The lower wing is part of the lower fuselage and is something of
an 'insert'. It also is shallower than the upper wing area into which it fits so
much sanding and filling is needed to smooth all that out. No nose weight
is required unless you want to put some in because you feel the need.
There is a pilot figure that is pretty much just a bust. This fits into a slot in the cockpit section. Any detail painting can be done with a brush if you wish. I painted the flight suit an olive drab color with a grey helmet/oxygen mask and a black shield. A bit of detail work with some flesh and black were all that were needed. It was then plugged into the cockpit. The canopy was masked off and also just plugged in place. This would prove to be useful later.
| COLORS & MARKINGS |
 I wanted my Eagle to be in the Mod Eagle colors. I'm
not really sure if the instructions call for that scheme for the US plane or not
as none of the two Mod Eagle shades; FS 36251 for the light color and FS 36176
for the dark are listed. The Compass Ghost colors are called for when it comes
to the Japanese Eagle as that is the color in which they are still being
painted. Two other greys are listed for the US version. I chose to ignore those
as I wanted a Mod Eagle plane, accurate to the markings or not.
I wanted my Eagle to be in the Mod Eagle colors. I'm
not really sure if the instructions call for that scheme for the US plane or not
as none of the two Mod Eagle shades; FS 36251 for the light color and FS 36176
for the dark are listed. The Compass Ghost colors are called for when it comes
to the Japanese Eagle as that is the color in which they are still being
painted. Two other greys are listed for the US version. I chose to ignore those
as I wanted a Mod Eagle plane, accurate to the markings or not.
For the lighter FS 36251, I used some of several
bottles of Aeromaster Acrylic paint that I've had around for years and never
used. It was sprayed right from the bottle and went on well. For the darker color, I used Testors
Model Master enamel FS 36176, thinned down considerably and sprayed using my
Skybow AB-100 detail airbrush. While researching the correct Mod Eagle colors,
several reference used Dark Gull Grey as the darker shade. To show you that it
really is a bit too light, take a peed at the image showing the painted model. A
small blotch of FS 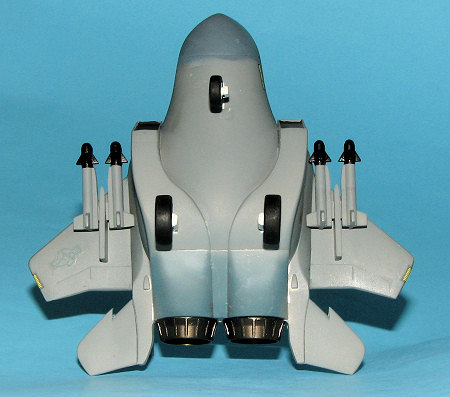 36231 was
sprayed on the back. This area will be covered by the exhaust when done.
36231 was
sprayed on the back. This area will be covered by the exhaust when done.
The missiles and pylons were painted in the FS 36251 shade with the missile noses getting some black. The gear legs and wheels were painted white. For this I used some Pactra lacquer I had ready to go which I'd been using on a lexan slot car body. It went on well and dried gloss, though it is a tad thicker than what many might be pleased with. The wheels and intake were then brush painted Matte Black, using Floquil's Engine Black.
The landing gear were then glued in. They are a VERY tight fit and frankly, the glue helped to lubricate the gear legs to get them into position. I then sprayed everything with a coat of Future clear gloss acrylic, right from the bottle with no thinning.
Naturally, I wanted to choose the Egg-lin AFB markings for this one as it would be quite appropriate. These decals are well printed and went on without any trouble. I used Solvaset on them to get them to snuggle down and that was accomplished without any problems. Of course, I accidentally touched one or two prior to them being fully dry and totally hosed them.....
| FINAL CONSTRUCTION |
With the decals in place and dry, the airframe was
given a coat of semi-matte clear and the various bits of masking removed. I had
forgotten to install the cockpit instrument decal (which ended up being a bit
too large and nearly invisible anyway), but since I'd
 not glued the canopy, I
was able to get it installed.
not glued the canopy, I
was able to get it installed.
The missile rails and missiles were glued together (again, you could just push them together, but the glue made it easier to install), and attached to the lower wings. Wheels were glued on and the afterburners attached. That was pretty much it.
| CONCLUSIONS |
You really have to give one of these a go. They are really relaxing as there is no need to fuss over details, no worry about part x being the right shape or placement. The really cool thing is that it does look neat and can be set on the shelf next to a 'proper' model of the plane for comparison.
Even though these will probably bring a downfall of Western civilization, it's egg-zactly what you need.
Oh yes, you might
be interested in knowing that these were produced under license from Boeing.
Apparently they have trademarked eggs as well.......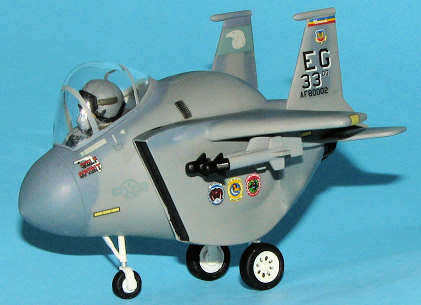
February 2008
Copyright ModelingMadness.com. All rights reserved. No reproduction in part of in whole without express permission.
If you would like your product reviewed fairly and fairly quickly, please contact the editor or see other details in the Note to Contributors.