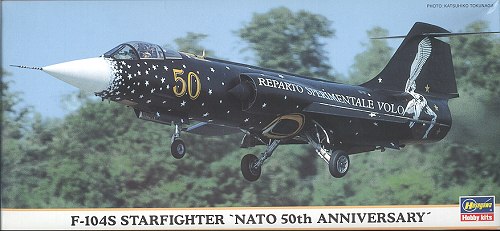
Hasegawa 1/72 F-104S Starfighter
| KIT # | 00059 |
| PRICE: | $16.98 when new |
| DECALS: | One option |
| REVIEWER: | Scott Van Aken |
| NOTES: | Special boxing for NATO 50th anniv |
| HISTORY |
Initially designed as an interceptor to combat Soviet bombers, the F-104 was soon turned into a very effective fighter-bomber. Used by numerous countries around the world, it was especially popular with NATO countries, including Norway, Denmark, Germany, Belgium, Netherlands, Spain, Italy, Greece and Turkey. It was also used extensively by Taiwan and Japan. Licenses to build the Starfighter were granted to Japan, Netherlands/Belgium and Italy.
It was with Italy that the best of the Starfighters was developed, the uprated F-104S which was enhanced even more into the ASA variant and finally left Italian service right after the turn of the century, a remarkable feat of longevity for any aircraft.
| THE KIT |
 I'll refer you to the standard boxing of this kit for a look at the sprues. Other than possibly slightly reshaping the rear of the fuselage for the S variant, this kit captures the look of the 104 very well and is one of the best on the market in any scale. Since its original production well over ten years ago, the kit has come out in a variety of different boxings, most of which are just a change in decals and a small addendum sheet. This 2000 boxing includes a very nice Aeromaster sheet for this specially painted variant. The idea of putting on the myriad of small stars is enough to keep me from doing this scheme. Another is that a gloss black scheme is just very difficult to do without the model looking like a toy. For that reason, I'll be falling back to an aftermarket sheet for this one.
| CONSTRUCTION |
Lacking originality, I'll start off with the cockpit. Actually, I started off painting the cockpit and a bunch of other parts of the kit. Just to give you a taste, I did the exhaust in Alclad II Jet Exhaust, the gear and wheel wells in Alclad II Aluminum, the inner intakes in flat black and the cockpit bits in Testors ModelMaster FS 36231 Dark Gull Grey. Thanks to the use of aluminum, I was able to see the zillions (well, maybe not that many) of small ejector pin marks on most of the pieces. Some will be invisible once the kit is finished, but many will be quite noticeable such as those on the back of the wheels, on the struts, pylons, and a few other places. No choice, really, but to break out the filler and get to work on making those disappear.
 Moving now to the painted cockpit bits (and that included the clear plastic instrument panel), I took the decals and placed them over the raised detail. A couple of zaps of Solvaset and they'd managed to snuggle down quite well and look very nice. I should also mention that my kit had flash on a few parts as well as breakage of some of the more delicate ones. This is primarily because Hasegawa puts everything into one bag and all the bumping and jostling around during shipment means scratched and broken parts. I know they won't change, but I find it quite irritating that other Japanese companies have no trouble putting 2-3 sprues max into a bag and Hasegawa doesn't.
Once the decals had properly dried, I squeezed the sides of the tub together (just like the instructions said) and glued on the back bulkhead and the nose gear well. I recommend not gluing the gear well until after you install it in the nose half or you'll end up like mine and not have a perfect fit. I glued in the instrument panel and the control stick. Then the assembly was glued into the nose halves, and the halves glued together. No need for weight on an F-104 as they have a long enough wheel base that it isn't required. Don't forget to open the holes for the fuselage Sidewinder rails or the belly pylon before doing the glue thing. I chose not to use the belly pylon as it just looks silly.
 I also took this opportunity to glue together the four drop tanks. They all had some level of flash on them from little to lots. After the usual sanding, I rescribed the panel lines in the tanks and left them aside until later. The next move was to the aft fuselage. I glued together the afterburner can and the rear compressor face. This was then glued into one rear fuselage half. The next step was to glue in an aft wheel well bulkhead. This had already been painted aluminum on one side. I then glued the aft halves together and inserted the unused burner nozzle just to make sure all fit will. There was quite a bit of flash and sunken in areas on the aft fuselage, as much due to the high usage of the common sprues as anything. I'm not really sure what the life span is of a set of molds, but Hasegawa might want to look into either refurbishing or replacing these in the near future or the flash is going to be a major issue.
While that was drying, I glued the major pieces of the main landing gear onto the upper well bay piece. These had been prepainted using Alclad II Aluminum, but it parts clean-up meant that they needed another application once all were together. With that done, they were glued to the aft well bulkhead. Before all had a chance to dry, the forward fuselage was glued in place. With things still a trifle tacky, the right and left intakes were glued to the forward fuselage and all the parts then fiddled into place to minimize any filler or sanding needed.
That was set aside to dry and I spent some quality time sanding the ejector pin marks on a lot of smaller parts. Mostly pylons, the wheels, and the ventral fins. It was about half and half concerning those that needed filler and those that just could be sanded down. One thing for sure, each part had two or three of them and it isn't the part of modeling that I find the most enjoyable.
 As one can probably imagine, my fuselage did not escape filler free. The most usage was around the intakes as that is often a sensitive area to get just right. I also used some on the lower rear fuselage section, destroying all those nice indentations, but the plastic was just not well formed and I had little choice. The inside of the upper exhaust section also needed some as not all would be covered by the burner can. While the second application of filler was drying, I attached the wings. There is no real positive locator to ensure that the proper wing angle is maintained so one just has to be very careful and hope for luck to get it straight. I did have to use some filler on the wing attachment seams as well. T
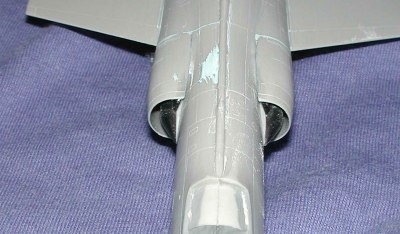
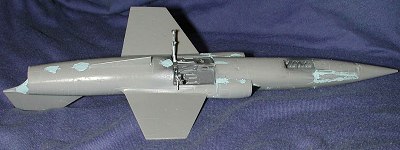 he 104S has no internal gun, that being removed as unnecessary and to allow additional space for avionics. As a result, Hasegawa has provided an insert for the covered up gun port. It is a touch on the small side and doesn't fit too snugly so filler is needed here as well. The two photos show the fuselage after the initial filler application has been sanded off, but not the second as additional bits were found that needed some more work.
I also discovered that the wings had not dried at the proper angle to each other and the tail. A bit of expert pressure applied at just the right place resulted in the offending wing giving in and moving to the proper angle without breaking any of the seams. Were not the 104 a thin wing aircraft, I could not have successfully done that!
Next, I attached the t-tail, not exactly the easiest thing to do as one has to keep adjusting it to make sure all is straight. I also opened up the holes for the ventral strakes and glued those in place. Back at the top forward section, I painted the area behind the cockpit flat black. I could also have used Dark Gull Grey as I've seen that area in that shade as well. The instrument panel combing was painted in a khaki green. I then attached the clear bits and when they were dry, they were masked. The nose probe was glued in place and the usual filler applied. Once dry, it and the filler used on the ventral strakes was carefully sanded down. It was then time for some paint.
| COLORS AND MARKINGS |
 NATO colors are not the easiest to come by and for this plane I did have to do some fudging and mixing. First off, I mixed some Xtracolor French Silver with ModelMaster FS 36622 light grey to get the silver-grey the decal instructions recommended. This worked out well though if I did it again, I think I'd add some white to it to make it brighter. The upper NATO green is one of the Xtracolor paints that I happened to have 'in stock' so that was used on the upper surface and on the drop tanks. Once that was dry (which was basically overnight), I masked off those areas I wanted to keep green and then sprayed on the grey. Then went the usual back and forth painting. Things did not go well during all of this. I knocked off both the wing pylons I'd glued in place and the horizontal stabilizer as well as the cockpit canopy. The touch-up paint turned a different shade than the paint already on the plane. Add to that a problem with paint 'wrinkle' that happens when too thin a paint is applied over Xtracolor and you get a much longer and more discouraging build than normal. I won't even go into any details on problems with the wing tanks and paint seepage under the masking.
For info, I painted the radome RLM 84 as the sky that was suggested by the instructions seemed a bit too green for my tastes. Oh yeah, the tailpipe assembly also broke loose during all this! With the glitches somewhat taken care of (there is a point of diminishing returns when it comes to some things), I masked the final bits and that was the black areas for the anti-glare panel and the engine intakes and shock cones.
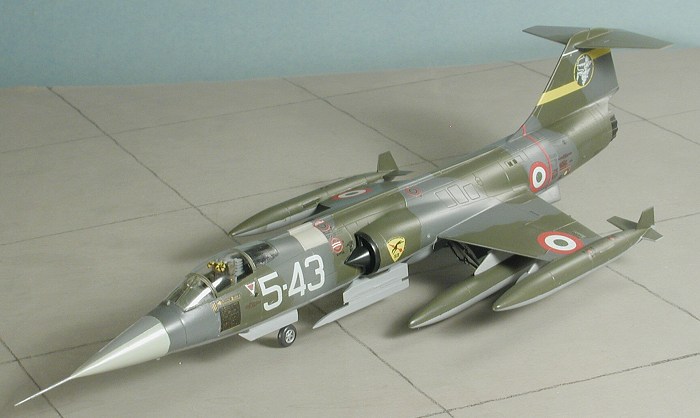
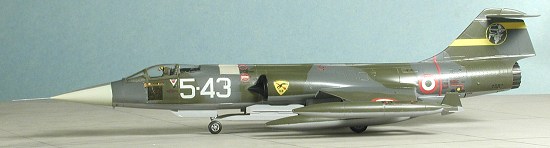
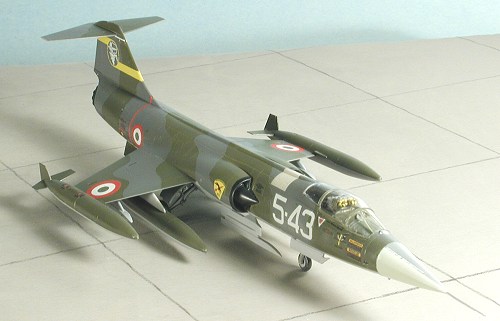
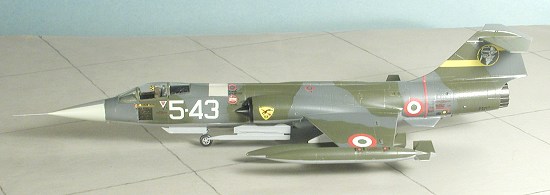
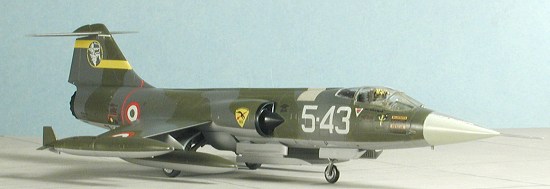
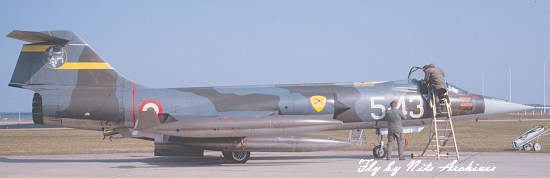 Then it was time for decals. I chose a set of markings off an old Modeldecal sheet that I have, #85 that was printed in 1986. It has markings for a number of F-104s including several S versions, all in the old scheme with large white numbers on the nose. I chose a nice scheme from 23 Gruppo, 5 Stormo with the yellow tail band. I made a few minor changes to try to duplicate the aircraft in the photo, but there are some differences on the sheet, especially with some of the data markings. Despite its age, the old sheet worked very well. Modeldecals are a bit thick, not as crisply printed as some, have a bit more clear around them as well, so trimming the decals is really a necessity. As with all modern aircraft, there are a ton of stencils. I used most of them, but since I was pressed for time, I left off some of them.
After they were all on and had a chance to dry, the kit was wiped down to get rid of excess glue residue, and it was time to start gluing on all the final bits.
| FINAL CONSTRUCTION |
 These final bits were mostly gear doors, pylons and drop tanks. The gear doors fit reasonably well, though I did have one of the retraction arms on a main door broken off sometime during the life of the kit. This is a direct result of all the sprues being able to bump and jostle around in a single bag. After the gear doors, and wheels were glued on, I worked on the pylons. The drop tanks for the wing pylons were a tight fit and those on the wing tips simply slid into place with no glue being needed. There are a number of small clear lights to glue on. After having a pair of them go 'zinging' off into the dark, I gave up, having successfully installed only the front two!
The exhaust was pressed into place, the horizontal stab glued back on (for the third time) and the kit then given an overall matte clear as these planes soon lost their gloss. Once that was done, the masking was removed from the canopy and the kit was finally done. In case you are wondering why no weapons, you have to remember that Hasegawa doesn't supply them in many of their modern aircraft kits, including this one.
| CONCLUSIONS |
 There are times when even the best designed kit can give us fits and this is one of them. I know that it is a very nice kit and I've seen a lot of them beautifully done, but this particular build was almost not finished at all. Much of the 'fault' has to lie with my not having built it before, yet I successfully built a number of the much simpler ESCI kits with no real problem. The same for the much more fussy Heller 104s. It just has to be one of those things that happens and I'm sure that the next Hase 104 I build will be a breeze with no problems at all. It is, after all, what makes model building such an interesting hobby!
Review kit courtesy of ME!!
April 2004
# 1311 in a series
If you would like your product reviewed fairly and fairly quickly, please contact the editor or see other details in the