Anigrand 1/72 C-141A Starlifter
| KIT #: | AA-2081 |
| PRICE: | $173.00 |
| DECALS: | One option |
| REVIEWER: | Scott Van Aken |
| NOTES: | Resin with cast metal landing gear. |
| HISTORY |
In the spring of 1960 the Air Force released Specific Operational Requirement 182, calling for a new aircraft that would be capable of performing both strategic and tactical airlift missions. The strategic role demanded that the aircraft be capable of missions with a radius of at least 3,500 nautical miles (4,000 miles, 6,500 km) with a 60,000 pound (27,000 kg) load. The tactical role required it to be able to perform low-altitude air drops of supplies, and carry and drop paratroops in combat. Several companies responded to SOR 182, including Boeing, Lockheed and General Dynamics.
 Lockheed responded to the requirement with a unique design: the
Lockheed Model 300, the first large jet designed from the start to carry
freight. The Model 300 had a swept high-mounted wing with four 21,000 pound
thrust TF33 turbofan engines pod-mounted below the wings. An important aspect
was the cabin floor's height of only 50 in (1.27 m) above the ground, allowing
easy access to the cabin through the rear doors. The two rear side doors were
designed to allow the aircraft to drop paratroopers (in August 1965 the type
performed the first paratroop drop from a jet-powered aircraft). The rear cargo
doors could be opened in flight to allow airborne freight drops. The
shoulder-mounted wings gave internal clearance in the cargo hold of 10ft (3.05m)
wide, 9ft (2.74m) high and 70ft (21.34m) long. The size enabled the Starlifter
to carry, for example, a complete LGM-30 Minuteman ballistic missile in its
container. The aircraft was capable of carrying a maximum of 70,847 lbs over
short distances, and up to 92,000 lbs in the version configured to carry the
Minuteman, which stripped other equipment. The aircraft could also carry up to
154 troops, or 123 fully-equipped paratroopers.
Lockheed responded to the requirement with a unique design: the
Lockheed Model 300, the first large jet designed from the start to carry
freight. The Model 300 had a swept high-mounted wing with four 21,000 pound
thrust TF33 turbofan engines pod-mounted below the wings. An important aspect
was the cabin floor's height of only 50 in (1.27 m) above the ground, allowing
easy access to the cabin through the rear doors. The two rear side doors were
designed to allow the aircraft to drop paratroopers (in August 1965 the type
performed the first paratroop drop from a jet-powered aircraft). The rear cargo
doors could be opened in flight to allow airborne freight drops. The
shoulder-mounted wings gave internal clearance in the cargo hold of 10ft (3.05m)
wide, 9ft (2.74m) high and 70ft (21.34m) long. The size enabled the Starlifter
to carry, for example, a complete LGM-30 Minuteman ballistic missile in its
container. The aircraft was capable of carrying a maximum of 70,847 lbs over
short distances, and up to 92,000 lbs in the version configured to carry the
Minuteman, which stripped other equipment. The aircraft could also carry up to
154 troops, or 123 fully-equipped paratroopers.
The prototype and development aircraft then began an intensive operational testing program including the first delivery to MATS on the 19 October 1964 to Tinker Air Force Base, Oklahoma. Testing continued and a Federal Aviation Authority type certificate was awarded on 29 January 1965. The first delivery to an operational unit was on the 23 April 1965 to Travis Air Force Base, California. Although operational testing continued the Air Force needs due the involvement in South Vietnam soon had aircraft involved in operational sorties to the combat zone.
Since the airframe was shown to fill up before it reached it load
carrying capability, nearly all extant C-141A airframes were lengthened 23
feet with fuselage plugs fore and aft of the wing. These were designated C-141B
and part of the modification included air to air refueling capabilities. The
modifications to the remaining 270 aircraft was accomplished between 1977 and
 1982, effectively adding 60 airframes worth of carrying capacity to the fleet.
On 16 September 2004 the C-141 left service with nearly all active duty USAF units, being confined to reserve units for the remainder of its service life. As of 25 September 2005, there were only eight C-141 aircraft still flying (all from the 445th Airlift Wing at Wright-Patterson AFB). In 2004, 2005, and 2006, the C-141s stationed at WPAFB participated in missions to Iraq and Afghanistan, mostly for the medical evacuation of wounded service members.
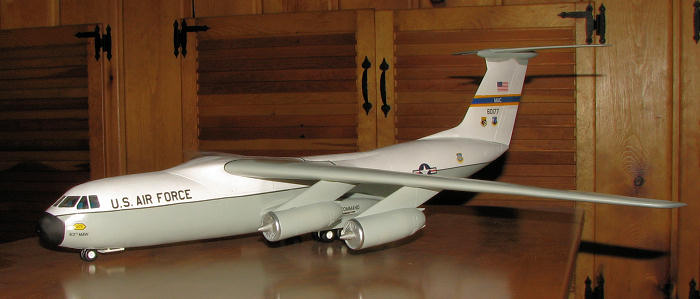
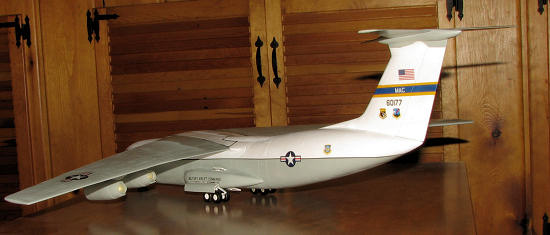
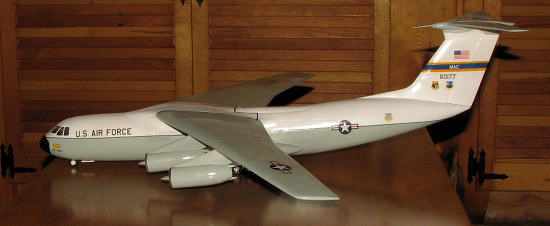
One of these last eight aircraft was the Hanoi Taxi (tail number 66-0177 and subject of this kit), which was one of the same aircraft used in 1973, for Operation Homecoming in the final days of the Vietnam War, to repatriate American POWs from North Vietnam. Though no longer a C-141A as it was in 1973, the Air Force repainted this aircraft in the same livery as it wore in 1973 as the final year of Starlifter operations approached.
With the 2006 announcement of the retirement of these last eight C-141s, the Hanoi Taxi embarked on a series of flights, giving veterans, some of whom flew out of captivity in this aircraft, the opportunity to experience one more flight before retirement. At 9:30 AM on Saturday, 6 May 2006, the Hanoi Taxi landed for the last time and was received in a formal retirement ceremony at the US Air Force Museum. The Hanoi Taxi is now part of the permanent static display collection of the Museum.
| THE KIT |
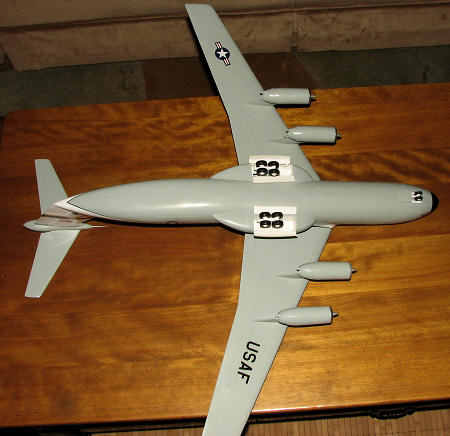
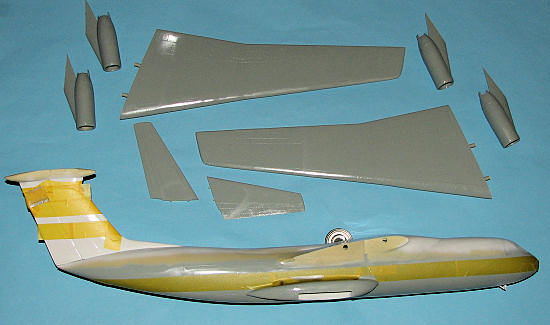
This is another monster resin kit from our friends at Anigrand. This is the short fuselage C-141A variant, with a near identical C-141B also being offered. In fact, all the B bits (well, the IFR receptacle) is included in this kit. Molded in Anigrand's usual tan resin with nicely engraved detailing, the kit itself is actually relatively basic. The fuselage is molded in four sections as it just makes it easier to box like that. I have found that Anigrand's method of attaching fuselage sections is quite sturdy and works very well.
 The wings are upper and lower sections and pretty well free from
warping, not an easy task in this scale. Pylons and engines also have large
attachment points to make it easier to connect these items. The fin has the
usual T-tail with a central fairing into which the two stabilizers fit. The
cockpit has a compete loadmaster station as well as the usual flight engineer,
pilot, co-pilot and navigator's positions. This is all covered by a nicely done
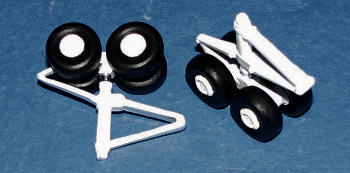
clear canopy. Anigrand has learned from earlier kits and provides a very nicely
done set of metal landing gear. There is also sufficient space to cram in the
weight as this one will probably need quite a bit.
The wings are upper and lower sections and pretty well free from
warping, not an easy task in this scale. Pylons and engines also have large
attachment points to make it easier to connect these items. The fin has the
usual T-tail with a central fairing into which the two stabilizers fit. The
cockpit has a compete loadmaster station as well as the usual flight engineer,
pilot, co-pilot and navigator's positions. This is all covered by a nicely done
clear canopy. Anigrand has learned from earlier kits and provides a very nicely
done set of metal landing gear. There is also sufficient space to cram in the
weight as this one will probably need quite a bit.
Instructions are well done with seven photo-realistic images that show where all the bits fit. Decals come from a variety of other kits including the C-117 kit with a small sheet designed just for this particular aircraft. The decals are nicely printed and with the large, relatively flat surfaces, should work very well. Though these stick well, past experience has shown that they do not 'snuggle down' in to the various panel lines and crevices, even with help from setting solution.
This particular kit also comes with a CD that shows both interior and exterior details of the C-141 to help with the construction of the kit. The CD is only available for a very limited time.
I would be remiss not to mention that this kit shows the usual array of molding glitches from resin blobs to myriad pin holes and some relatively large voids, all of which will need to be taken care of if one wishes a contest level model. For that reason alone, this kit is not for the beginner but one who has several of the smaller kits under their belt.
| CONSTRUCTION |
When Chris Mikesh, owner of Nostalgic Plastic/Anigrand USA told me that this kit was on its way and asked me to build one in a month, my mind was somehow thinking 1/144 and flush from victory over the CMR JRM Mars, I readily agreed.
Imagine my surprise when a huge box arrived a few weeks later, containing this 1/72 kit!
 What was not surprising was that the kit was nicely
detailed, but fraught with molding faults, from paper thin areas on the
fuselage, to voids in wheel wells, to air bubble and air pinholes, to misaligned
molds, blobs of resin, and gouges where the pour stubs had snapped off, taking
part of the piece with it. Sounds horrible, but in reality, it is part and
parcel of many short run resin kits. These are all hand made, but made on
something like an assembly line. This provides the kit at a reasonable price to
us balanced against flawless resin, which would probably double the kit price. I
know resin kits can be made flawlessly as I've built them, but they can been
pricey. Once you have built several of these kits, and I think
I've probably built more Anigrand kits than most, these sorts of things are just
taken as part of the construction experience. I know this will be a bit of a
battle, so am going to treat this WIP article as a boxing match.
What was not surprising was that the kit was nicely
detailed, but fraught with molding faults, from paper thin areas on the
fuselage, to voids in wheel wells, to air bubble and air pinholes, to misaligned
molds, blobs of resin, and gouges where the pour stubs had snapped off, taking
part of the piece with it. Sounds horrible, but in reality, it is part and
parcel of many short run resin kits. These are all hand made, but made on
something like an assembly line. This provides the kit at a reasonable price to
us balanced against flawless resin, which would probably double the kit price. I
know resin kits can be made flawlessly as I've built them, but they can been
pricey. Once you have built several of these kits, and I think
I've probably built more Anigrand kits than most, these sorts of things are just
taken as part of the construction experience. I know this will be a bit of a
battle, so am going to treat this WIP article as a boxing match.
Round One
Before delving into what is to come, I should mention that there are several things one really needs to have when dealing with kits like this. Super glue, filler and sandpaper are a given. Items I find indispensible are:
 --Slow speed motor tool and attachments. I use a
battery powered one from Micro Detailer, model 351.
--Slow speed motor tool and attachments. I use a
battery powered one from Micro Detailer, model 351.
--Micro files. A cheap Chinese set will do just fine as it will be very helpful
for cleaning up bits that sandpaper can't reach.
--Hand held drill bit set and handle. This is great for opening up resin-filled
attachment holes.
--Two part epoxy filler. I use Apoxie Sculpt. The smallest size is just the
ticket and will last most of us for many, many years.
--Sanding sticks. Get several of the really coarse grade for initial sanding.
Conversely, you can use 180 grit sandpaper.
So, first thing is to test fit some parts and see what needs to be cleaned up. I played with a few bits to make sure they would fit, sanding off the mating surfaces and cleaning up some of the parts. When working with these large, four piece fuselages, I like to get it to fuselage halves first, then mate them. So, working on one side, I cleaned up and dry fit the fore and aft section.
Hmm, quite a bit of a step between front and rear sections. Wonder if the other half is like that? Yep it is the same, providing a good sized if not huge gap in the forward fuselage. Mating just the forward sections to see if the canopy is too large, I found that in fact, the canopy is a teeny bit undersize. I did the same with the fin, finding it fit perfectly at the current rear fuselage width.
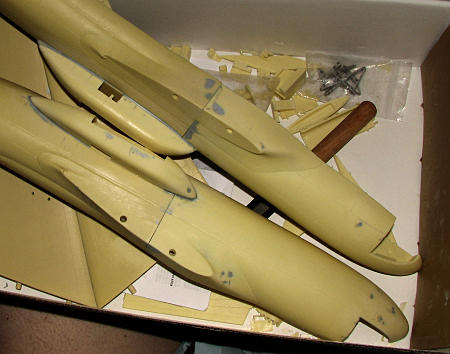
 This basically means I'll be gluing the aft fuselage, then when that is
dry, I'll glue the nose and use plastic card to fill the gap. To start things
off. I first glued the front fuselage to the aft sections, gluing it in stages
to try to keep the parts aligned. Despite the gap, the alignment lugs match,
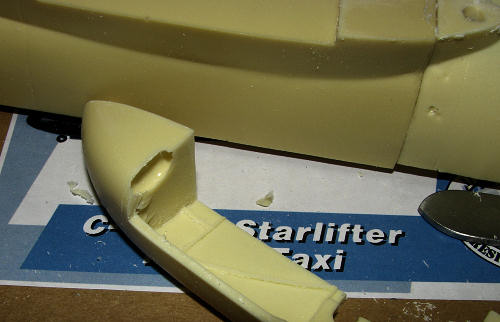
which really helps out. During this stage, I figured I would attach the landing
gear sponsons as well. One of these had a rather large void that needs to be
filled. There was also a small step on one fuselage half at the join that would
need to be sanded down once the sponson was in place. Another area that will
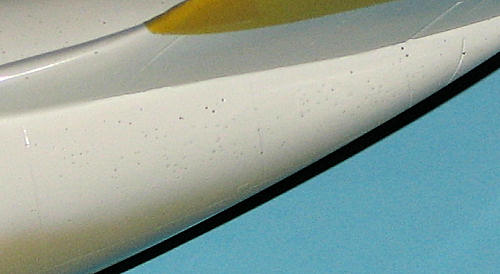
need taken care of are the various little 'dimples' that are on the fuselage
halves. Most are very slight, but some are quite deep as you an see in the
image. These things can be taken care of with standard filler. The large void
and large dimples will be best treated with epoxy filler as it does not shrink
when drying. Epoxy filler is not good for shallow repairs as it needs depth to
stick well.
This basically means I'll be gluing the aft fuselage, then when that is
dry, I'll glue the nose and use plastic card to fill the gap. To start things
off. I first glued the front fuselage to the aft sections, gluing it in stages
to try to keep the parts aligned. Despite the gap, the alignment lugs match,
which really helps out. During this stage, I figured I would attach the landing
gear sponsons as well. One of these had a rather large void that needs to be
filled. There was also a small step on one fuselage half at the join that would
need to be sanded down once the sponson was in place. Another area that will
need taken care of are the various little 'dimples' that are on the fuselage
halves. Most are very slight, but some are quite deep as you an see in the
image. These things can be taken care of with standard filler. The large void
and large dimples will be best treated with epoxy filler as it does not shrink
when drying. Epoxy filler is not good for shallow repairs as it needs depth to
stick well.
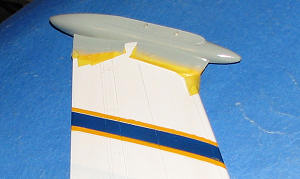
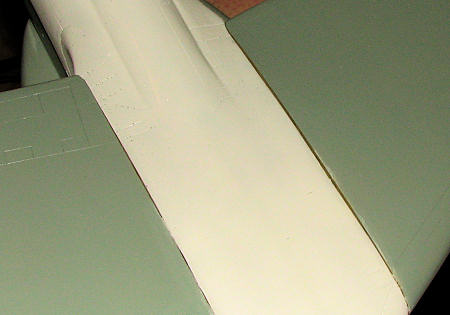
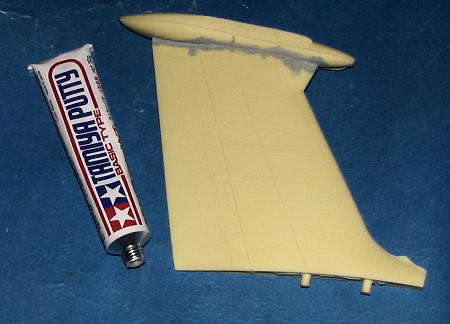 I filled the sponson's gap with Apoxie Sculpt, smoothing to near the final contours to lessen
later sanding. I also took my motor tool and sanding sticks to clean up the
various major parts. This meant the wings, fuselage halves, sponsons, tail and
speed fairing. The speed fairing was suffering from mold misalignment. I decided
to attach it to the fin before dealing with the alignment problem. You can see
the step in the photo to the left.
I filled the sponson's gap with Apoxie Sculpt, smoothing to near the final contours to lessen
later sanding. I also took my motor tool and sanding sticks to clean up the
various major parts. This meant the wings, fuselage halves, sponsons, tail and
speed fairing. The speed fairing was suffering from mold misalignment. I decided
to attach it to the fin before dealing with the alignment problem. You can see
the step in the photo to the left.
With the fuselage halves together, I applied filler to the joins and when dry, sanded those down. Then the sponsons were attached. I found them to be a bit larger than the mating surfaces. I chose to match things up on the underside as that would be the area most easily seen. The inner engines will block much of the upper sponson area and that is where I chose to do most of the filling. I also glued the wings together. This was done in stages since they are so long. As usual, there were a number of air holes on the tip so I applied additional super glue there to help fill them.
Filler work on a kit like this is usually extensive. Sometimes it can easily consume 1/3 of the build time. Since I'm under a time constraint, I decided only to deal with the most egregious glitches and leave the small ones to fend for themselves. This meant that I'd be limiting myself to four rounds of filler and sanding. Sounds like a lot, but it seems that one always finds something that needs corrected after each round. Fortunately, the amount needed each time is less and less. Once round one was applied, I stopped and let this dry before continuing.
Round Two
 As
you might have guessed, the time since the last update has been spent reapplying
filler and after a day's drying, it is sanded down and reinspected. I give these
volatile fillers a full day to dry so that I won't be surprised later by sunken
down sections. The photo you see of the fuselage bits to the right, is after the
third application of filler and sanding. There is at least one more to go as
some of these are a bit on the deep side. In retrospect, I should have used
epoxy filler on the upper sponson join surface as it was deep enough where this
material would have proven useful. Same on the large air void on the nose, but
one more application will surely take care of it. Besides, I still haven't
joined the fuselage halves and there will be more filler needed there. The wings
also had their second application done and cleaned. This was mostly on the
leading edges and on the wing tips, the latter having more than their fair share
of holes.
As
you might have guessed, the time since the last update has been spent reapplying
filler and after a day's drying, it is sanded down and reinspected. I give these
volatile fillers a full day to dry so that I won't be surprised later by sunken
down sections. The photo you see of the fuselage bits to the right, is after the
third application of filler and sanding. There is at least one more to go as
some of these are a bit on the deep side. In retrospect, I should have used
epoxy filler on the upper sponson join surface as it was deep enough where this
material would have proven useful. Same on the large air void on the nose, but
one more application will surely take care of it. Besides, I still haven't
joined the fuselage halves and there will be more filler needed there. The wings
also had their second application done and cleaned. This was mostly on the
leading edges and on the wing tips, the latter having more than their fair share
of holes.
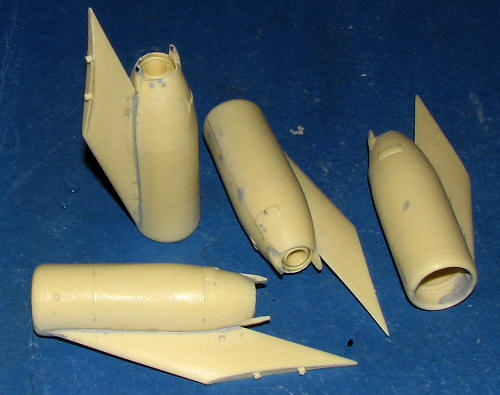
 During
this time I also joined the engines. This was a bit more time consuming than I'd
originally anticipated thanks to some major resin blobs on the rear of one of
the engine halves that took considerable time to
During
this time I also joined the engines. This was a bit more time consuming than I'd
originally anticipated thanks to some major resin blobs on the rear of one of
the engine halves that took considerable time to
 grind
away so that the exhaust would fit. I found that one has to install the
exhaust piece during mating the engine halves, but not the compressor face
(though I did glue one in anyway). This will make it much easier to clean up the
inner intake seam.
grind
away so that the exhaust would fit. I found that one has to install the
exhaust piece during mating the engine halves, but not the compressor face
(though I did glue one in anyway). This will make it much easier to clean up the
inner intake seam.
I know this does not seem like a lot of progress for two days, but such is the case when dealing with this sort of thing. My focus following this will be on the cockpit as that needs to be done before I can join together the fuselage halves. Stay tuned.
Round Three
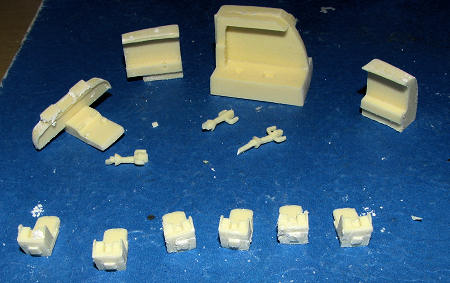 Now it was on
to the interior. Anigrand provides what are basically shapes for the various
consoles. They also give you six somewhat generic seats and I was blessed with
three control sticks. First thing was to grind out the resin gunk in the
attachment holes in the floor. I also had to grind away at the back of the large
item you see in the upper center to get it to fit properly. When working w
Now it was on
to the interior. Anigrand provides what are basically shapes for the various
consoles. They also give you six somewhat generic seats and I was blessed with
three control sticks. First thing was to grind out the resin gunk in the
attachment holes in the floor. I also had to grind away at the back of the large
item you see in the upper center to get it to fit properly. When working w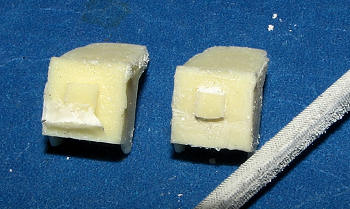 ith
these bits, it is a good idea to have a set of fine files. These were
particularly handy when it came to cleaning up the underside of the seats as the
resin pour stub was particularly invasive. I then painted the floor of the
interior in dark gull grey using a lighter grey for the sidewalls and bulkheads.
I also painted the various consoles. The seats were grey with a bluish cover and
the main instrument panel and console were black. I was able to get all the bits
in place without too much trauma, though all of this took a considerable amount
of time. I left off the main instrument panel and control sticks which will be
installed just prior to attaching the clear bits.
ith
these bits, it is a good idea to have a set of fine files. These were
particularly handy when it came to cleaning up the underside of the seats as the
resin pour stub was particularly invasive. I then painted the floor of the
interior in dark gull grey using a lighter grey for the sidewalls and bulkheads.
I also painted the various consoles. The seats were grey with a bluish cover and
the main instrument panel and console were black. I was able to get all the bits
in place without too much trauma, though all of this took a considerable amount
of time. I left off the main instrument panel and control sticks which will be
installed just prior to attaching the clear bits.
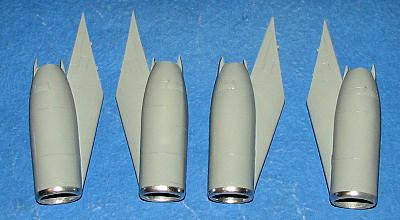
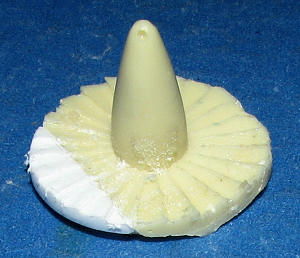 In between
filing and letting paint dry, I got an e-mail that told me that the engine fans
were set too far back in the nacelles. Sure enough, my own 141 photos showed
that these were nearly flush with the front of the engine nacelles. Anigrand has
them set way back. Well, I'd already glued one in the set place, but was
determined to remove it and put it in the proper location. Of cours
In between
filing and letting paint dry, I got an e-mail that told me that the engine fans
were set too far back in the nacelles. Sure enough, my own 141 photos showed
that these were nearly flush with the front of the engine nacelles. Anigrand has
them set way back. Well, I'd already glued one in the set place, but was
determined to remove it and put it in the proper location. Of cours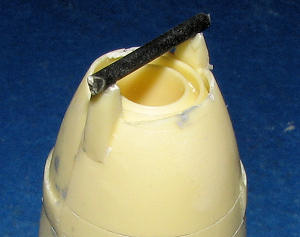 e,
I couldn't get it all out and snapped off a bit of it. Nothing to do but make a
replacement so I superglued and section of plastic card and when dry, filed some
blades. It isn't pretty , but will be better than nothing.
e,
I couldn't get it all out and snapped off a bit of it. Nothing to do but make a
replacement so I superglued and section of plastic card and when dry, filed some
blades. It isn't pretty , but will be better than nothing.
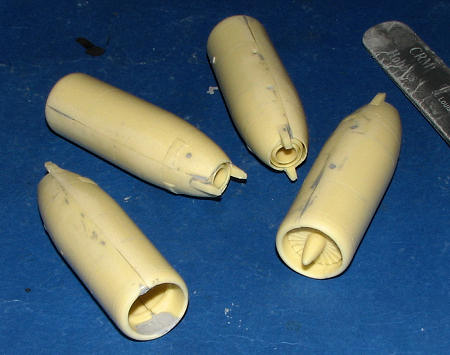
I also did more filling and sanding on the engine nacelles. The thrust reverser link covers on several of these had large air pockets. One way to fix some of these was to install a section of plastic rod and when the glue dries, it will be sanded down and more filler applied to smooth things out. The only other option would be to trim the fairings down, or to cut off the protrusions and replace them with plastic card.
I also did more filler and filing applications to the fin fairing, fuselage and the wings. I know this doesn't sound like much, but all of this does take time to let filler dry and all that stuff.
Round Four
I know that some would like daily updates on this, but the truth is that much of the time, as mentioned earlier, is taken up with filling and sanding. Pretty boring stuff.
Anyway, I did ge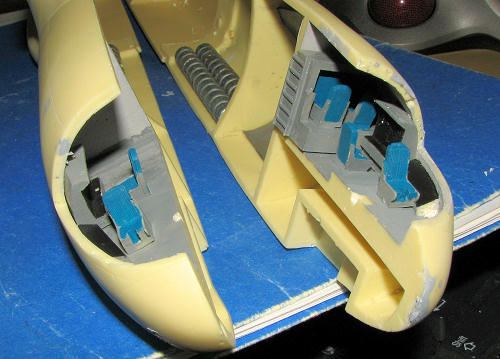 t
the majority of the cockpit bits painted and in place. I left off a few until
just before putting on the clear bit as I know I'll break something if I don't.
I also installed what I hoped would be enough weight. Several long weights a bit
farther back and two large sections of sheet lead placed just behind the cockpit
and formed to the fuselage sides. You can just see this lead on the right side
of the image. I know the cockpit isn't fancy, but I'm also not sure how much
detail will be visible through the transparency. Those that wish, could add
paper or tape belts to the mix.
t
the majority of the cockpit bits painted and in place. I left off a few until
just before putting on the clear bit as I know I'll break something if I don't.
I also installed what I hoped would be enough weight. Several long weights a bit
farther back and two large sections of sheet lead placed just behind the cockpit
and formed to the fuselage sides. You can just see this lead on the right side
of the image. I know the cockpit isn't fancy, but I'm also not sure how much
detail will be visible through the transparency. Those that wish, could add
paper or tape belts to the mix.
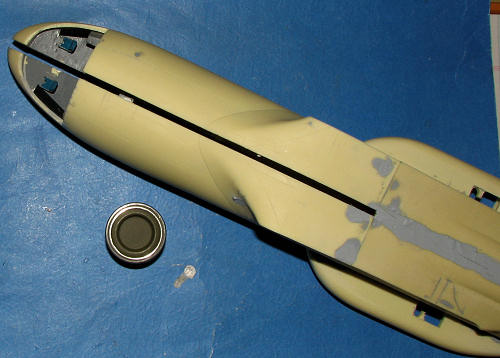 At
this time, it seemed as if joining the fuselage halves together would be a good
idea. With long resin parts like this, it is best to glue in stages so that
things can line up as best as they can. Even then, I fully expected to use a lot
of filler and shimming. As you can see from the image, there is a considerable
gap in the forward fuselage halves. Though it looks bad, this is not that
unusual. The owner of CMR told me that depending on the temp and humidity of the
day parts are cast, it was not unusual to get wide variances in parts' sizes. He
says he just tries to match things up as best he can and let the builder deal
with the rest. That is the reason for the 'experienced' modeler' labels on these
kits.
At
this time, it seemed as if joining the fuselage halves together would be a good
idea. With long resin parts like this, it is best to glue in stages so that
things can line up as best as they can. Even then, I fully expected to use a lot
of filler and shimming. As you can see from the image, there is a considerable
gap in the forward fuselage halves. Though it looks bad, this is not that
unusual. The owner of CMR told me that depending on the temp and humidity of the
day parts are cast, it was not unusual to get wide variances in parts' sizes. He
says he just tries to match things up as best he can and let the builder deal
with the rest. That is the reason for the 'experienced' modeler' labels on these
kits.
Regardless, it will take more time and work to correct
this. I put a standard paint tinlet in the photo for a comparison. I decided that
before tackling the forward half, I'd get the rear as good as I could. Usual
sanding and filling and I installed the vertical fin at this time as well so I
could get it smoothed in. Downside of this is if it is off, I'm doomed (and I'm
pro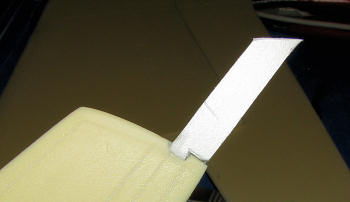 bably
doomed to alignment problems anyway as it seems to be my biggest cross to bear
when it comes to any model). I also took this time to clean up the tail planes.
No real problems aside from a large void on the tip of one. This one also had a
large depression near the root, but an easy fill. For the tip, I cut it even
larger and into a rectangular shape. Then I placed a section of formed
plasticard into it and filled it with superglue. This is standard stuff so is a
skill that should be learned. Often times it is easier to just cut out the area
of interest and replace it with plastic card than try to fill a myriad of holes.
I also continued to work on the engine nacelles with filler and such.
bably
doomed to alignment problems anyway as it seems to be my biggest cross to bear
when it comes to any model). I also took this time to clean up the tail planes.
No real problems aside from a large void on the tip of one. This one also had a
large depression near the root, but an easy fill. For the tip, I cut it even
larger and into a rectangular shape. Then I placed a section of formed
plasticard into it and filled it with superglue. This is standard stuff so is a
skill that should be learned. Often times it is easier to just cut out the area
of interest and replace it with plastic card than try to fill a myriad of holes.
I also continued to work on the engine nacelles with filler and such.
Round Five
OK, I should be a bit farther along than I am, but with the holidays and all.....
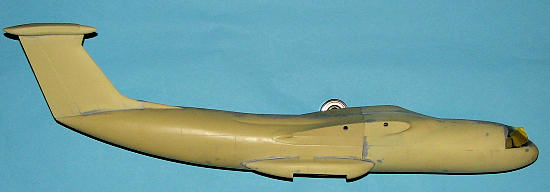
 Anyway,
I have been working on some of the smaller parts of the kit while fixing the big
stuff as well. I did finish the tailplane section as you can see from the image
to the right. I also glued the forward fuselage, making sure that the cockpit
area was properly mated. This is to ensure minimal additional work getting the
transparency to fit. This squeezing did cause some cracks in the fore/aft
fuselage join that was fixed once
Anyway,
I have been working on some of the smaller parts of the kit while fixing the big
stuff as well. I did finish the tailplane section as you can see from the image
to the right. I also glued the forward fuselage, making sure that the cockpit
area was properly mated. This is to ensure minimal additional work getting the
transparency to fit. This squeezing did cause some cracks in the fore/aft
fuselage join that was fixed once
 the
front of the fuselage was filled and there was no more flexing. Fortunately,
the forward fuselage section is long enough to allow this. On the C-141B kit
there will be even more length to help out.
the
front of the fuselage was filled and there was no more flexing. Fortunately,
the forward fuselage section is long enough to allow this. On the C-141B kit
there will be even more length to help out.
To fill the fuselage, I used sections of the thickest
plastic card that I had. First, the car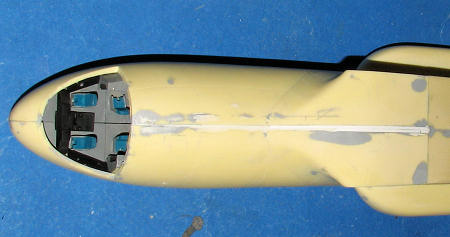 d
was trimmed in a similar manner as I did with the previous repair. By having a
larger 'tab', it prevents the section of card from falling into the fuselage and
makes it easier to handle. For the really wide part, I had to double up the
card. Thinner sections were used for other parts of the gap, all installed in a
similar manner of trimming to size first, then installing. I then flooded the
card to card join with cement and the rest of the area with super glue. Unlike
the nose, I did not use accelerator and let the super glue dry normally. This
provides a stronger bond with fewer pits.
d
was trimmed in a similar manner as I did with the previous repair. By having a
larger 'tab', it prevents the section of card from falling into the fuselage and
makes it easier to handle. For the really wide part, I had to double up the
card. Thinner sections were used for other parts of the gap, all installed in a
similar manner of trimming to size first, then installing. I then flooded the
card to card join with cement and the rest of the area with super glue. Unlike
the nose, I did not use accelerator and let the super glue dry normally. This
provides a stronger bond with fewer pits.
Of course, one then has to cut off what are rather thick sections of card and then smooth things down. Not exactly an easy task and I went through a coarse sanding stick in no time while doing this! However, after several days of work (one needs to recall that this was on both the top and the bottom of the fuselage) I got things to a respectable level. It also put me onto my second tube of filler. Once that was done, the instrument panel/console and the control yokes were glued in place.
 Meanwhile,
I returned to the engines and attached them to their pylons. For all of the
various attachments, I have found that I needed to drill out the mounting holes.
Basically, they are not deep enough and in some cases are too small. I was
fortunate enough to take the advice of my good friend Drew at a show one year,
and spent the funds on a set of drill bits that went from #59 to #1. This has
made much of this work and work on other kits so much easier as I have found I
use a lot of bits in the 50s and 40s on various models.
Meanwhile,
I returned to the engines and attached them to their pylons. For all of the
various attachments, I have found that I needed to drill out the mounting holes.
Basically, they are not deep enough and in some cases are too small. I was
fortunate enough to take the advice of my good friend Drew at a show one year,
and spent the funds on a set of drill bits that went from #59 to #1. This has
made much of this work and work on other kits so much easier as I have found I
use a lot of bits in the 50s and 40s on various models.
Next up, attaching the canopy and work on the landing gear.
Round Six
 This
time, I first masked the canopy and then attached it using clear paint. Once
that had dried, I added a bit of superglue for strength. As mentioned earlier,
the canopy itself is a bit undersized so several coats of filler were needed to
try to smooth things in. Still wasn't quite as much as I'd have liked. As a
suggestion to Anigrand when they do things like this, it would be nice to have
more room to work with in terms of having
This
time, I first masked the canopy and then attached it using clear paint. Once
that had dried, I added a bit of superglue for strength. As mentioned earlier,
the canopy itself is a bit undersized so several coats of filler were needed to
try to smooth things in. Still wasn't quite as much as I'd have liked. As a
suggestion to Anigrand when they do things like this, it would be nice to have
more room to work with in terms of having
 more
'airframe' as part of the clear bits. Having an additional 1/4 or 1/2 inch away
from the window parts would have been a huge help. Anyway, that was finally
smoothed as best as I could get and this pretty well left me with a complete
fuselage. It was now time to get some painting done.
more
'airframe' as part of the clear bits. Having an additional 1/4 or 1/2 inch away
from the window parts would have been a huge help. Anyway, that was finally
smoothed as best as I could get and this pretty well left me with a complete
fuselage. It was now time to get some painting done.
| COLORS & MARKINGS |
Early C-141s were in ADC Grey FS 16473 with a white upper fuselage and fin. The tailplanes, wings and engines were all ADC grey. When I went looking for my favorite Model Master enamel, I found that Testors no longer makes ADC Grey, but now calls it Light Aircraft Grey. As usual, I mixed this with lacquer thinner to reduce the drying time. On an airframe this large, painting takes considerable time and I spent most of the last several days doing little more than spraying on paint.
Once most of the ADC grey was done, I started to spray on the white,
choosing to concentrate on the fin/rudder and doing some
 on
the upper surface as well. Spraying on the white (Testors Model Master enamel
gloss white), showed a myriad of pin holes on the aft fuselage. I'm not sure
just whether I'll go through all the work to fill those or not. Once the white
fin had properly dried (and this stuff really takes a good day and a half before
one should handle it), I masked off the upper/lower demarcation line. I also had
to mask off the fin band. Anigrand does not supply this as a decal (though I
think they should). However, there are prominent lines showing where this band
goes. I fudged a bit to the inside during this process as one also has to paint
the yellow surround. The underlying white will make this easy once the blue
section is painted. I should mention that there are no wing walk decals provided
either. This will be a VERY long undertaking as stripe decals of decent length
are very difficult to locate. So far, I've had no success beyond short sections
of Microscale railroad decals.
on
the upper surface as well. Spraying on the white (Testors Model Master enamel
gloss white), showed a myriad of pin holes on the aft fuselage. I'm not sure
just whether I'll go through all the work to fill those or not. Once the white
fin had properly dried (and this stuff really takes a good day and a half before
one should handle it), I masked off the upper/lower demarcation line. I also had
to mask off the fin band. Anigrand does not supply this as a decal (though I
think they should). However, there are prominent lines showing where this band
goes. I fudged a bit to the inside during this process as one also has to paint
the yellow surround. The underlying white will make this easy once the blue
section is painted. I should mention that there are no wing walk decals provided
either. This will be a VERY long undertaking as stripe decals of decent length
are very difficult to locate. So far, I've had no success beyond short sections
of Microscale railroad decals.
 Getting
back to things, I masked off the items as mentioned, also masking off the area
under the tailplanes. I still have to add more masking to prevent overspray and
I have to deal with cleaning up and painting the wheels and gear doors. I did
glue in the nose gear and the resin piece that goes with it. Apparently this
resin bit is supposed to attach to the nose gear, but if so, the attachment
stubs are too short or missing. I just glued it in so it looks properly busy.
Once that was in and dry, I sprayed all the gear wells. There is overspray, but
since I've still got some grey to do, this will be touched up during that time.
Getting
back to things, I masked off the items as mentioned, also masking off the area
under the tailplanes. I still have to add more masking to prevent overspray and
I have to deal with cleaning up and painting the wheels and gear doors. I did
glue in the nose gear and the resin piece that goes with it. Apparently this
resin bit is supposed to attach to the nose gear, but if so, the attachment
stubs are too short or missing. I just glued it in so it looks properly busy.
Once that was in and dry, I sprayed all the gear wells. There is overspray, but
since I've still got some grey to do, this will be touched up during that time.
Round Seven
 Still
in with the painting. As you may surmise, painting something this large, and
with gloss enamel paints, is not a quick effort. However, I did manage to paint
the fin band (I think the colors may be a bit too bright) and apply several
sessions of topside gloss white during this time. Last night, I was able to do
touchup on the ADC grey underside and tail tip. This required me to mask off the
wheel wells, a somewhat complex task. I also
Still
in with the painting. As you may surmise, painting something this large, and
with gloss enamel paints, is not a quick effort. However, I did manage to paint
the fin band (I think the colors may be a bit too bright) and apply several
sessions of topside gloss white during this time. Last night, I was able to do
touchup on the ADC grey underside and tail tip. This required me to mask off the
wheel wells, a somewhat complex task. I also
 painted
the intakes to the engines using Alclad II polished aluminum. These did turn out
nicely.
painted
the intakes to the engines using Alclad II polished aluminum. These did turn out
nicely.
While waiting for the paint to dry, I
 also
assembled the main landing gear. Bare Metal Foil was wrapped around the oleo and
the main wheels were drilled out as the mounting holes were either too small,
too shallow, or filled with resin. There was some mold shift on several wheels
so a bit of additional sanding was needed on them. These all had the hubs
painted gloss white and then the tires were brush painted with Floquil's Engine
Black. They were glued to the struts with somewhat slow drying super glue. As
the wheels are not all perfectly round nor of equal width, some fudge room needs
to be allowed to move them around so that all four wheels will touch. I got them
pretty close and will sand the bottom of them later on.
also
assembled the main landing gear. Bare Metal Foil was wrapped around the oleo and
the main wheels were drilled out as the mounting holes were either too small,
too shallow, or filled with resin. There was some mold shift on several wheels
so a bit of additional sanding was needed on them. These all had the hubs
painted gloss white and then the tires were brush painted with Floquil's Engine
Black. They were glued to the struts with somewhat slow drying super glue. As
the wheels are not all perfectly round nor of equal width, some fudge room needs
to be allowed to move them around so that all four wheels will touch. I got them
pretty close and will sand the bottom of them later on.
I still have six days in which to assemble and attach the wings, engines, gear, gear doors, and tailplanes. I also have to do something about painting the nose and anti-glare panel and install the engine faces at the proper depth. Decals need to be done as well. It will be close.
Round Eight
In the last several days, I've been basically working on finishing up the painting and doing some minor assembly and decal work.
First thing I did was to mask off and paint the nose radome matte black. Then, looking at photos, I discovered that an area I left unpainted for the nose anti-glare panel needed to be left white as the 141 did not have one of these. After the paint dried on the nose, I masked it off and the grey below it to apply a couple of coats of white.
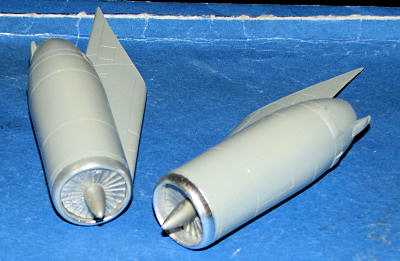 As
that was drying, I returned to the engines to see what could be done about the
compressor depth. As you can, hopefully, see from the photos, Anigrand has them
too far back when they should be almost up to the engine intake lip.
Fortunately, the fit is a bit tight so it was easy to glue these in place. One
has to be careful on this as the inlet 'spike' is not molded at 90 degrees to
the fan blades so it is easy to get things out of line. Better to have the
blades a bit off than an off-kilter inlet spike.
As
that was drying, I returned to the engines to see what could be done about the
compressor depth. As you can, hopefully, see from the photos, Anigrand has them
too far back when they should be almost up to the engine intake lip.
Fortunately, the fit is a bit tight so it was easy to glue these in place. One
has to be careful on this as the inlet 'spike' is not molded at 90 degrees to
the fan blades so it is easy to get things out of line. Better to have the
blades a bit off than an off-kilter inlet spike.
Finally, the paint was dry enough for some decals. One has to find an
alternate source for the stripes and I used Microscale sheet 91102, 3" and 4¾"
Black. You can get these from any place selling trains. You'll probably have to
order them. There are not enough to do both the fuselage and wing walk stripes
you need to order two sets if you want to do them all. The 3 inch stripes are
about the right size for the 141. Unfortunately, I was totally unable to get a
full stripe on the plane as each one was determined to
 break down
into several small pieces. As this was a new sheet, I can only surmise that
actual decal sheet had been sitting in a warehouse for many years before being
installed in a new package.
break down
into several small pieces. As this was a new sheet, I can only surmise that
actual decal sheet had been sitting in a warehouse for many years before being
installed in a new package.
It made putting on the stripes a two day job as I'd put on a goodly section on both sides, then carefully apply Microsol before setting it aside to fully dry. The next day I added the rest of the stripes.
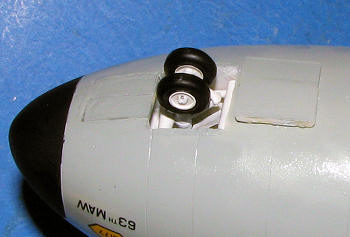
When those were dry and settled enough to handle, I attached the landing gear. The nose gear had been glued in for quite a while, so I just glued on the nose wheels. The openings for these are considerably larger than the axle, so I needed to use accelerator on the glue. Be sure to leave a bit of a stub sticking out.
The main gear were not difficult to attach and again, I used accelerator to get them into initial position. The mounting brackets don't seem to be in perfect alignment with each other or the well as looking from the bottom, the wheels would hit the sponsons on retraction. However, few will see this so it is no worry. It also seems that the kit gear were molded from an unloaded museum aircraft as they sit a bit high. There should be a section of the strut sticking up through the top of the sponson where there is a door to allow proper clearance. The kit gear do not. Fixing this would take time and cutting on the metal gear so I left it as it is.
![]() I
then started putting on the fuselage decals. These are well printed as are all
Anigrand decals. The white is semi-transparent so the MAC on the tail badge has
bleed through as does the white star on the insignia where the fuselage band
goes through it. The yellow on the various badges also nearly disappears once
the decal is applied. I'm thinking that these should be outlined in black, but
am not positive. I also noticed that the unit name is "63th MAW" instead
of "63rd MAW". A problem one can find when a kit is made by people who
don't speak English as their main language. I also was a bit disappointed to
find that the red cross for the fin was not included as a decal. Painting this
would be a chore and I just did not have the time for it so left it off.
I
then started putting on the fuselage decals. These are well printed as are all
Anigrand decals. The white is semi-transparent so the MAC on the tail badge has
bleed through as does the white star on the insignia where the fuselage band
goes through it. The yellow on the various badges also nearly disappears once
the decal is applied. I'm thinking that these should be outlined in black, but
am not positive. I also noticed that the unit name is "63th MAW" instead
of "63rd MAW". A problem one can find when a kit is made by people who
don't speak English as their main language. I also was a bit disappointed to
find that the red cross for the fin was not included as a decal. Painting this
would be a chore and I just did not have the time for it so left it off.
So I'm into the home stretch and have three days to add gear doors, wings, tailplanes and a few other sundry parts as well as a few more decals and the inevitable touch up painting. Stay tuned.
| FINAL CONSTRUCTION |
Final Round
Well, I didn't think I'd make it, but have been lucky, I guess. The
final steps were not as simple as one would have wished, but such is the way of
things. I started off this final run by attaching the gear doors. As was
expected, the fit of the main doors wasn't bad, but not that good either. The
doors curve at the attachment points, but the sponsons don't. Anigrand obviously
didn't spend much time in research as the inner doors do not hang straight down,
but fold up nearly flat against the bottom of the fuselage.
 One
has to do some work to remove hinges to get a proper fit. The nose doors are
something that also requires work. First of all, the forward doors remain closed
except during gear cycling. I glued those in place, finding the expected gaps.
These were not filled due to time constraints. The rear door is not at all the
'hang from the edge' design that is molded. This piece slides down and back,
again fitting tight against the bottom of the fuselage. Don't make the mistake
of cutting on these doors beforehand as it will only add to your work load when
you have to c
One
has to do some work to remove hinges to get a proper fit. The nose doors are
something that also requires work. First of all, the forward doors remain closed
except during gear cycling. I glued those in place, finding the expected gaps.
These were not filled due to time constraints. The rear door is not at all the
'hang from the edge' design that is molded. This piece slides down and back,
again fitting tight against the bottom of the fuselage. Don't make the mistake
of cutting on these doors beforehand as it will only add to your work load when
you have to c ement
them back together. Do remove the hinges before painting. I also glued on the
small upper sponson doors in a slightly open position. Normally the strut would
push these doors up, but as the strut is molded extended, it won't reach that
high. Before adding wings I also figured it would be a good time to drill out
the tip of the fin to accept the resin pitot probe.
ement
them back together. Do remove the hinges before painting. I also glued on the
small upper sponson doors in a slightly open position. Normally the strut would
push these doors up, but as the strut is molded extended, it won't reach that
high. Before adding wings I also figured it would be a good time to drill out
the tip of the fin to accept the resin pitot probe.
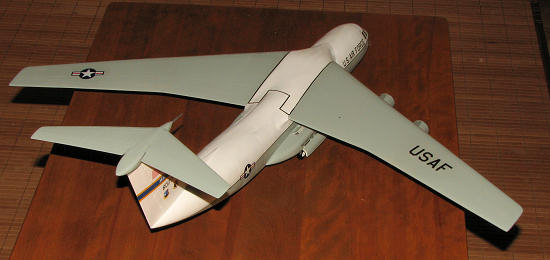
 With
the doors in place (and be very careful not to break them off during handling)
it was time to attach the wings. Not an easy task due to the size of the kit and
several things became apparent. One is that the fit wasn't as great as I'd have
hoped. When I'd finished attaching the two wings, there were some gaps at the
top of the wing. Two options. One was to break out the filler and get to work.
But I didn't have the time to spend several days working on that and besides,
I'd probably break something else. So I chose option two and that was to cheat.
I cheated by getting somewhat wide black stripe decals and pretending there were
black dividing lines. These stripes were also added in a fake walkway pattern
just to add to the illusion. Though the gaps are still there, the black lines
attract attention away from them and they seem to disappear. I should also point
out that one has to sand the inner trailing edge of the wing to a rounded shape
in order to get it to fit. Conversely, one could carve into the small fairing
that is there.
With
the doors in place (and be very careful not to break them off during handling)
it was time to attach the wings. Not an easy task due to the size of the kit and
several things became apparent. One is that the fit wasn't as great as I'd have
hoped. When I'd finished attaching the two wings, there were some gaps at the
top of the wing. Two options. One was to break out the filler and get to work.
But I didn't have the time to spend several days working on that and besides,
I'd probably break something else. So I chose option two and that was to cheat.
I cheated by getting somewhat wide black stripe decals and pretending there were
black dividing lines. These stripes were also added in a fake walkway pattern
just to add to the illusion. Though the gaps are still there, the black lines
attract attention away from them and they seem to disappear. I should also point
out that one has to sand the inner trailing edge of the wing to a rounded shape
in order to get it to fit. Conversely, one could carve into the small fairing
that is there.
Next were the engines. Fit here is as to be expected. They don't fit well and the angle is decidedly 'downhill'. Again, because of time constraints, I did nothing to fix this, but it does require reshaping of each of the upper portions of the engine pylon in order to remove the nose down attitude of the engines. This should also help to get rid of the gap that is there in the stock position. The last steps were to attach the tail planes, which actually fit rather well, and then glue on the pitot tube. I then removed the masking from the windscreens and that was it.
| CONCLUSIONS |
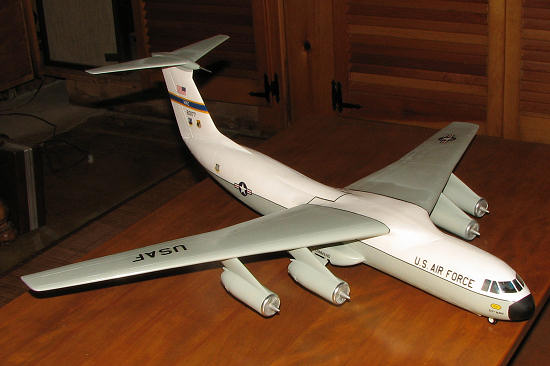
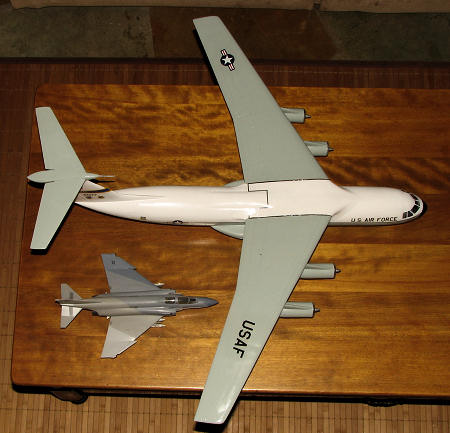
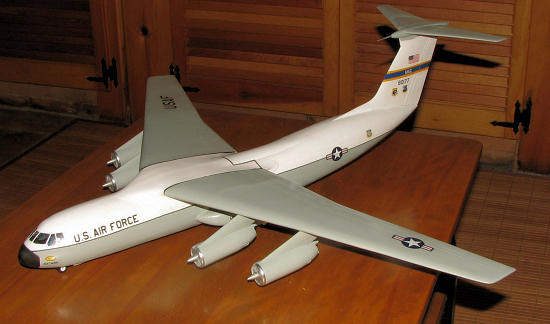 So
there you have it. A resin 1/72 C-141A in 28 days. Was it worth it. Certainly.
As much as I fuss about the work these kits require, to me, this is more like
modeling than just gluing and painting some
wunderkit. There
are challenges to overcome, one gets to stretch one's skills, and the end result
is a model that few others will have in their collection. It also re-taught me
not to build things according to a fixed time table, something I will not do
again. Had I not agreed to do so, I'd have fixed several of the glitches that I
let pass (such as the myriad pinholes on the fuselage, the wing gap and the
engine pylons), but then, it would have taken me three or four months to
complete.
So
there you have it. A resin 1/72 C-141A in 28 days. Was it worth it. Certainly.
As much as I fuss about the work these kits require, to me, this is more like
modeling than just gluing and painting some
wunderkit. There
are challenges to overcome, one gets to stretch one's skills, and the end result
is a model that few others will have in their collection. It also re-taught me
not to build things according to a fixed time table, something I will not do
again. Had I not agreed to do so, I'd have fixed several of the glitches that I
let pass (such as the myriad pinholes on the fuselage, the wing gap and the
engine pylons), but then, it would have taken me three or four months to
complete.
I highly recommend these kits to those who are ready to stretch their skills to the next level. You'll be glad you delved into these sorts of kits.
| REFERENCES |
July 2008
Copyright ModelingMadness.com. All rights reserved.
If you would like your product reviewed fairly and fairly quickly, please contact the editor
or see other details in the
Note to
Contributors.