Eduard 1/48 MiG-21MF (Weekend Edition)
| KIT #: | 84126 |
| PRICE: | $29.19 |
| DECALS: | One option |
| REVIEWER: | Scott Van Aken |
| NOTES: |
| HISTORY |
- MiG-21MF (1970; Izdeliye 96F; NATO "Fishbed-J")
- M = Modernizirovannyy ("Modernised")
- F = Forsirovannyy ("Uprated [engine]")
- Export version of the MiG-21SM, with RP-22 radar and
R13-300 turbojet. The choice of weapons loads was increased with the
addition of the R-60 (NATO: AA-8 "Aphid") and later the R-60M IR-seeking
AAM. These were also licence-built in India by HAL as the Type 88.

-
- MiG-21MFR (1995)
- R = Razuznavatelen ("Reconnaissance")
- Bulgarian local designation for MiG-21MF modified to carry recce pods after the retirement of the MiG-21F-13R.
- MiG-21MF-75
- Unofficial designation used in Bulgaria, East Germany, Romania and Czechoslovakia to refer to MiG-21MF aircraft delivered with cockpit instrumentation identical to that in the MiG-21bis (the "75" refers to "1975", the year in which these entered production.)
- MiG-21MFN
- Czech Air Force designation for MiG-21MF upgraded with NATO standard avionics.
While there may be some disagreement, the MF variant is probably the most exported version of the MiG-21. While there are -21s still in service with some nations, most have been retired to museums or scrapped.
| THE KIT |
Eduard has gotten a lot of positive press regarding its MiG-21 line. Since the MF came in more interesting camo schemes that probably any other variant, I picked this one up when it showed up on the shelves of the LHS. This is the Weekend Edition version so what you do not get from the standard boxing are two photo etch frets and a set of canopy/antenna masks. Fortunately, the pieces that would be used from the p.e. fret are provided as plastic bits or decals
 The kit has a nicely done cockpit with a nicely done bang
seat. All the instrument areas and inside of the cockpit walls are decals and it
will be up to the builder to try to match the color.
There are a lot of clear canopies provided, but most will not be used. The
canopy can be displayed open.
The kit has a nicely done cockpit with a nicely done bang
seat. All the instrument areas and inside of the cockpit walls are decals and it
will be up to the builder to try to match the color.
There are a lot of clear canopies provided, but most will not be used. The
canopy can be displayed open.
The wheel wells are very nicely detailed and all separate bits that eventually fit into the fuselage halves. There are also a number of bulkheads that go in the fuselage to add stiffness. A well detailed exhaust and burner can are also provided. Eduard recommends nose weight but does not tell us how much. As this cannot be added once the fuselage halves are together, the builder will have to tape together all the major components to get the right amount. In order to be able to produce multiple variants using the same basic fuselage and wings, the upper spine and fin are separate pieces and have their own small bulkheads. In fact, it is this feature that differentiates this MF kit from the later bis version. Eduard have gotten these bits correct.
On the wings, the builder will have to assemble the multipiece
wing wheel wells. Any pylons will need the holes opened up as well. The kit
provides separate forward speed brakes if we want to cut away the ones molded
into the bottom of the wing so these can be displayed open. I dare say few
modelers will do this. There is a se parate rear speed brake assembly for open or
closed. Landing
gear are properly complex and should look quite good when done. A goodly portion
of the sprues are for fuel tanks, pylons and weapons. One will choose what one
wants to use fairly late in the build process. Some of these have a multitude of
small parts as Russian weapons seem to have a lot of tiny fins. Interestingly,
the instructions only show a pair of RS2-U2 missiles on the inner pylon and fuel
tanks on the outer.
parate rear speed brake assembly for open or
closed. Landing
gear are properly complex and should look quite good when done. A goodly portion
of the sprues are for fuel tanks, pylons and weapons. One will choose what one
wants to use fairly late in the build process. Some of these have a multitude of
small parts as Russian weapons seem to have a lot of tiny fins. Interestingly,
the instructions only show a pair of RS2-U2 missiles on the inner pylon and fuel
tanks on the outer.
Instructions are well done on standard paper that includes a full color painting and markings guide with What looks like Humbrol (H number) colors are the primary with Gunze paints listed below. This is odd as the the paint info during the build is in Gunze paint references. This might be an issue where Gunze paints are not available, but since the colors are relatively common, finding local substitutes should be easy. Markings are for a single aircraft as shown on the box top. This plane is from the Slovak Air Force and is painted in a one time color scheme of white, grey, and black uppers with grey undersides. According to the painting guide, locally obtained black and white paint was used and the grey was mixed. The small decal sheet is well done and should produce a colorful model.
| CONSTRUCTION |
 The mass of sprues is a bit overwhelming at first, but that is because all
their variants have some common sprues that are in all the boxings. I pretty
well followed the instructions and so started on the nose gear well/cockpit
for this one, I also assembled the fin and the main gear wells. The cockpit
offers the choice of raised detail instrument panels or flat ones with
decals. I usually put the decals over the raised detail and did so this
time. The side consoles were then glued in place once they were built up and
painted. The gear wells I painted a sort of greenish grey using Vallejo 947
medium grey. Akan Russian cockpit color was used for the cockpit. The gear
wells have some hoses and other small bits that need installed. Some are
truly tiny. This was set aside for the time being.
The mass of sprues is a bit overwhelming at first, but that is because all
their variants have some common sprues that are in all the boxings. I pretty
well followed the instructions and so started on the nose gear well/cockpit
for this one, I also assembled the fin and the main gear wells. The cockpit
offers the choice of raised detail instrument panels or flat ones with
decals. I usually put the decals over the raised detail and did so this
time. The side consoles were then glued in place once they were built up and
painted. The gear wells I painted a sort of greenish grey using Vallejo 947
medium grey. Akan Russian cockpit color was used for the cockpit. The gear
wells have some hoses and other small bits that need installed. Some are
truly tiny. This was set aside for the time being.The exhaust was then built up after quite a bit of detail painting. This is another somewhat complex subassembly and some of your work will be pretty much invisible once it is done. There are some bulkheads to install in the fuselage halves and then the exhaust and cockpit/nose well assembly can be installed. The fit is quite tight for the cockpit and you'll have to do some fiddling around to get it all in place. Nose weight is required, though the instructions don't say how much. How difficult can it be to provide a number for this? I used 10 ounces,
 which is
probably overkill (it was) and there is a goodly amount of room for it.
With that superglued into place and the nose cone attached, the fuselage
halves were cemented together. The upper portion needs little filler as it
is covered by the fin and fairing. Underside I did need filler so that was
taken care of.
which is
probably overkill (it was) and there is a goodly amount of room for it.
With that superglued into place and the nose cone attached, the fuselage
halves were cemented together. The upper portion needs little filler as it
is covered by the fin and fairing. Underside I did need filler so that was
taken care of. Next were the tailplanes, various scoops and the wings. The wings have a number of circular bottles (oxygen and air?) that were installed. It turns out that these had deleterious effects on getting the upper wings in their proper place so next time I'll probably not install them or at least sand them down once dry. The fit of the lower wings (into which one puts the main gear wells) was excellent. I also attached the intake ring and some little piece that goes in the front of the nose gear well. During this time, the flaps and ailerons were glued in as were the upper wing fences. Then the underside bits were attached. This includes the optional open or closed lower speed brake. I chose the closed position. This part left a step at the rear that needed filler and sanding to deal with. I also had to trim the ventral stab a bit to get a good fit.
The next steps were the landing gear. Since I prefer to paint my kit prior to attaching these, I skipped that section for now and moved on to building the seat; all 17 parts. When that was done and painted, it was
 installed. I then masked the clear
bits as called out in the instructions and glued those in the closed
position after attaching the gun sight bits. Clear pieces fit well, though
not perfectly. The kit would have you build this one with a large centerline
tank, two outer wing tanks and some fairly large air to ground missiles. No
other options were provided. However, there are plenty of weapons and
alternate pylons. After some sleuthing, I found the correct rails for the
Atoll missiles and glued those on. Then I built up the missiles. The
separate fins are a simple butt join, which does not guarantee a proper
alignment. The outer pylons were left empty. The gear wells were then filled with Silly Putty and I glued
on several of the small bits called out earlier, but that I knew I'd break
off and it was off to the paint shop.
installed. I then masked the clear
bits as called out in the instructions and glued those in the closed
position after attaching the gun sight bits. Clear pieces fit well, though
not perfectly. The kit would have you build this one with a large centerline
tank, two outer wing tanks and some fairly large air to ground missiles. No
other options were provided. However, there are plenty of weapons and
alternate pylons. After some sleuthing, I found the correct rails for the
Atoll missiles and glued those on. Then I built up the missiles. The
separate fins are a simple butt join, which does not guarantee a proper
alignment. The outer pylons were left empty. The gear wells were then filled with Silly Putty and I glued
on several of the small bits called out earlier, but that I knew I'd break
off and it was off to the paint shop.| COLORS & MARKINGS |
 Once I did most of the overall painting (still a few antennas to
attach), I removed the Silly Putty from the openings and went to work
installing the landing gear. This proved to be fairly fiddly. First off
I lost one of the two piece oleo scissors, which resulted in my having
to replicate the part from card stock. With those in place, the gear was
wedged into the openings in the wing, which made for a fairly tight fit.
The retraction struts and gear doors have no positive locators and sort
of fit where they touch. The five piece wheels were assembled and glued
on.
Once I did most of the overall painting (still a few antennas to
attach), I removed the Silly Putty from the openings and went to work
installing the landing gear. This proved to be fairly fiddly. First off
I lost one of the two piece oleo scissors, which resulted in my having
to replicate the part from card stock. With those in place, the gear was
wedged into the openings in the wing, which made for a fairly tight fit.
The retraction struts and gear doors have no positive locators and sort
of fit where they touch. The five piece wheels were assembled and glued
on. The front landing gear was even more fiddly. Once I had the larger part of the gear in place, there was an oleo section and the two forks, which had to be attached along with the four part nose wheel. Fiddly really understates what a pain this was to assemble. Eventually I got it all in place. I then added the rest of the small bits, including the long nose pitot. I had to do a bit more painting to get rid of the bare plastic. For all intents and purposes, the kit was complete.
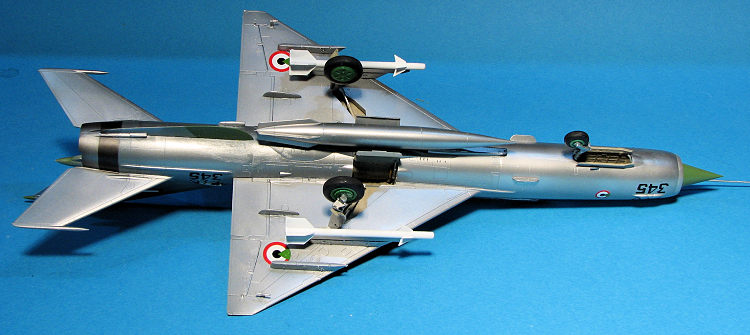 Now for the markings. I have a really nice RV Models decal sheet for the
MiG-21MF that has almost two dozen options. However, it only provides
profiles of one side and no upper surface markings information. Pretty
damn sloppy work if you ask me. Well, that precluded any of the non-bare
metal options as one side isn't really very good for doing complex
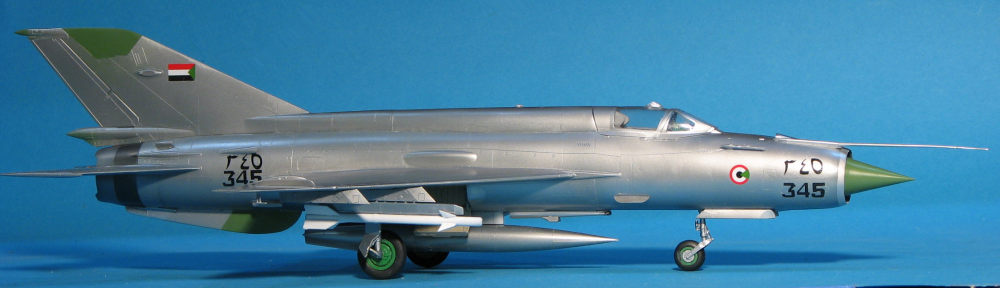
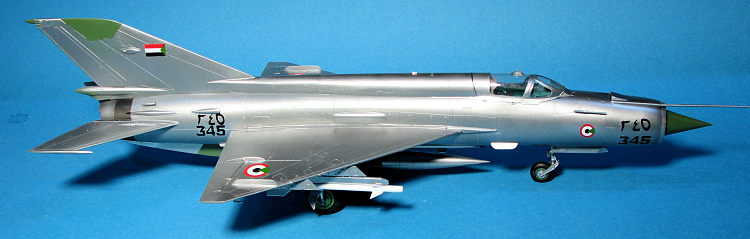
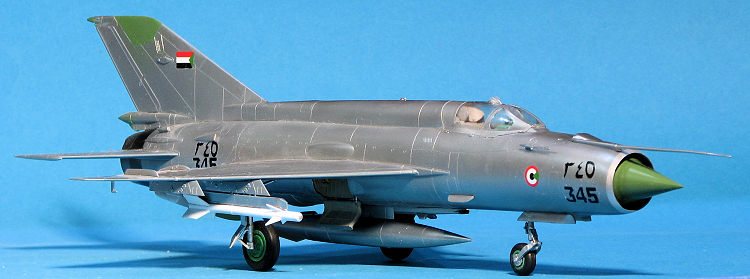
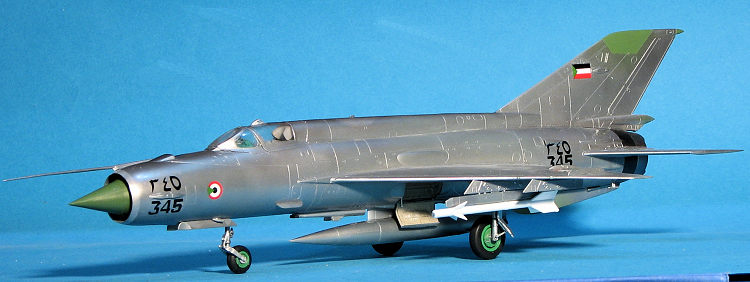
camouflage schemes. I decided on one of the two Sudanese AF options as
that fits into my liking for small air forces.
Now for the markings. I have a really nice RV Models decal sheet for the
MiG-21MF that has almost two dozen options. However, it only provides
profiles of one side and no upper surface markings information. Pretty
damn sloppy work if you ask me. Well, that precluded any of the non-bare
metal options as one side isn't really very good for doing complex
camouflage schemes. I decided on one of the two Sudanese AF options as
that fits into my liking for small air forces. The decals are very nice and went on with no issues. However, they boneheaded the tail flag and did not mirror image them so the vertical sequence is reversed on one side. Once the decals were all in place, I removed the masking, added the mirror atop the canopy, attached the drop tank and missiles, and that was it.
| CONCLUSIONS |
I can say that this was pretty much what I expected
from an Eduard kit. Nice detail, looks to be quite accurate, and was generally a
nice, but fiddly build. As this was the weekend edition without p.e., you don't
get the 'Odds Rods' IFF antenna nor the the small vanes for the long pitot tube
and probably missing some other small items, but overall that is not all that
much of an issue for most. It is difficult to compare this with kits I've not
built, but it sure beats out the Revell 1/48 MiG-21PF I built several years
back.
I have other variants from Eduard in the stash so will probably give those a go
at some time in the future. Worth picking up if you like the type and have the
ability to handle the somewhat frustrating build.
| REFERENCES |
http://en.wikipedia.org/wiki/Mikoyan-Gurevich_MiG-21_variants
6 March 2010
Copyright ModelingMadness.com. All rights reserved. If you would like your product reviewed fairly and fairly quickly, please
contact
the editor or see other details in the
Note to
Contributors.