
Revell 1/72 Tornado F.3
| KIT #: | 04375 |
| PRICE: | $20.00 or so delivered. |
| DECALS: | Two options |
| REVIEWER: | Scott Van Aken |
| NOTES: | 1989 release |
| HISTORY |
The Panavia Tornado Air Defence Variant (ADV) was a long-range, twin-engine interceptor version of the swing-wing Panavia Tornado. The aircraft's first flight was on 27 October 1979, and it entered service with the Royal Air Force (RAF) in 1986. It was also previously operated by the Italian Air Force (AMI) and the Royal Saudi Air Force (RSAF).
The Tornado ADV was originally designed to intercept Soviet bombers as they were traversing across the North Sea with the aim of preventing a successful air-launched nuclear attack against the United Kingdom. In this capacity, it was equipped with a powerful radar and beyond-visual-range missiles, however initial aircraft produced to the F2 standard lacked radars due to development issues. The follow-up F3 standard was the definitive variant used by the RAF, as well as all Tornado ADV aircraft that were leased by the AMI and procured by the RSAF.
During its service life, the Tornado ADV received several upgrade programmes which enhanced its aerial capabilities and enabled it to perform the Suppression of Enemy Air Defenses (SEAD) mission in addition to its interceptor duties. Ultimately, both the RAF and RSAF retired their Tornado ADV fleets; the type has been replaced in both services by the newer, multi-role Eurofighter Typhoon. The last aircraft was retired in 2011. Interestingly, the aircraft itself was not significantly superior to the Phantom that it replaced, but had much more advanced weapons systems.
| THE KIT |
It was suggested to me that the Revell offering of the Tornado was superior in terms of shape to the recently previewed Hasegawa kit; specifically in the area around the cockpit. So I was able to find one at a good price and so bought it. While this isn't the GR.1, there is little airframe difference save the radome area.
Surface detailing is on a par with the Hasegawa kit, though this one seems to have more ejector pin marks in areas such as the wheels and inner gear doors. The breakdown of the fuselage is a bit different with the nose section molded in with the upper and lower fuselage halves. Cockpit is fairly minimal with two somewhat generic seats (with molded on belt detail) fitting on a floor to which a front and rear bulkhead along with a forward control stick are attached. This fits atop the nose gear weel piece. On the upper half the instrument panels are placed and there are decals for dials.
The wing upper halves have the control surfaces molded in place and so one just attaches the lower wings after one installs the pylons. These pylons are supposed to swing so heat up your screwdriver to allow that to occur. The swing mechanism is a lever between the two wings. This also has to be heat-soldered into place. The moveable horizontal stabs are connected to each other. All this will make dealing with seams in some places rather difficult. 10 grams of nose weight is required before closing the fuselage halves.
With that done, the intakes are attached along with the fin, windscreen and canopy. There is no open option. Speed brakes and burner cans complete the basic airframe. You can pose the speed brakes open, but these were usually closed. Landing gear is pretty straight-forward and looks to be sturdy. There are ejector pin marks to remove/fill on the inside of the gear doors and each wheel has two or three of them as well. You are provided a full 'things under wings suite consisting of two Hindenburger tanks four Skyflash and four Sidewinders. Note that the airplane did not always carry this stuff, so you might want to check photos for the load-out (or lack of it). For instance, the 229 OCU planes were generally devoid of all this stuff on the underside, including the pylons.
 Instructions
are nicely done with only Revell paint references. This means that most of the
airframe colors will need to be mixed. The upper surface was Barley
Grey/Aircraft Grey 626 with the underside in Light Grey 627 (both BSC381
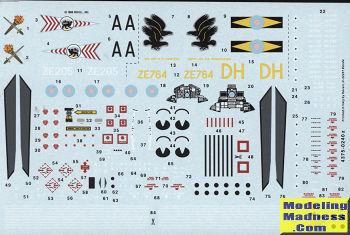
colors). Markings are for a 229 OCU/65 Squadron plane in 1988 and an 11 Squadron
aircraft as shown on the box art. There are plenty of aftermarket decals if you
want to use something else. Decals are nicely printed with all the white stripes
for the wing walk areas. These latter items are all under a single carrier so
will need to be cut prior to use.
Instructions
are nicely done with only Revell paint references. This means that most of the
airframe colors will need to be mixed. The upper surface was Barley
Grey/Aircraft Grey 626 with the underside in Light Grey 627 (both BSC381
colors). Markings are for a 229 OCU/65 Squadron plane in 1988 and an 11 Squadron
aircraft as shown on the box art. There are plenty of aftermarket decals if you
want to use something else. Decals are nicely printed with all the white stripes
for the wing walk areas. These latter items are all under a single carrier so
will need to be cut prior to use.
| CONCLUSIONS |
The only ADV kit I've ever built was an Airfix GR.1 with a resin conversion set to make the F.2. This looks like a nice one though dealing with the fuselage seam will probably be time consuming if the fit isn't perfect. One thing for sure, it is cheaper than the Hasegawa kit, though really not by all that much if buying 'second hand'.
| REFERENCES |
https://en.wikipedia.org/wiki/Panavia_Tornado_ADV
August 2019 Copyright ModelingMadness.Com. All rights
reserved. Thanks to me for getting this one on sale. If you would like your product reviewed fairly and fairly quickly, please
contact
the editor or see other details in the
Note to
Contributors. Back to the Main Page
Back to the Review
Index Page
Back to the Previews Index Page