Fujimi 1/48 OH-58A
Kit #: 214 (Testor's bagging)
Price: $3.00 in a bag.
Decals: Two versions; an Army OH-58A of 120 AHC in Bien Hoa 1970, a civil 206B in red and white.
Bell's Model 206 is one of the best selling light helicopters since Bell's own Model 47 that we have all seen watching MASH. It is used by most TV stations to cover traffic, many police departments fly it, the US Army and other nation's military air arms have bought copious numbers of them either from Bell or from Augusta of Italy where they are made under license. A light and nimble helo that is fun to fling about, the US Army bought them as the OH-58 to replace OH-6's in the scout category. The big benefit of the 206 being more power and a bit more room which made up for its larger size. At this writing, these helicopters are still being made for the Army in the much improved and more capable and deadly OH-58D version. The A models have just recently been phased out of most Army National Guard units and are sadly missed by the scout pilots who now have to fly the much less fun UH-60 Blackhawk
 Fujimi's kit is molded in its now familiar hard grey plastic; this kit having
engraved panel lines despite its age. Typical of Fujimi, the cockpit
is that of a civil helicopter with comfy seats and sparse interior. It does
come with both controls which is unusual in a helo kit as many manufacturers
overlook the side control. The instrument panel is a decal as is the
overhead one. There are rudder controls and with a bit of work it can
be made acceptable. Fitting weight into this one was a real poser,
but I flattened some weight for under the floor and put some in the center
console. It seems to have been enough. To do a late model OH-58A,
I needed to make some modifications. The biggest one was to shorten
the landing struts as they are way too tall. That was easily accomplished
by removing a 1/4" section from right next to the skid.
Fujimi's kit is molded in its now familiar hard grey plastic; this kit having
engraved panel lines despite its age. Typical of Fujimi, the cockpit
is that of a civil helicopter with comfy seats and sparse interior. It does
come with both controls which is unusual in a helo kit as many manufacturers
overlook the side control. The instrument panel is a decal as is the
overhead one. There are rudder controls and with a bit of work it can
be made acceptable. Fitting weight into this one was a real poser,
but I flattened some weight for under the floor and put some in the center
console. It seems to have been enough. To do a late model OH-58A,
I needed to make some modifications. The biggest one was to shorten
the landing struts as they are way too tall. That was easily accomplished
by removing a 1/4" section from right next to the skid.
Interior assembly went well with most parts being painted a medium grey with
seats a nice olive drab, instrument panel, glare
 shield and console flat
black and the controls aluminum with black grips. The back was left completely
empty although a mini-gun is provided. The rotor assembly was painted and
installed in one half of the fuselage. I left out the rotor shaft until
final assembly. At this time the exhaust had to be installed from inside
the fuselage. They were glued firmly in place and when dry, were hollowed
out with a drill bit. Assembly of the fuselage was pretty painless, but as
usual, filler was used on the top and bottom to smooth out mismatches
and clamps were needed at the front. The tail cone was then attached as was
the tail boom shaft cover. Early OH-58's had the tail shaft exposed,
but later in life these were all covered. The tail was then glued on and
any gaps filled and filed.
shield and console flat
black and the controls aluminum with black grips. The back was left completely
empty although a mini-gun is provided. The rotor assembly was painted and
installed in one half of the fuselage. I left out the rotor shaft until
final assembly. At this time the exhaust had to be installed from inside
the fuselage. They were glued firmly in place and when dry, were hollowed
out with a drill bit. Assembly of the fuselage was pretty painless, but as
usual, filler was used on the top and bottom to smooth out mismatches
and clamps were needed at the front. The tail cone was then attached as was
the tail boom shaft cover. Early OH-58's had the tail shaft exposed,
but later in life these were all covered. The tail was then glued on and
any gaps filled and filed.
Military Kiowa's had a different landing light so the civilian one was installed and then filled in and smoothed over. A circular one was made from a thin slice of tubing and installed in its place. The shortened landing gear was then glued to the bottom and it was on to the doors and the transparencies.
 The doors were painted medium grey like the rest of the interior and the
door transparencies installed. Fit of the door transparencies is not bad.
For some reason, all the doors are separate on the kit. I wanted
to model them closed as the interior is pretty barren. The back ones were
installed first and the fit is not real good. Fortunately, the real ones
are not a perfect fit either. Once those were on, I installed the windscreen
and lower windows. They do not fit at all well and despite a bit of
filing and fiddling around, was never able to get a good fit. I used
5 minute epoxy for all the transparencies. The cabin roof transparencies
were next. They also did not fit well. Thankfully, I did not install
the front doors until last as it was quite handy to have an opening to fiddle
with the clear bits when seating them.
The doors were painted medium grey like the rest of the interior and the
door transparencies installed. Fit of the door transparencies is not bad.
For some reason, all the doors are separate on the kit. I wanted
to model them closed as the interior is pretty barren. The back ones were
installed first and the fit is not real good. Fortunately, the real ones
are not a perfect fit either. Once those were on, I installed the windscreen
and lower windows. They do not fit at all well and despite a bit of
filing and fiddling around, was never able to get a good fit. I used
5 minute epoxy for all the transparencies. The cabin roof transparencies
were next. They also did not fit well. Thankfully, I did not install
the front doors until last as it was quite handy to have an opening to fiddle
with the clear bits when seating them.
After that mess, the rear stabilizers and side grab handles were installed
with no fuss. There is a curious little splitter plate that goes just in
front of the engine intakes. The instructions don't do justice for their installation, so hope you have a good photo reference for
their fitment.
Once that was done, the transparencies were masked and the kit sprayed with
Gunze Olive Drab. Then it was sprayed with Future gloss clear coat
in preparation for the decals. While all that was drying, the main
and tail rotor blades were painted flat black, then the tips masked and painted
white. Once that was dry, the tips were painted yellow on the main
 blades and red on the tail. The tail blades got a white center stripe
courtesy of a Scalemaster white stripe sheet.
blades and red on the tail. The tail blades got a white center stripe
courtesy of a Scalemaster white stripe sheet.
Then the tail rotor shaft was glued on and the exhaust was given a nice brushed on coat of Metallizer. Next were the decals. I wanted to do a model of one I photographed at an air show belonging to the Illinois Army National Guard. I used a combination of kit decals and some from the spares box for the NG markings. Once relatively dry, they were given a dose of Champ decal setting solution to properly snuggle down. Then it was time to take off the masking that had been on the kit for about four months. Needless to say, it was a real mess and took a long time to get all the residue off. The upper windows were given a coat of Tamiya Transparent Green using a large brush. Final assembly consisted of adding antenna and windshield wipers.
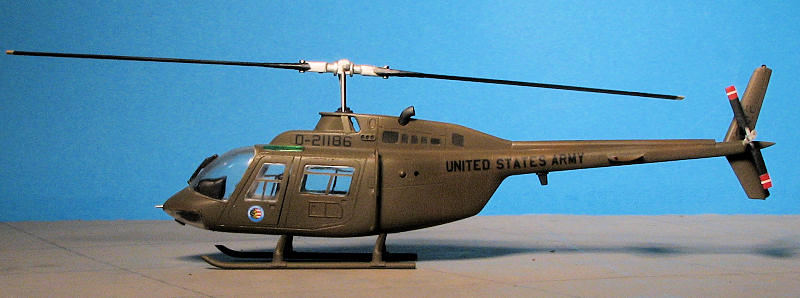
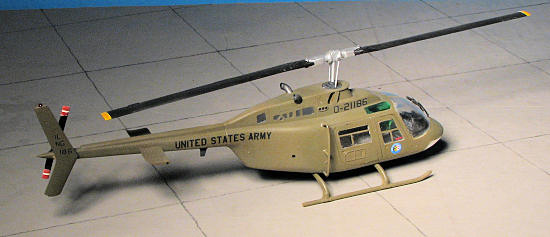
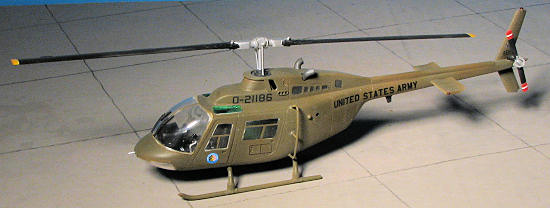
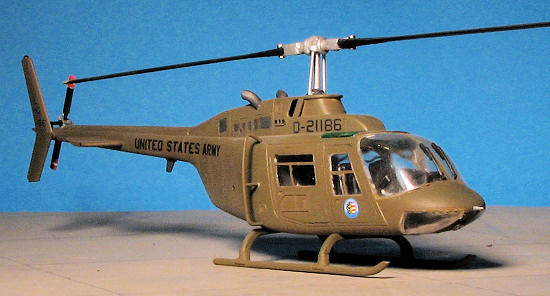
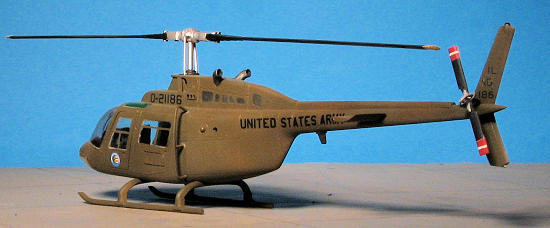
The finished kit looks like an OH-58. There are a number of differences that the real helo fanatic will instantly spot, but for me, it is good enough. I would not recommend this kit to the beginner due to the horrible fit of the nose transparencies, but the more experienced modeler should be able to rectify those problems.
22 November 1998
Copyright Modeling Madness.com. All rights reserved. No reproduction in part or in whole without express permission from the editor.