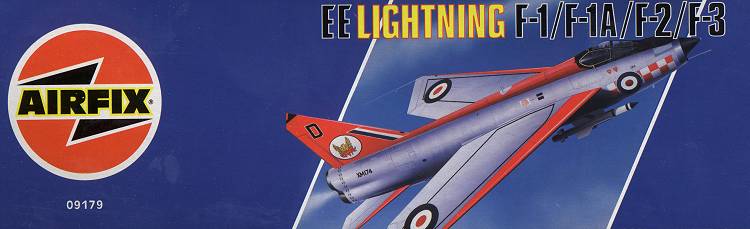
Airfix 1/48 EE Lightning F.1/F.1A/F.2/F.3
Kit Number: 9179
Price: $33.00 retail
Decals: for six versions, all natural metal; F.1 - 74 Sq, F.1A - 56 Sq,F.2 - 92 Sq, F.3 - 23 Sq, 29 Sq, 111 Sq (most versions have full color tailsand spines)
Date of Review: 5 July 1998
Review and Photos by: Scott VanAken
If you like aircraft with excessive amounts of power and noise, then the EE (later Bae) Lightning is the one for you. Britain's last twin-engined, single seat interceptor, it was built in small numbers, but the number of people who loved to see and hear the brute ran in the millions. Finally retired in 1988, a number of them still exist and are kept in flyable condition. Despite the inability to get a license to fly them in the UK, they are often fired up for blasts down the runway to the appreciation of thousands of enthusiasts. Now why one is not brought here to the US where the laws are not so oppressive regarding flying these types of aircraft is beyond me as they would be a huge hit at the airshow circuits.
Airfix has done it again with the Lightning. If you liked their recent Spitfires in this scale, you will like this kit. There is minimal flash and just a few sink marks, notably on the outside of the gear doors and the upper wing tips. Both are easily filled with putty and sanded off. Representations of several versions are given in the kits so one does not have to buy several different kits as is the practice with Japanese models. There are two common sprues with wing leading edges and tails and armament common to all Lightning models and two that are specific to the F.1 to F.3and F.2A /F.6 which have different wing leading edges and larger fuselage fuel tanks. The decal sheets are huge and fill the bottom of the boxand my copy was in perfect register, however, I wanted to build somethinga bit different so chose an Aeromaster sheet for my Lightning of choice.
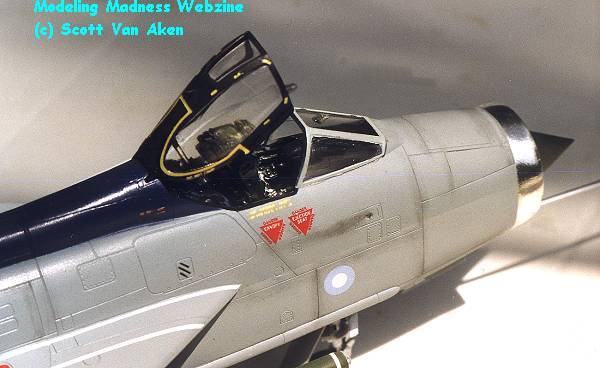
First step for me is to start building small subassemblies such as weapons, wheels, wings and such. The intake on this kit is very well done and allows one to not only have a full intake trunk, but leaves plenty of room for weight, which this kit really needs. I also decided to discard the kit cockpit and replace it with a very well done resin one from Cutting Edge. It was a very tight fit to get the resin cockpit to fit above the intake trunk, but careful filing finally got it to fit. The new interior is a real improvement over the kit one! It was painted dark grey, then washed with black and then drybrushed with a light grey. Really made the details pop out. Spend some time doing detail painting on the cockpit as it is well worth the effort, even if you cannot see it all when done!
Once that is installed, then the afterburner section can be painted, assembled and installed. One of the drawbacks of multiple version kits are the various inserts and combination parts required to do one specific version. Since this kit is for four different versions, you need to make sure the proper holes are opened up in the fuselage prior to joining it. Any real Lightning expert will tell you about the different lengths of cable ducting on the fuselage side. Airfix allows for this with different sections of ductfor which holes need to be opened. Oddly, Airfix already opens up the holes for ducting used by F.1A and F.2 versions. That means if you do an F.1, you need to fill holes! (In this same light, the holes in the wing for the refueling probe are already opened for you, meaning you must fill them if you wish to kit an F.1.) If doing an F.3 (as this one is)additional holes near the front of the fuselage must be opened. Finally the fuselage sections can be joined. I did mine in sections as I am prone to getting mismatches any other way.
Once joined, the cable duct sections were added and the plugs for the upper and lower guns were installed as the F.3 was missiles only. The gun representations are just small troughs that would need drilling out and deepening anyway. The plugs fit fairly well, but needed a touch of sanding fora perfect fit. The cable ducts were a bit of a pain especially as the longer ones were not perfectly molded and had small indentations along the side. This prevented the attachment points from being perfectly straight and required some judicious filling to get a smooth appearance. Next was the installation of the nose ring. On my example, the fuselage was more oval from top to bottom than the intake ring. Since the ring is rather rigid,and the fuselage did not respond to squeezing, filing and putty were used to get a smooth transition.
The tail and wings were next attached with no real problems as was a section just aft of the cockpit that needs cut as the Cutting Edge cockpit provides a small section. No real problems encountered there. A note on the separate flaps. It is great that Airfix provided them, however unless landing or taking off, the flaps were in the neutral position. I looked at over a hundred images of Lightnings and other than a maintenance photo, the flaps were all up. Same for the speed brakes, although I did find one photo of a taxiing aircraft with speedbrakes deployed. The next step was attaching all the various fuselage antenna, scoops and other protuberances that would be painted in fuselage color. For some strange reason, few of these items had the holes predrilled, although all versions had many ofthe same items. There was a diagram showing where to drill the holes, but how many new modelers are going to have a set of drill twists? For the scoops, the attachment pins were cut off and they were glued straight tothe fuselage. Another interesting note. The airframe is fullof NACA intake/exhaust ducts. Those on the lower fuselage were properly indented, while on the upper section, there were just engraved lines the shape of the ducts. Very odd indeed.
 Once all the
fuselage bits and pieces were added, it was time to put on the paint. Firstoff, the wheel wells and intake were painted aluminum. Then all
the openings (intakes, wheel wells, cockpit) were filled with tissue in
preparation for painting. Now I doubt if there is an easy way to do the 3-greyscheme without much masking and repainting, not that it does me much
good as I always end up repainting areas anyway. I used Xtracolor paints
for all fuselage colors. The first color was Light Aircraft Grey for under the wing and horizontal stabilizers. Once dry, they were
masked and the leading edge trimmed back in anticipation of the wrap around
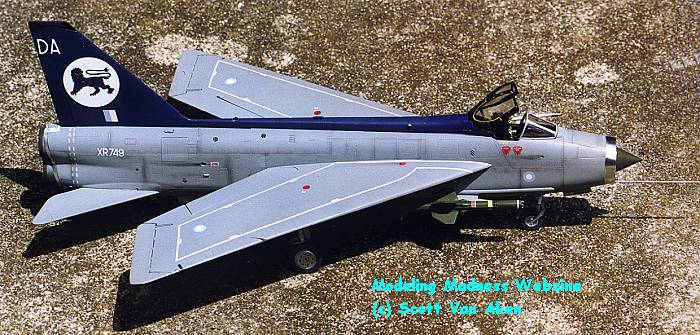
upper wing color. Next the lower fuselage was painted Barley Grey. Normally the fin would be this color, but I'm doing a special
scheme that has a dark blue fin and dorsal spine. When the Barley Grey was
dry, that area was masked and the spine and fin were painted in Roundel Blue. While that was drying, the landing gear were assembled in
anticipation of installation. No real problems, however you will find the main
gear strut links to be much wider than the attachment points on the strut. Bare
Metal Foil was also attached to the strut oleos and to the band around the as-yet-to-be-installed exhaust.
Once all the
fuselage bits and pieces were added, it was time to put on the paint. Firstoff, the wheel wells and intake were painted aluminum. Then all
the openings (intakes, wheel wells, cockpit) were filled with tissue in
preparation for painting. Now I doubt if there is an easy way to do the 3-greyscheme without much masking and repainting, not that it does me much
good as I always end up repainting areas anyway. I used Xtracolor paints
for all fuselage colors. The first color was Light Aircraft Grey for under the wing and horizontal stabilizers. Once dry, they were
masked and the leading edge trimmed back in anticipation of the wrap around
upper wing color. Next the lower fuselage was painted Barley Grey. Normally the fin would be this color, but I'm doing a special
scheme that has a dark blue fin and dorsal spine. When the Barley Grey was
dry, that area was masked and the spine and fin were painted in Roundel Blue. While that was drying, the landing gear were assembled in
anticipation of installation. No real problems, however you will find the main
gear strut links to be much wider than the attachment points on the strut. Bare
Metal Foil was also attached to the strut oleos and to the band around the as-yet-to-be-installed exhaust.
Once the multiple resprayings were finished and the paint well and dry, it was time to add on the additional parts. First was the landing gear. The wheels are designed for a specific landing gear so be sure to mark which wheel goes with which gear (I scribe a tiny L or R on them). I then glued them to the wheel wells using superglue. It is a nice, snug fit. Similarly snug was the nose gear, again using superglue. Next were the gear doors and retraction struts. The instructions are useless as far as placing the retraction struts were concerned, so I delved into the Aeroguide for help. Airfix provides no definite attachment points for these and so I felt it was better to put the gear doors on first and then worry about the struts later. Main doors fit very well with no problem. The small auxiliary doors atop the main doors are a real poser to fit. They should angle down slightly and not touch the wing. The long rodon these small doors will help get them to properly fit, but it takes a bit of fussing around to get them positioned for tack gluing. Once in position, they can then be glued more firmly. Now on to the retraction struts. Once the doors were in place, it was obvious that the larger strut was way too big for the hole it was supposed to fit into. The smaller one ended up basically laying in the gear well with its ends attached to the gear and the wheel well. The larger one was shaved down at its attaching area to the gear and sort of crammed into place and well glued. Really, Airfix has not done a very good job on this part of construction. The other gear doors fit without any real fuss.
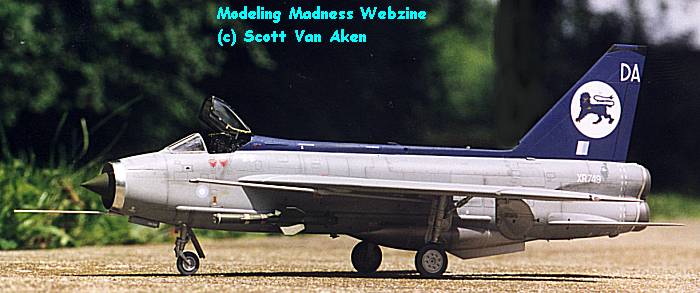
Now that all the basic bits are on the aircraft, this is the time I add the decals. Xtracolor's paints are a great starting point as they are quite glossy. I used the LTF scheme from Aeromaster's sheet 48-371 Lightnings Part III; Late Colors. The LTF Lion on the fin is printed in several sections to prevent mis-register problems and while a bit time consuming (as I let each part dry a full day), the results are superb. As with many decal sheets, all the common markings come from the kit decals. And here is whereI had some momentary panic. I chose a three-grey paint scheme and the kit decals are for bare metal Lightnings! That meant all their markings are in black where the grey Lightnings had white markings! Fortunately, I also have the F.6 kit so robbed the white markings from that kit. Not all the F.6 markings are for the F.3 so with both instruction sheets sided by side, I was able to piece together which ones I needed. WHEW!! Looking at this in hindsight, Aeromaster should have realized this problem and provided white markings; even if it meant an additional sheet and a price increase. A note on the kit decals. The ones for the F.3 are quite good, whereas theF.6 sheet is not very crisply done. Most of the white markings are blurredand illegible, while the black ones for the F.3 are easy to read. All the decals responded very well to Champ decal setting solution.
After decaling, it is time to add the other parts. The interior had the clear bit added on the sight and then the windscreen was painted Medium Sea Grey and attached to the fuselage with epoxy. The canopy section was painted flat black, the decals added and then set aside for final assembly. Next the radome was painted green using Aeromaster Mitsubishi Interior Green and attached to the nose. Bare Metal foil was then applied to the intake ring, various antennas were added and painted, and the refueling probe was painted Light Aircraft Grey and attached to the underside of the wing; epoxy used for all these bits as normal glues and superglue really attack the Xtracolor paint!
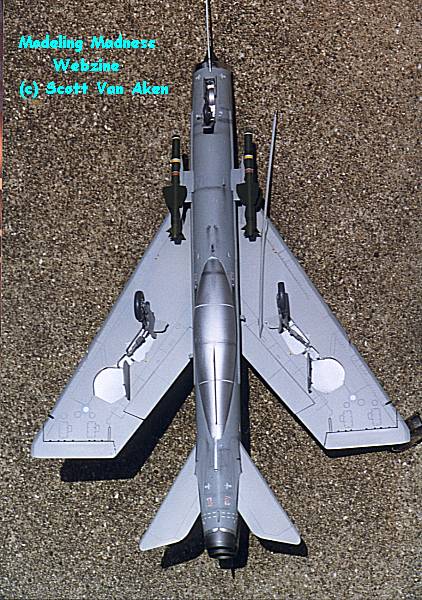
Final assembly consisted of the Red Top missiles (also painted Mitsubishi Interior Green) and the nose probe. The kit was then sprayed with clear matte and when dry the bang seat, canopy and canopy strut were added. I used alcohol to remove the acrylic matte from the nose ring , removed the masking from the windscreen and then used pastels to dirty the aircraft upa bit.
Final result is well worth the efforts put into it. Highly recommended for all but the neophyte due to the number of small parts and the plethora of decals.
References:
Copyright ModelingMadness.com. All rights reserved. No reproduction in part or in whole without express permission from the editor.
Back to Reviews Page 2023