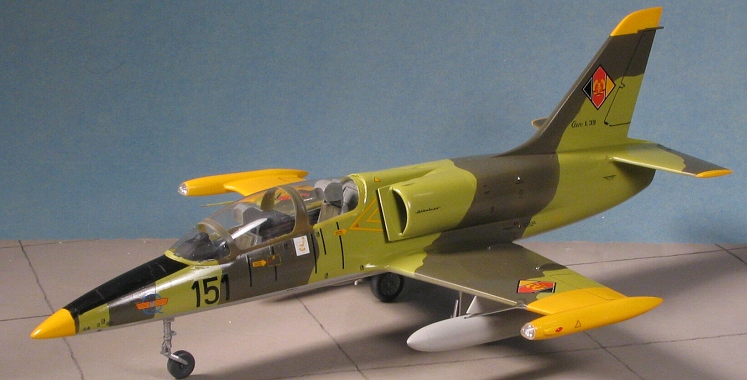
MPM 1/48 Aero L-39 ZO
|
KIT # |
48042 |
|
PRICE: |
$39.95 |
|
DECALS: |
Four aircraft |
|
REVIEW : |
|
|
NOTES: |
Resin bits and vac canopy |
|
HISTORY & THE KIT |
For a look at what comes in the box and a brief history, follow this link.
|
CONSTRUCTION |
First thing I did was to scope out the instructions for possible
subassemblies. I then started gluing them together. This was basically the
underwing tanks, the wheels, the seats, horizontal stabilizers, and the wings.
The wings have small inserts into which the landing gear will fit. Be quite
careful installing these so that the attachment point is centered in the small
opening. My wing had some flash in these openings that needed cleaned out. They
also had large ejector stubs that had to be removed. These are also found on
other parts of the kit and must be removed for the parts to fit together. It is
an easy task if you have a pair of flush-cut sprue cutters.
With the seats pretty well done, my attention turned to the cockpit. I guess
that MPM didn't think there were enough parts, so made a lot of interior bits
overly complicated. The rudder pedal assemblies each consist of three parts; the
crossbar and two foot rests. The instructions would have you build these
separately and then install them on the floor, but I found it much easier to
first glue on the crossbar and when dry, glue the foot pads to them. Same with
the control columns. These are two parts and it was much easier to glue the base
to the floor and then the stick into the base. The base is a bit larger than the
area on the floor it is supposed to occupy, so a touch of trimming is needed.
Time moves slowly by and I decided that I had to do something about the
ever increasing size of the unfinished kit pile. This one was the first as
it seemed to be at a stage where it could be completed in a reasonable
amount of time. I notice that over the years, the rudder pedals for the
front seat had gone missing and the rear left side console had also
departed, but was in the box. First thing I did was to re-cement this side
console. It was a lot of work just to get it back into position as there
just
Next, I assembled the intakes. These parts have R and L etched on them. Use
this as a guide as the parts guide will have you assembling the wrong
intakes onto the appropriate backing plate. These had a bit of filler put
on them and were set aside. I'll paint the interior of them with Aluminum
though no painting information is given for this part.
Back at the cockpit, there is some more work to do. The instrument panels
were glued into their appropriate anti-glare shields after a bit of
trimming. The assembly on the forward shield does not fit all that well as
it is a bit too s
After painting the inside of the intakes with aluminum, I glued them in
place. Fit is fair, but it is obvious that there will be filler used. Once
it was applied, I used 220 grit sandpaper to level things out as best as I
could. Rather harsh measures, but sometimes kits require them and this was
one. After going down through the usual grits of 320, 400, 600, 1200 and
2400, I rescribed a number of the lost panel lines and then glued on the
wing. Fit here is commensurate with the intakes. There is a good 1/16th
inch step between the wing root and the upper wing (wing is thinner). Fit
in the rear also leaves a step between the rear fuselage and the wing (wing
is lower). Front attachment doesn't suffer from this step, but it is
thinner than the fuselage. To say that I had to slather on the filler would
be an understatement and it will take multiple applications.
With that done, I then glued all the interior bits in place. Then I managed
to fit the canopy in place. Much to my dismay, it was too short in the
back. I guess I shouldn't have followed the frame lines so slavishly.
Having hosed my first canopy, I decided not to wait the weeks on a
replacement and soldiered on. If you recall, this kit had sat around for
years and if I stopped work on it to wait for parts, it would sit for more
years! After getting in on by using some superglue to tack it in place and
then white glue to fill the gaps, I masked the canopy. Then I installed two
of the four pylons as I wanted to use the drop tanks. There are dimples in
the lower wing to fit two of the pylons so I chose two of the four and
cleaned them up. I ended up cutting off the aft alignment pin as they were
too far apart to match the dimples in the wing. After they were glued in
place, I used filler on the gap that was on the outside of both pylons.
 When
gluing the wings, I found it best to begin at the tip tanks and work inward.
This assured that the tanks would not be out of round. Generally the fit was
pretty good and I didn't need as much filler as I usually end up using on short
run kits. The under wing tanks also fit well as did the wheels. The seats are a
somewhat complicated structure consisting of many parts. I did find the fit of
them to be pretty decent, though you do have to take your time building them.
The headrests are resin, probably to make sure there are no sink marks. These
are super glued onto the rear framework. I left off the cushions until after the
seat frames were painted as they are a different color. I'm sure that many will go for aftermarket sets to enhance these and other areas
of the kit, but I wanted to do mine pretty well out of the box.
When
gluing the wings, I found it best to begin at the tip tanks and work inward.
This assured that the tanks would not be out of round. Generally the fit was
pretty good and I didn't need as much filler as I usually end up using on short
run kits. The under wing tanks also fit well as did the wheels. The seats are a
somewhat complicated structure consisting of many parts. I did find the fit of
them to be pretty decent, though you do have to take your time building them.
The headrests are resin, probably to make sure there are no sink marks. These
are super glued onto the rear framework. I left off the cushions until after the
seat frames were painted as they are a different color. I'm sure that many will go for aftermarket sets to enhance these and other areas
of the kit, but I wanted to do mine pretty well out of the box.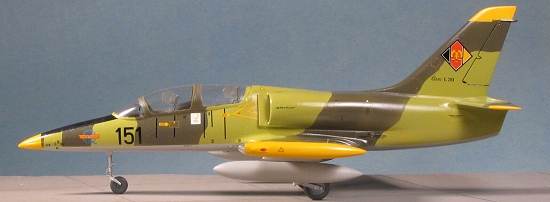 I recommend gluing in the side consoles prior to installing the cockpit as
you'll find they will be a real bear to get in there afterward. Once dry, I
put some weight into the nose and then glued the pad onto which the nose
gear will fit. Then I glued in the cockpit and cemented the forward
fuselage together. At this time, I totally lost interest in the kit and it
sat in a box for a couple of years.
I recommend gluing in the side consoles prior to installing the cockpit as
you'll find they will be a real bear to get in there afterward. Once dry, I
put some weight into the nose and then glued the pad onto which the nose
gear will fit. Then I glued in the cockpit and cemented the forward
fuselage together. At this time, I totally lost interest in the kit and it
sat in a box for a couple of years. isn't a lot of room to play with in there. With that in place, I then
assembled the exhaust section using the resin piece and the plastic exhaust
pipe. I then glued the tail section together after sanding down the mold
lines where the sprues attached. The tail pipe assembly was then glued in
place. Fit here was actually pretty good and I only needed a touch of
filler to take care of the seams. The usual filler and sanding ensued.
isn't a lot of room to play with in there. With that in place, I then
assembled the exhaust section using the resin piece and the plastic exhaust
pipe. I then glued the tail section together after sanding down the mold
lines where the sprues attached. The tail pipe assembly was then glued in
place. Fit here was actually pretty good and I only needed a touch of
filler to take care of the seams. The usual filler and sanding ensued.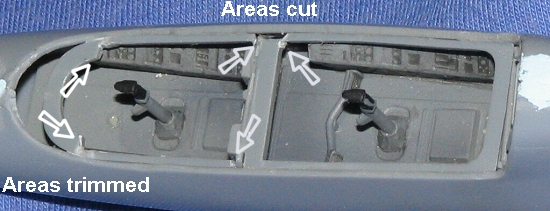 mall to cover the opening provided, and a bit too big to
fit inside it! There is what I can only assume to be some sort of framework
that is supposed to fit down inside the canopy opening. No way will it fit
as it is provided. I cut the rear section away making a bit of a rectangle
and glued it in place. I totally blew off the little pieces that are to fit
under it as I couldn't see any reason for them being there. In the front, I
trimmed the remaining 'legs' so it would fit. Up where the instrument panel
is supposed to slot in place, I trimmed it bac
mall to cover the opening provided, and a bit too big to
fit inside it! There is what I can only assume to be some sort of framework
that is supposed to fit down inside the canopy opening. No way will it fit
as it is provided. I cut the rear section away making a bit of a rectangle
and glued it in place. I totally blew off the little pieces that are to fit
under it as I couldn't see any reason for them being there. In the front, I
trimmed the remaining 'legs' so it would fit. Up where the instrument panel
is supposed to slot in place, I trimmed it bac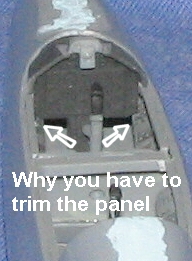 k about a 1/8 inch
![]() or so.
Both instrument panel lower sections were too long so those were trimmed
until the fit was good. On the forward panel, I had to trim the lower
corners to get a good fit. I then cut one of the canopies and trimmed it
until it looked like a good fit. I appreciate the second canopy and so will
those who like to display their models with canopies open. I also
appreciate it as I totally sliced the first one when I sneezed during
cutting!
or so.
Both instrument panel lower sections were too long so those were trimmed
until the fit was good. On the forward panel, I had to trim the lower
corners to get a good fit. I then cut one of the canopies and trimmed it
until it looked like a good fit. I appreciate the second canopy and so will
those who like to display their models with canopies open. I also
appreciate it as I totally sliced the first one when I sneezed during
cutting!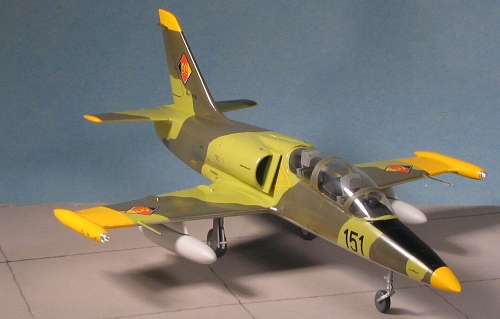 Once the first major sanding of the wings
was done, I attached the horizontal
stabilizers. These are thicker than the roots on the fuselage. Since it
would be easier to correct any problems on the upper surface, I matched the
lower bits as much as I could and let them dry. For the upper part, I first
sanded on them, but realized that I'd have to sand the entire upper surface
of the stabs to keep things even so only did a bit. Then I applied filler
to the large step in order to blend it in with the upper fuselage as much
as I could.
Once the first major sanding of the wings
was done, I attached the horizontal
stabilizers. These are thicker than the roots on the fuselage. Since it
would be easier to correct any problems on the upper surface, I matched the
lower bits as much as I could and let them dry. For the upper part, I first
sanded on them, but realized that I'd have to sand the entire upper surface
of the stabs to keep things even so only did a bit. Then I applied filler
to the large step in order to blend it in with the upper fuselage as much
as I could. 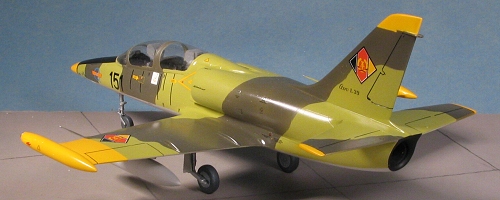 Checking to see if I'd missed anything, indeed I had. I sawed two resin
'thingies' and glued them in place on the underside (I assume they are
speed brake hinges). I also glued an antenna on the back of the upper fin.
I then realized that I'd forgotten to glue in the little square positioning
part for the nose gear. Instead, I glued it to the outside and then sanded
off the mount to where it was flush with the body, yet still had something
on which to glue the nose gear. While all that was drying, I assembled the
landing gear. These are both a bit fussy so take care when assembling them.
I found it odd that there were no open wheel well sections of any kind as
I'd have thought that there would be some openings. It seems that what we
do is pretend they are there as there are sections of gear door that we do
glue in place in the end. It is just that there are no wheel wells
provided! A rather odd oversight and really, something that takes us back
to the fifties and sixties with our Aurora kits!
Checking to see if I'd missed anything, indeed I had. I sawed two resin
'thingies' and glued them in place on the underside (I assume they are
speed brake hinges). I also glued an antenna on the back of the upper fin.
I then realized that I'd forgotten to glue in the little square positioning
part for the nose gear. Instead, I glued it to the outside and then sanded
off the mount to where it was flush with the body, yet still had something
on which to glue the nose gear. While all that was drying, I assembled the
landing gear. These are both a bit fussy so take care when assembling them.
I found it odd that there were no open wheel well sections of any kind as
I'd have thought that there would be some openings. It seems that what we
do is pretend they are there as there are sections of gear door that we do
glue in place in the end. It is just that there are no wheel wells
provided! A rather odd oversight and really, something that takes us back
to the fifties and sixties with our Aurora kits!
|
PAINT & DECALS |
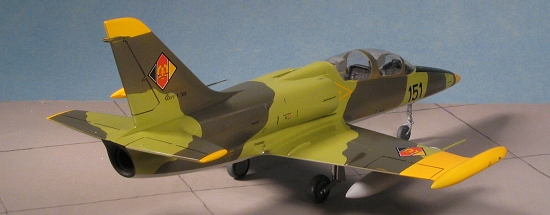
With all the bits masked, it was time to start paint. I had decided
to do the East German version. This has yellow sections on it so the first
thing I did was to paint those areas with white using my normal Floquil
Reefer White for the undercoat. When dry, I painted these areas with yellow
from some Polly Scale yellow I already had mixed.
Actually, I thought it looked pretty good!
Then I returned to the work bench to add some landing gear to it. These had
been painted aluminum so I sanded down on the mounting pins a bit and glued
them in with superglue. The nose gear had to have the hole opened up a bit.
Gluing them in was a snap and I then glued on the wheels. For the nose, I
bumped it and broke away the mount. A bit of super glue reattached it with
no foul. Much to my delight, it sat on its nose gear with no problems! The
gear doors were then glued on (yeah, a bit weird when there are no main
wheel wells). A couple of coats of clear acrylic gloss (Future) and it was
time for decals.
You know, there are times, when just finishing a kit that has a number of
errors in it is enough. You want to go back and fix all the glitches, but
you have to ask yourself several questions. Is this going to go to a
contest? Am I relatively pleased with the result so far? Is it worth all
the additional work to make it how you'd like it? In my case, that was No,
Yes, No. When dealing with kits that have been languishing uncompleted for
years, just finishing them to some sort of acceptable standard is fine. It
depends on your comfort level and I'm comfortable with doing what I have
been doing with this one.
Once the decals were on, I attached the pitot tubes and painted those with
the remnants of the paint I used for the rest of the airframe. Some
touch-up also had to be done at this time. For the tip tanks, I glued a
couple of MV lenses into the leading portion, then glued the clear domes
onto them with white glue. Then the entire airframe was given another coat
of clear gloss acrylic. These aircraft were not matte painted. As trainers,
they were kept in good condition with really high gloss finishes. Last step
was to remove the masking from the too short canopy and glue the drop tanks
in place. No painting info at all was given for these tanks so I just
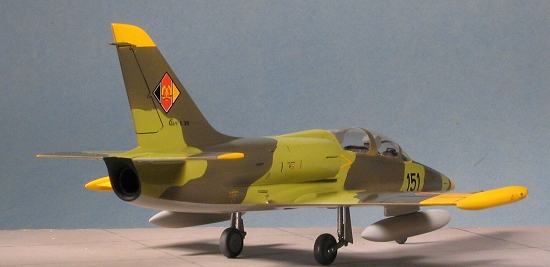
painted them in overall light aircraft grey. 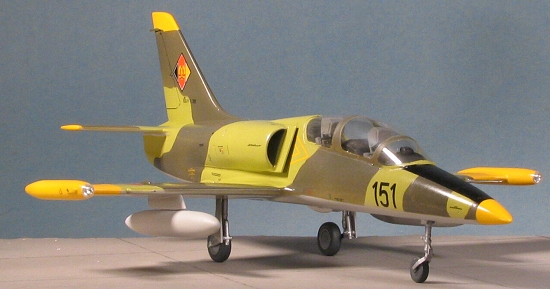 Once those areas were masked, I painted the underside with light aircraft
grey from the Humbrol line. That was masked when dry. For the upper green,
I was unable to come up with the shade that was recommended. So, taking my
FS595 fan deck, I mixed up something close using ColourCoat's Nakajima
interior green with a splash or Testors insignia yellow. Looked good in the
bottle so I sprayed it on. It darkened up more than I'd have liked, but
otherwise wasn't bad. I mixed up just enough as I ran out of paint towards
the end. For the other shade, which is standard Testors ModelMaster US Army
Olive drab, after two hours of masking, I did the usual
10 minutes of painting. Then I removed the masking from all but the nose
and painted the anti-glare panel black.
Once those areas were masked, I painted the underside with light aircraft
grey from the Humbrol line. That was masked when dry. For the upper green,
I was unable to come up with the shade that was recommended. So, taking my
FS595 fan deck, I mixed up something close using ColourCoat's Nakajima
interior green with a splash or Testors insignia yellow. Looked good in the
bottle so I sprayed it on. It darkened up more than I'd have liked, but
otherwise wasn't bad. I mixed up just enough as I ran out of paint towards
the end. For the other shade, which is standard Testors ModelMaster US Army
Olive drab, after two hours of masking, I did the usual
10 minutes of painting. Then I removed the masking from all but the nose
and painted the anti-glare panel black. Looking through my stash brought no aftermarket decals for this kit so I
was stuck with what came in the box. The decals are printed by Cartograf,
but are quite matte. There wasn't much glue on them when they released from
the backing, but with the help of Solvaset, they did snuggle down (anything
weaker did nothing). I used about a third of the available stencils as I
wasn't into spending three days applying stencil decals. During the
decaling of the kit, the aft upper fuselage seam came unglued. After
considering re-gluing and repainting the area, I decided to leave it as it
was.
Looking through my stash brought no aftermarket decals for this kit so I
was stuck with what came in the box. The decals are printed by Cartograf,
but are quite matte. There wasn't much glue on them when they released from
the backing, but with the help of Solvaset, they did snuggle down (anything
weaker did nothing). I used about a third of the available stencils as I
wasn't into spending three days applying stencil decals. During the
decaling of the kit, the aft upper fuselage seam came unglued. After
considering re-gluing and repainting the area, I decided to leave it as it
was.
|
CONCLUSIONS |
 I always feel a bit of accomplishment when I finish
long-dormant projects. It is sort of like making good on a promise long
forgotten. One thing for sure, I know why I've not seen many of these
built. It is not one of MPM's better efforts and even experienced
modelers will have their moments with this one. However, as I generally say
after every difficult model, the end result is something that few others
will have done. I'll add it to my small group of 1/48 trainers and put it
between the Czech Model T-34C and Premiere Hawk. It will be in good
company.
I always feel a bit of accomplishment when I finish
long-dormant projects. It is sort of like making good on a promise long
forgotten. One thing for sure, I know why I've not seen many of these
built. It is not one of MPM's better efforts and even experienced
modelers will have their moments with this one. However, as I generally say
after every difficult model, the end result is something that few others
will have done. I'll add it to my small group of 1/48 trainers and put it
between the Czech Model T-34C and Premiere Hawk. It will be in good
company.
Additional note. I've been told that the L-39 has bare aluminum covers that fill the main wheel wells when the gear is down so what has been depicted is normal (other than the fact that I've not painted them the right color).
Review kit courtesy of me and my wallet!
March 2005
#1356 in a series.
Copyright ModelingMadness.com. All rights reserved. No reproduction in part or in whole without express permission from the editor.
If you would like your product reviewed fairly and fairly quickly, please contact the editor or see other details in the Note to Contributors. 2015