| KIT #: | 07392 |
| PRICE: | 3360 yen |
| DECALS: | Two options |
| REVIEWER: | Scott Van Aken |
| NOTES: | 2014 limited edition |
| HISTORY |
To upgrade the Phantom fleet the JASDF planned the F-4EJ Kai (Japanese for "modified") program. This involved 110 aircraft, later reduced to 96, which were upgraded with APG-66 radar, ground attack capabilities and most importantly, ASM-1 or ASM-2 anti-ship missiles (two mounted under the wings). This boosted their capabilities in the anti-shipping role; filling in for the indigenous Mitsubishi F-1s which were too few in number and lacked range, and the P-3Cs which were too slow, even if well-armed with Harpoon missiles. The F-4EJ Kai upgrade added several other air-to-surface weapons to the F-4, including bombs and rockets.
 RF-4Es were upgraded to RF-4
Kai standard with AN/APQ-172
TFR radar, and the J/APR-2 RWR was replaced with the J/APR-5; both
Japanese-designed systems. Seventeen F-4EJs were also converted to RF-4EJ
configuration, which, while mounting no internal cameras, carried podded
reconnaissance equipment. Among the systems installed were TACER (electronic
reconnaissance pod with datalink), TAC (pod with KS-135A and KS-95B cameras),
D-500UR IR detection system, and the LOROP pod (with a KS-146B camera).
RF-4Es were upgraded to RF-4
Kai standard with AN/APQ-172
TFR radar, and the J/APR-2 RWR was replaced with the J/APR-5; both
Japanese-designed systems. Seventeen F-4EJs were also converted to RF-4EJ
configuration, which, while mounting no internal cameras, carried podded
reconnaissance equipment. Among the systems installed were TACER (electronic
reconnaissance pod with datalink), TAC (pod with KS-135A and KS-95B cameras),
D-500UR IR detection system, and the LOROP pod (with a KS-146B camera).
The F-4EJ Kai first flew on 17 July 1984, and first F-4EJ Kai was delivered on 24 November 1989 to the JASDF 306th Squadron. It was fitted the smaller and more lightweight AN/APG-66J pulse Doppler radar and a heads-up display resulting in a lookdown/shootdown capability. The central computer was updated, as well as the J/APR-6 homing and warning system, IFF system and the inertial navigation unit.
The first F-4EJ Kai aircraft were delivered to the 306 Hikōtai at Komatsu, but within a few years they were replaced by F-15Js. In April 1994 the F-4 strength was reduced to four squadrons: 8 (Misawa), 301 (Nyutabaru), 302 ((Hyakuri), and 306 (Naha, Okinawa). The 501st at that time operated the RF-4EJ. Over time the F-4s and F-1s are being replaced with the newer Mitsubishi F-2, an enlarged development of the F-16 developed jointly with Lockheed Martin.
| THE KIT |
One can always count on Hasegawa to reissue kits with new decals and sometimes resin bits in their limited edition series. This kit is their F-4EJ kai variant which differs from the standard F-4EJ and the US F-4E by fin mounted antennas and a few other minor areas. This kit has different fuselage halves to take these differences into account.
This is not a raised panel line kit as is their F-4C/D and the original boxing of the F-4J. Nor is it a mixed raised/engraved kit as was their RF-4B, but the most recent big Phantom tooling with all engraved panel lines. Those who have built any Hasegawa Phantom kit in this scale will find it very familiar. It has a nicely appointed interior that is designed for the two pilot figures, hence rather plain bang seats. The cockpit tub has control sticks fore and aft along with instrument panels. There are decals for these panels and raised detail on both the instrument panel and side consoles. A nose gear well fits under the cockpit floor and this is in turn trapped between the two fuselage halves.
 One then adds the nose and the intake sections. Historically
the fit of the intakes takes a bit of filler, at least it does for me. The wing
is a full lower section with separate upper wing halves. One will need to remove
the little bumps on the center upper wing as the F-4E does not have the beefed
up landing gear joints of the USN variants.
One then adds the nose and the intake sections. Historically
the fit of the intakes takes a bit of filler, at least it does for me. The wing
is a full lower section with separate upper wing halves. One will need to remove
the little bumps on the center upper wing as the F-4E does not have the beefed
up landing gear joints of the USN variants.
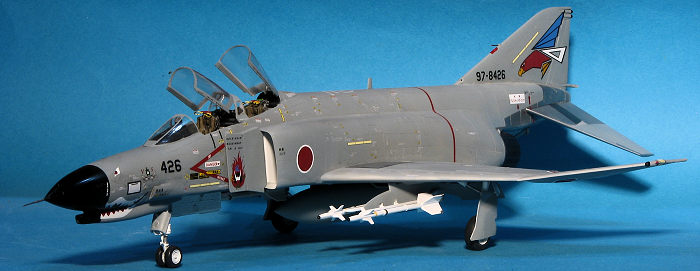
The kit provides nicely detailed landing gear with all the proper struts and scissors. The speed brakes can be displayed lowered and it was not unusual to see these deployed when the plane was on the ramp. There are the usual inserts for the area that holds the catapult strop on the Navy versions and the small ESM bumps on the lower wing will need to be removed.
A multi-piece cockpit canopy assembly is provided with separate canopies which can be posed up or down as you wish. A boarding ladder is provided. For things under wings you have an F-15 style centerline tank and two wing tanks. Inner pylons are supplied for the Sidewinders. Unlike many Hasegawa kits, this one comes with both Sparrows and Sidewinders. A set of anti-shipping weapons would have been appropriate for this boxing and perhaps you can get those separately.
Markings are provided for two planes from 8 Squadron in the early 2000s. The scheme is two blues as used on the JASDF's F-2s, which makes for a relatively dark airplane. The very long decal sheet has more stencils than you can shake a stick at. Fortunately, Hasegawa provides these in groupings, making it a bit easier to apply them. The decals are nicely done and will work as well as aftermarket.
| CONSTRUCTION |
Considering that the F-4E was the variant built in the largest numbers and the type that stayed in service the longest, it is surprising that modern kit makers have so far concentrated on the earlier versions.
If you have built any of their 1/72 Phantom II kits, then much of this will be familiar. This particular molding is mostly from their F-4J kit and so there are bits and pieces that will need modified. For instance, there larger upper wing bumps that are there for the beefier landing gear supports in the F-4J are not there on the E so need to be removed. Same for the four small antennas on the underside of the wing. These were first cut with a pair of sprue cutters, then sanded flush and the panel lines restored. I then put in the forward lower wing inserts as the E does not need catapult strop attachments. The nose was glued as was the gun muzzle brake and the drop tanks. Hasegawa has the holes open for all the pylons so if not using one, they will need to be plugged.
 I also started assembling the seats. I had considered aftermarket, but have a
set of Eduard harnesses just for the F-4 seat so am going to use those later on
in the build. I then painted a lot of white bits including intakes, landing gear
and gear doors as well as the interior, which was painted with dark gull grey.
Eventually, I managed to paint and then assemble all the interior bits save for
the seats. Naturally, a lot of artistic license was taken with the
instrument/console colors. Modern military panels are generally all black with
perhaps grey knobs unless one hits the 'lamp test' button. Yet we modelers will
paint all sorts of colors in them.
I also started assembling the seats. I had considered aftermarket, but have a
set of Eduard harnesses just for the F-4 seat so am going to use those later on
in the build. I then painted a lot of white bits including intakes, landing gear
and gear doors as well as the interior, which was painted with dark gull grey.
Eventually, I managed to paint and then assemble all the interior bits save for
the seats. Naturally, a lot of artistic license was taken with the
instrument/console colors. Modern military panels are generally all black with
perhaps grey knobs unless one hits the 'lamp test' button. Yet we modelers will
paint all sorts of colors in them.
With that together, the nose gear well was glued to the underside of the cockpit and then this assembly was trapped in the fuselage halves. No nose weight is required for Phantoms. I then glued on the lower nose intakes and sanded those to shape. The gun muzzle was attached along with an insert that fits on the side of the forward fuselage. After painting the intake bits white on the inside, these were glued on. As usual they required some modeling skills to be a smooth fit. I then filled in the old gun sight indentation on the anti-glare panel and when done, tried to assemble the replacement gun sight. I made a real mess of it, but have learned for the next time I have to do this. The wings were then glued on and the usual filler was applied at the lower forward section as well as just aft of the wings.
| COLORS & MARKINGS |
 The canopy sections were masked and the windscreen piece along with the
small center section were glued in place. The forward and aft canopy were
simply tacked on with clear paint as I wanted to remove them after painting
to have them open. The little center piece on my kit seemed to be warped as
I ended up having to super glue it in place. The aft metallic bits were then
masked off and the airframe was given an initial coat of paint.
The canopy sections were masked and the windscreen piece along with the
small center section were glued in place. The forward and aft canopy were
simply tacked on with clear paint as I wanted to remove them after painting
to have them open. The little center piece on my kit seemed to be warped as
I ended up having to super glue it in place. The aft metallic bits were then
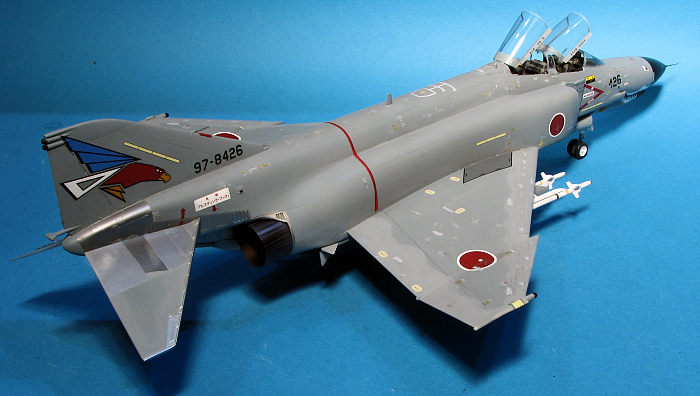
masked off and the airframe was given an initial coat of paint. 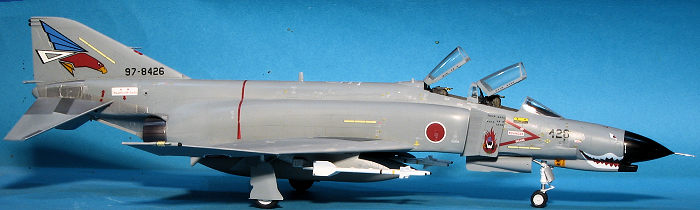 As is my norm, I installed the landing gear, especially because there are a
lot of markings for the underside. Planes like this always have a ton of
stencils and that usually takes me a couple of weeks to do that task. As a
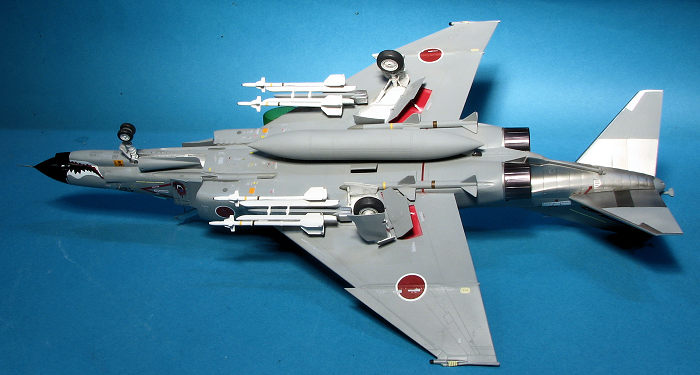
note, Phantom main landing gear should be canted slightly inward and not
straight down. Then began the long task of applying markings. The decal
sheet I used, DXM 41-4219 is superbly printed and the markings went on
without any issues. The instruction sheet indicated that all the special
markings should be applied prior to putting on the various stencils, so that
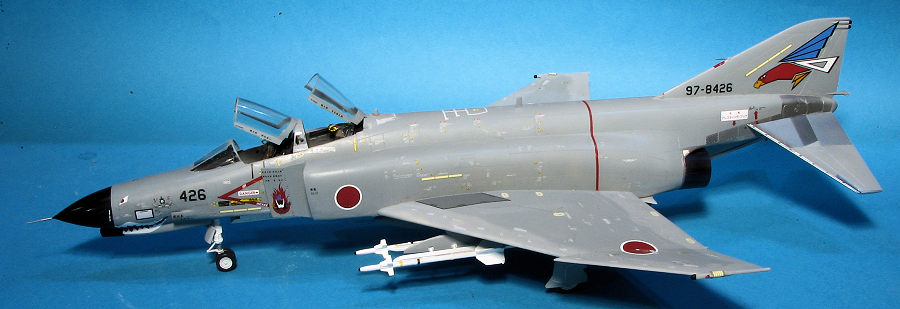
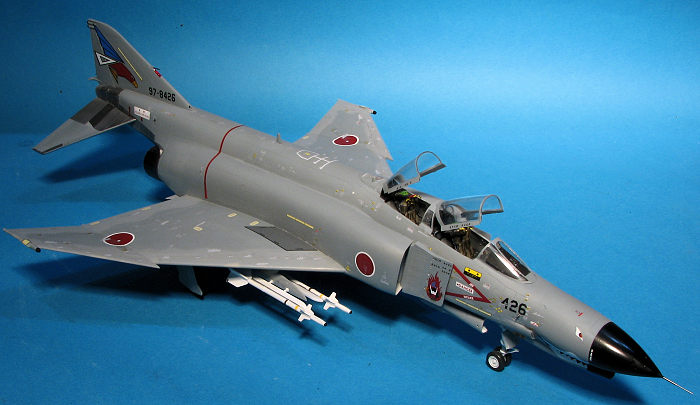
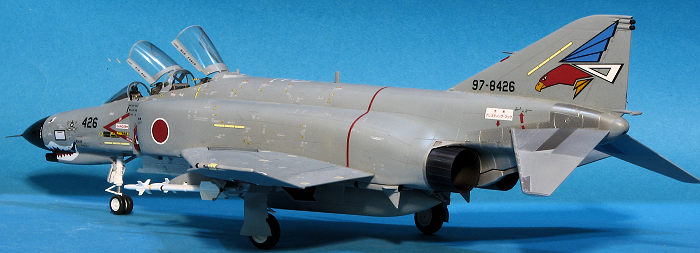
was done first. I chose one of the 302 Squadron markings as I've always
liked that scheme and the unit is one of the longest running Phantom
operators in Japan, first flying the type in 1974. After getting underway
with the aftermarket decals, I started to apply the huge number of stencils.
Fortunately, a lot of these are connected into one decal. The largest of
them fits on the underside. In hindsight, I should have cut this into mor
manageable sections as I totally messed it up as it folded up on itself in
several places and became useless. After that debacle, I lost interest and it sat in the box for several years.
As is my norm, I installed the landing gear, especially because there are a
lot of markings for the underside. Planes like this always have a ton of
stencils and that usually takes me a couple of weeks to do that task. As a
note, Phantom main landing gear should be canted slightly inward and not
straight down. Then began the long task of applying markings. The decal
sheet I used, DXM 41-4219 is superbly printed and the markings went on
without any issues. The instruction sheet indicated that all the special
markings should be applied prior to putting on the various stencils, so that
was done first. I chose one of the 302 Squadron markings as I've always
liked that scheme and the unit is one of the longest running Phantom
operators in Japan, first flying the type in 1974. After getting underway
with the aftermarket decals, I started to apply the huge number of stencils.
Fortunately, a lot of these are connected into one decal. The largest of
them fits on the underside. In hindsight, I should have cut this into mor
manageable sections as I totally messed it up as it folded up on itself in
several places and became useless. After that debacle, I lost interest and it sat in the box for several years.
 After 8 years of gathering dust and dead bugs, I resurrected the project.
The kit was cleaned up and I took stock of what was done and what needed to
be finished. The upper antenna and fuel dump had broken away but were
salvageable. The main landing gear legs had warped somewhat due to weight
being on the kit for so many years. Still, everything I needed was there.
After 8 years of gathering dust and dead bugs, I resurrected the project.
The kit was cleaned up and I took stock of what was done and what needed to
be finished. The upper antenna and fuel dump had broken away but were
salvageable. The main landing gear legs had warped somewhat due to weight
being on the kit for so many years. Still, everything I needed was there.
| CONCLUSIONS |
It is good to get another model off the shelf of doom. There are still quite a few there and I only hope I can shrink the pile as time goes on. This one shouldn't have taken that long as it is a fairly nice, though now somewhat dated, kit. It is interesting to note that of all the 1/48 F-4 kits out there, I've only built ESCI, Monogram, and Hasegawa ones. Hopefully the next one won't take 8 years to complete. Hasegawa's offering still make into very nice models and can often be found and a decent discount.
| REFERENCES |
http://en.wikipedia.org/wiki/McDonnell_Douglas_F-4_Phantom_II_non-U.S._operators
11 November 2022
Copyright ModelingMadness.com. All rights reserved. No reproduction in
part or in whole without express permission from the editor.
Thanks to
www.hlj.com
for the review kit. If you would like your product reviewed fairly and fairly quickly, please
contact
the editor or see other details in the
Note to
Contributors.