Premier 1/48 Hawk T.1A
Kit Number: 3101
Price: $1.99 on deep discount
Decals : Two low viz grey schemes
Date of Review: 30 March, 1996
Comments: When Premier first announced their 1/48 Hawk T.1, I could hardly wait for it to be offered at a discount. I am basically a cheap modeler, so I am more than happy to wait a while before grabbing on the latest and greatest. Well, after about a year of waiting, I noticed the Squadron had them for a mere $1.99!! Needless to say, I grabbed several thinking I had made the bargain of the century.
When I breathlessly opened the box, I began to see why they were so cheap. The moldings were adequate in that they conveyed the shape well and had some engraved panel lines on it. The under wing accessories were not the crisp details one expects from Hasegawa, but since this is Premier (often called Frog reincarnated), it was what I had expected. What really grabbed my eye was that the fuselage came in four parts; two fore and two aft. Generally, I do not like this method of molding fuselages as it adds another place for alignment problems, but careful building prevented me from having a big problem. The decal sheet had sufficient markings for two aircraft, one for 151 SQ in LV greys and another with no unit marks, but a different scheme of grey. The decals proved to be pretty poor and are best discarded.
 On to the construction. The interior is basic and could do with a
nice set of replacement bang seats. The other bits are OK, but again, a brass
detail set would be of major help as the Hawk has a nice, clear canopy to show
off any detail work. Once the interior is set in the front fuselage, it is time
to pack the nose with weight as you'll need it. The aft fuselage was assembled
and it was then time to mate the two. Grab the putty as the gap that is left
will need a lot of filler. My example proved to be shorter on one side than the
other so I added a shim of sprue to even things out.
On to the construction. The interior is basic and could do with a
nice set of replacement bang seats. The other bits are OK, but again, a brass
detail set would be of major help as the Hawk has a nice, clear canopy to show
off any detail work. Once the interior is set in the front fuselage, it is time
to pack the nose with weight as you'll need it. The aft fuselage was assembled
and it was then time to mate the two. Grab the putty as the gap that is left
will need a lot of filler. My example proved to be shorter on one side than the
other so I added a shim of sprue to even things out.
Once the fuselage is built, it was time for the wings. They fit together well, but unfortunately, the panel lines do not match from top to bottom. You can live with it or try to fix it, your choice. The wheel wells have no detail and are open at the top. You can fix them if you want. I'm lazy and left them. While the wings were drying, I got the intakes attached to the fuselage and, with my usual mass of putty, got them smoothed into the fuselage. Then it was time to attach the ventral fins which come as one piece and fit in a slot in the lower fuselage. Again, grab the putty as the fin piece is a bit smaller than the hole it has to fill.
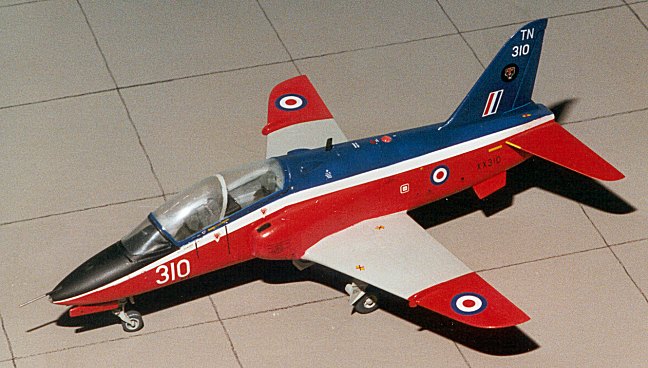
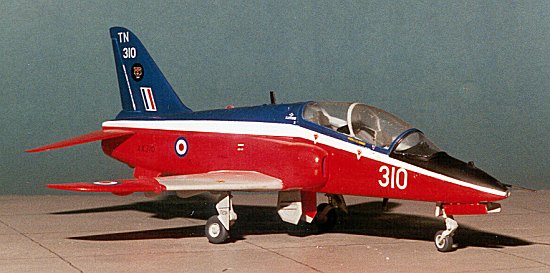
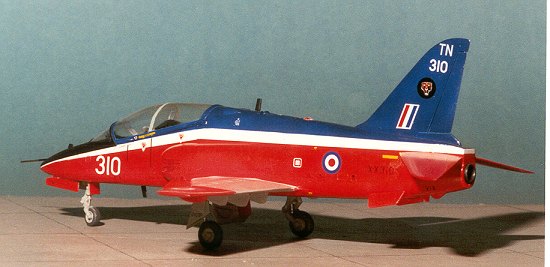
It is then time to attach the wings. The fit was pretty good with no major hassles. It did leave a large gap on the bottom at the front and rear so had to have several putty applications before the multiple contours were finally smoothed out on the front side. The nice, clear canopy was then attached and it was time to paint. I think the red, white, and blue 'raspberry ripple' scheme is the best of the five schemes the Hawk has carried with the RAF. Fortunately, Xtradecal has a sheet for this scheme and it is of XX 310 of 4 FTS. This scheme requires a lot of masking. First the entire airframe is painted white. Then the white cheat line is masked off. Then the light aircraft grey of the wings is painted and masked when dry. Next comes the Post Office Red for the wing tips and lower fuselage. When that is dry, it is masked off and the Roundel Blue of the upper fuselage is painted. The last thing to be painted is the black anti-glare panel. Painting took longer than the actual building of the kit!
 One needs to save applying the flap hinges until after painting as
they do interfere with masking. The wing fence was not a problem. Just before
the painting was completed, I got a slide of XX 310 with 74 Sq. The only
difference between this and the 4FTS bird was the squadron badge on the tail and
the addition of squadron codes. I grabbed the tiger badge from a Modeldecal
sheet for the Lightning T.5 and the codes came from another Modeldecal sheet.
The Xtradecals are really well done and are highly recommended. One last
thing; the hole for the nose pitot tube was much larger than the accompanying
part so was replaced by telescoping pieces of stainless tubing. Adds a lot. I
also replaced the kiddie wheels with white metal ones from Aeroclub.
One needs to save applying the flap hinges until after painting as
they do interfere with masking. The wing fence was not a problem. Just before
the painting was completed, I got a slide of XX 310 with 74 Sq. The only
difference between this and the 4FTS bird was the squadron badge on the tail and
the addition of squadron codes. I grabbed the tiger badge from a Modeldecal
sheet for the Lightning T.5 and the codes came from another Modeldecal sheet.
The Xtradecals are really well done and are highly recommended. One last
thing; the hole for the nose pitot tube was much larger than the accompanying
part so was replaced by telescoping pieces of stainless tubing. Adds a lot. I
also replaced the kiddie wheels with white metal ones from Aeroclub.
Would I recommend the kit? Well, as of this writing, it is the only 1/48 Hawk in town. It was also not difficult to build, but you need to be ready to putty quite a bit. The finished product looks great, and that I attribute to the color scheme more than anything else. This is one of those kits that super-detailers will love.
Copyright ModelingMadness.com. All rights reserved. No reproduction in part
or in whole without express permission from the editor.
Back to Reviews
Page 2015