Airfix 1/72 Hawk T.1 'RAF Benevolent Fund'
| KIT #: | A50155 |
| PRICE: | $19.99 SRP |
| DECALS: | One option |
| REVIEWER: | Scott Van Aken |
| NOTES: | Kit includes paint, glue and brushes |
| HISTORY |
The Hawk entered RAF service in April 1976, replacing the Folland Gnat and Hawker Hunter in the advanced training and weapons training roles respectively. The Hawk T1 ("Trainer Mark 1") was the original version used by the RAF, deliveries commencing in November 1976, with 176 being ordered.
From 1983 to 1986, some Hawks were equipped as the
short-range interceptor aircraft for point defence. 88 T1s were modified to
carry two AIM-9L Sidewinder air-to-air missiles (AAMs) in addition to the
centreline gun pod carrying a single 30 mm ADEN cannon. These aircraft were
designated Hawk T1A. In the event of war, they would have worked in
collaboration with Tornado F3 aircraft, which would use their Foxhunter search
radars to vector the radarless Hawks against enemy targets. Such missions would
have been flown by
 instructor pilots. Conversions were completed in 1986. With
the fall of the Soviet Union and the end of the Cold War, RAF Hawks are no
longer tasked with this role. Hawks were used also as "aggressors", simulating
air combat with Tornado ADVs.
instructor pilots. Conversions were completed in 1986. With
the fall of the Soviet Union and the end of the Cold War, RAF Hawks are no
longer tasked with this role. Hawks were used also as "aggressors", simulating
air combat with Tornado ADVs.
The most famous RAF operator of the Hawk is the Red Arrows aerobatic team, which adopted the plane in 1979.
The Hawk subsequently replaced the English Electric Canberra in the target towing role.
The Royal Navy acquired a dozen Hawk T1/1As from the RAF, for use as aerial targets for the training of ships' gunners and radar operators.
Eighty Hawk T1/1A aircraft have been upgraded under the Fuselage Replacement Programme (FRP), which involves the replacement of the aft, centre and rear fuselage sections, using new build sections derived from the Mk. 60.
In 2009, the RAF began receiving the first Hawk T2 aircraft, which will replace the T1 in the advanced trainer role.
| THE KIT |
There is just something about the Hawk that looks right; at least the initial production versions before they started tacking on all that stuff to the nose and tail. Typical of the latest batch of Airfix new molds, the engraved detail, which is really quite good, seems to be a bit much, especially when compared to the Japanese and even newer Czech releases. However, few have really found that to be a deal breaker.
Prior to this kit, there have been older, raised panel line
kits of this plane by Airfix and Matchbox when the plane first came out. Later,
Fujimi and Italeri produced kits, though the Fujimi one had the wing fences in
the wrong location, and the Italeri kit was fiddly. Now we h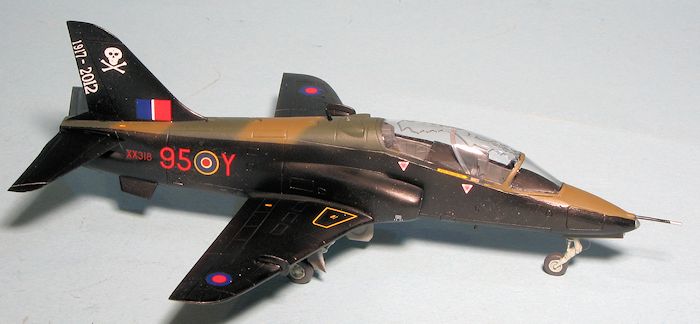 ave a new 21st
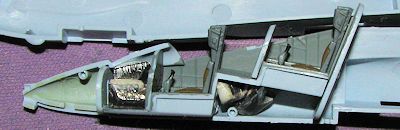
century mold. This one has a nice, though somewhat basic cockpit with decals for
the instruments and a pair of crew members to help hide the bare seats.
ave a new 21st
century mold. This one has a nice, though somewhat basic cockpit with decals for
the instruments and a pair of crew members to help hide the bare seats.
There are nicely done landing gear with complete wells. The nose gear is attached when the fuselage halves are cemented together, increasing the opportunity to break it during construction, though to be frank, it is a rather sturdy piece. The two piece canopy includes the blast shield, something missed in some other kits. Like other kits, it has it attached to the canopy. All of the gear doors and the speed brake can be posed up or down as one wishes, though there is no in flight display stand. For stuff to put under the plane there is a gun pod, and either tanks or Sidewinders, the latter of which are nicely molded. Thankfully, Airfix have not pre-opened these attachment holes so one can build a clean airframe. I see a smoke tank on the sprues so (no surprise) a Red Arrows boxing is also offered. There are also bits on there that are apparently for the T.2 version and so not appropriate for this variant.
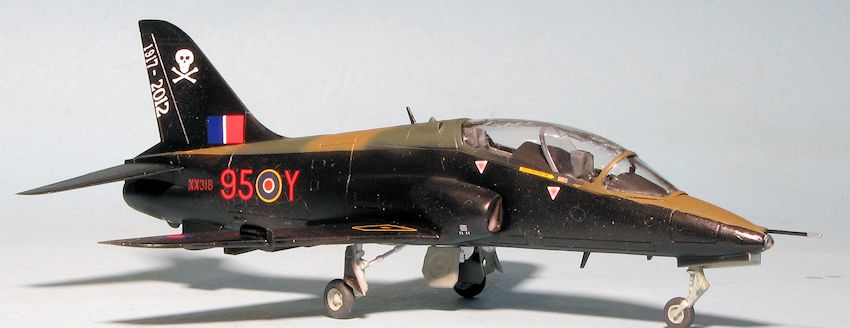
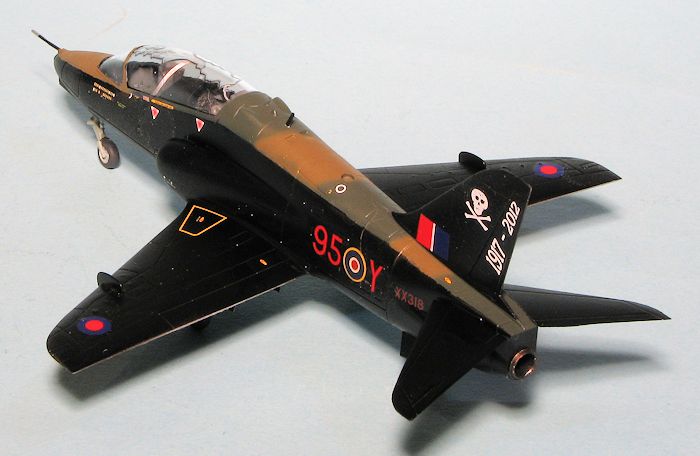
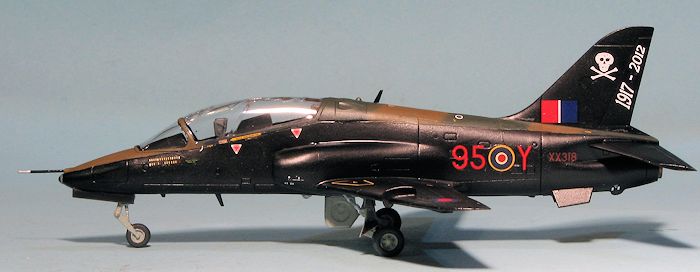
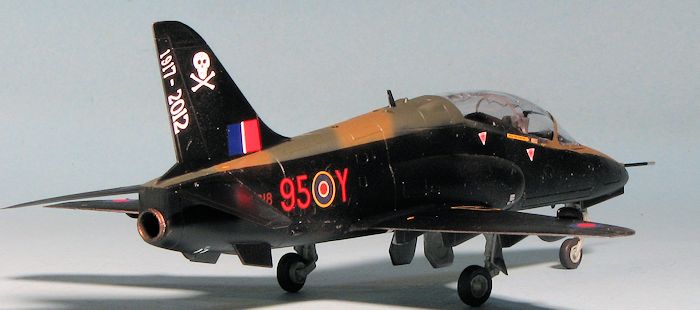
This is a special boxing of the Hawk T.1 with glue, brushes and paint included. The box is end opening but has a tray in it, similar to the much disliked Testors boxes of the 1980s. As part of this special boxing, part of the proceeds of the cost of the kit goes to the fund. As such, there is just a single markings option and that is for the 2012 specially painted plane. The decals are nicely done and in my experience will work with most setting solutions.
| CONSTRUCTION |
This isn't a brand new kit, but is fairly new and since I've always like the
Hawk, I decided to go ahead and build one. The first step for me was to paint
all the interior bits with dark gull grey. I used a brush for this and for
painting the wheel wells, interior gear doors and landing gear with light
aircraft grey. Actually, Airfix offers
 this interior grey as one of the acrylic
colors that come with the kit. I did a test bit with it and it is a bit lighter
than the Testors grey I used. Dries quickly, though. Anyway I also painted the
seats with dark sea grey and did the cushions in Vallejo's British Uniform
color. Once the instrument panels had dried, the instrument decals were applied.
this interior grey as one of the acrylic
colors that come with the kit. I did a test bit with it and it is a bit lighter
than the Testors grey I used. Dries quickly, though. Anyway I also painted the
seats with dark sea grey and did the cushions in Vallejo's British Uniform
color. Once the instrument panels had dried, the instrument decals were applied.
With all those bits being painted and drying, I glued the wings together. Fit
is quite good. The interior was then built up. During this time I discovered
that I'd placed the instrument decals too low on the panels. Fit them more near
the top or you'll cut off the side bits. Actually, you won't see much of them
once everything is buttoned up, but if someone aims a flashlight in there, it
will be obvious they are too low. The control sticks were glued in, followed by
the front and rear bulkheads. Then the seats. The interior was glued in and
 when dry, I cut up sections of
weight. The instructions state 5 grams to fit into the small area forward of the
front instrument panel, but I couldn't get it all to fit so added another gram
or two and placed that under the rear seat section.
when dry, I cut up sections of
weight. The instructions state 5 grams to fit into the small area forward of the
front instrument panel, but I couldn't get it all to fit so added another gram
or two and placed that under the rear seat section.
I taped the fuselage halves together while the interior dried and tried to install the nose gear through the gear opening. It won't work so you need to glue on the nose gear to the forward bulkhead before cementing the fuselage halves. Personally, I don't like gear hanging down when I have to fill seams, but there is no other option on this one.
With the halves together, there was the usual fit of filling and sanding.
Probably because I'm a sloppy builder, I had to do the filler and s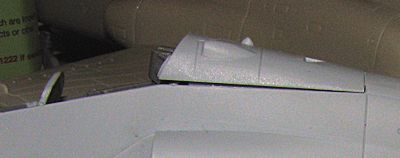 anding
thing with every seam. Sometimes twice. The intakes are a fair fit. However, the
upper fuselage section behind the cockpit will not properly fit. This is because
the rear bulkhead is too tall. This needs to be sanded down to get this insert
to fit flush. I then installed the wing and found it had not only some
goodly gaps at the lower forward join, but also had a pretty large step. Rear
fit quite well.
anding
thing with every seam. Sometimes twice. The intakes are a fair fit. However, the
upper fuselage section behind the cockpit will not properly fit. This is because
the rear bulkhead is too tall. This needs to be sanded down to get this insert
to fit flush. I then installed the wing and found it had not only some
goodly gaps at the lower forward join, but also had a pretty large step. Rear
fit quite well.
After the usual rounds of filler, I attached the rear speed brake piece in
the closed position. It was a rather tight fit. Next were the flap hinges. I
checked the decal sheet I am using to be sure these would not interfere with the
lower fuselage markings before installation. The ventral stabs were next. These
are very loose fitting and leave some rather large gaps at the back. Returning
to the c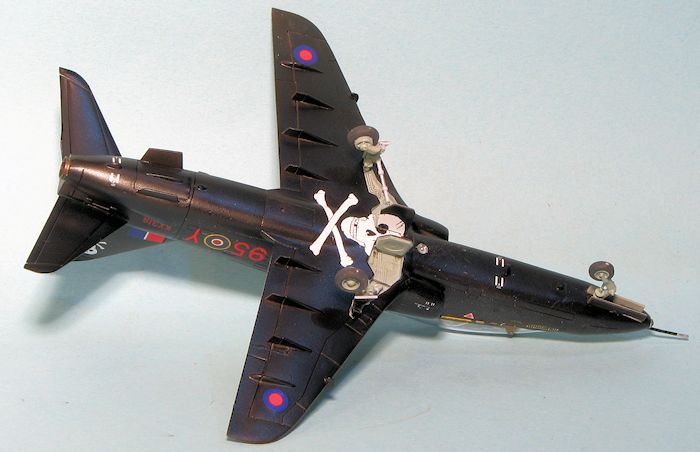 ockpit, I glued in the rear seat instrument panel anti-glare shield.
Like the section aft of the cockpit, it did not fit without trimming on the
instrument panel and this includes parts going down the outer sides of the
panel. Not sure why these panels were not a good fit as you'd have thought that
the kit would have been test built prior to full production. I would put it down
to my goofing something up, but it was the same on another kit I was building.
ockpit, I glued in the rear seat instrument panel anti-glare shield.
Like the section aft of the cockpit, it did not fit without trimming on the
instrument panel and this includes parts going down the outer sides of the
panel. Not sure why these panels were not a good fit as you'd have thought that
the kit would have been test built prior to full production. I would put it down
to my goofing something up, but it was the same on another kit I was building.
The next step was to install the major clear bits. This meant the blast shield and the canopy. It is a one piece canopy and the fit of both is really quite good. The canopy was then masked, a simple process as it only has two large clear panels. The next major bit were the horizontal stabs. Once these were on, it was a good time to think about painting.
| COLORS & MARKINGS |
 1943
until 1946 when they converted to Lincolns. Interestingly, before flying Lancasters, they flew Vildebeests out of Malaya, losing most of their
aircraft on attacks against the Japanese early in the Pacific war.
1943
until 1946 when they converted to Lincolns. Interestingly, before flying Lancasters, they flew Vildebeests out of Malaya, losing most of their
aircraft on attacks against the Japanese early in the Pacific war.| FINAL BITS |
Time for the decals and I used the same sheet I used
for the previous T.2 kit, Xtradecal 72-156. This time I did not have all the
markings available to me on the sheet so used quite a few kit decals to make
things look busy. One issue I did have was that the roundels for the fuselage
were off register. Fortunately, I had a
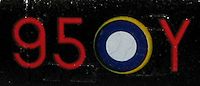 Modeldecal
sheet that included the proper 18 inch roundels so used those atop it. However,
the proportions of the roundel was different between the two sheets so I had to
use the deeper red center section from the Modeldecal sheet as the Xtradecal one
completely covered the white area.
Modeldecal
sheet that included the proper 18 inch roundels so used those atop it. However,
the proportions of the roundel was different between the two sheets so I had to
use the deeper red center section from the Modeldecal sheet as the Xtradecal one
completely covered the white area.
 With the
decals in place, I started adding on the final bits. This included the main
wheels, antennas, pitot tube and the nose and main gear doors. A coat of semi
matte clear was then sprayed on to seal the decals and to cut down on the shine.
I know these planes are a gloss black, but having them a bit more matte makes
them a lot easier to photograph. Then the nose landing light lens and the
exhaust pieces were installed, the masking removed from the canopy bits and the
project was done.
With the
decals in place, I started adding on the final bits. This included the main
wheels, antennas, pitot tube and the nose and main gear doors. A coat of semi
matte clear was then sprayed on to seal the decals and to cut down on the shine.
I know these planes are a gloss black, but having them a bit more matte makes
them a lot easier to photograph. Then the nose landing light lens and the
exhaust pieces were installed, the masking removed from the canopy bits and the
project was done.
| CONCLUSIONS |
Airfix has a real winner in its Hawk kits. If you have the Italeri or Fujimi kits, then by all means build them as they are nice kits, but if you want a kit that goes together well, and is relatively inexpensive, then you need to add the Airfix version to your list.
| REFERENCES |
http://en.wikipedia.org/wiki/BAE_Hawk
May 2014
Thanks to
me and a sale for this one.
If you would like your product reviewed fairly and fairly quickly, please contact the editor or see other details in the Note to Contributors.