| KIT #: | 02484 |
| PRICE: | $33.10 from www.greatmodels.com ($38.95 SRP) |
| DECALS: | 14 options (all Red Arrows) |
| REVIEWER: | Scott Van Aken |
| NOTES: | New tool kit. Xtradecal X32027 and X32038. Scale Aircraft Conversions 32050 |
| HISTORY |
The Hawk is a tandem two-seat aircraft and has a low-mounted cantilever monoplane wing and is powered by a non-augmented turbofan engine. The low-positioned one-piece wing was designed to allow a wide landing gear track and to enable easier maintenance access. The wing is fitted with wide-span, double-slotted, trailing-edge flaps for low-speed performance. Integral to the wing is 836 litre (184 imp gal) fuel tank and room for the retractable main landing gear legs. Designed to take a +8/-4 g load, the original requirement was for two stores hardpoints but it was designed to fit four hardpoints by Hawker Siddeley.
The fuselage design was led by the need to get a height differential between the two tandem cockpits; this enabled increased visibility for the instructor in the rear seat. Each cockpit is fitted with a Martin-Baker Mk 10B zero-zero rocket-assisted ejection seat. The centre fuselage has an 823-litre (181 imp gal) flexible fuel tank. The two-shaft turbofan Rolls-Royce Turbomeca Adour engine is fitted in the rear-fuselage with inlets on each side above the forward wing roots. A ram air turbine is fitted just in front of 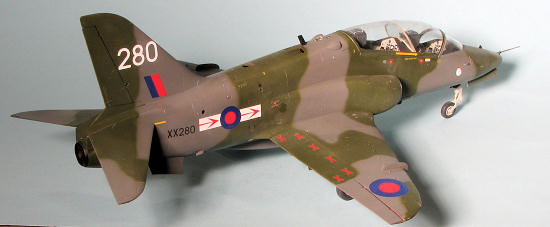 the single fin as well as a gas turbine auxiliary power unit above the engine. The forward retracting landing gear leg is fitted in the nose.
The Hawk was designed to be manoeuvrable and can reach Mach 0.88 in level flight and Mach 1.15 in a dive, thus allowing trainees to experience transonic flight before advancing to a supersonic trainer. Its airframe is very durable and strong, stressed for +9 g but the normal limit in RAF service is +7.5/-4 g.
The Hawk is designed to carry a centreline gun pod (normally a 30 mm ADEN cannon) and two under-wing pylons. Most Hawks use the two hardpoints but the aircraft is designed to carry four. The RAF has used the under-wing pylons to carry Sidewinder air-to-air missiles.
The Hawk is still in production with over 900 Hawks sold to 18 customers around the world. 80 of the original 178 T.1 fleet have been overhauled with new center and aft fuselages from the T.60 series. First deliveries of the Hawk to the RAF were in late 1976, making some airframes over 35 years old. The RAF is currently taking deliveries of the much less aesthetically pleasing Hawk T.2.
| THE KIT |
Revell has become probably the most prodigious maker of 1/32 aircraft kits. Unlike some of the other more recent 1/32 kit makers, Revell seems to feel that there is merit in doing subjects that are not strictly WWII. They also do not seem to go for the myriad of variant boxings that one sees from Eduard and Dragon.
This particular kit is one that will resonate more with European modelers than those here in the US. The Hawk is pretty much British in origin, and probably one of the last all-British designed aircraft. To your reviewer's eyes, it is also one of the most fetching aircraft of the last 40 years in terms of just looking sleek and fast. 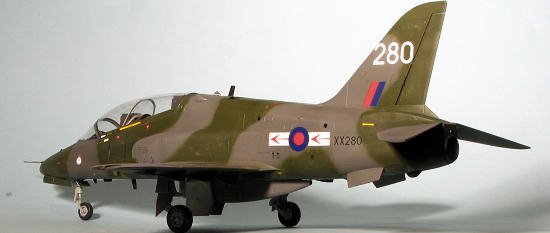 Understandably, this boxing is for the Red Arrows aircraft and it seems that there will be at least one other boxing as the kit comes with some parts that are not used (like a centerline gun pack). Molded in red plastic, the detailing on the kit is really very good indeed. Now I have to say that I wish they would have used just grey plastic on this as it makes painting other shades quite difficult. This is especially so for white as the decal sheet, comprehensive as it is, does not cover everything needing white paint.
But let us get to some of the specifics. First off, the cockpit is superbly outfitted. The seat looks right and while a resin one will have more detail, I am sure most will be pleased with the ones in the kit. There are decals for the instruments though these sections have raised detail already. Decals are also provided for the seat harnesses, something I appreciate. The canopy can be built open or closed and includes the rear seat blast shield.
Detailing in the wheel wells is excellent and properly complex looking for the scale. Landing gear and wheels are also very well molded. A full engine intake and exhaust are included with the kit with the intakes engine in an engine compressor section. The instructions suggest a light grey for gear wells, intakes, gear legs and wheels. This is correct according to the Aeroguide reference and it is light aircraft grey.
It is nice that the lower wing is in a single piece with the control surfaces as part of the upper wings. In fact, one builds up the wheel wells in the upper wing before attaching the wing sections. Though the rudder seems to be movable, all the other controlsurfaces are in the neutral position. This is typical of the type on the ground. Also typical are lowered inner gear doors. The kit has a separate speed brake that can be posed open, but this is not typical.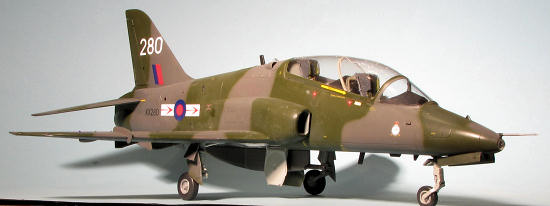 As this is a Red Arrows plane, it has the special oil tank for the centerline as well as a different rear fuselage plate that includes the nozzles for the three colors of dye that are injected into the exhaust. Parts not used are two other rear fuselage plates, the centerline gun pod and what looks to be a wing pylon. No stores of any kind nor any drop tanks are included in this boxing.
Instructions are typical Revell AG and on their semi-newsprint paper. All paint colors are Revell with only one shade needing mixed. Construction steps are very nicely done and show any colors needed during that stage. The very large decal sheet provides markings for one plane and serials for all of the Red Arrows aircraft flown during what I have to assume is the 2010 season. The white markings are quite complete and are in sections for the gear doors, which is nice. The white bits on the wing flap actuators will need to be painted as will the roundel blue section of the fin/rudder. I do hope that white is quite opaque as red and blue are a real challenge to properly cover. The decals are very nicely printed and look to be as good as any aftermarket sheet.
| CONSTRUCTION |
First thing I had to do was to get past all that red plastic. Not a favorite color of mine for plastic. I do wish that model makers would stick with light grey, but then I guess they assume that many will build this without filling seams, thus requiring a repaint anyway.
Once my fussing for that was done, I started looking for subassemblies and there are a lot of them. For instance, I glued the wheel halves together as well as the horizontal stab halves. I built up the wheel wells and assembled the landing gear. I also worked on the interior. I installed the right side bulkheads as well as the control sticks and rudder pedals. I did this at it would be easier to paint if not fully built up.
While building up the gear legs, I noticed that the parts had some gaps in difficult to reach spots (the legs are left and right halves), as well as some sink areas. I recalled that Scale Aircraft Conversions does a set for the Hawk (32050), so I pulled that out. SAC 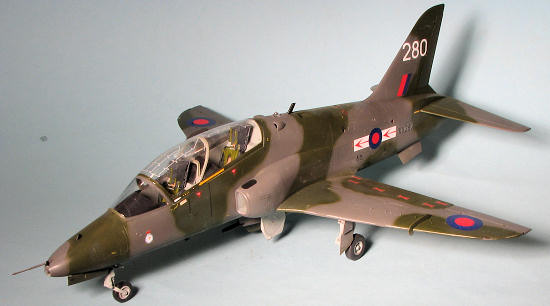 gear are not in two halves and they have already filled the sink areas prior to molding the gear. Much better. One only has to bend open the hinges and then simply squeeze them back shut once the lower fork is installed. They also filled in some ejector marks before casting. What's not to like?
I then did some major prepainting using mostly Light Aircraft Grey for all the intakes, cockpit parts and inside of gear doors. The wheel wells were painted white. This was all in accordance with information from the Aeroguide book. I used Model Master enamels for all this. The cockpit instrument panels and side consoles have decals that fit over the raised detailing and those were applied. I then glued on the control sticks and rudder pedals, painting these items as shown in the instructions as the Aeroguide book is rather devoid of cockpit information. I decided to build the seats, but wait until later in the build process to install them. Each seat is comprised of five pieces plus decals for the harness. They are well done and while resin ones will undoubtedly have greater detail, look just fine once they are painted.
Next, the three small bulkheads were glued into the nose section. Test fitting the other fuselage half after these dried, showed that there was going to be some difficulty getting things to match up. The aft sections of the intake were then cemented together. This showed that there was going to be a seam that would be difficult to fill, however, these are rather far back in the intake and so should not be visible from the outside once installed. After cementing them together, one was installed in the right body half as recommended in the instructions. This showed that the very forward end of the trunking is actually the outer lip of the intake so 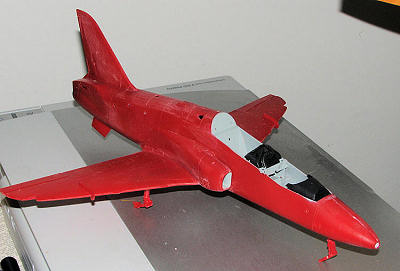 be sure to get it properly smoothed out.
Back at the paint shop, I painted a few landing gear links, did the interior of the fuselage at the nose gear well in white, painted the intake compressor aluminum and all the exhaust bits with Alclad II Jet exhaust. With the major bits done, the interior was installed and the fuselage halves cemented together. I then glued the wheel well pieces in place. Test fitting after getting these installed will save problems later. The wells were painted white, not an easy task with all that red plastic, then the wings cemented together. These were then joined to the fuselage.
Meanwhile, the intakes were then cemented in place, followed by the wings. Fit is probably quite good, but something always seems to go awry with my builds and there was a considerable amount of filling and sanding to get these areas in order. The section behind the lower intakes was particularly poor fitting. I stuck in the landing gear to be sure I had enough nose weight and it seems I do. The tail planes were then glued on.
Eventually, it was all done. The windscreen and canopy were masked off and the windscreen glued in place. I then masked off the rest of the cockpit and prepared to paint.
| COLORS & MARKINGS |
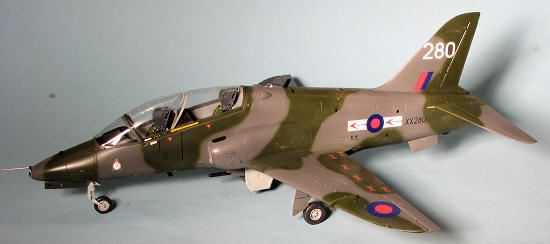 I chose to do a wraparound camouflage scheme for this one and so first painted the entire airframe with Dark Sea Grey, using Testors Model Master paints. This took several days due to the size of the airframe. I realized I had forgotten to attach the wing tip light assemblies so did that and masked them off. The seam was taken care of and then, as sometimes happens, the project stalled as I went on to work on other projects for about a month.
 | FINAL CONSTRUCTION |
I then pulled out the tissue from the wheel wells and touched up any overspray. I then installed the metal landing gear. One thing I noticed is that most of the attachment holes in the metal parts will need to be either enlarged or deepened. With that done, the gear bits were glued in. To make sure I had enough weight in there, I set it on its gear before the super glue fully dried. I then saw 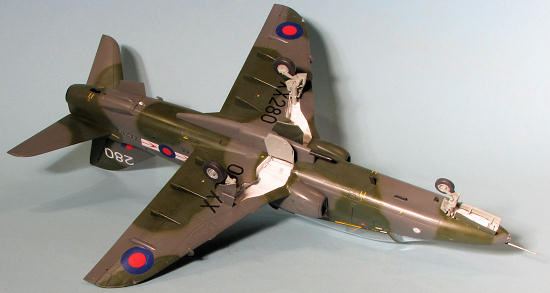 it tail sat so quickly removed the nose gear. I then cut up some small pieces of weight and pushed them into the hole behind the nose well. Thankfully that area is open. I put in enough to where tail sitting was not a major issue though it will sit back if the tail is pushed down about half way.
The wheels were then attached. I had to do some major bending on the nose wheel forks to get that to fit. It was then squeezed shut with some flat nose pliers. Then I tackled the gear doors. These fit fairly well, though I found them rather easy to knock off so many are glued more than once. I did have difficulty with the two doors that fit on each main gear leg. On the right side, I found it impossible to get them to fit flush atop each other. It turned out that this was because of the small door attachment struts, which the instructions have you glue to the main gear first. I worked around this on the left right side by cementing the doors in place first and then attaching the door struts, shortening these struts as might need be.
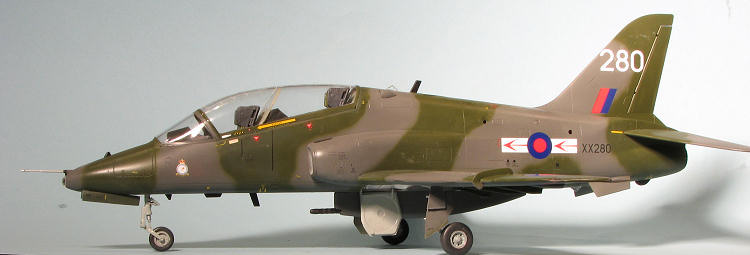
With all the doors in place, it seemed like a good time to apply decals. Now for this kit, I decided to use a couple of sets of markings from the Xtradecal range. Specifically I used setX32038 which is a stencil set, and for the unique markings, I used X32027 for early schemes, which includes the green/grey camo version. Putting on decals took well over a week. The down side of modern jets is that they have a TON of stencils and data markings. One could limit what is used, but then the model just does not look quite right. I did find on the stencil sheet that a coupld of stencils were mis-numbered in the instructions, but nothing one cannot figure out. I used Microsol to help them settle down, though a few required some Mr. Mark Softer, and naturally, I hat a couple silver, despite my efforts. I used the 79 Squadron markings as I just plain like their unit markings, having done an Airfix Hunter in their livery several decades ago.
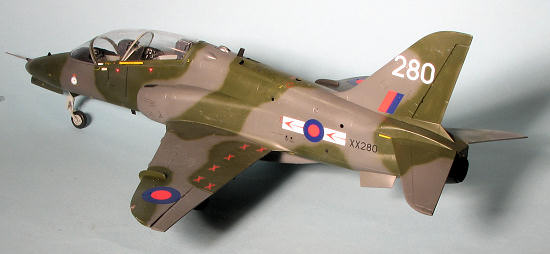 Once the marking were in place, the airframe was given a semi-matte clear coat to seal in the decals (this is also where those that silvered reared their ugly head). There are quite a few additional bits to add on which includes a few antennas, the clear collision lights and the nose light. I also had to glue in the nose pitot and assemble, paint and attach the gun pod. Though not called for in the kit instructions, the pod is included and was not difficult to add.
During all the decal work, I painted the two seats. Now let me mention that these seats are not appropriate for the markings. The Hawk fleet got updated bang seats sometime during the greys period I believe. But without any early replacements around, I had little choice. I used the harness decals on these seats and frankly, the decals do not fit at all well. It would help in the instructions if they would show what they are supposed to look like instead of just having arrows point to the general direction of the seats. This kit also has the canopy heating wires as decals. Front one is quite large and impossible to get in place without wrinkles. The aft one is not quite as bad. There are also decals to simulate the grey canopy seals. They are too long and so were not installed. The heating wire decals cloud the canopy so will eventually be removed. I decided to attach the canopy closed. It is not a snug fit and many gaps needed to be filled with the same material I used to attach the canopy, clear gloss paint. A bit more touch-up and I was done.
| CONCLUSIONS |
It is not often I build 1/32 kits nor modern jets so doing two in one was a bit different for me. One thing for sure, if not building a Red Arrows plane, get a later kit that is not molded in red. The red plastic is a real bear to cover up and bits of it were peeking out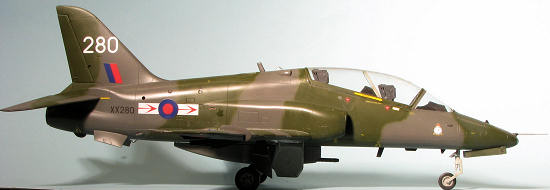 all over the place once the basic painting was done. Secondly, I found the fit to be quite good for the most part. The nose gear well bits were a real challenge as it was not as clear as it could be just what went where. I also found the gear door attachment braces to not work very well and had issues with the front of the wings as noted in the article. The few kit decals I used stuck well, which was nice, despite the harness decals not working all that well. What is really nice is that Xtradecal does a ton of markings for this kit, and was the major reason I decided to go for it. I understand an armed T.1A is either released or in the works and that should appeal to a wider range of builders.
The Hawk is a nice looking plane and one that lends itself to all sorts of markings. It is a kit I would recommend to those with some experience building large and somewhat complex kits.
| REFERENCES |
April 2012
Copyright ModelingMadness.com. All rights reserved.
No reproduction in part or in whole without express permission from the editor.
My thanks toHannants for the decal sheets. These are all still available and well worth it. Thanks also to Scale Aircraft Conversions for the metal landing gear. If you would like your product reviewed fairly and fairly quickly, please contact the editor or see other details in the