Heller 1/48 Jaguar A
KIT #: 80428
PRICE: $25.00 when new
DECALS: Two Options
REVIEWER: Scott Van Aken
NOTES: Basically old Airfix tooling

HISTORY

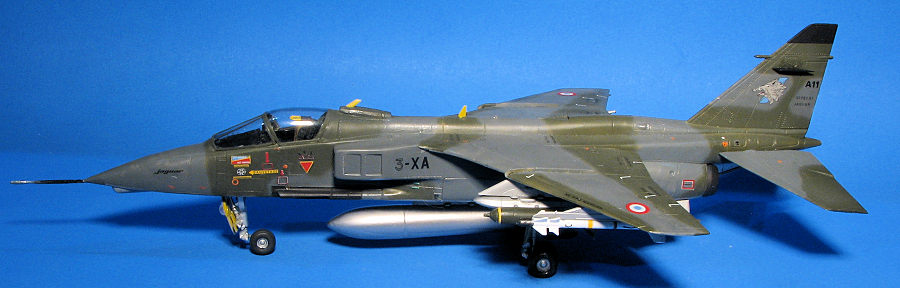
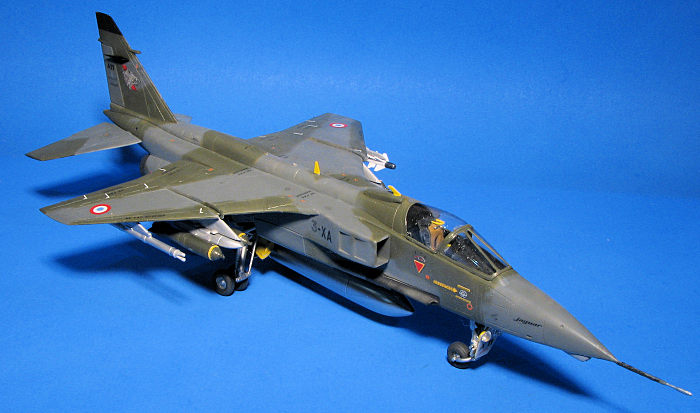
The SEPECAT Jaguar is an Anglo-French jet attack aircraft originally used by the British Royal Air Force and the French Air Force in the close air support and nuclear strike role. It is still in service with the Indian Air Force.

Originally conceived in the 1960s as a jet trainer with a light ground attack capability, the requirement for the aircraft soon changed to include supersonic performance, reconnaissance and tactical nuclear strike roles. A carrier-based variant was also planned for French Navy service, but this was cancelled in favour of the cheaper Dassault-Breguet Super Étendard. The aircraft were manufactured by SEPECAT (Société Européenne de Production de l'avion Ecole de Combat et d'Appui Tactique), a joint venture between Breguet and the British Aircraft Corporation, one of the first major joint Anglo-French military aircraft programmes.

The Jaguar was exported to India, Oman, Ecuador and Nigeria. The aircraft was used in numerous conflicts and military operations in Mauritania, Chad, Iraq, Bosnia, and Pakistan, as well as providing a ready nuclear delivery platform for the United Kingdom, France, and India throughout the latter half of the Cold War and beyond. In the Gulf War, the Jaguar was praised for its reliability and was a valuable coalition resource. The aircraft served with the French Air Force as the main strike/attack aircraft until 1 July 2005, and with the Royal Air Force until the end of April 2007. It was replaced by the Panavia Tornado and the Eurofighter Typhoon in the RAF and the Dassault Rafale in the French Air Force.

THE KIT
While Heller did their own Jaguar kit, it was originally tooled so that one could install either a single seat or two seat nose section. This kit has a solid single seat fuselage so it is the old Airfix kit with bits to do the French version as well as French pylons and weapons.

Typical of Airfix kits of the era it does have engraved panel lines, but the engraving is fairly soft. If you have built their older Buccaneer, you know what you are getting. It has a fairly nice cockpit that uses decals for instrument faces and a fairly nice ejection seat. The cockpit fits atop the nose gear well and that is trapped between the fuselage halves.

Wings are a full upper half with separate lower sections. The upper half includes part of the upper fuselage. There are separate wing fences. Inserts are used for the side guns and the nose cone is two halves. No weight is called out and I doubt any is really needed. Intakes are in two parts and there is no blanking plate. Canopy is two part, but it doesn't seem that you can display it open.

Landing gear is quite complex looking as it is on the real deal. This can be installed after the airframe is complete so a plus for painting. In the rear is an insert over the engine section as I've seen on every Jag kit I've built. Exhaust are blocked off so no see-though effect. Speed brakes can be posed raised or lowered. For things under wings you are provided a single drop tank, an air to ground missile, a pair of air to air missiles, various pods and a selection of bombs.

Instructions are well drawn and provide Humbrol paint references. Two markings options are provided. One is the box art plane in the Arabie scheme from EC3/11 during Desert Storm. The other is a European scheme plane from EC 3/3. Decals are well done and quite matte.
CONSTRUCTION
When the new tool Airfix kit was announced, I thought it was time I built one of the two kits in my stash. I chose the Heller version as Airfix did not announce a Jaguar A. I started with the cockpit as usual and it built fairly quickly. After painting the sidewalls, I attached the cockpit interior to the nose gear well and glued that to one side of the fuselage, using the other half to ensure it was properly aligned. Then the other fuselage half was attached. Fit is good, but filler is needed on the seams.

The upper and lower wing sections were glued together. No need to open pylon holes as those have already been done. I also attached the wing fences. The holes are considerably larger than the pegs that go into them. Back at the fuselage, the nose was assembled and attached as were the two guns. Fit is fair, but there are fairly large gaps. Same for when the intakes are attached. One will need to exercise sanding skills on this one. I then attached the wing.

Main landing gear were next. Detailing on these is fairly soft and the attachment points of the various pieces is vague. I also found that the longest brace had one of them short shot. For that, I used a piece of bronze wire to replace it on one of the gear legs. I then attached the gun sight then masked and attached the windscreen and canopy. These items were then masked. The kit then marinated for several months
COLORS & MARKINGS

Getting back into it, I headed for the paint shop. This one would be green/grey uppers with a silver-grey underside. I used White Ensign paints for this as I had the appropriate French shades. This paint can take a while to dry and dries quite gloss. The silver undersides were done first and then masked off. I freehanded the two upper colors.

Before the clear coat, I attached a number of smaller items. I also painted the various pylons and built up and painted the weapons and centerline fuel tank. The decals were next as the gloss paint was ready for them. Decals are quite matte and though old, they still functioned fairly well. The glue had that cream colored residue that was fairly normal with old Heller decals, but did not hamper the application and was easy to clean off. As the decals were added, so were things like the bombs, speed brakes, and the gear doors. I also added antennas, though some had to be scratch-built as I could not find them on the sprues. Then a clear matte coat, using Tamiya paint, was added. Wheels were attached with one snapping an axle due to being a very tight fit. That was fixed with a section of paper clip. The exhaust was added, landing lights attached and the canopy unmasked.
CONCLUSIONS

As is often the case, I am glad I built this kit, despite it taking a fairly long time. The overall fit is not good and the detailing is soft compared to today's kits. I don't know if Airfix will do a Jaguar A with its new tool kit, but I'm sure it will be appreciated. Overall, this is not a kit I would recommend to a casual modeler. I had to use a lot of modeling skills to build it and I'm sure it would frustrate many modelers to the point of being trashed.

REFERENCES

https://en.wikipedia.org/wiki/SEPECAT_Jaguar

8 May 2026

If you would like your product reviewed fairly and quickly, please contact the editor or see other details in the Note to Contributors.

Back to the Main Page

Back to the Previews Index Page