Hasegawa 1/48 F-16C
| KIT # | V-4 |
| PRICE: | $15.00 |
| DECALS: | See Review |
| REVIEW : | |
| NOTES: |
|
| HISTORY |
Not really too much to say about the F-16 Fighting Falcon that hasn't been repeated before in innumerable books, magazines and other media. Suffice it to say that it is the most successful Western aircraft since the F-4Phantom II with well over 3,500 units produced in the US and other factories world-wide.
With the completion of the F-16A, an improved version, the F-16Cwas brought into service around 1985. One can tell the difference between thenow mostly out of service (in the US) F-16A and the C model by the elongated forward section of the fin with the small antenna on it. There are other differences depending on block or construction number, but I'll leave that tothe real F-16 fanatics.
| THE KIT |
Hasegawa's kit of the F-16 has been around for a number of years and despite it's near 20 year age, is still a very good model. Most of the kit has engraved panel lines, and the general fit of the kit is quite good. An interesting anomaly is that the panel lines on the external fuel tanks and travel pod are of the raised variety. This does not in any way detract from the kit itself, it is just interesting.
 Typical of Hasegawa 1/48 kits,there are lots of weapons racks but only a pair of Sidewinders and AIM-120missiles. If you need bombs, you'll have to spring for the weapons set.
One thing I'm not fond of is that Hasegawa has opened the holes for the racks. It
is possible that some of us would like a lightly armed Falcon without the huge wingmounted fuel tanks, and to do that we'll have to fill in these holes.
Typical of Hasegawa 1/48 kits,there are lots of weapons racks but only a pair of Sidewinders and AIM-120missiles. If you need bombs, you'll have to spring for the weapons set.
One thing I'm not fond of is that Hasegawa has opened the holes for the racks. It
is possible that some of us would like a lightly armed Falcon without the huge wingmounted fuel tanks, and to do that we'll have to fill in these holes.
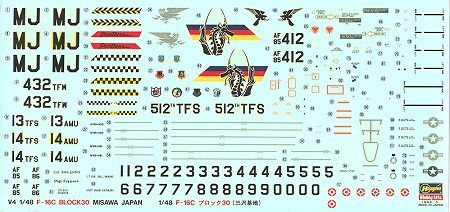
One thing that sets this kit apart is the killer decal sheet. This isn't called the MISAWA JAPAN version for nothing. With the enclosed sheet one coulddo any aircraft assigned to the 432 TFW in 1988, the year of the boxing of thiskit.
As you can see from the sheet, in addition to the Misawa units, you get aspecial scheme from the 512th TFS at Ramstein, Germany.
| CONSTRUCTION |
This will be my third 1/48 Falcon from Hasegawa; the first being an A and the second being a Belgian version. One big difference is that I will be using an aftermarket interior set with this kit. After reading all the hoopla about BlackBox, I picked up their F-16C set, #48005. I surely hope it is worth the $16.00 I had to fork out for it. This set will effectively double the price I paid forthe kit!
 For me, construction starts with
gluing together subassemblies. This means fuel tanks and travel pods. I also carefully read the Black Box instructions. Not sure if
I'm too keen on hacking away the glare shield, but it says I gotta do it.
For me, construction starts with
gluing together subassemblies. This means fuel tanks and travel pods. I also carefully read the Black Box instructions. Not sure if
I'm too keen on hacking away the glare shield, but it says I gotta do it.
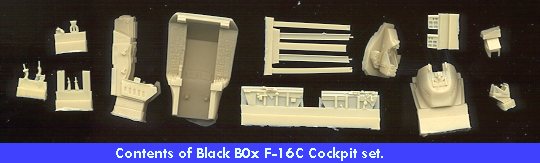
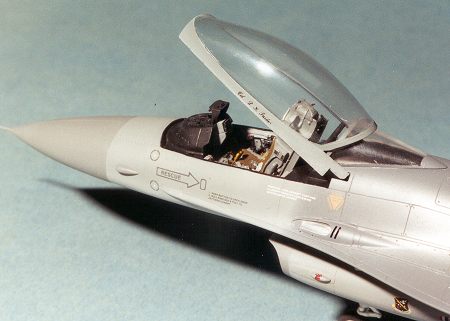
As you can see from the image, the BlackBox interior set is quite complete. I noticed that there is not a small
upright bit on the left front corner of the seat. Not sure if this means 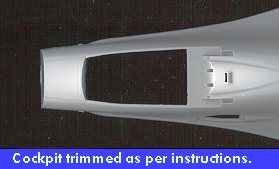 thepart was broken off or not as there wasn't anything floating around in
the package that looked like this. It also appears that one gets two different HUDs. Anyway, I committed myself to using this set so cut out the glare shield from
the kit and thinned down the sides and front quite a bit with a sanding stick.
After tacking on the sides to the cockpit and assuring that they fit, I did
several test fits to the kit. More material than I thought had to be taken away before Igot a good fit.
thepart was broken off or not as there wasn't anything floating around in
the package that looked like this. It also appears that one gets two different HUDs. Anyway, I committed myself to using this set so cut out the glare shield from
the kit and thinned down the sides and front quite a bit with a sanding stick.
After tacking on the sides to the cockpit and assuring that they fit, I did
several test fits to the kit. More material than I thought had to be taken away before Igot a good fit.
Then the resin anti-glare shield was
cut from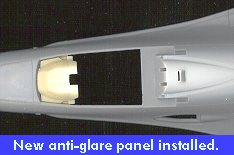 its block and test fitted tothe cockpit opening. Make sure when you cut this item, that you cut it from
the top as there is supposed to be a bit of an overhang. Cutting it from the
bottom is only asking for trouble. When freed from the block, the front was sanded atthe same angle as the front of the kit cockpit. Constant test fitting ensured
a good fit. It was then superglued into place. The instructions would have you
add the instrument panel and HUD first, but I threw caution to the wind and did
it this way instead.
its block and test fitted tothe cockpit opening. Make sure when you cut this item, that you cut it from
the top as there is supposed to be a bit of an overhang. Cutting it from the
bottom is only asking for trouble. When freed from the block, the front was sanded atthe same angle as the front of the kit cockpit. Constant test fitting ensured
a good fit. It was then superglued into place. The instructions would have you
add the instrument panel and HUD first, but I threw caution to the wind and did
it this way instead.
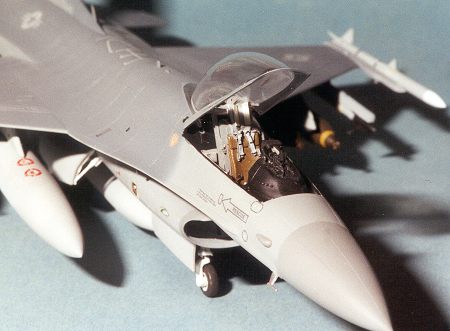
Meanwhile, back at the interior, the rudder pedals were glued in place andthen it was painted overall FS 36375 as per the kit instructions (there are no painting instructions at all in the Black Box set. A rather large omission, if you ask me). Then the instruments were painted flat black and then drybrushed.There are some teeny bits like the control stick, arm rest and throttle that are added to various consoles. These are painted black and then the side panels were glued in place. A few other bits were picked out in yellow and red to break up the monotony of black and grey.
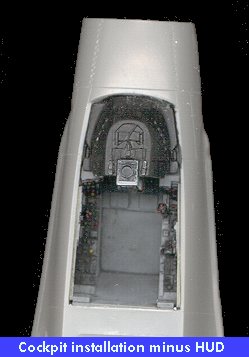 Once that was accomplished the instrument panel was glued into place
followed by the interior. Fit is quite good and it does look better than the kit version.The HUD will be installed as one of the last items.
Once that was accomplished the instrument panel was glued into place
followed by the interior. Fit is quite good and it does look better than the kit version.The HUD will be installed as one of the last items.
Then the wings, tail, and exhaust sections were assembled. There was as mall bit of filler needed for these parts, but not really that much. While that was drying, I prepared to glue together the fuselage halves. There is a bit more resin on the bottom of the interior than one would like. Removal of the old interior tabs and much sanding on the bottom of the resin tub finally enabled meto glue the top and bottom fuselage together. The fuselage was rather badly warped so I glued it in stages starting at the front.
After gluing the fuselage, the joins were cleaned up and the wings attached.
Next, the exhaust section was glued in place.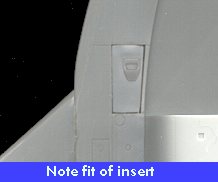 This piece doesn't exactly fit like
a glove. It was difficult to line things up and I had to use clamps to deform
the fuselage a bit for the best fit. There is a small insert next to the intake
that was installed at this time. The fit was less than stellar and so some filler wasused to take care of the gaps.
This piece doesn't exactly fit like
a glove. It was difficult to line things up and I had to use clamps to deform
the fuselage a bit for the best fit. There is a small insert next to the intake
that was installed at this time. The fit was less than stellar and so some filler wasused to take care of the gaps.
Then it was on to sanding down as much of the mismatch on the tail section as possible. Upon completion of that, the little gaps there and in the wing/fuselage join were puttied and later sanded smooth. Meanwhile, the intake was assembled and sanded smooth. Then the intake was painted FS 36320using an old tin of Humbrol paint that I found in the back of a drawer. Once that was dry, the forward part was masked off and the rest of it painted white. The nose and main wheel wells were painted white at this time as well.
Next, the tail was glued in place. With the longer spine section, it covers up some of the panels on the top of the fuselage. One of the problems one runs into when trying to adapt an F-16A to become an F-16C as I would be willing tobet those panels have been slightly redesigned for the C model. At this time, the weighted nose and freshly painted intake were glued in place. Also attended to were a few intakes and vents that go on the fuselage. The few gaps that were present during these steps were filled and sanded smooth. Then it was time to go to the paint shop!!!
| PAINT & DECALS |
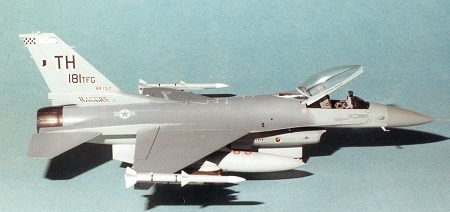 F-16s are a sea of greys. In fact, there are four major grey colors that are on an F-16. From lightest to darkest they are: Fs 36375, 36320,36270, and 36118. I used Testors Model Master paints for all but the 36118,
for which Aeromaster was used, mainly as the Testors color is, to me, way too
dark. As is usual with me, I painted all the major areas, and then went back and forthwith these colors, masking as needed, until all the colors were on.
F-16s are a sea of greys. In fact, there are four major grey colors that are on an F-16. From lightest to darkest they are: Fs 36375, 36320,36270, and 36118. I used Testors Model Master paints for all but the 36118,
for which Aeromaster was used, mainly as the Testors color is, to me, way too
dark. As is usual with me, I painted all the major areas, and then went back and forthwith these colors, masking as needed, until all the colors were on.
Painting of the canopy was an especially difficult task for meas when I put the canopy on prior to painting, it wouldn't fit. The glare shield on the Black Box set sits too high and won't allow the canopy to be closed all the way, leaving about a 1/4 inch gap in the front. I followed the instructions and don't think I messed anything up in doing so. Whatever the case may be, it makes no difference to the final product. After all, why spend all those bucks and have a closed canopy? However, it does make painting and masking more difficult.
 During this stage, the gear doors, stabilizers and ventral
fins were painted on the sprue to make things easy. Also painted on the sprue werethe various bomb and missile racks as well as the undercarriage and
actuating struts. Needless to say, it took quite a while to get all the painting done to adecent level (like over a week). Then the fins and stabs were glued in
place using superglue.
During this stage, the gear doors, stabilizers and ventral
fins were painted on the sprue to make things easy. Also painted on the sprue werethe various bomb and missile racks as well as the undercarriage and
actuating struts. Needless to say, it took quite a while to get all the painting done to adecent level (like over a week). Then the fins and stabs were glued in
place using superglue.
Once the major painting was done, the landing gear was assembled so that the kit could stand on its own wheels. Any of the struts that needed it had the oleos covered with Bare Metal Foil prior to gluing in place. During this time, the forgotten brace in the intake was added. Then the entire kit was given a nice coat or two of Future acrylic gloss clear in preparation for adding the first decals.
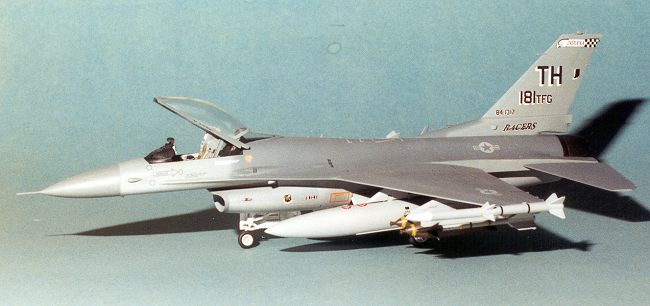
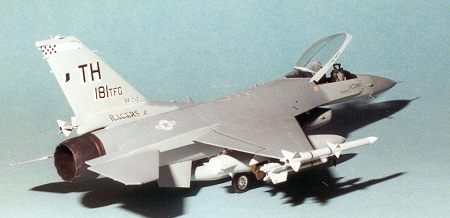
For this kit, I decided to use Superscale #48-447 for ANG F-16s.Since one of the units on the sheet (113 TFS/181 TFG) is just a few hours away,I thought it might be nice to use their older markings from about 10 years ago when then first got their F-16Cs. Another reason for using it is that the number of stencils on this bird is considerably less than on a new F-16C. No wing walk or compressor warning bands are needed as often when one of these planes is repainted, those types of things just are not replaced. They reacted beautifullyto the usual application of Champ setting solution.
| YET MORE CONSTRUCTION |
 While all this decal
putting on was going on, other bits and pieces were assembled. Things like the
fuel tanks and various bomb racks were glued to their respective pylons and then
repainted. During this operation, I trashed one of the kit supplied Sidewinders(like, I stepped on it), and had to go shopping for a weapons set. It
also seemed like something was needed on the bomb rack. Having Hasegawa's weapons set'A', I looked for something to hang there. Mk 82/83/84 bombs didn't seem to
fit the bill and the Mk117s were not even the right time period. I settled on theSUU-30 cluster bombs after making sure they were still in the inventory.
These were painted olive drab with the usual yellow ring on the front.
While all this decal
putting on was going on, other bits and pieces were assembled. Things like the
fuel tanks and various bomb racks were glued to their respective pylons and then
repainted. During this operation, I trashed one of the kit supplied Sidewinders(like, I stepped on it), and had to go shopping for a weapons set. It
also seemed like something was needed on the bomb rack. Having Hasegawa's weapons set'A', I looked for something to hang there. Mk 82/83/84 bombs didn't seem to
fit the bill and the Mk117s were not even the right time period. I settled on theSUU-30 cluster bombs after making sure they were still in the inventory.
These were painted olive drab with the usual yellow ring on the front.
All the racks and pylons were painted the same color as the underside of the aircraft as were the missiles. The weapons set Sidewinders are MUCH more detailed than those that come with the kit. The head of the AMRAAMs were painted white while the Sidewinders had the fin stabilizers painted steel and the missile head black.
| CONCLUSIONS |
 While not the 1 week wonder kit that I had thought it would be,nonetheless, it was a really fun build. It also reminded me why I don't
build that many modern jets. Things under wings. It seems like a lot of my
construction time was spent in building up fuel tanks and weapons. Older
aircraft just don't seem to have that much 'stuff' hanging off the wings and ifthey do it usually isn't so large.
While not the 1 week wonder kit that I had thought it would be,nonetheless, it was a really fun build. It also reminded me why I don't
build that many modern jets. Things under wings. It seems like a lot of my
construction time was spent in building up fuel tanks and weapons. Older
aircraft just don't seem to have that much 'stuff' hanging off the wings and ifthey do it usually isn't so large.
Anyway, it is really a very fine kit and since it has been around for so long, the purchase price is quite reasonable for what comes in the kit. As for the Black Box interior, the jury is still out on that. The detailing is very good and the interior set is as complete as one could want. I am still troubled by the fact that the glare panel sticks up too high. I'm sure I followed the instructions to the letter.
The end result is a very nice looking kit that is sure to please.
Copyright ModelingMadness.com. All rights reserved. No reproduction in part or in whole without express permission.