Hasegawa 1/72 F-14A Tomcat
|
KIT # |
K 12 |
|
PRICE: |
$10 (in the early 1980s) |
|
DECALS: |
once aircraft, VF-33 |
|
REVIEW: |
|
|
NOTES: |
This is the initial molding of the kit |
|
HISTORY |
Once the F-4 Phantom was in service, the Navy started looking around for a new fleet defense fighter. The F-111B was not going to be that plane as it was not at all what the Navy was looking for. This behemoth was thrust upon the USN by the current Sec Def Robert MacNamara and his belief that one plane could be built to satisfy both an Air Force and Navy requirement. It didn't work, and while the TFX or F-111 became a great USAF bomber, it was a bust as a Naval aircraft.
 Having already
gotten development of the long range AIM-54 Phoenix underway, the Navy began
looking for a new aircraft to carry it. Grumman stepped forward and proposed a
swing wing aircraft that had no pretense as a bomber to be that aircraft. As we
all know, this was developed into the F-14 Tomcat. This aircraft was able to
carry as much as 4 Phoenix, 2 Sparrow and 2 Sidewinder missiles at the same
time, or 6 Phoenix. Each missile was capable of destroying an enemy plane over
100 miles from the point of launch. The perfect missile for long-range fleet
defense. To my knowledge, no enemy aircraft was ever destroyed using this
missile. Every plane the Tomcat has shot down has been with the standard Sparrow
or Sidewinder missile.
Having already
gotten development of the long range AIM-54 Phoenix underway, the Navy began
looking for a new aircraft to carry it. Grumman stepped forward and proposed a
swing wing aircraft that had no pretense as a bomber to be that aircraft. As we
all know, this was developed into the F-14 Tomcat. This aircraft was able to
carry as much as 4 Phoenix, 2 Sparrow and 2 Sidewinder missiles at the same
time, or 6 Phoenix. Each missile was capable of destroying an enemy plane over
100 miles from the point of launch. The perfect missile for long-range fleet
defense. To my knowledge, no enemy aircraft was ever destroyed using this
missile. Every plane the Tomcat has shot down has been with the standard Sparrow
or Sidewinder missile.
Taking a clue from the gun-less F-4 Phantom, the Navy installed a 20mm Vulcan cannon in the Tomcat. In addition, it was a two seater, with the back seater, or RIO (Radar Intercept Officer), operating the powerful radar and other weapons systems of the F-14.
As is typical with Naval aircraft, a number of them have been lost at sea in various accidents and incidents since they made their first cruise with VF-1 and VF-2 on the USS Enterprise in 1973. The F-14 is currently only used by about half of the original number of squadrons that were flying it at its height of power. Later versions have improved engine and armament. A much later modification allows the Tomcat to carry bombs, much to the chagrin of its crew! With the fleet life of the F-14 now nearing an end, it will mean one less type in service and a move toward a carrier full of Hornets!
|
THE KIT |
 Hasegawa's Tomcat
was eagerly snatched up by modelers the world over. It was cutting edge and much
appreciated by the modeling public. Though it has raised panel line detail, it
had a rather well detailed cockpit, full wheel wells, and the swing wings
actually functioned! As is normal with F-14 kits, the fuselage was in four
sections. The wing box was split into an upper and lower so to be able to trap
the wings and operating mechanism. The cockpit section was split into left and
right as normal.
Hasegawa's Tomcat
was eagerly snatched up by modelers the world over. It was cutting edge and much
appreciated by the modeling public. Though it has raised panel line detail, it
had a rather well detailed cockpit, full wheel wells, and the swing wings
actually functioned! As is normal with F-14 kits, the fuselage was in four
sections. The wing box was split into an upper and lower so to be able to trap
the wings and operating mechanism. The cockpit section was split into left and
right as normal.
Overall accuracy of the kit was superb. There was some detail in the wheel wells and the rest of the kit was up to the usual high standards of Hasegawa at the time. I know that I built several of them though only this one has survived several moves, with the rest being given as gifts. Hasegawa also gives you a choice of full open or full shut afterburner petals.
Instructions are quite good giving adequate building steps with color callouts given where needed. Colors are given in reference to FS numbers where applicable. No paint tie ups are in these instructions as it was before Gunze was a big force in Japan. Decals for the kit were quite colorful, but typically a bit on the thick side as is the norm for Hasegawa decals.
|
CONSTRUCTION |
 One can start in
several places with this kit. I started on the cockpit and wings at about the
same time. The cockpit consists of a tub, control stick, instrument panels and
seats. The seats are accurate looking enough, but the fussy will want to replace
them with aftermarket. I built the kit straight from the box. At this time the
wings were glued together and the edges cleaned up. The cockpit was
painted dark gull grey with black instruments. The seats were black with OD
cushions. The interior was then placed in the forward fuselage halves along with
some nose weight and the halves glued together.
One can start in
several places with this kit. I started on the cockpit and wings at about the
same time. The cockpit consists of a tub, control stick, instrument panels and
seats. The seats are accurate looking enough, but the fussy will want to replace
them with aftermarket. I built the kit straight from the box. At this time the
wings were glued together and the edges cleaned up. The cockpit was
painted dark gull grey with black instruments. The seats were black with OD
cushions. The interior was then placed in the forward fuselage halves along with
some nose weight and the halves glued together.
I did need filler on the nose section, but I can say that about every kit I build! The wingbox section has some very well done intakes with compressor blades to be set far to the back of the intakes. The intake interior and where it fits on the lower wingbox section were painted white. Then the intakes were glued to the wingbox after the aluminum-painted compressor blades were glued it. The fit of these intakes isn't perfect and you will need some filler, especially at the back where they do not meet flush with the fuselage. The underfuselage strakes were then glued in place.
 When the wings were
dry, they were fit into the lower wingbox section. An actuating rod fits between
them to allow the wings to swing in unison, so to speak. The hinges were lubed
with some petroleum jelly and the fuselage halves glued together. There was a
major seam problem in the back half between the wing and the horizontal
stabilizer. This is common to every Tomcat kit I have built. Nothing to do but
fill it and smooth it out. Once the wing section was complete, the nose was
glued on. This also had a seam that needed some attention. Not to say it is a
bad fitting kit, just that I always seem to need filler on the major seams!
Final step here was to attach the nose radome.
When the wings were
dry, they were fit into the lower wingbox section. An actuating rod fits between
them to allow the wings to swing in unison, so to speak. The hinges were lubed
with some petroleum jelly and the fuselage halves glued together. There was a
major seam problem in the back half between the wing and the horizontal
stabilizer. This is common to every Tomcat kit I have built. Nothing to do but
fill it and smooth it out. Once the wing section was complete, the nose was
glued on. This also had a seam that needed some attention. Not to say it is a
bad fitting kit, just that I always seem to need filler on the major seams!
Final step here was to attach the nose radome.
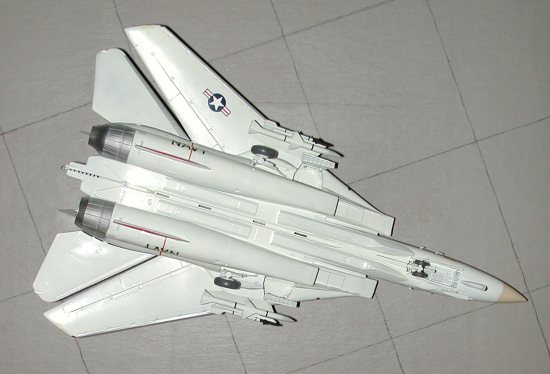
Once the main fuselage was done, the two tails were glued in place. You may want to glue these on later as it makes painting and masking the exhaust section easier when they are not in place. Meanwhile, the various buts for the Phoenix rails that run one either side of the fuselage centerline were brought together and glued in place. Hopefully you won't forget to open the holes for the underwing missile pylon as I did! The missile pylon was glued together and set aside. The tailplanes were cleaned up, but not yet attached. I did glue in place the canopy and masked that. The landing gear, which would be the same color as the underside, were glued in place and then it was off to the paint shop
|
PAINT & DECALS |
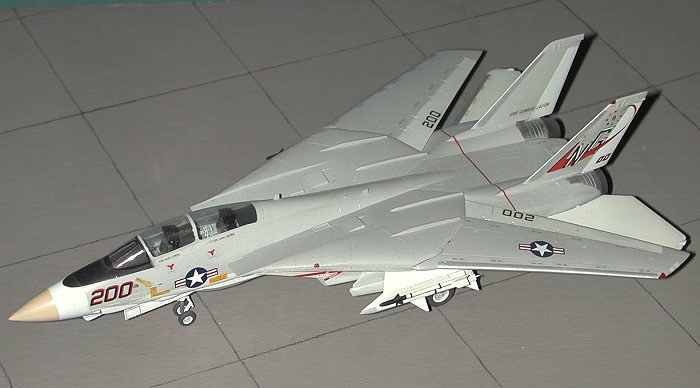
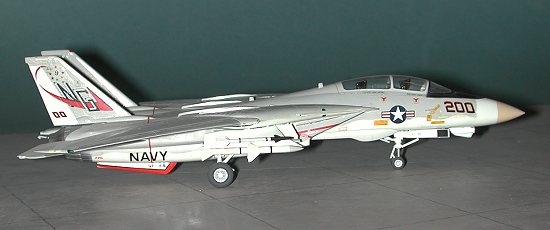
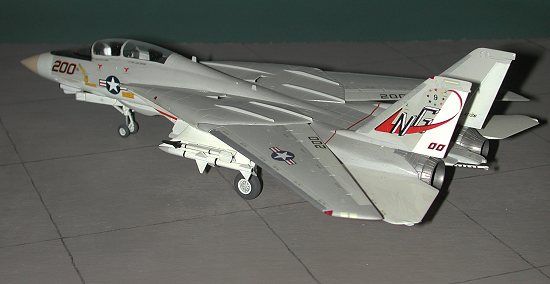
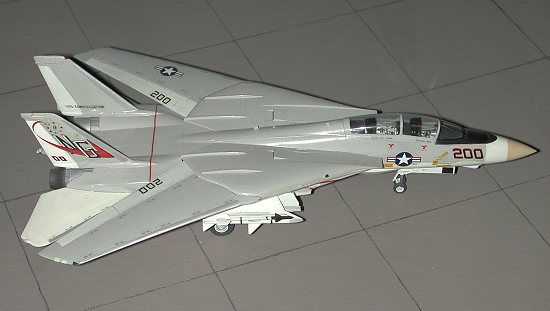
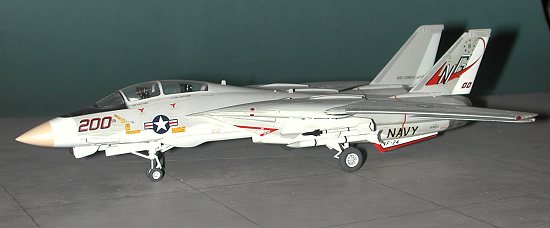
Early Tomcats were painted in gloss gull grey over white with white control surfaces. This particular scheme also had a buff colored nose radome tip. Needless to say, I used a LOT of gloss white when doing this kit. The stabilators are overall gloss white as are the landing gear and missile pylons. The rudders, flaps and ailerons are also white. Once all the white bits were painted and dry, they were masked off. The forward fuselage was given sort of a wavy mask line as was typical of the type.
 Then the rest of the airframe was painted
gloss gull grey. I used Testors Model Master paints for all the colors of this
kit. The wheels were painted black. This kit has nice raised lines to help
assist in painting tires. I hate those kits where the demarcation between wheel
and tire is almost non-existent! When the grey had dried, an area for the
anti-glare panel was masked off and that painted flat black. The tip of the
radome was painted with a buff color. In the back, the afterburner section was
painted aluminum and titanium.
Then the rest of the airframe was painted
gloss gull grey. I used Testors Model Master paints for all the colors of this
kit. The wheels were painted black. This kit has nice raised lines to help
assist in painting tires. I hate those kits where the demarcation between wheel
and tire is almost non-existent! When the grey had dried, an area for the
anti-glare panel was masked off and that painted flat black. The tip of the
radome was painted with a buff color. In the back, the afterburner section was
painted aluminum and titanium.
Now that the kit was basically painted, the decals were applied. I used Superscale sheet 72-296, now long out of production. It had a CAG bird from VF-24 (now disestablished), off the USS Constellation. The sheet also included a bunch of stencils and that took as much time as anything to apply.
Once the decals were on and dry, the rest of the plane was finished. This included attaching wheels, gear doors, stabilators, missile pylons and the missiles themselves. I used one each of the optional afterburner exhaust. It is typical for Tomcats to shut down the right engine first. This causes the exhaust petals to contract. When the other engine is shut down, there is no hydraulic pressure the close those petals so they remain open.
Final steps were to remove the masking, paint the wing lights and install some slime lights from a long defunct Detail and Scale sheet.
|
CONCLUSIONS |
This kit has been superceded by a more modern and more fiddly kit that costs easily twice as much as the old one. The older kit is still very nice and can be found at very reasonable prices at swap meets. If you don't need the latest and greatest and want to do an early F-14A, then by all means look for this kit. It is still very much available, though not in this particular part number, and will be the less expensive one.
November 2000
Review kit courtesy of me and my wallet!
Copyright ModelingMadness.com. All rights reserved. No reproduction in part or in whole without express permission.
If you would like your product reviewed fairly and fairly quickly, please contact the editor or see other details in the Note to Contributors.
Back to Reviews Page 2021