
| KIT: | Monogram 1/48 F-100D |
| KIT # | 5442/ |
| PRICE: | About $10 at swap meets/$35.00 |
| DECALS: | Thunderbirds/None |
| REVIEW BY: | |
| NOTES: | Conversion is resin |

| HISTORY |
Well known in the US as America's first truly supersonic fighter, theF-100 went on to serve from the mid-1950s to the late 1970s with the USAF andlater Air National Guard. Also chosen to fulfill these duties in the skies ofWestern Europe with many NATO countries as well as with Turkey and Taiwan. Inlater years in the US, hundreds were converted to QF-100 drones. Even today,there are Huns serving with Flight Systems and a few warbird owners. The modelbuilt in the greatest number was the F-100D. With this being such a hot fighterof the day, it was natural that a two seater would be developed to helpfamiliarize new pilots to the aircraft on the then very intricate systems of theF-100. Gone were the days of a quick checkout on the ground and off you go.Modern aircraft were getting more involved to fly and switchology was becoming arequirement.
| THE KIT |
I have always had a fondess for twin seat fighters and a chance to build atwo seater Hun in my favorite scale was made possible by a resinconversion from C&H. The basis for this conversion is Monogram's kit of theF-100D, which has been around for 25-30 years and is still a great kit. Detailis excellent in all respects, although the panel lines are raised and notengraved as with most current kits. It includes an openable canopy, loweredslats, lowerable speed brake, straight or curved refueling probe, boardingladder, external fuel tanks, and armament that includes Mk 82 bombs or Bullpupmissiles. The C&H kit offers a replacement fuselage, new interior, new seatsand a few other bits and pieces. For a more detailed look at this conversionset, go to
this review.For more on the Monogram kit, look at the parts breakdown shown below.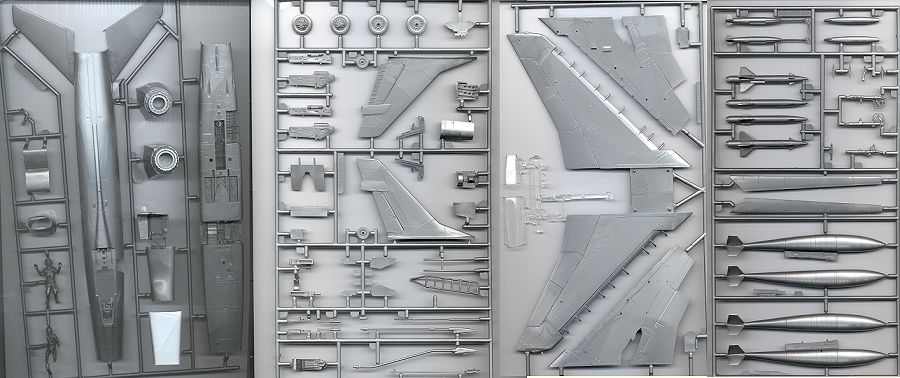
| CONSTRUCTION |
First step in the C&H instructions is to remove the tailplanes fromthe Monogram upper fuselage half. This was done with a razor saw. At the sametime, I removed several other parts that could be built as subassemblies whileconstruction was on going. This included the wings, fuel tanks, intake, fin andwheels. At the same time, I cut the cockpit from the intake as suggested in theinstructions. It was then that I went to work on the resin fuselage.
The first things that had to be done were to remove the resin plugs and flashfrom the fuselage halves. This was done rather easily as the resin is semi-soft,making it easy to work with. There is also a huge amount of resin around thewheel wells to provide strength and much of this needs to be trimmed back toallow proper fitting of the upper fuselage half and the Monogram wing. Bothfuselage halves had their mating surfaces sanded flat to facilitate a cleanassembly. The upper fuselage had to be thinned around the wheel well area toensure a flush exterior fit. In addition, test fitting the Monogram kit wingshowed that more thinning needed to be done to ensure a proper fit here as well.The fuselage is reinforced all around the edge, which is nice as it preventscracking from a lot of handling. Test fitting the upper and lower fuselage, Inoticed that the upper one was narrower than the lower one. While attaching thewing will widen the fuselage in this area it also meant that I had to cutthe aft bulkhead and will have to use a brace in this area. Test fittingthe intake in the nose section showed a need to thin the resin reinforcement inthat area as well and the intake should stretch the nose wide enough to fitproperly.
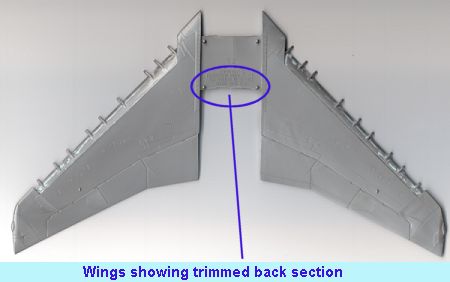 TheMonogram wing center section also needs trimmed back as far as you dare to clearwhat part of the large resin reinforcement lump is left in the wheel well area.While one could simply cut the wings in half and not worry about it, I feel thatkeeping the wing a one-piece affair is best for structural rigidity. However itis your call on this.
At this time I also scoped out the detail on the fuselage. Why, it looks verymuch like the Monogram kit! In fact, it is. C&H obviously used it as amaster and just stretched it to accommodate the second seat. The detailingaround the second seat is lightly engraved and weak as well. In fact, it isclear that a less than professional job was done. For instance, it is easy tosee sanding marks around the added section and a less than smooth putty jobwhere the upper gun troughs were filled in. In addition, the places where thesprue gates are located on the Monogram kit are easily found on the resinreplacement. Hmmm. To their credit, the castings are very well done with almostno air bubbles or pinholes in the fuselage casting and we are supposed touse modeling skills when doing these conversions. Maybe I'm just being toofussy.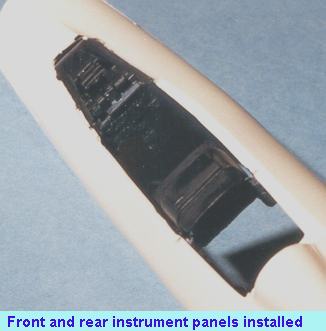
Getting on to other things, the interior bits were painted a darkish grey andthe instruments
themselves painted flat black. The rear instrument panel is basically a copyof the one in the front. A couple of notes. Several F-100F's had all flat blackinstrument panels. Some also had a very different rear instrument panel withstrip gauges. Your choice. While this was drying, the wings, wheels, fin, andfuel tanks were cemented together. Then the kit control stick was glued in thefront seat and the conversion stick in the back. Then the front instrument panelwas glued in place.
For the rear instrument panel, you need the rear combing. The panel is gluedto this, after a bit of trimming to get a good fit. Now the drawing shows thecombing fitting on the fuselage opening. Reality is that it doesn't work thisway, as the rear combing is about 1/8 inch too narrow to bridge the gap. Whatneeds to be done is to get everything properly situated and then glue the rearinstrument panel/combing combination in. For this job you really need to useaccelerator to quickly tack the combination in place. Once that was done, thecombing was painted black and the interior was installed in the upper fuselagehalf.
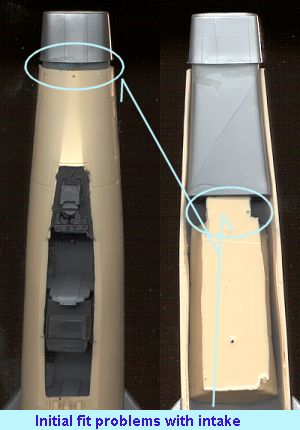 Nowit was time for the big moment. The gluing together of the fuselage halves.Would it fit properly? Would it be a painless operation? Would it look greatwhen done? First of all, the intake, which had been cut back as indicated in theinstructions, was installed. Whoops! Looks like someone goofed! Must be me.Apparently the resin interior also needs to be trimmed back to get a good fit.Odd that there is no mention of this in the instructions.
Then onto the fitting of the fuselage halves. The back fit just great,however the front part was less than kind to me. First of all, all the flexingcaused the interior and the rear instrument panel to break loose and startfloating around. Not a lot of fun. Next the sides just didn't want to cooperateand line up. The result is not pretty to look at and will take a lot of fillerand sanding to get right. (Sigh).
Now onto the nose. No help here either. The darn thing is actually largerthan the front of the fuselage. Fit is not too good either. What I did was toget the bottom to fit best I could and all the filling and filing will be on theupper part. Was going to try to line up the top part first, but there was no waythat was going to come even close. To make a long story short, the answer to allthree questions posed a few paragraphs ago is 'No'. Now, where is that bodyputty?
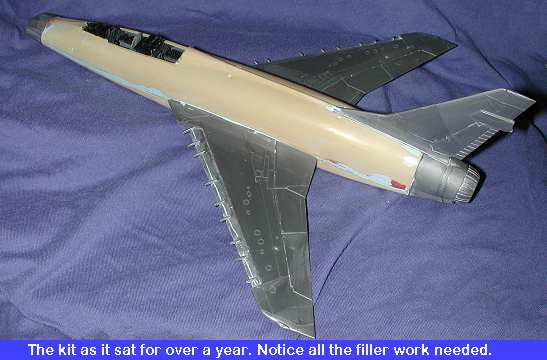
Well, after over a week of daily filling, filing and re-gluing, thefuselage is pretty well as smooth as I'm going to get it. That includes the rearsection becoming unsuperglued at least twice during this time. Talk aboutfrustration!! It is unfortunate that this didn't turn out to be the dream that Iwas hoping for and instead is the typical, for me, nightmare of doingconversions. Good thing that I kept the original fuselage so that I have someidea of where to re-scribe panel lines. Getting the nose piece smoothed out tomatch the fuselage was as much a pain as the fuselage itself! In fact, it was somuch of a pain, that I basically stuck the model in the box for several monthsbefore pulling it back out and returning to work on it.
Eight months later: Decided to start back on this thing as it was justsitting there mocking me. Since the last entry, I have done some correspondingand bought the Missing Link F-100 fuel tank mod that turns a 275 gallon tankinto a 325 gallon tank. I did this as I have decided to do a Vietnam era Fast-FacHun, and they used the larger tanks. A bit of a bonus is a small diamond shapedlump that is supposed to be the nose radar warning antenna.
 Doing the tanks isreally a no-brainer. Simply cut off the kit tanks at the forward indentation,smooth off the resin ones and apply a lot of superglue. The tricky part isgetting them on straight. Like the kit part removed, there is a slightupward curve to them. I aligned them so that the fuel fillers were on the top ofthe tank. Seemed to work ok as they don't look all out of whack.
During this stage, I cleaned up the cut off horizontal stabilizers andattached the kit tail and exhaust cone. If doing an ANG F-100F, don't forget touse the F-102 afterburner section provided. Regular AF units didn't use this soit wasn't attached. Fit wasn't too bad for either of them, a bit of fillertaking care of the gaps. Naturally, the glue joints on the fuselage broke againduring this stage due to all the handling! In complete frustration I set the kitaside for over a year before even considering tackling it again.
| PAINT & DECALS |
| CONCLUSIONS |
| REFERENCES |
Review copy courtesy of me and my wallet!! If any of you manufacturers orshop owners want to send products for review and building, please
contactme