| KIT #: | 05804 |
| PRICE: | $ |
| DECALS: | Several options |
| REVIEWER: | Scott Van Aken |
| NOTES: | 2017 release |
| HISTORY |
The Aero L-39 Albatros is a high-performance jet trainer developed in Czechoslovakia by Aero Vodochody. It was designed during the 1960s as a replacement for the Aero L-29 Delfín as a principal training aircraft. The L-39 Albatros has the distinction of being the first of the second-generation jet trainers to be produced, as well as being the first trainer aircraft to be equipped with a turbofan powerplant. The type was exported to a wide range of countries as a military trainer.
 The L-39 Albatros later served as the basis for the updated L-59 Super Albatros,
as well as the L-139 (prototype L-39 with Garrett TFE731 engine). A further
development of the design, designated as the L-159 ALCA, entered production in
1997. To date, more than 2,800 L-39s have served with over 30 air forces around
the world. The Albatros is the most widely used jet trainer in the world; in
addition to performing basic and advanced pilot training, it has also flown
combat missions in a light-attack role. The design never received a NATO
reporting name.
The L-39 Albatros later served as the basis for the updated L-59 Super Albatros,
as well as the L-139 (prototype L-39 with Garrett TFE731 engine). A further
development of the design, designated as the L-159 ALCA, entered production in
1997. To date, more than 2,800 L-39s have served with over 30 air forces around
the world. The Albatros is the most widely used jet trainer in the world; in
addition to performing basic and advanced pilot training, it has also flown
combat missions in a light-attack role. The design never received a NATO
reporting name.
At the Farnborough Airshow in July 2014, Aero Vodochody announced the launch of the L-39NG, an upgraded and modernised version of the L-39. The L-39C trainer aircraft were widely sold as surplus and a considerable number have found homes in the jet war bird market.
| THE KIT |
 This
is the initial release of this aircraft from two years back. Prior to this
we have had, in this scale, the MPM L-39 kit and more recently a version
from Special Hobby, this one differing in having an injected plastic clear
sprue instead of vacuforme parts. I built the MPM kit and while the end result turned out
fairly well, it was a lot of work to reach that point. In fact, it spent
some time on the 'shelf of doom' before being completed. Fast forward to the
present and we have a modern, non-short run kit of this aircraft from
Trumpeter. Typical of 'one mold meets all variants' kits, you will need to open up
or close a
few holes during construction. It also comes with a photo etch fret as it
seems that you cannot get kits nowadays without it. The fret is not all that
extensive proving bang seat pull handles, the VOR antennas for the fin, a
rudder hinge plate, and some other small bits.
This
is the initial release of this aircraft from two years back. Prior to this
we have had, in this scale, the MPM L-39 kit and more recently a version
from Special Hobby, this one differing in having an injected plastic clear
sprue instead of vacuforme parts. I built the MPM kit and while the end result turned out
fairly well, it was a lot of work to reach that point. In fact, it spent
some time on the 'shelf of doom' before being completed. Fast forward to the
present and we have a modern, non-short run kit of this aircraft from
Trumpeter. Typical of 'one mold meets all variants' kits, you will need to open up
or close a
few holes during construction. It also comes with a photo etch fret as it
seems that you cannot get kits nowadays without it. The fret is not all that
extensive proving bang seat pull handles, the VOR antennas for the fin, a
rudder hinge plate, and some other small bits.
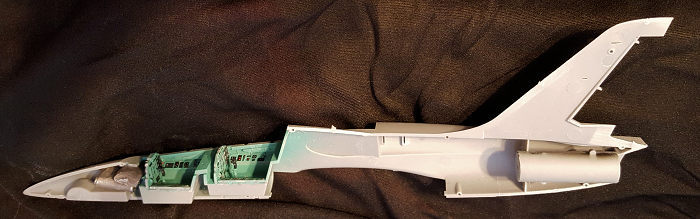
The cockpit has two bang seats with belts molded in place. Side consoles have inserts and there are decals to fit atop these and the instrument panels. Rudder pedals and control sticks complete this assembly. There are small side panel pieces for inside the fuselage halves and once you build up and attach the exhaust and glue in the nose gear well, you can add 10 grams of nose weight and close up the halves. There is absolutely no color information provided for the cockpit or the seat frame. Even the instrument panel has no painting information. A bit of time on the net showed three cockpit colors. One is the blue-green Soviet style, or a dark grey or even one close to the shade of British interior green. Seats were either black or dark grey.
 The wing is a single lower piece with
separate upper halves. There are holes opened in the bottom wing piece for
pylons, but no pylons are in the kit so you'll have to fill those. The main gear well fits into the lower half. The kit
provides separate flaps and ailerons as well as a separate rudder.
Additional cockpit pieces along with the windscreen and canopies
are glued on after the airframe is fairly complete. You can pose the canopy
sections open if you so wish. Landing gear is well molded and the gear doors
have positive locators. You can also model the speed brakes open or closed,
though you'll have some trimming to do for the closed position.
The wing is a single lower piece with
separate upper halves. There are holes opened in the bottom wing piece for
pylons, but no pylons are in the kit so you'll have to fill those. The main gear well fits into the lower half. The kit
provides separate flaps and ailerons as well as a separate rudder.
Additional cockpit pieces along with the windscreen and canopies
are glued on after the airframe is fairly complete. You can pose the canopy
sections open if you so wish. Landing gear is well molded and the gear doors
have positive locators. You can also model the speed brakes open or closed,
though you'll have some trimming to do for the closed position.
This is a standard 'learn to fly jets' trainer so the pylons and weapons that come with the L-39ZA kit are not present.
Instructions provide a full color painting guide with a variety of paint company options. There is only one scheme but with nine options. The huge decal sheet provides the markings for any one of the Breitling team jets. Most of this plane is in dark blue with silver wing undersides and silver around the cockpit and the top of the jet intakes. The silver areas will also need to be painted as will the black areas around the cockpit. Interestingly, the painting guide shows two aluminum painted tanks, but there are no additional tanks included in the kit and certainly no pylons on which to attach them. The giant decal sheet fills the box and should be fairly straight forward to apply.
| CONSTRUCTION |
 rubber black. This gave me a good
start. One thing I do not like about modern kits is a tendency for some
companies to have the sprue attachment points on the gluing surface. For me,
this invariably means that I end up sanding a bit too much to remove them
and it leaves a gap that needs to be filled.
rubber black. This gave me a good
start. One thing I do not like about modern kits is a tendency for some
companies to have the sprue attachment points on the gluing surface. For me,
this invariably means that I end up sanding a bit too much to remove them
and it leaves a gap that needs to be filled. 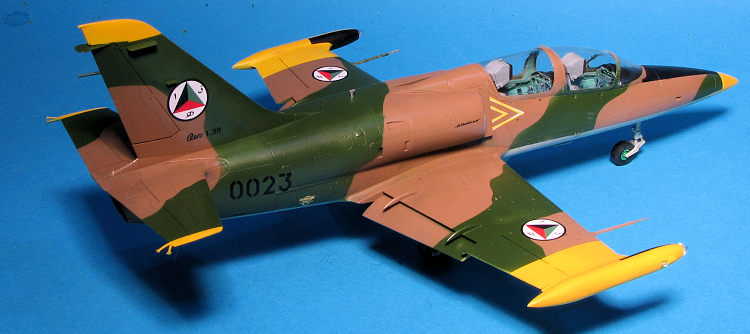 place, the fuselage halves were closed. Fit of the fuselage is quite
tight so you'll need to tape it closed to prevent gaps. Despite this there
is one at the very rear and may well have been caused by sanding sprue
stubs.
place, the fuselage halves were closed. Fit of the fuselage is quite
tight so you'll need to tape it closed to prevent gaps. Despite this there
is one at the very rear and may well have been caused by sanding sprue
stubs.  e seats installed. I then attached
the clear pieces in the closed position. This will leave some open squares
as they are apparently supposed to be modeled open.
e seats installed. I then attached
the clear pieces in the closed position. This will leave some open squares
as they are apparently supposed to be modeled open. | COLORS & MARKINGS |
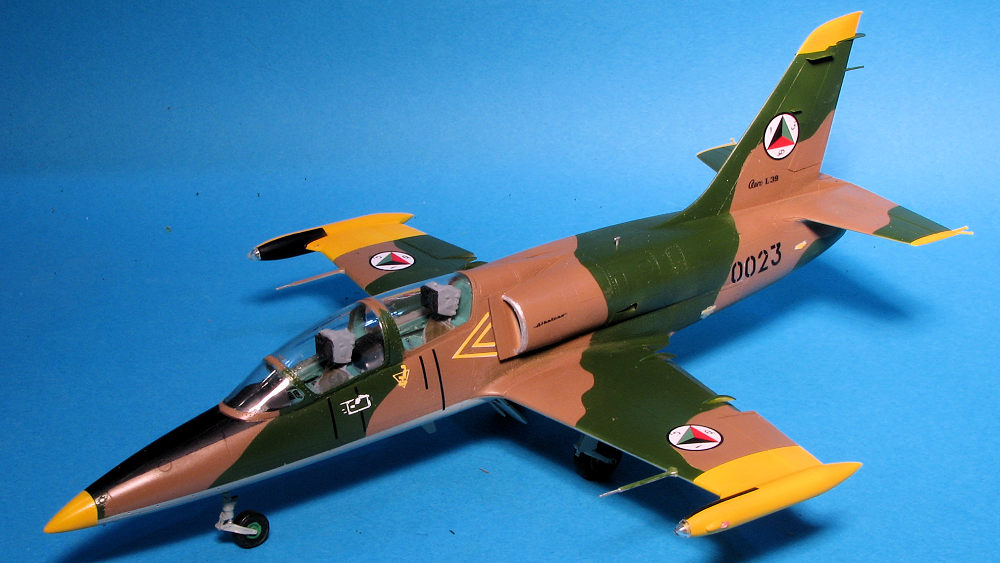
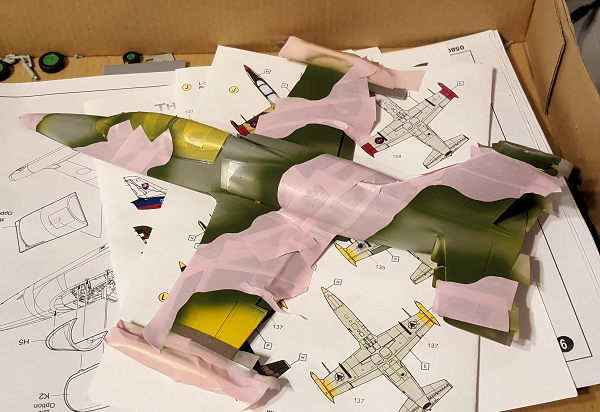 Once that had dried
sufficiently to mask, I did so and painted large areas of the upper surface
in the color recommended in the instructions. In this case it was FS 34102
dark green. This is a bit lighter than that shown in the instructions, but
should work well. Then began several hours of masking the green. The
camouflage on the L-39 is sprayed so tight that it cannot really be
duplicated free hand on a model so that is why all the masking. The other
upper color is listed as FS 30219. That was then sprayed on. All these
colors are Testors Model Master enamels thinned with DYI lacquer thinner.
Once all that was done, I had to paint the black areas atop the forward
fuselage and the inside of the wing tanks.
Once that had dried
sufficiently to mask, I did so and painted large areas of the upper surface
in the color recommended in the instructions. In this case it was FS 34102
dark green. This is a bit lighter than that shown in the instructions, but
should work well. Then began several hours of masking the green. The
camouflage on the L-39 is sprayed so tight that it cannot really be
duplicated free hand on a model so that is why all the masking. The other
upper color is listed as FS 30219. That was then sprayed on. All these
colors are Testors Model Master enamels thinned with DYI lacquer thinner.
Once all that was done, I had to paint the black areas atop the forward
fuselage and the inside of the wing tanks. | CONCLUSIONS |
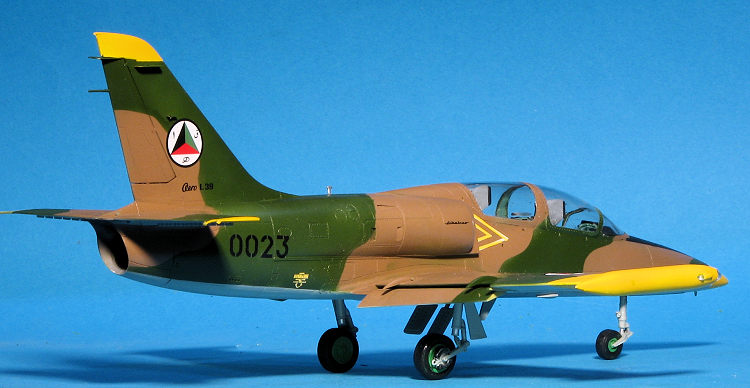
 I have enjoyed building pretty much every Trumpeter kit I've
built. Some of them have their issues, but fit is usually not a major factor.
This one builds well and while it does provide a few challenges as I mentioned
in the build regarding the gear doors and speed brakes, it makes into a very
nice model when you are done. One thing I did notice is that it is a bit wobbly
on the landing gear. Not disastrously so, but noticeable.
I have enjoyed building pretty much every Trumpeter kit I've
built. Some of them have their issues, but fit is usually not a major factor.
This one builds well and while it does provide a few challenges as I mentioned
in the build regarding the gear doors and speed brakes, it makes into a very
nice model when you are done. One thing I did notice is that it is a bit wobbly
on the landing gear. Not disastrously so, but noticeable.
Having said that, I would steer people away from this boxing unless you want to do the Breitling team jet. This is because it does not provide any wing pylons and most of the photos I saw of standard L.39C aircraft had these pylons and fuel tanks. I would spend my funds on the ZA boxing for these bits and you'll have a bunch of weapons that you can add to your stash. Of course, since Trumpeter brain farted the insignia in that boxing, you'll need an aftermarket sheet and while a bit pricey, I recommend the one I used for this build.
| REFERENCES |
https://en.wikipedia.org/wiki/Aero_L-39_Albatros
March 2019
Copyright ModelingMadness.com. All rights reserved. If you would like your product reviewed fairly and fairly quickly, please
contact
the editor or see other details in the
Note to
Contributors. Back to the Main Page
Back to the Review
Index Page
Back to the Previews Index Page