Qmen J-20 Mighty Dragon
| KIT #: | 01001 |
| PRICE: | $ |
| DECALS: | Two options |
| REVIEWER: | Scott Van Aken |
| NOTES: | 2019 tooling |
| HISTORY |
The Chengdu J-20 (Chinese: 歼-20; pinyin: Jiān-Èrlíng), also known as Mighty Dragon (Chinese: 威龙; pinyin: Wēilóng), is a single-seat, twinjet, all-weather, stealth, fifth-generation fighter aircraft developed by China's Chengdu Aerospace Corporation for the People's Liberation Army Air Force (PLAAF). The J-20 is designed as an air superiority fighter with precision strike capability; it descends from the J-XX program of the 1990s. It has been surmised that a fair amount of the technology in the J-20 is a result of espionage from the F-35 program.
| THE KIT |
 35
or so years ago, Hasegawa came out with an entire line of whimsical kits that
were known as Egg Planes. The line was fairly extensive and they were fun to
build. However, that seemed to be the end of it. The kits were steady sellers,
but not to the extent that engendered more new offerings. Move forward to about
10 years ago and we see a slow renewal of interest with some new items from
Hasegawa. This seemed to take off fairly well and other model companies started
producing similar lines of models, but expanding into ships and tanks in
addition to aircraft.
35
or so years ago, Hasegawa came out with an entire line of whimsical kits that
were known as Egg Planes. The line was fairly extensive and they were fun to
build. However, that seemed to be the end of it. The kits were steady sellers,
but not to the extent that engendered more new offerings. Move forward to about
10 years ago and we see a slow renewal of interest with some new items from
Hasegawa. This seemed to take off fairly well and other model companies started
producing similar lines of models, but expanding into ships and tanks in
addition to aircraft.
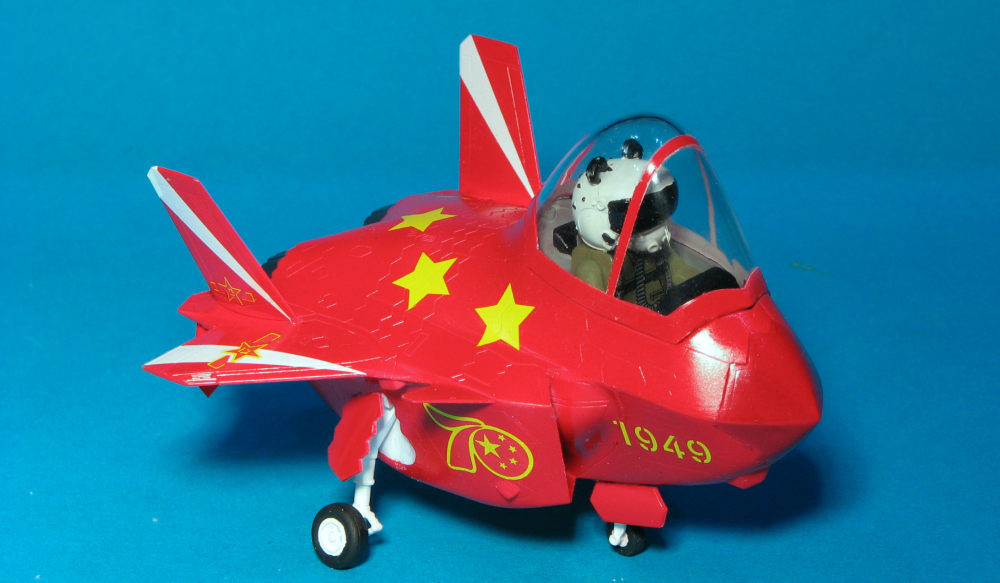
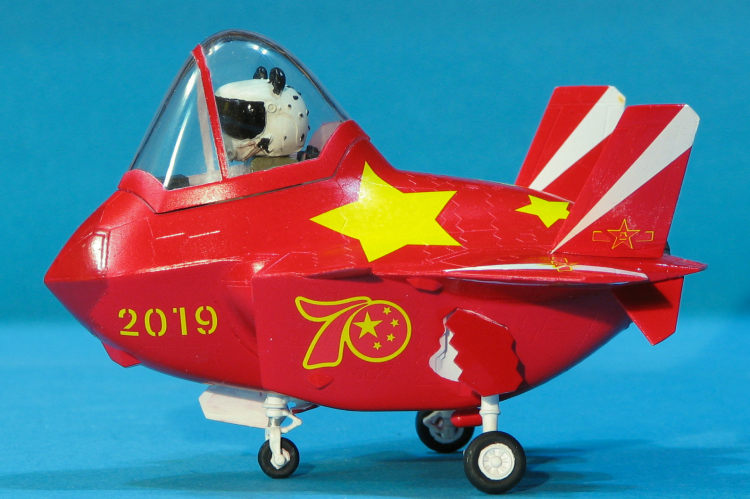
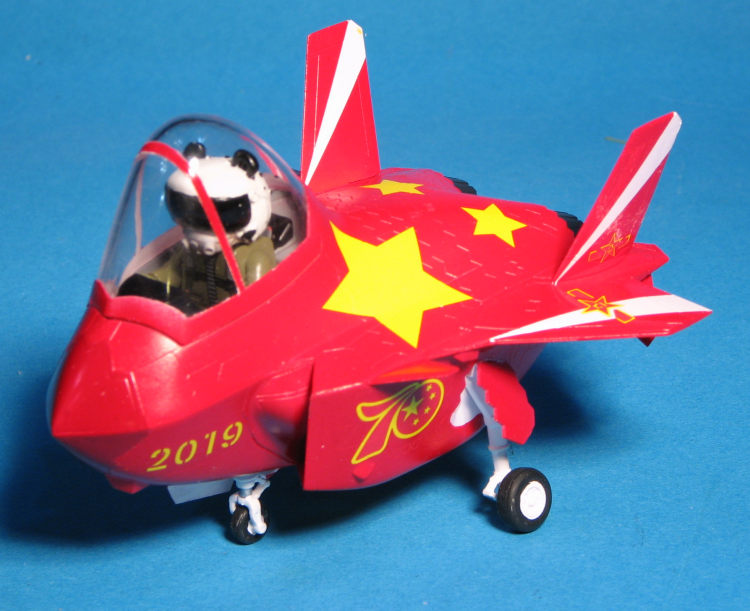
Now we have the first two kits from a company called Qmen. Apparently, Qmen is part of the Kitty Hawk/Panda group. This is their first offering and is something to be expected from a company based in China as the Chinese are very proud of the J-20.
 The kit itself is molded in red plastic and has a
minimal number of parts. There is no stand provided, so you have some very heft
landing gear, which has separate wheels to make painting
easy. No nose weight is indicated, but it may be smart to add a little anyway.
Decals are provided for instruments.
The kit itself is molded in red plastic and has a
minimal number of parts. There is no stand provided, so you have some very heft
landing gear, which has separate wheels to make painting
easy. No nose weight is indicated, but it may be smart to add a little anyway.
Decals are provided for instruments.
The kit comes with a pilot figure that can be built to either fit into the cockpit or stand next to the completed model. From the look of it, the pilot is a Panda. The seated pilot is placed under a large, one-piece canopy.
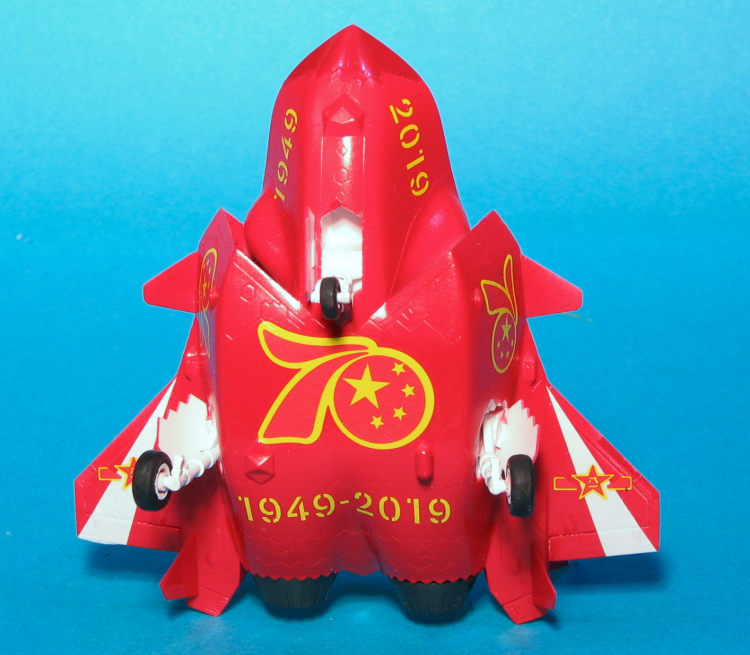
Instructions are well done though brief as you'd expect from a simple kit. Paint information is provided using Gunze paints. You have two options with this one. One is a fairly standard scheme of greys with low visibility markings. The other is a plane that was specially painted to celebrate 70 years of the PRC. This one is overall red, which undoubtedly why the kit is red. Decals look to be very nice and should provide no issues on application.
| CONSTRUCTION |
The first thing I did was to build the intakes. This is
probably the most complex part of assembly as you are
 to attach two somewhat
flat panels into the lower fuselage at the proper angle to get a snug fit. This
will require a goodly amount of fiddling about once you figure out how the parts
attach to each other and the lower fuselage. I did not paint the 'intake' part
black before assembly and wish I had. Masking this off after painting will be a challege due to the shape and depth of the part. I eventually got it painted
after slopping black on the intake sides and masked it best I could with Silly
putty prior to attaching the upper fuselage half.
to attach two somewhat
flat panels into the lower fuselage at the proper angle to get a snug fit. This
will require a goodly amount of fiddling about once you figure out how the parts
attach to each other and the lower fuselage. I did not paint the 'intake' part
black before assembly and wish I had. Masking this off after painting will be a challege due to the shape and depth of the part. I eventually got it painted
after slopping black on the intake sides and masked it best I could with Silly
putty prior to attaching the upper fuselage half.
Doing just that showed where I did not get the intake parts down far enough and it left a bit of a bump on what should be a flat mating surface. Once sanded, and the upper section attached, I dealt with the inevitable small seams that were left. I then took this opportunity to paint the cockpit dark gull grey and the gear wells, gear, wheel hubs and inside of the gear doors with white.
Next was the panda/pilot. This is apparently designed to have all the arms and legs move so you can either fit it into the cockpit or have it standing nearby. I chose the sitting position and so painted the body an olive green. The kit provides suit details as decals and these are nice additions. The head was painted white and I poorly painted the various details as noted in the instructions. It was then glued into the cockpit.
| COLORS & MARKINGS |
 The canopy
was masked and the gear wells filled with Silly Putty then attached. I used
standard Tamiya gloss red for the airframe with steel from Alclad for the burner
cans. The nose was laboriously masked around and painted dark red (which is
quite visible in person, but maddingly near-invisible in the photos). There are
a bunch of other dielectrics which should have been so painted as well, but I
chose not to do those as it would have meant a lot more maskings.
The canopy
was masked and the gear wells filled with Silly Putty then attached. I used
standard Tamiya gloss red for the airframe with steel from Alclad for the burner
cans. The nose was laboriously masked around and painted dark red (which is
quite visible in person, but maddingly near-invisible in the photos). There are
a bunch of other dielectrics which should have been so painted as well, but I
chose not to do those as it would have meant a lot more maskings.
I then installed the landing gear, followed by the already painted wheels. Then the gear doors were installed. I had left off the other fork of the nose gear until now and that was an error as the door got in the way. Add it after attaching the wheel.
The decals are superb. Cannot say enough about how nice they are. They come off the backing quickly, and snuggle down even without setting solution. They are also very opaque and there was no color bleed-through on the white markings. The red anniversary scheme is quite fetching and looks a lot better than grey. I removed all the masking and did a bit of touch-up where needed.
| CONCLUSIONS |
This is the third kit of this type I've built in the last few years. It is a bit more complex, but nothing that even a beginning modeler couldn't do as it is pretty much a snap kit. Gluing, however, gives a better fit, especially where the parts are really tight. Well worth picking up if you are so inclined.
8 May 2020
Copyright ModelingMadness.com. All rights reserved
Thanks to Glen Coleman and Qmen models for the preview kit. Get yours at your local retailer.
If you would like your product reviewed fairly and fairly quickly, please contact the editor or see other details in the Note to Contributors.
Back to the Main Page Back to the Review Index Page Back to the Previews Index Page